The fastest production-ready image resize. Part 0
Last edited:
Hi there. Name’s Alex. I made the fastest image resize for modern x86 processors. I’d like to share my experience hoping I might motivate and inspire you to go optimize things.
My warmest thanks to fellow Pillow contributors for their comments and motivation: Alex Clark, Hugo van Kemenade, Andrew Murray.
Even though this article is mostly for developers, I seek to keep it simple. However, I love tech details, so I’m planning to talk over plenty of those. It doesn’t seem a single article has enough room for that, so I’ll be releasing more. Part 0 is intended to give you the big picture.
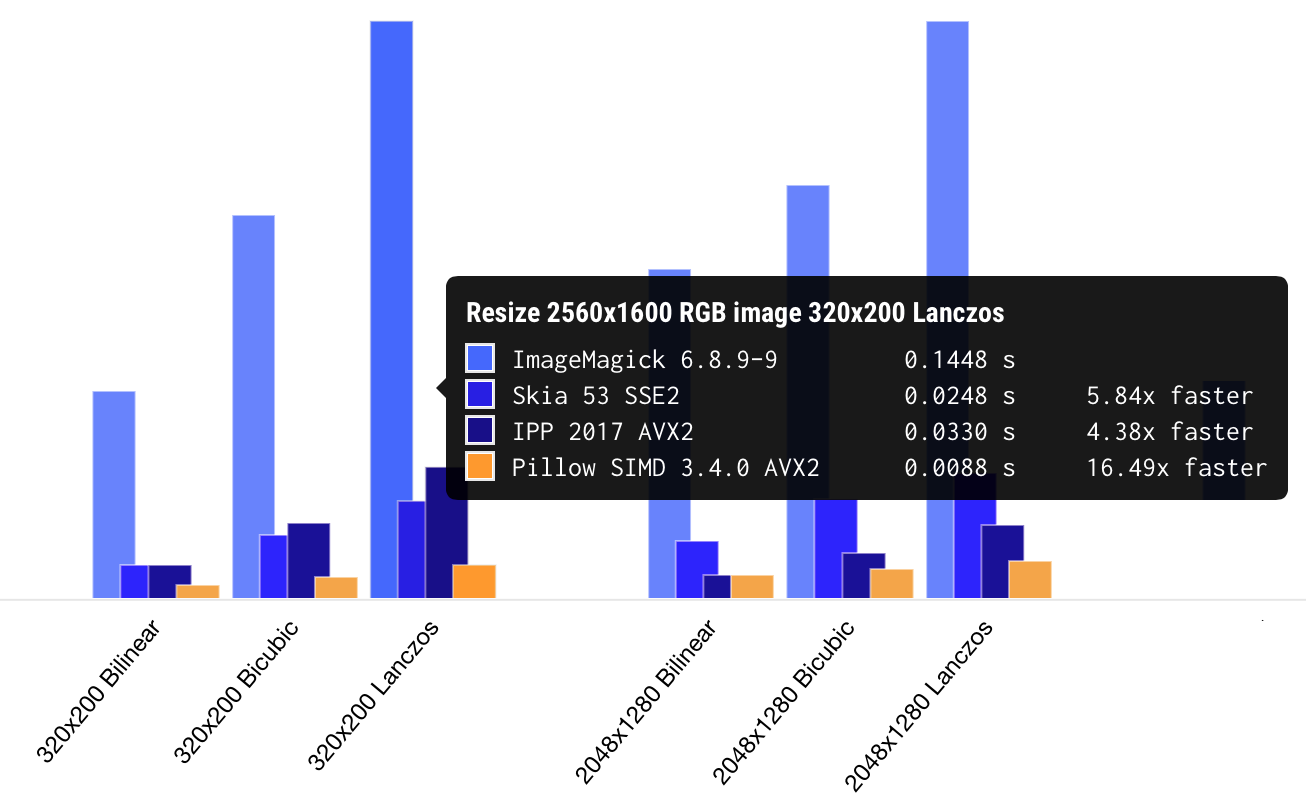
 Pillow-SIMD benchmark
I call it “the fastest resize” because every other library I could find and test was slower. I wasn’t building it for fun: I work for Uploadcare and resizing images has always been a practical issue with on-the-fly image processing. With optimizations, Uploadcare now needs six times fewer servers to handle its load than before. Right when I started off, we decided to open the source code. I forked Pillow, a Python image processing library used by Uploadcare, and called the fork Pillow-SIMD.
On average, Pillow-SIMD is currently resizing images 15 times faster than ImageMagick. The lib is also faster than Intel Performance Primitives, low-level building blocks for image processing optimized for a wide range of Intel architectures. And that’s the thing, really: you can optimize the code well only when you’re aware of the architecture of a device running it.
When someone claims he made something unique, there’s always a question of testing. That’s also a part of what I do, so you can always check out the testing results, submit your own data or run your own tests.
The task
Entry conditions are as follows: a photo shot with the latest iPhone takes about 1.37 sec to get resized to 2 MP via Pillow 2.6 with none of the optimizations implemented. This allows to process about 2.5k photos per hour on a single core. And, in the age of responsive designs, you want more.
Let’s define what “image resize” is. It’s an operation aimed at changing the dimensions of a source image. In many cases, the most suitable way to do that would be convolution-based resampling. It helps preserve the quality of the source image. The drawback of keeping the original quality is the poor performance of that algorithm.
The resampling itself is performed on arrays of 8-bit RGB pixels. All the calculations use data stored in RAM, so we aren’t taking coding/decoding procedures into account. We do account for memory allocation and calculating coefficients needed for operations.
It’s pretty straight-forward. No tricks like decoding a smaller image from a JPEG, no algorithm combinations, just assessing the speed of convolution resampling calculations.
Convolution-based resampling
Let me try and explain how convolution works when resizing images.
Let’s say we’re downscaling an image. In the very beginning, the output is an empty matrix and we’re calculating values to put into its cells. That’s where a “scaling factor” comes in, a ratio of input image dimensions to output image dimensions. Taking the factor into consideration, we can always calculate which pixel from the source image is “closer” to the output pixel. The easiest way is to assign that nearest value to the output.
That’s called “nearest neighbor interpolation.” Here, check the image to which this kind of interpolation was applied:
 Nearest neighbor interpolation example
Looks quite messy, doesn’t it?
The significant decline in the output quality is caused by losing pretty much of the source data (in between those “neighboring pixels”). And convolution-based resampling (hereinafter referred to as just resampling) is a way to calculate output pixels taking into account as many input pixels as you wish. It helps avoid local geometry distortions.
Also, resampling is rather universal: it gives well-predictable output quality for a wide range of scaling factors. Here, check the example of convolution-based resampling applied to the same image:
 Convolution-based resampling example
So, results are generally great while performance isn’t.
Pixels are discrete entities since we’re talking about digital images. This means we’re using discrete convolution. Also, images are two-dimensional. So, we might want to deal with multidimensional convolution, but the calculations we apply are separable hence we can use row-column decomposition.
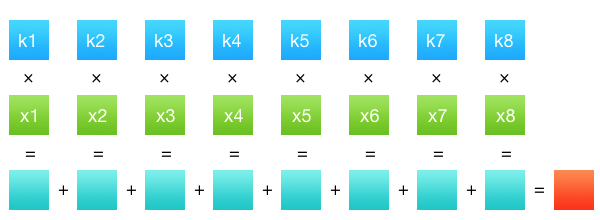
Our processing then takes two passes: one each per image dimension. That gives us a decent performance boost. We’ve got rows of data and sets of coefficients (filter function values). Convolution is then defined as a sum of products of the two rows: see the picture below:
 Summing products of the two rows
And that’s about it. Row k holds pixel values from a single channel of a source image, row x — filter coefficients. There are many shapes of filters which hugely affect convolution results (i.e. properties of the output image). For instance, filters can be found in a resize window of an image editor: there usually is a dropdown with bilinear, bicubic, and sometimes Lanczos options.
What we’re doing with convolution is calculating output pixel values for every channel of an output image. For instance, when downscaling images, we have to run convolution (M * n + M * N) * C times. Where M and N are width and height of the output image, n is height of the input image, and C is a number of channels. Also, M * n is the resolution of the intermediate pass. So, the expression above accounts for our two-pass approach.
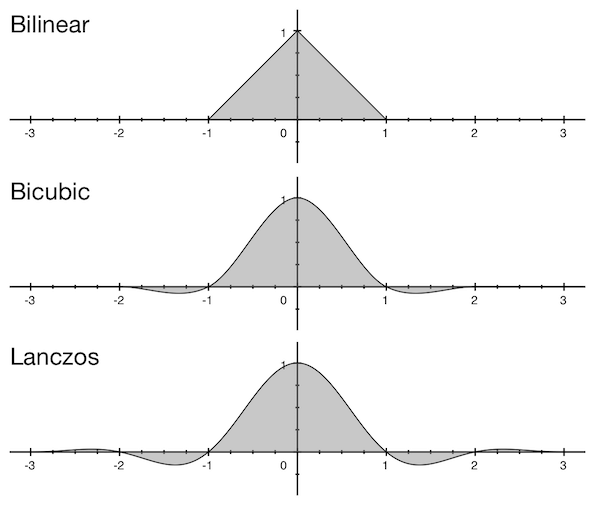
While there are many window functions, only these three finite ones are often used when rescaling images: bilinear, bicubic, and Lanczos. Each filter function equals 0 except for the small radius which is commonly called “filter width.” The plot below shows windows shapes and their widths:
 Window shapes and widths
After decomposition, we’re dealing with rows. And that’s how we fill the cells of the above-mentioned empty output matrix. Say, we need to downscale an image having 2560 pixels in width to 2048 pixels in width using bicubic filter (the scaling factor would be 1.25). And we’re calculating pixel value for the 33rd pixel of the output (in any row, basically).
Firstly, we figure out the position of the output pixel in the input space: 33 * 1.25 = 41.25. With downscaling, we’re adjusting filter sizes by multiplying their widths by the scaling factor. Bicubic filter width is 2, which means we’re going to be using the size of 2 * 1.25 = 2.5.
Then, we’re taking pixels around the 41st cell of the input row: from round(41.25 - 2.5) to round(41.25 + 2.5), which is from the 39th to the 44th pixel respectively. Once we got the data, we calculate bicubic coefficients and convolve those with the data. This way we’ve just calculated the value of the 33rd pixel accounting for 6 input cells. Since it’s a pixel-by-pixel operation, the contents of the image don’t affect the performance.
Pillow
Pillow is an image processing library for Python maintained by the community headed by Alex Clark and Eric Soroos.
The lib was already being used by Uploadcare when I became a part of the team. At first, it seemed pretty surprising, why use a language-dependent library for such a critical task like image processing? Wouldn’t it be better to go with ImageMagick or something? Currently, I’d say Pillow was a good idea because Pillow and ImageMagick had quite the same performance, while it’d take way more time and effort to optimize resize for the latter.
Initially, Pillow was forked from PIL. And PIL itself wasn’t using resampling to resize images. The method was first implemented in version 1.1.3 as a part of ANTIALIAS filter. The title hints at output quality improvements.
Unfortunately, ANTIALIAS had poor performance. That was when I decided to go check the source code and see if I could somehow improve the operation. It turned out the ANTIALIAS constant was equivalent to the Lanczos filter which was then convolved with input pixels. And as you already know, the function is rather wide and thus slow.
The first optimization I implemented was adding bilinear and bicubic filtering. This allowed using filters with lower widths hence optimizing the performance yet staying in the “quality” field.
The next step for me was looking into the code of the resize operation. Even though I mostly code in Python, I saw some weak spots in this C code performance right away. After implementing a few optimizations (which I will thoroughly describe in the next article), the performance boost reached 2.5x. Then I started experimenting with SIMD, integer-only arithmetic, optimizing loops, and grouping calculations. The task piqued my interest completely, and I always had a couple more ideas to try and test.
Step by step, the code was growing bigger and the speed was getting faster. But it was rather difficult to contribute the SIMD code back to the original Pillow because it had x86 architecture optimizations while Pillow itself is a cross-platform library. That’s how I ended up with the idea of starting the non-cross-platform fork: Pillow-SIMD. Its versions are identical to the versions of the original Pillow, but they include architecture-specific optimizations for certain operations (e.g. resize).
The latest versions of Pillow-SIMD with AVX2 are resizing stuff from 15 to 30 times faster than the original PIL. And again, it’s the fastest resize implementation among those I’ve been able to test. I even made this web page where you can check out benchmark results for different libs.
I’ve already mentioned testing is a part of what I do, so let me tell you a bit about its methodology. I take an image of 2560×1600 pixels in size and resize it to the following resolutions: 320×200, 2048×1280, and 5478×3424. I also use bilinear (bil), bicubic (bic), and Lanczos (lzs) filters which make 9 operations in total. The source image is of a relatively large size because it shouldn’t completely fit into the L3 processor cache.
Here’s the example of how things were in Pillow 2.6 without any optimizations:
Operation             Time         Bandwidth
---------------------------------------------
to 320x200 bil        0.08927 s    45.88 MP/s
to 320x200 bic        0.13073 s    31.33 MP/s
to 320x200 lzs        0.16436 s    24.92 MP/s
to 2048x1280 bil      0.40833 s    10.03 MP/s
to 2048x1280 bic      0.45507 s     9.00 MP/s
to 2048x1280 lzs      0.52855 s     7.75 MP/s
to 5478x3424 bil      1.49024 s     2.75 MP/s
to 5478x3424 bic      1.84503 s     2.22 MP/s
to 5478x3424 lzs      2.04901 s     2.00 MP/s
Here’s how I calculate bandwidths, if it took 0.2 s to resize a 2560×1600 image, bandwidth equals to 2560 * 1600 / 0.2 = 20.48 MP/s.
The source image gets resized to 320×200 in 0.164 seconds using Lanczos filter. Sounds fine, right? Why optimize anything at all? Well, not really. Let’s recall that an average photo taken with a current smartphone is about 12MP in resolution. Thus, it’ll take about 0.5 seconds to resize it. That’s where I started off at 2.5k pics per hour on a single core.
A brief conclusion
With optimizations, Uploadcare now needs six times fewer servers to handle the load. Hypothetically, if we’d extrapolated this worldwide and changed code running every resize operation on the planet, we’d save tens of thousands of servers, and that’s a whole lot of electricity, at the least 😉
Personally, I’m glad it worked. It’s exciting to know we can resize images on Intel processors faster than Intel. We never stop researching, and I’m sure it’ll only get better.
Another thing that gives me joy is that Pillow and Pillow-SIMD are real. Those are production-ready libraries any developer can handle. It’s not just some code published around Stack Overflow or “primitives” that should be joined as in construction kits to at all work. And it’s not even a complicated C++ library with a shady interface and a 30-min compilation time. It’s just about typing the three lines: install, import, load... blam! “Hey, mom, look, I’m using the world’s fastest resize in my app!”
Continue this optimization journey with me in the next article.