Before you start, you need to have a real Instagram account for testing with one photo and one video uploaded. It would help if you used it in the review submission.
First, you need to create a Facebook application at https://developers.facebook.com or use an existing one from your account.
If you need to create a new Facebook app to add the App Platform, go to Facebook APP → Settings → Basic and click Add Platform at the bottom of the screen:

Сhoose Website, enter your site URL, and then click Save Changes:

For the App Domains field, you need to use social.uploadcare.com or your own custom social CNAME domain.
Please make sure the fields Business Use, Category, Privacy Policy URL, Terms of Service URL, and App Icon (1024 x 1024) are set up for your Facebook Application.
Once you’re finished with the settings, click on the plus sign after the PRODUCTS label (in the left menu at the bottom), then find Instagram Product (it will appear at the bottom of the products list), and click Set Up.

After the Instagram Product has been added to your app, it will appear under the PRODUCTS list on the left. From there, go to Instagram → Basic Display:

Click Create New App, give your app a name and continue.
Now you need to set up this Instagram Application to work with Uploadcare and then submit it to the review process. Also, you need to save these values in your project settings:

Go to your Project Dashboard at Dashboard | Uploadcare, open the Custom OAuth apps page, select Instagram Basic Display, and fill in the App key and App secret fields with the keys you got from Instagram. Click Save Key.

Now back to the Instagram Application configuration:
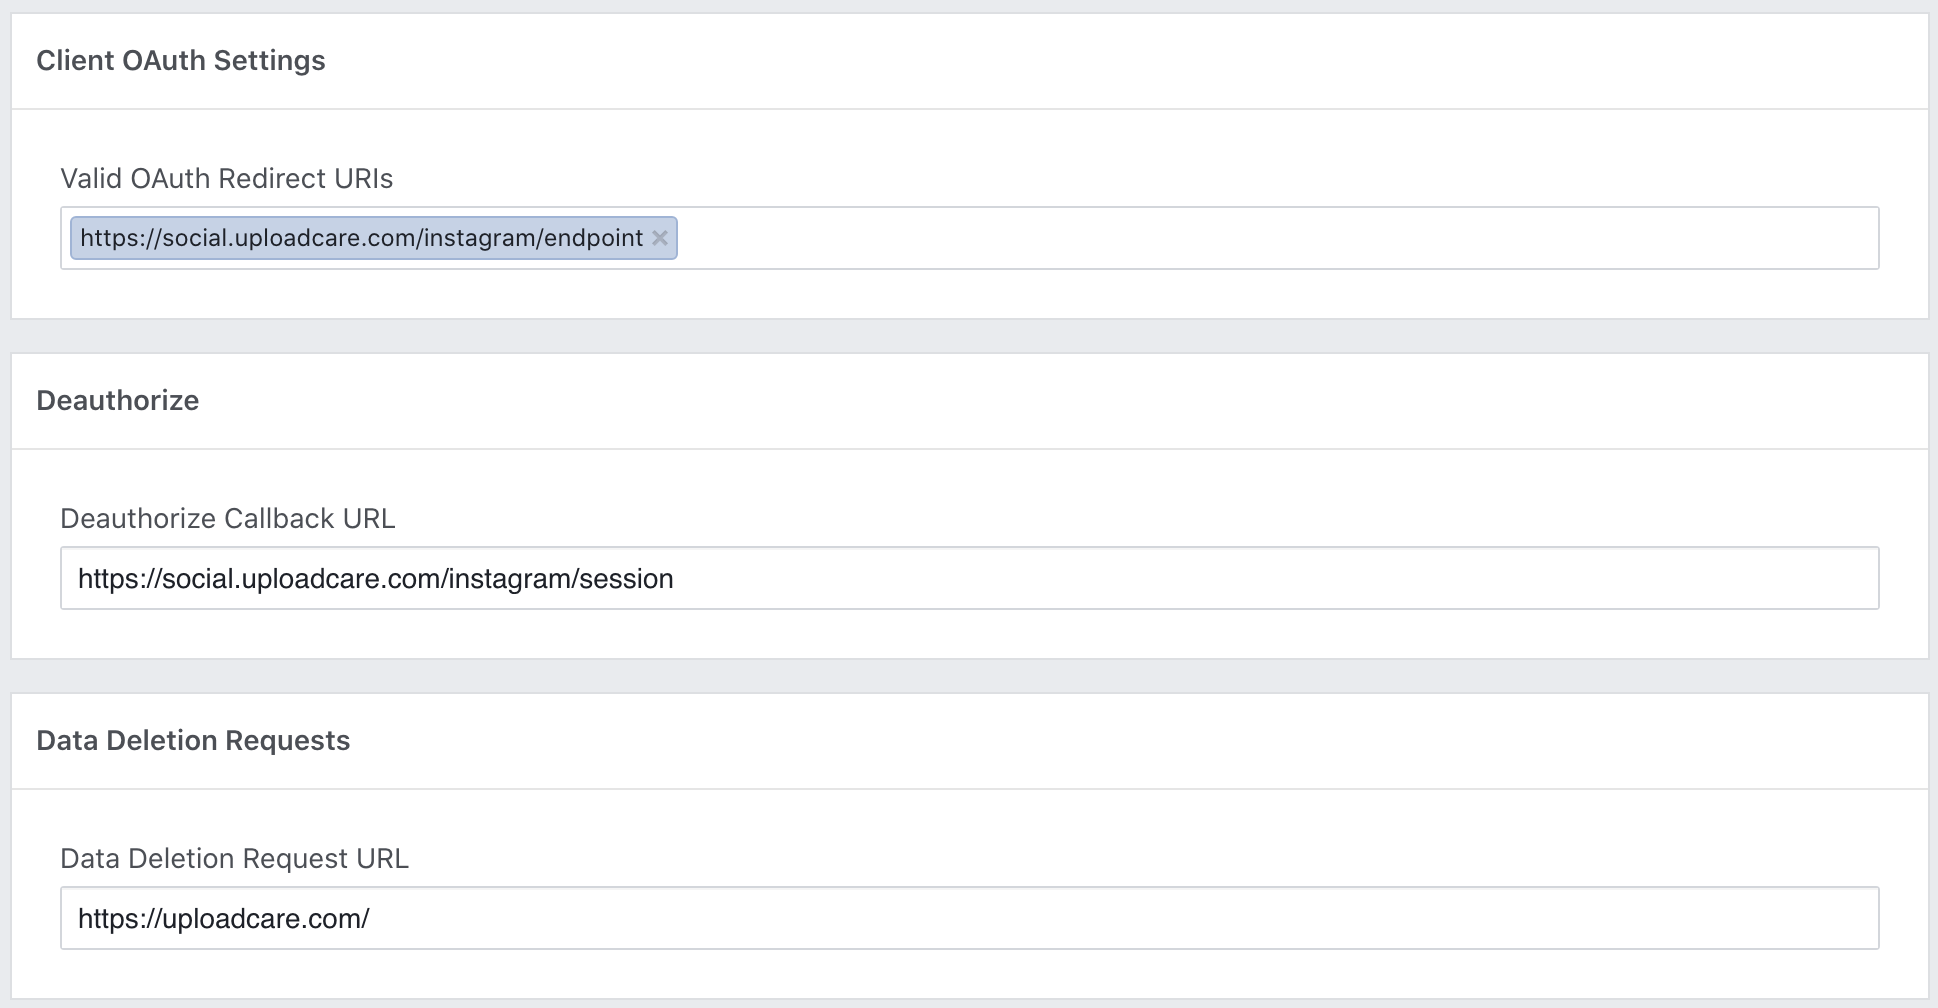
For the fields Client OAuth Settings, Deauthorize, and Data Deletion Requests, you should use your own custom social CNAME domain, or use Uploadcare domain, as in the following:
Client OAuth Settings: https://social.uploadcare.com/instagram/endpoint or https://YOUR.CUSTOM.SOCIAL.CNAME.DOMAIN/instagram/endpoint
Deauthorize: https://social.uploadcare.com/instagram/session or https://YOUR.CUSTOM.SOCIAL.CNAME.DOMAIN/instagram/session
Data Deletion Requests: https://uploadcare.com/
Now you need to add a real Test User as an Instagram App tester. Go to the User Token Generator section and open Add or Remove Instagram Testers (at the bottom). Make sure you open the link in a new browser tab. You will be redirected to the Test users page. Find the Instagram Testers section at the bottom of the page, click Add Instagram Testers, and follow the instructions.
Please do not forget to accept this invite at the following page of your test user account: http://instagram.com/accounts/manage_access/ (Test Invites tab).
Now, let’s create a demo page so you’ll be able to record a screencast for the review submission.
Creating a demo page with the Uploadcare Widget
It would help if you recorded a screencast to submit your Instagram application for review. To do so, you need to create an HTML page and serve it on your domain (see Instagram Example, for example). You can find template source code for this page here: instagram-review-page-exmaple.html · GitHub
Just replace %YOUR_PROJECT_PUB_KEY% with your own value.
After you successfully set up this page, you need to record two screencasts for each permission. Just follow our videos step by step:instagram_graph_user_profile,instagram_graph_user_media
Review submission
Go back to the previous tab and go to the App Review for Instagram Basic Display section and add both instagram_graph_user_profile and instagram_graph_user_media to the submission:

Click on Edit Details for instagram_graph_user_profile, and for the field “Tell us how you're using this permission or feature”, copy the following text:
We use the scope ‘instagram_graph_user_profile’ to show the logged-in user’s username.
-
Go to %your_widget_demo_page_url%
-
Click “Choose a file from Instagram”
-
Select the Instagram tab in the widget
-
Click “Connect to Instagram”
-
After you give our app permissions, you’ll be able to see your user’s username
-
See your user’s username on the left of the widget
Please, attach a screencast video demonstrating the tab functionality you previously recorded.
Click on Edit details for instagram_graph_user_media, and for the field “Tell us how you're using this permission or feature", copy the following text:
We use the Uploadcare widget on our website and our Instagram application keys to allow users to utilize the Uploadcare Instagram tab functionality.
Uploadcare allows Instagram users to upload photos and videos to a website/app that has the integrated Uploadcare widget. We use this permission to list users’ videos and photos, and fetch them by URL when the user picks one.
-
Go to %your_widget_demo_page_url%
-
Click “Chose a file from Instagram”
-
Select the Instagram tab in the widget
-
Click “Connect to Instagram”
-
After you give our app permissions, you’ll be able to see your user’s photo and video thumbnails in the provided list of files
-
After choosing a photo or video, it is uploaded to Uploadcare storage
Now, attach a screencast video demonstrating the tab functionality you previously recorded.
Go to the App Verification section, click Edit details, and for the Testing Credentials (Optional) section, enter your real test user credentials.
Tick the I confirm I've completed the required steps checkbox at the bottom and click Save.
Click on the Submit for Review button and wait for the review results. Let us know if there are any updates on your submission.