It is common among modern websites and applications to use videos instead of GIFs.
The trend has been prominent in social networks and other content- or message-driven apps.
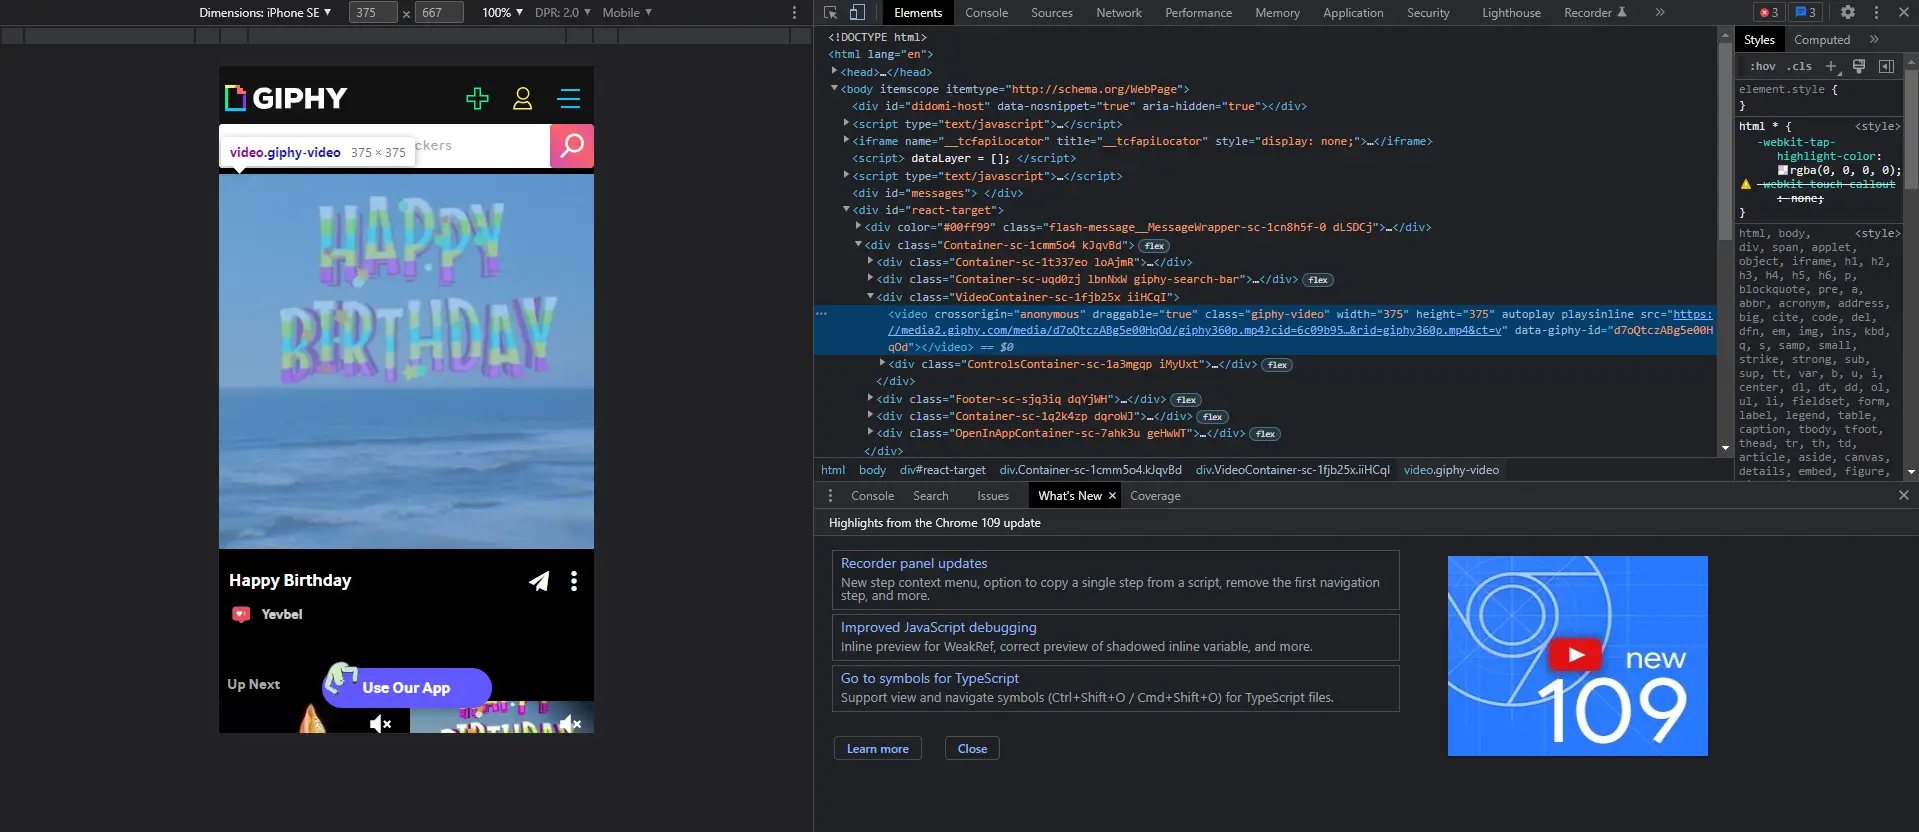
Let’s take one of the most popular GIF-hosting websites, Giphy.
If we go to DevTools and check the GIF animation source file URL at first glance, we can see an actual video file without sound and playback controls.
But why? In this article, we’ll review why video is usually a better choice than GIF and how to convert GIF files into videos to put onto web pages.
To provide optimal performance, any visual medium on websites or any other client-server application should balance visual quality and file size (i.e., compression).
It is even more important for users on limited mobile data plans or accessing web resources on slower public WiFi or 3G connections.
In addition, images, videos, or GIFs that play presentational roles usually occupy a significant amount of the viewport space, and a particular visual may be the largest element within the page viewport.
If it takes too long to load, it may decrease the page performance by increasing Largest Contentful Paint, one of the Core Web Vitals metrics.
Worth noting that images and videos are not render-blocking, but loading a heavy asset still may impact the page performance, narrowing the bandwidth and potentially prolonging the loading of other page content.
From my perception, since the early 00s, there has been a general feeling that video is usually a heavier asset than GIF (especially since GIF is an image format).
On top of that, GIFs have been around since the first stages of the Web and have proven to work, so why use video instead of a GIF?
Leaving some hacks aside, GIF is an 8-bit format, meaning it can encode up to 256 colors.
This results in a noticeable quality loss, especially with gradient-like color fades.
On the other hand, with video, you can preserve many more colors and details, depending on the codec, bitrate, and compression.
GIFs tend to have larger file sizes than modern formats because they use a lossless compression method, which preserves every frame as a full image, resulting in redundancy and larger files.
In comparison, modern formats employ more efficient lossy compression techniques and video codecs that can achieve higher quality at smaller file sizes.
Since the introduction of HTML5, <video> tag has been a standardized way to use videos on the Web.
Back in the day, this was achieved using things like Flash Player, which required dedicated software installed onto the client’s machine.
Using <video> tag without a poster attribute won’t make the video file a candidate for increasing LCP, whereas <img> elements are always considered when calculating LCP.
Knowing the advantages of using video instead of GIF, let’s see how to swap them.
In a nutshell, it comes down to a few different steps based on your input material.
Rendering your animation directly into video formats is always better than converting a GIF into a video.
This way, you skip the conversion process if the tool you used to create an animation gives enough flexibility to adjust video parameters.
Not any video format works for the Web. Here is the list of ones supported by modern browsers:
MP4 video encoded with H.264 codes: widely supported video format well-suited for the Web. It offers good balance options between quality and file size.
WebM with VP8/VP9 codec: relatively new format compared to MP4/H.264. It provides better compression ratios.
Based on caniuse.com, most modern browsers support the WebM format.
I usually convert into both WebM and MP4. If WebM offers better file size than MP4, preserving video quality, I include both file types onto a page for a browser to choose, prioritizing WebM.
Otherwise, it is enough to have only MP4.
There are two ways of converting GIFs to video: manually and using third-party services like Uploadcare.
In this article, we’re going to overview them both.
One of the popular cases of using animations on the website is schematically showcasing processes, for example, data flow in SaaS tools.
The closest representative I could find on Wikimedia with a Creative Commons license is this:
Note from Blog Editors: The thing you see above is a video. We converted the GIF to the video to make sure you won’t download excessive data.
It is close enough to a real-world scenario for the following reasons:
It looks like a generated GIF rather than a recorded video.
Some areas of high contrast and sharp edges need to be preserved.
Relatively big file size for a given color set, 1.18MB.
Download the FFmpeg version based on your operating system from the official website.
This is a command-line tool, so general experience with CLIs is required.
Then, put the FFmpeg executable and the test GIF into the same folder.
I’m running Windows, so in my case, it is ffmpeg.exe and sample.gif.
When opening the folder in the command line (I use Git Bash), here is how it looks:
Arthur@DESKTOP-RI3G960 MINGW64 ~/Desktop/Work/Uploadcare
$ ls
ffmpeg.exe* sample.gif
-b:v is a target average bitrate. Intentionally zero to provide an ability to set constant quality.
-crf is the Constant Rate Factor. In simple terms, this sets the quality of the resulting video. Lower values give better quality, but the size also gets bigger.
32 is the default value (for VP9), but I’m setting it here explicitly for better representation.
The output file named sample.webm will appear in the folder.
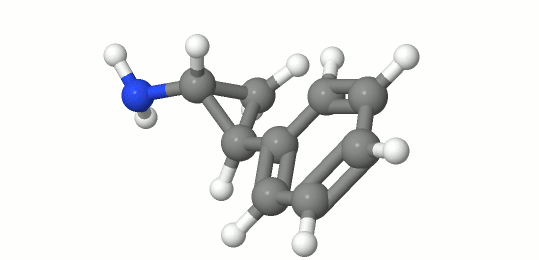
To check the quality in a situation that is closer to a real-life scenario, I took the 50th frame from each of the files using the commands below:
Now, to the interesting part. The resulting file is only 127 KB, and I believe it could be even lower with a bigger amount of compression, but this is already almost 10x size optimization.
The command looks complicated, so let’s go through the parameters:
sample.mp4 is an output file name, now in MP4 format.
-movflags +faststart allows the video to start playing even if it hasn’t been completely loaded, which is typical behavior for the Web.
-pix_fmt yuv420p specifies the pixel format that is supported on most browsers (contrary to yuv444). It relates to how a pixel color is broken into components and encoded.
Follow my previous article to discover more.
-vf "scale=trunc(iw/2)*2:trunc(ih/2)*2" makes us sure that the video’s height is divisible by 2, which is a prerequisite for yuv420 to work correctly.
-crf 23 sets CRF for the MP4 files, usually is a default FFmpeg parameter. I duplicated the default value to be more verbose for the sake of example.
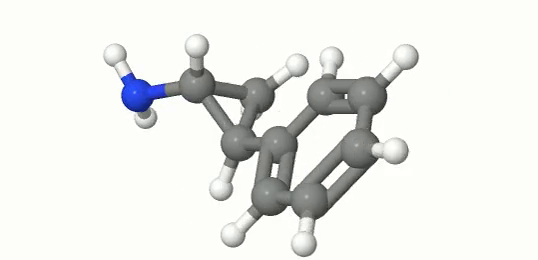
The file size of the resulting MP4 video turned out to be 113 KB, and the extracted 50th frame of the video looks like this:
Both formats offer lossy compression, meaning some initial data gets lost.
In our default-setting conditions, WebM has slightly outperformed MP4 regarding video quality at the expense of a few extra kilobytes.
If you’ve built your website using a CMS, adding a video is as simple as uploading the file through your WYSIWYG editor.
If you integrate videos manually, use the following HTML code instead of an <img> tag for GIF files:
<videoautoplayloopmutedplaysinline><sourcesrc="path/to/webm/video"type="video/webm"/><sourcesrc="path/to/mp4/video"type="video/mp4"/>
Your browser doesn't support HTML5 video tag.
</video>
Let’s break this down:
autoplay allows video to be played automatically, just as GIFs do.
muted turns off audio on the sidenote. Safari won’t autoplay video that is not muted.
loop allows video to loop automatically.
playsinline allows video play right where it is on the page without a fullscreen player.
This mix of 4 attributes makes the video behave like a GIF but with superior performance.
A browser will first try loading the nearest available source, which is WebM video in our case, and if it fails to do so, it will go to the next item.
Uploadcare has gif2video transformation, which allows you to solve the problem with several lines of code and forget about it forever.
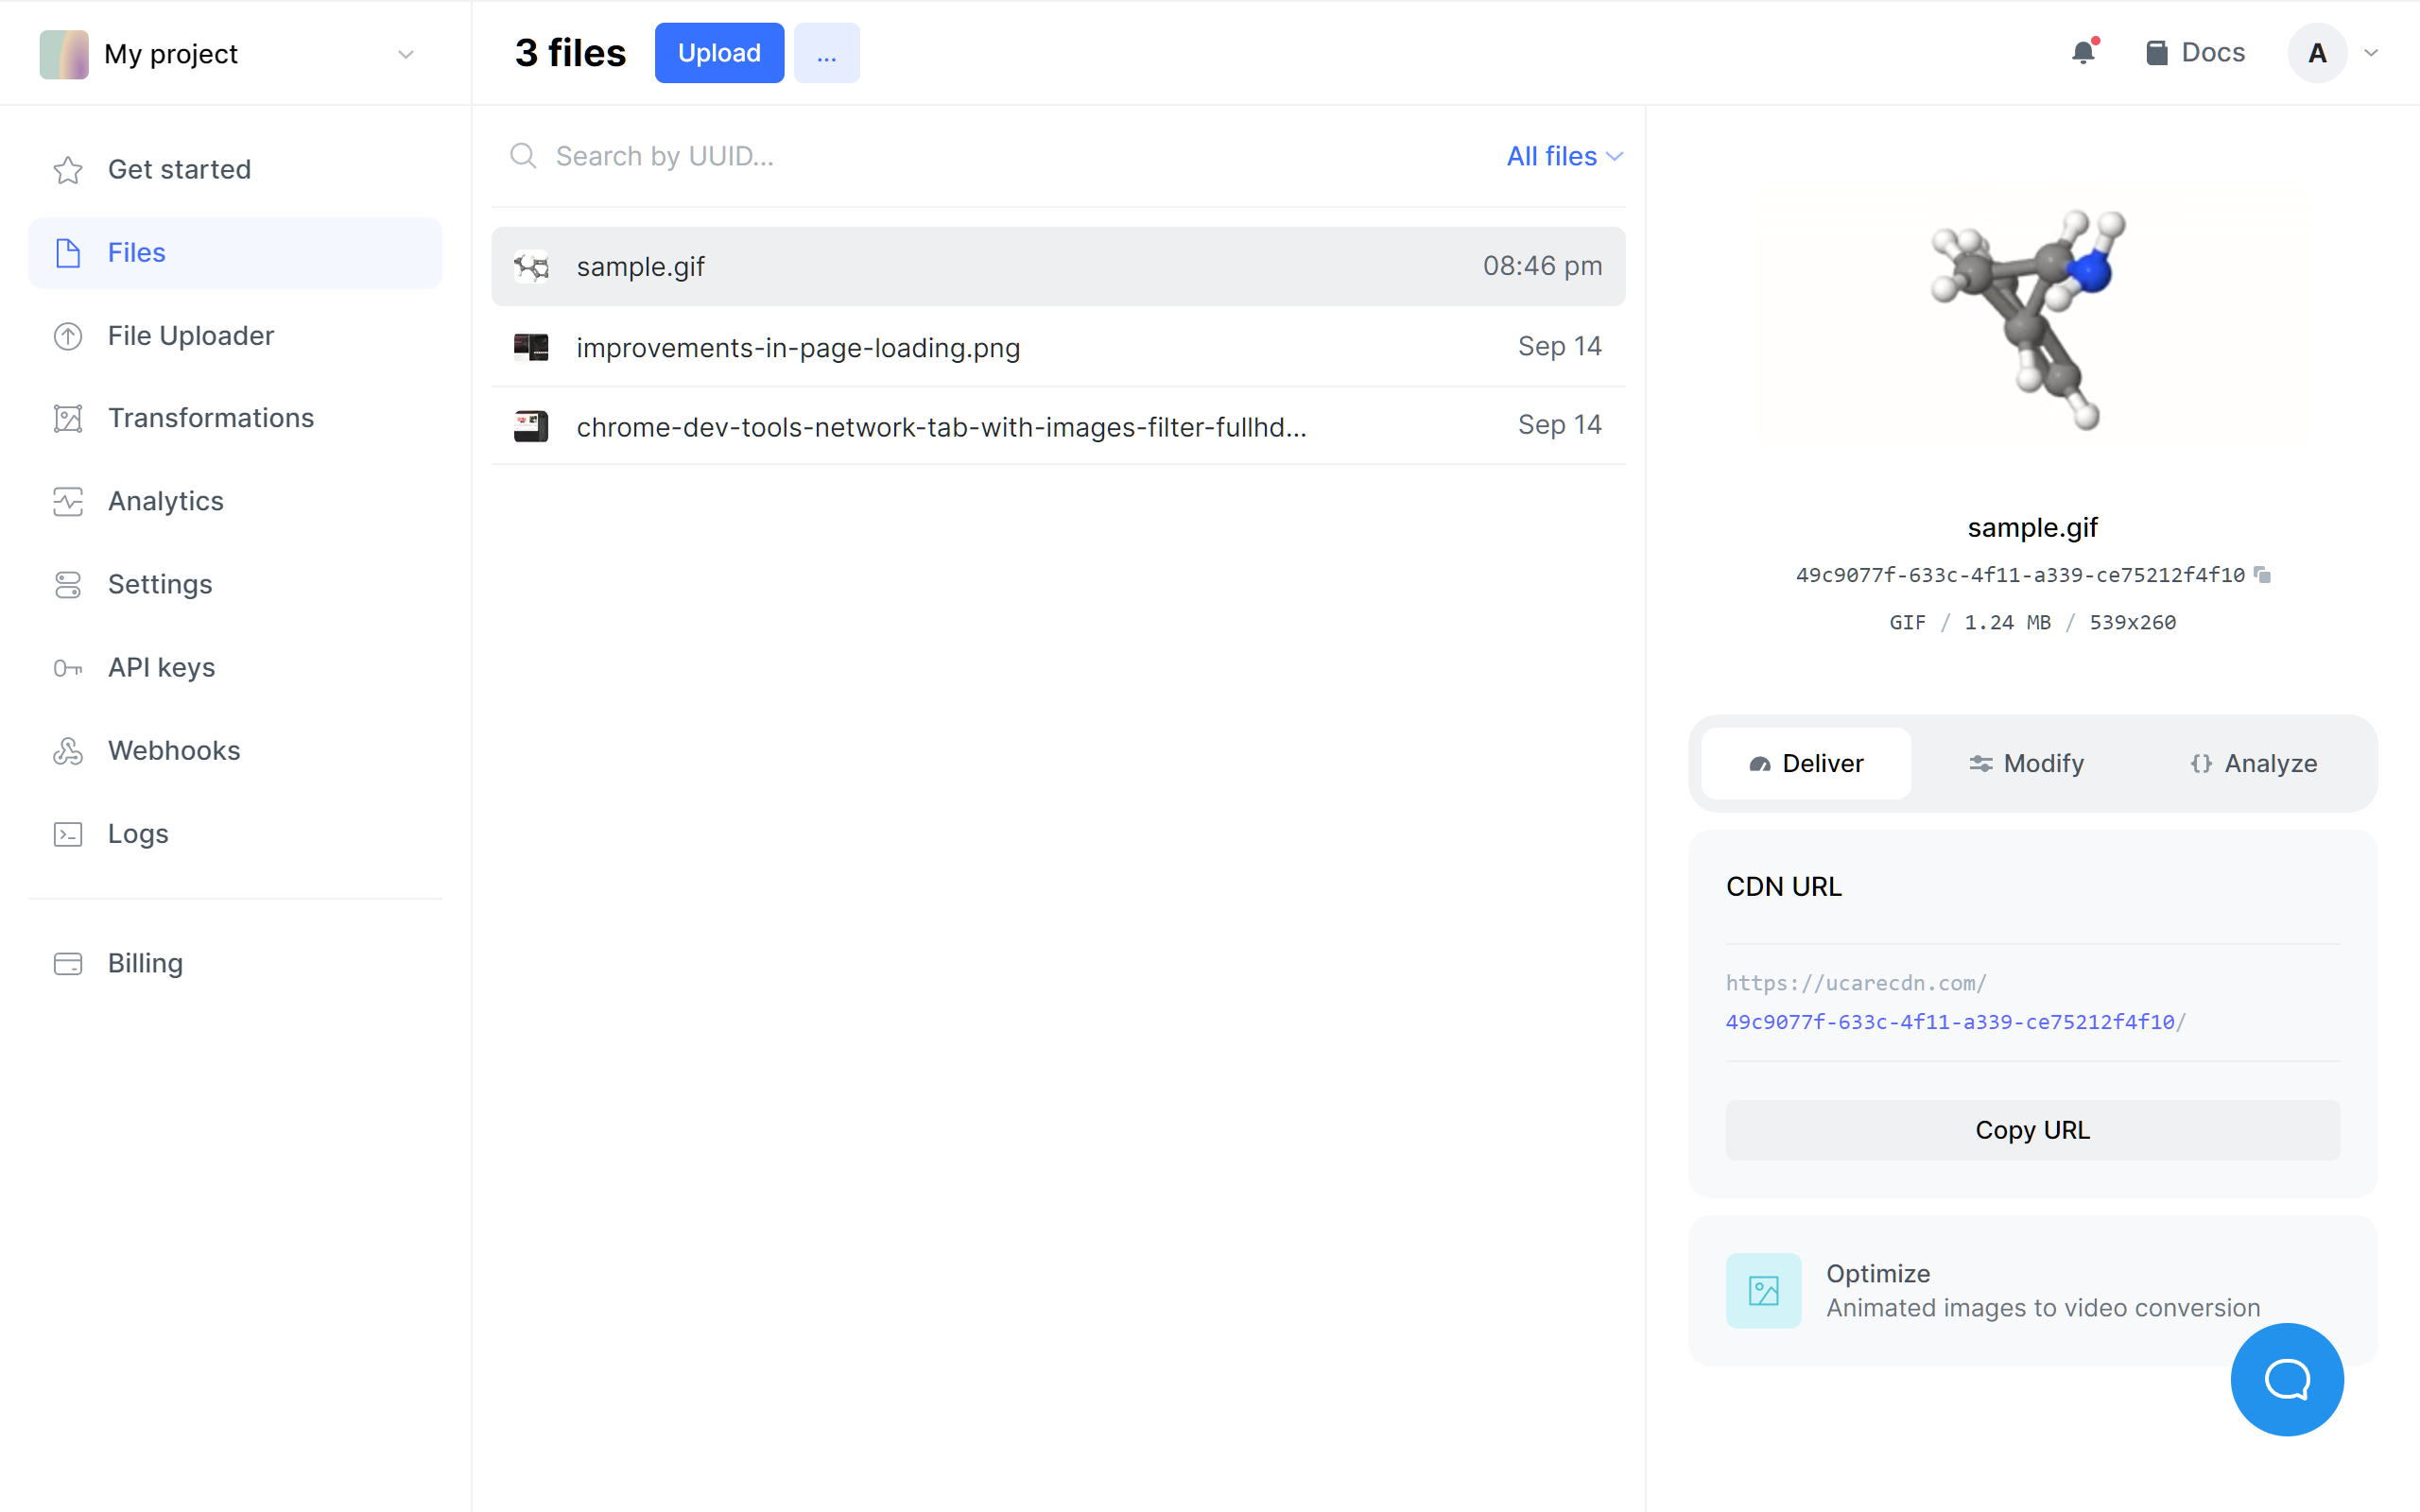
Once you’ve signed up to Uploadcare and created a project, upload the file into the Files menu.
After that, you’ll see file details and a GIF preview on the right. You may notice a unique string generated right under the file name on the right, which is UUID and is used to refer to assets in Uploadcare.
To convert the uploaded GIF into a video, you’ll need to access the resource via a URL of the following format:
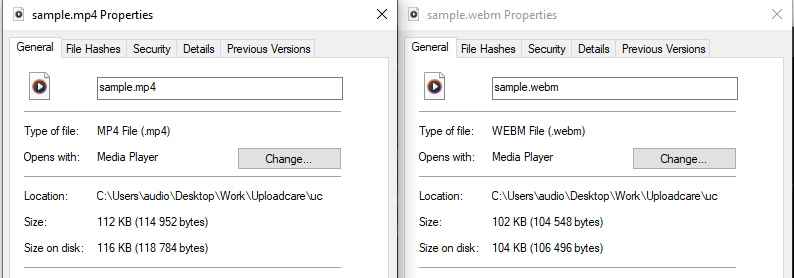
The WebM version weighs 102 KB, and the MP4 version occupies 112 KB of disc space.
Let’s also run our 50th frame test to see the difference in results produced using default Uploadcare’s settings:
The 50th frame of the WebM video produced by Uploadcare
The 50th frame of the MP4 video produced by Uploadcare
With the URI transformation approach that Uploadcare uses, it is possible to place converted videos onto a web page without downloading the files and storing them on your side.
Let’s use our HTML <video> snippet mentioned before, but replace the links to the WebM and MP4 files with Uploadcare links:
<videoautoplayloopmutedplaysinline><sourcesrc="https://ucarecdn.com/49c9077f-633c-4f11-a339-ce75212f4f10/gif2video/-/format/webm/sample.webm"type="video/webm"/><sourcesrc="https://ucarecdn.com/49c9077f-633c-4f11-a339-ce75212f4f10/gif2video/-/format/mp4/sample.mp4"type="video/mp4"/>
Your browser doesn't support HTML5 video tag.
</video>
Tech has evolved above and beyond what it used to look like back when GIF was the main format, and some things that were considered unimaginable without extra tooling, like Flash Player, are now part of everyday standards.
On a footnote, let’s compare the approaches we discussed today.
Conversion arguments are grouped into more human-readable parameters.
Managed storage and content delivery.
Cons:
Third-party service dependency.
Usually paid to get more features.
I encourage you to use this guide as a starting point for your image and video optimizations, or feel free to use Uploadcare’s solution that will handle all the heavy lifting mentioned in the FFmpeg part for you.