If you’ve ever searched for an image online, you may have found different versions of the same image. Some of these images may be good-looking in terms of quality while others may contain visual artifacts. I’m not talking about direct factors like image pixel resolution and size. What happens is that some JPEG images, especially popular ones, are often re-saved by people who use them in, for example, their own articles. Re-saving an already compressed image leads to the so-called “photocopier effect” meaning that an image loses its quality due to being resaved many times in a row, which is also called generation loss.
Why does it happen?
JPEG is a lossy compression format (read more about image compression in this article). Generally speaking, the algorithm behind this format makes some trade-offs to lower the image size. When done correctly, we don’t see any noticeable differences between an uncompressed image and its JPEG version. However, repeating this compression over and over again will accumulate these little “intentional mistakes” JPEG makes and the difference may become noticeable. Since the JPEG compression process consists of several consecutive steps, let’s walk through them to see what’s going on under the hood.
Color space conversion: YCbCr
While it may look confusing at first, YCbCr is just a method of encoding an RGB scheme. Instead of encoding red, green and blue colors separately, it contains values of luminosity (Y), blue (Cb) and red (Cr) color components.
This is what JPEG does first. It converts RGB values to YCbCr to separate brightness from the actual color information. Like a pure white backlight of an LCD monitor that bleeds through initially dark colors giving us an illusion of naturally shining pixels.
Having these separated allows us to process the information independently, and that’s the next step.
Chroma subsampling
Human eye is more sensitive to luminosity changes rather than color. Taking advantage of this, image and video encoding systems lower the resolution of color (also called “chroma'') information leaving luminosity intact. This technique is called chroma subsampling and it also takes place in JPEG.
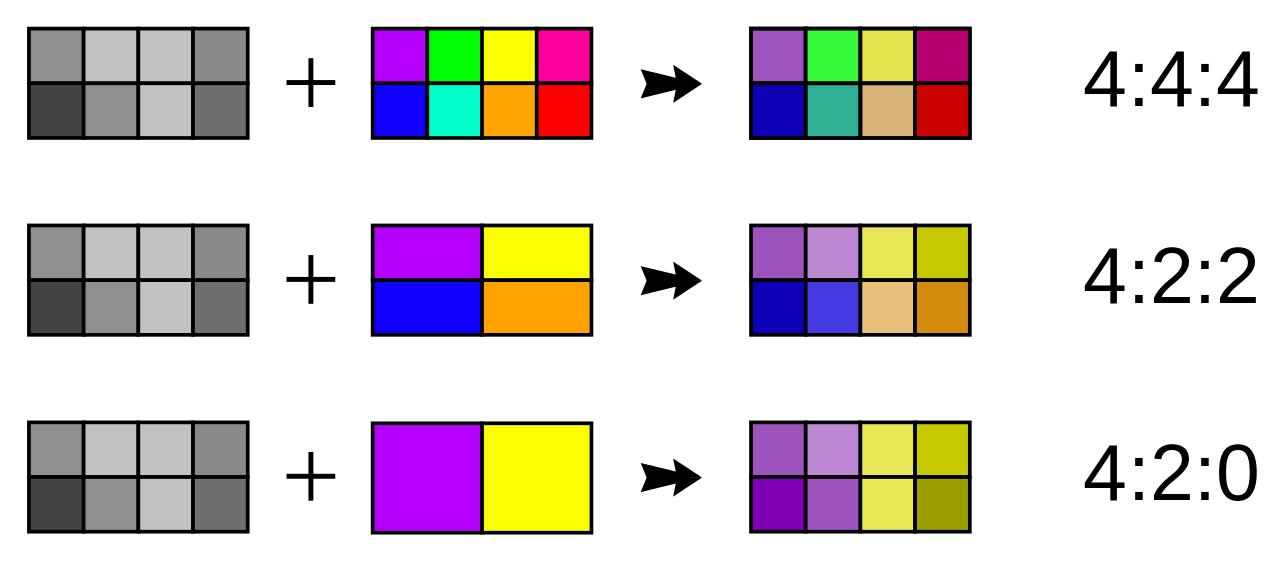
But how do we know how much these color components need to be scaled down? Instead of measuring subsampling in absolute values, a set of 3 (or sometimes 4) numbers is being used. The most common set for most JPEG encoded images is 4:2:0. Let’s take a look at the example:
In this case, the subsampling algorithm divides an image into blocks with width of 4 pixels (first number) with two rows. The top row consists of 2 colors (second number) meaning that all other colors are rounded to the nearest of two colors. The bottom row technically consists of 0 (third number) colors, but in fact this means that the top row is just copied and pasted to the bottom row.
This is the first place that actually makes an image lose part of its contents.
Frequency and contrast domain
Just like audio, a luminance component may vary in a wave-like manner throughout the image. If an image slowly fades from black to white with high contrast or vice versa, we’re more likely to notice it. And if there’re regions on the image that have low contrast and high brightness changing frequency we may not even notice them. Basically what it means is that we are more likely to notice big and prominent objects on the image discarding small nuances. To take advantage of this, JPEG first needs to somehow represent an image via frequencies.
Direct Cosine Transformation
This is where frequency magic starts happening.
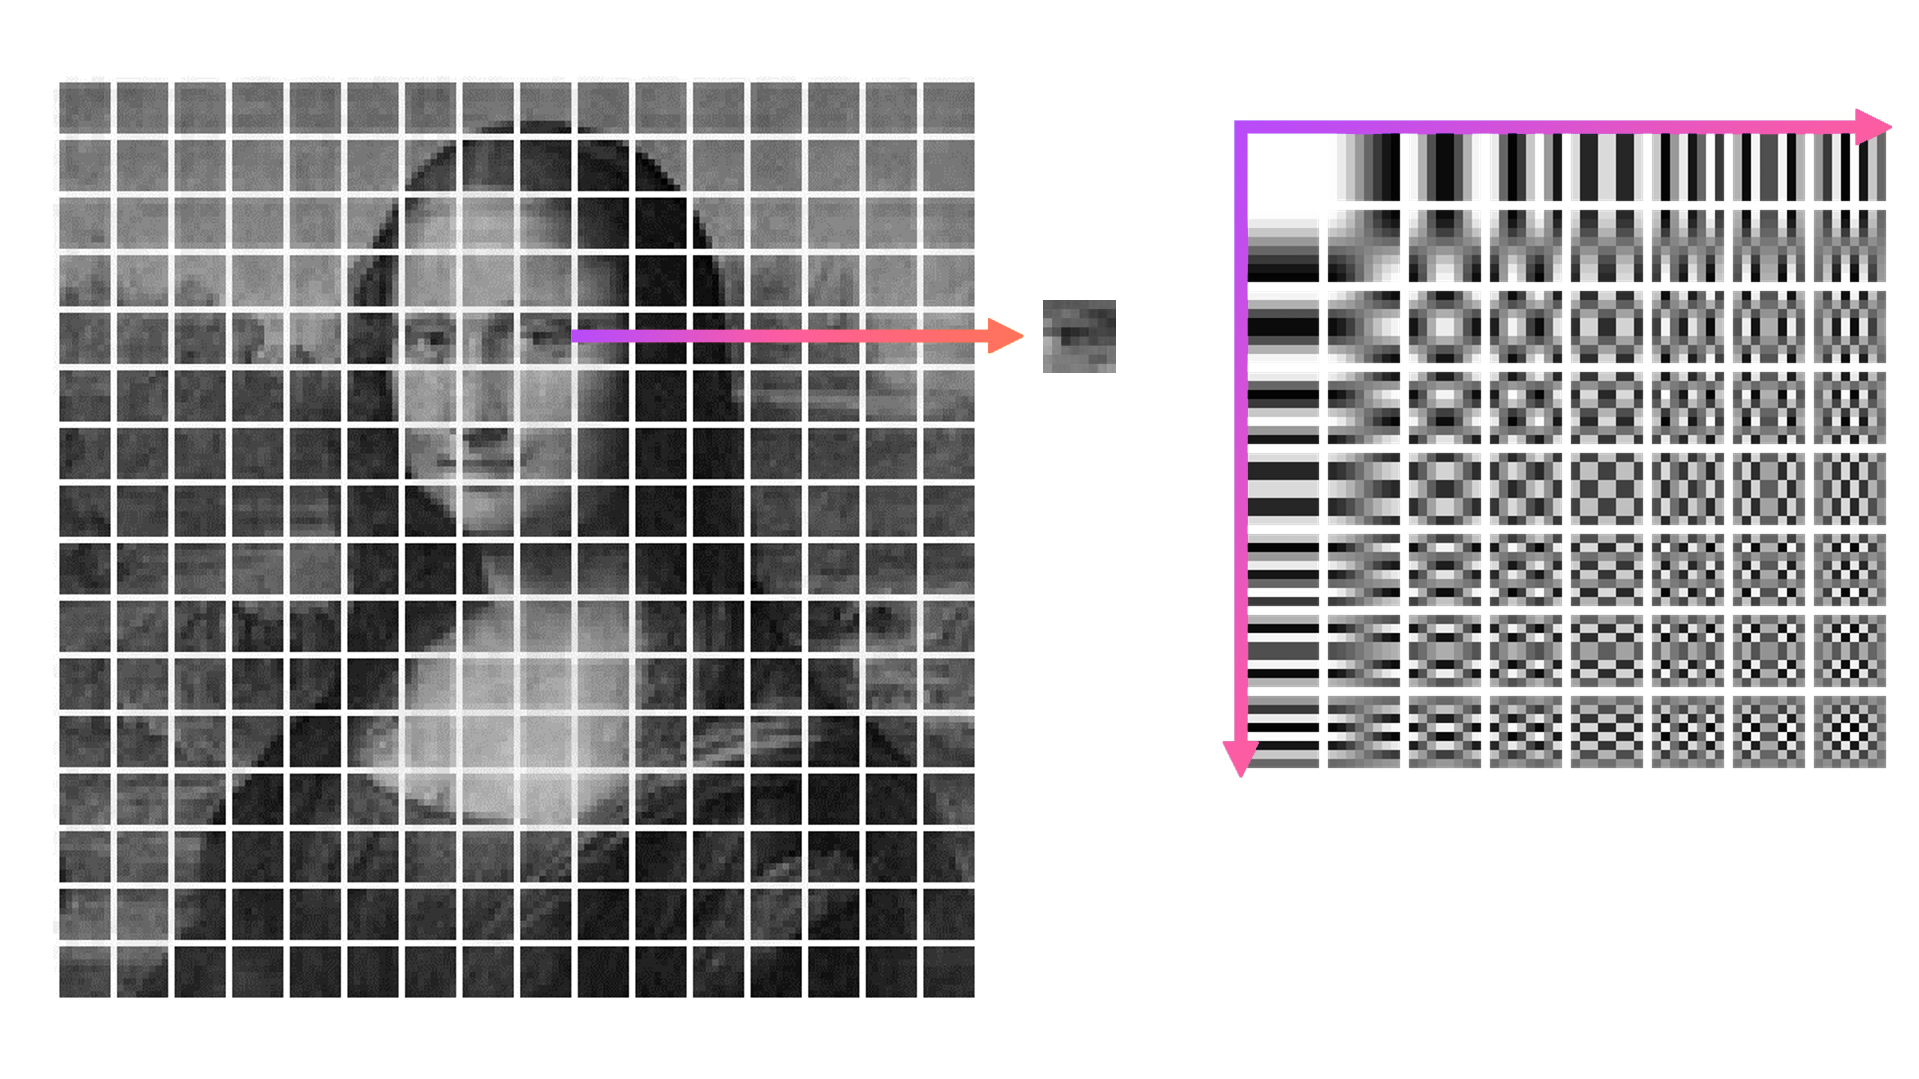
First, the image luminance map is divided into blocks of 8x8 pixels. Then, each of these blocks is compared to 64 frequency patterns. These are generated with frequency increasing from left to right and from top to bottom.
As a result, instead of having absolute brightness values for each block, we now have a table that contains coefficients that each of 64 components need to be multiplied by and then summed up. This method is called Direct Cosine Transform.
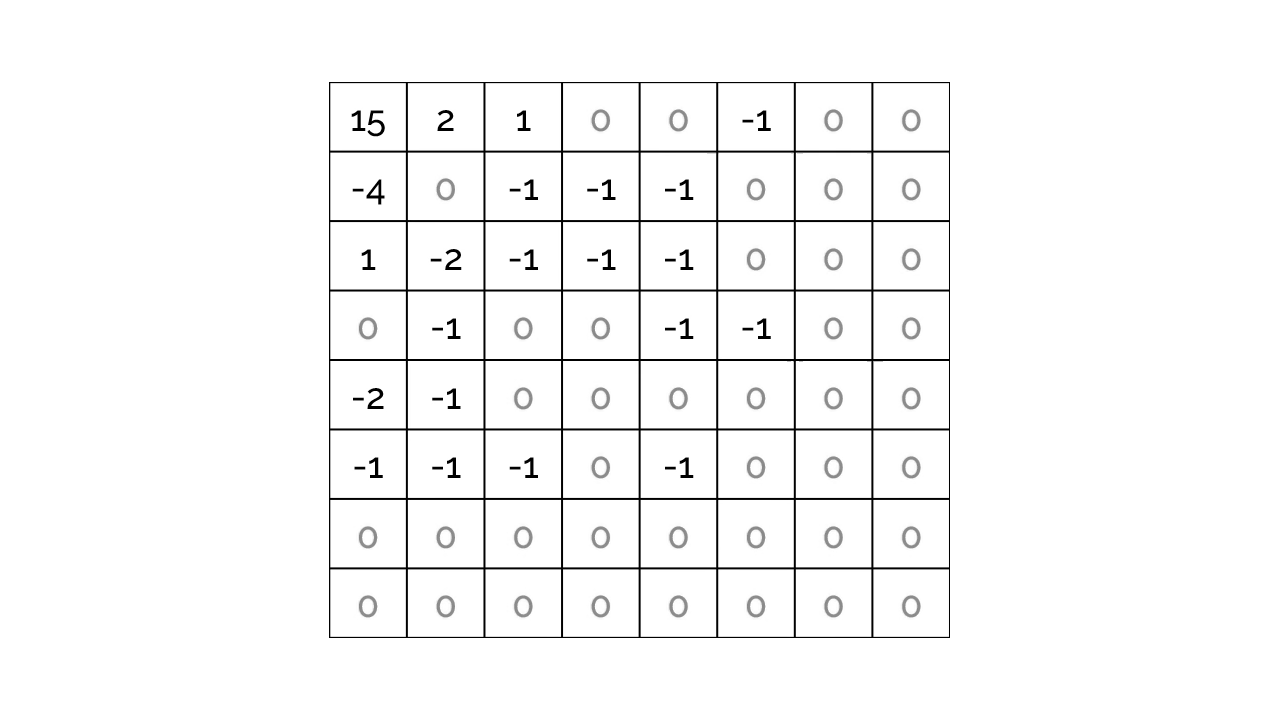
Quantization
Quantization is dividing each number in the result matrix by a certain value and then rounding results to nearest integers. If we find a divisor that could divide lead to rounding high-frequency components (bottom right corner) to zeros without flushing the top left corner, that would remove potentially invisible to human eye information from the image. This is where most of the quality loss happens.
Image editing software usually offers an option to control the quality of an image exported to JPEG. The way a program changes quality is by changing the divisor. Lower quality settings lead to higher divisors hence more high-frequency info being removed.
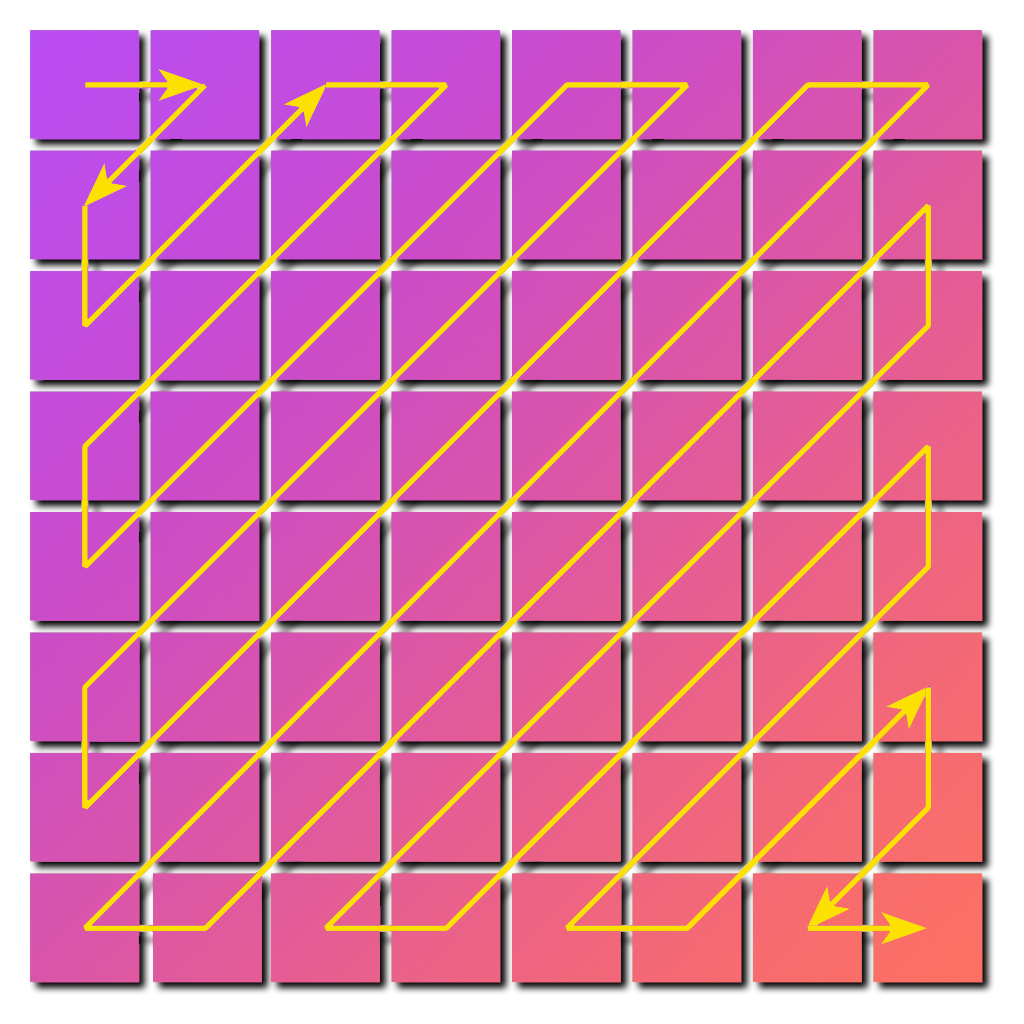
Run-length encoding
There’s an additional opportunity that JPEG utilizes in order to save bytes. Instead of storing the coefficient matrix as is, the algorithm creates a one-dimensional array of all coefficients collected in zig-zag manner.
This way it becomes possible to replace all repeating zeros by tuples, storing only the number of zeros instead of zeros themselves. No information is lost at this step.
Is quality loss common among other image formats?
Quality loss depends not on the exact image format but on the compression method it uses. When we talk about JPG, we're essentially referring to JPEG by another name. Lossless compression that is implemented in PNG and may also be in WEBP won’t lead to generation quality loss. However, using WEBP in lossy mode may lead to generation loss problems, and that depends on settings used just like with JPEG.
How to avoid generation loss in JPEG
The core idea here would be to not to go through a JPEG compression algorithm in full with an already compressed image, because this will lead to exaggerating not yet visible artifacts, especially when resizing. It is better to avoid reducing image dimensions of an already compressed image but if there’s no choice then scale down the image by a bigger amount (say 3x or 4x). Otherwise, DCT will break down the image differently, “thinking” that imperfections introduced on previous compression are actually image data. And this may lead to removing more actual information and leaving more visual noise.
Lossless image transformations
This narrows down the set of possible actions, but it is still possible to do some. For example, losslessly rotating, mirroring and cropping JPEG images.
Tools like jpegtran and xnview allow rotating an image by 90 degrees, as well as mirroring an image. This is possible because it is not needed to recalculate coefficient matrix, generally speaking, an already existing DCT matrix may be rotated instead.
Cropping is also possible, but cropping lines must be placed right in between 8x8 blocks. Instead of recalculating what’s inside the cropping zone, everything outside it can be just thrown away by, for example, jpegtran.
Quantization trick
If you need to re-save an image in a photo editor, save it with the same quality, even if it is not the highest (there are tools to find out the quality of a JPEG file). This way less quantization errors may be introduced because the quantization divisor stays the same, and this won’t lead to having a bigger file with worse quality.
General yet sometimes overlooked advice
With a meme-reference in mind: you can’t have a generation loss if you don’t introduce a new generation of an image. If you have an option to use the source file to make alterations to (e.g PSD for Photoshop), then this is the way to go.
How Uploadcare helps to avoid generation loss
As mentioned above, the best way to avoid generation loss is not to introduce new generations of an image over and over again. To achieve this, Uploadcare always stores an original version of your image, and each delivered image is created from the original image uploaded. Since compressing JPEG files for web is lossy, Uploadcare has different compression options for transforming an image including content-aware AI algorithms to deliver good-looking image versions with small file sizes.
This technique is also used in another Uploadcare product called Adaptive Delivery. In a nutshell, this is a tiny Javascript library that does all the image-related heavy lifting for you: chooses the most suitable image version for a particular user’s device and delivers it. Visit Uploadcare’s transformation documentation and Adaptive Delivery pages to learn more.