How to integrate Uploadcare with n8n for file uploads
In this guide, you’ll learn how to integrate Uploadcare with n8n to handle secure file uploads seamlessly. By the end of this tutorial, you’ll be able to capture files via n8n’s Webhook or Form Trigger nodes, upload them to Uploadcare using the HTTP Request node, and process the returned CDN URL for further use. We’ll address common challenges developers face, such as managing binary data and configuring multipart/form-data requests.
Prerequisites
To follow along with this tutorial, you’ll need the following:
- A free Uploadcare account
- Access to an n8n instance (self-hosted or n8n.cloud)
- Familiarity with n8n nodes, specifically the Webhook node, Form Trigger node, and HTTP Request node
- Basic understanding of HTTP requests and file uploads
 n8n and Uploadcare integration
Understanding file uploads in n8n
To effectively upload files to Uploadcare using n8n, let’s first understand how n8n handles file data and the requirements for file uploads in a workflow.
Binary data in n8n
 Binary data in n8n
In n8n, files are stored in a special Binary tab within the node’s output. Each file is associated with a key known as the “binary property name”. When configuring nodes that handle file uploads, it’s crucial to reference the correct binary property name to access the file data.
To find the binary property name:
- After capturing a file using the Form Trigger or Webhook node, click on the node.
- Navigate to the Output tab.
- Look for the Binary tab, which will list all available binary properties (files) along with their names.
For example, if you uploaded a file through a Webhook node with the field name file, the binary property name would be file.
The binary property name is what you’ll use to map the file in subsequent nodes, such as the HTTP Request node for uploading to Uploadcare.
multipart/form-data requirements
File uploads typically require the multipart/form-data encoding type,
which allows files to be sent as part of the HTTP request body.
In n8n, both the Form Trigger and Webhook nodes can handle multipart/form-data requests,
but they expect the file fields to be correctly formatted.
The Form Trigger node automatically manages multipart/form-data for you when users upload files through a form.
In contrast, when using the Webhook node, you must make sure that the incoming request is properly formatted as multipart/form-data,
with the correct field names for the files.
Tip: When using the Webhook node, append files via the FormData object in JavaScript,
or use tools like Postman, to keep the request correctly formatted.
Learn more about multipart uploads and how Uploadcare handles them, read Multipart file uploads explained: Scaling large file transfers with Uploadcare.
When to use Webhook vs Form Trigger
The Webhook node and Form Trigger node in n8n serve different purposes depending on your use case.
-
Form Trigger: Ideal for creating interactive forms where users can upload files directly through a web interface. It simplifies the process of capturing file uploads and is user-friendly for non-technical users.
-
Webhook: Best suited for programmatic file uploads, such as when files are being sent from other applications or services via API calls. It provides more flexibility for developers who need to handle file uploads in a backend context.
Which method to use depends on your specific requirements:
- Use the Form Trigger when you need an easy-to-use interface for end-users to upload files.
- Use the Webhook when you need to accept file uploads from other systems or automate the process through API calls.
Now that you understand the basics of file uploads in n8n, let’s proceed to set up the Uploadcare integration.
Step 1: Set up Uploadcare for file upload API access
Create a project
To get started with Uploadcare, you’ll first need to create a new project in your Uploadcare dashboard. This project will serve as the container for all your uploaded files and settings.
To do this:
- Log in to your Uploadcare dashboard
- Click on Create project and enter a name for your project. You can also choose the storage option you want for the project
- Click Create to finalize the project setup
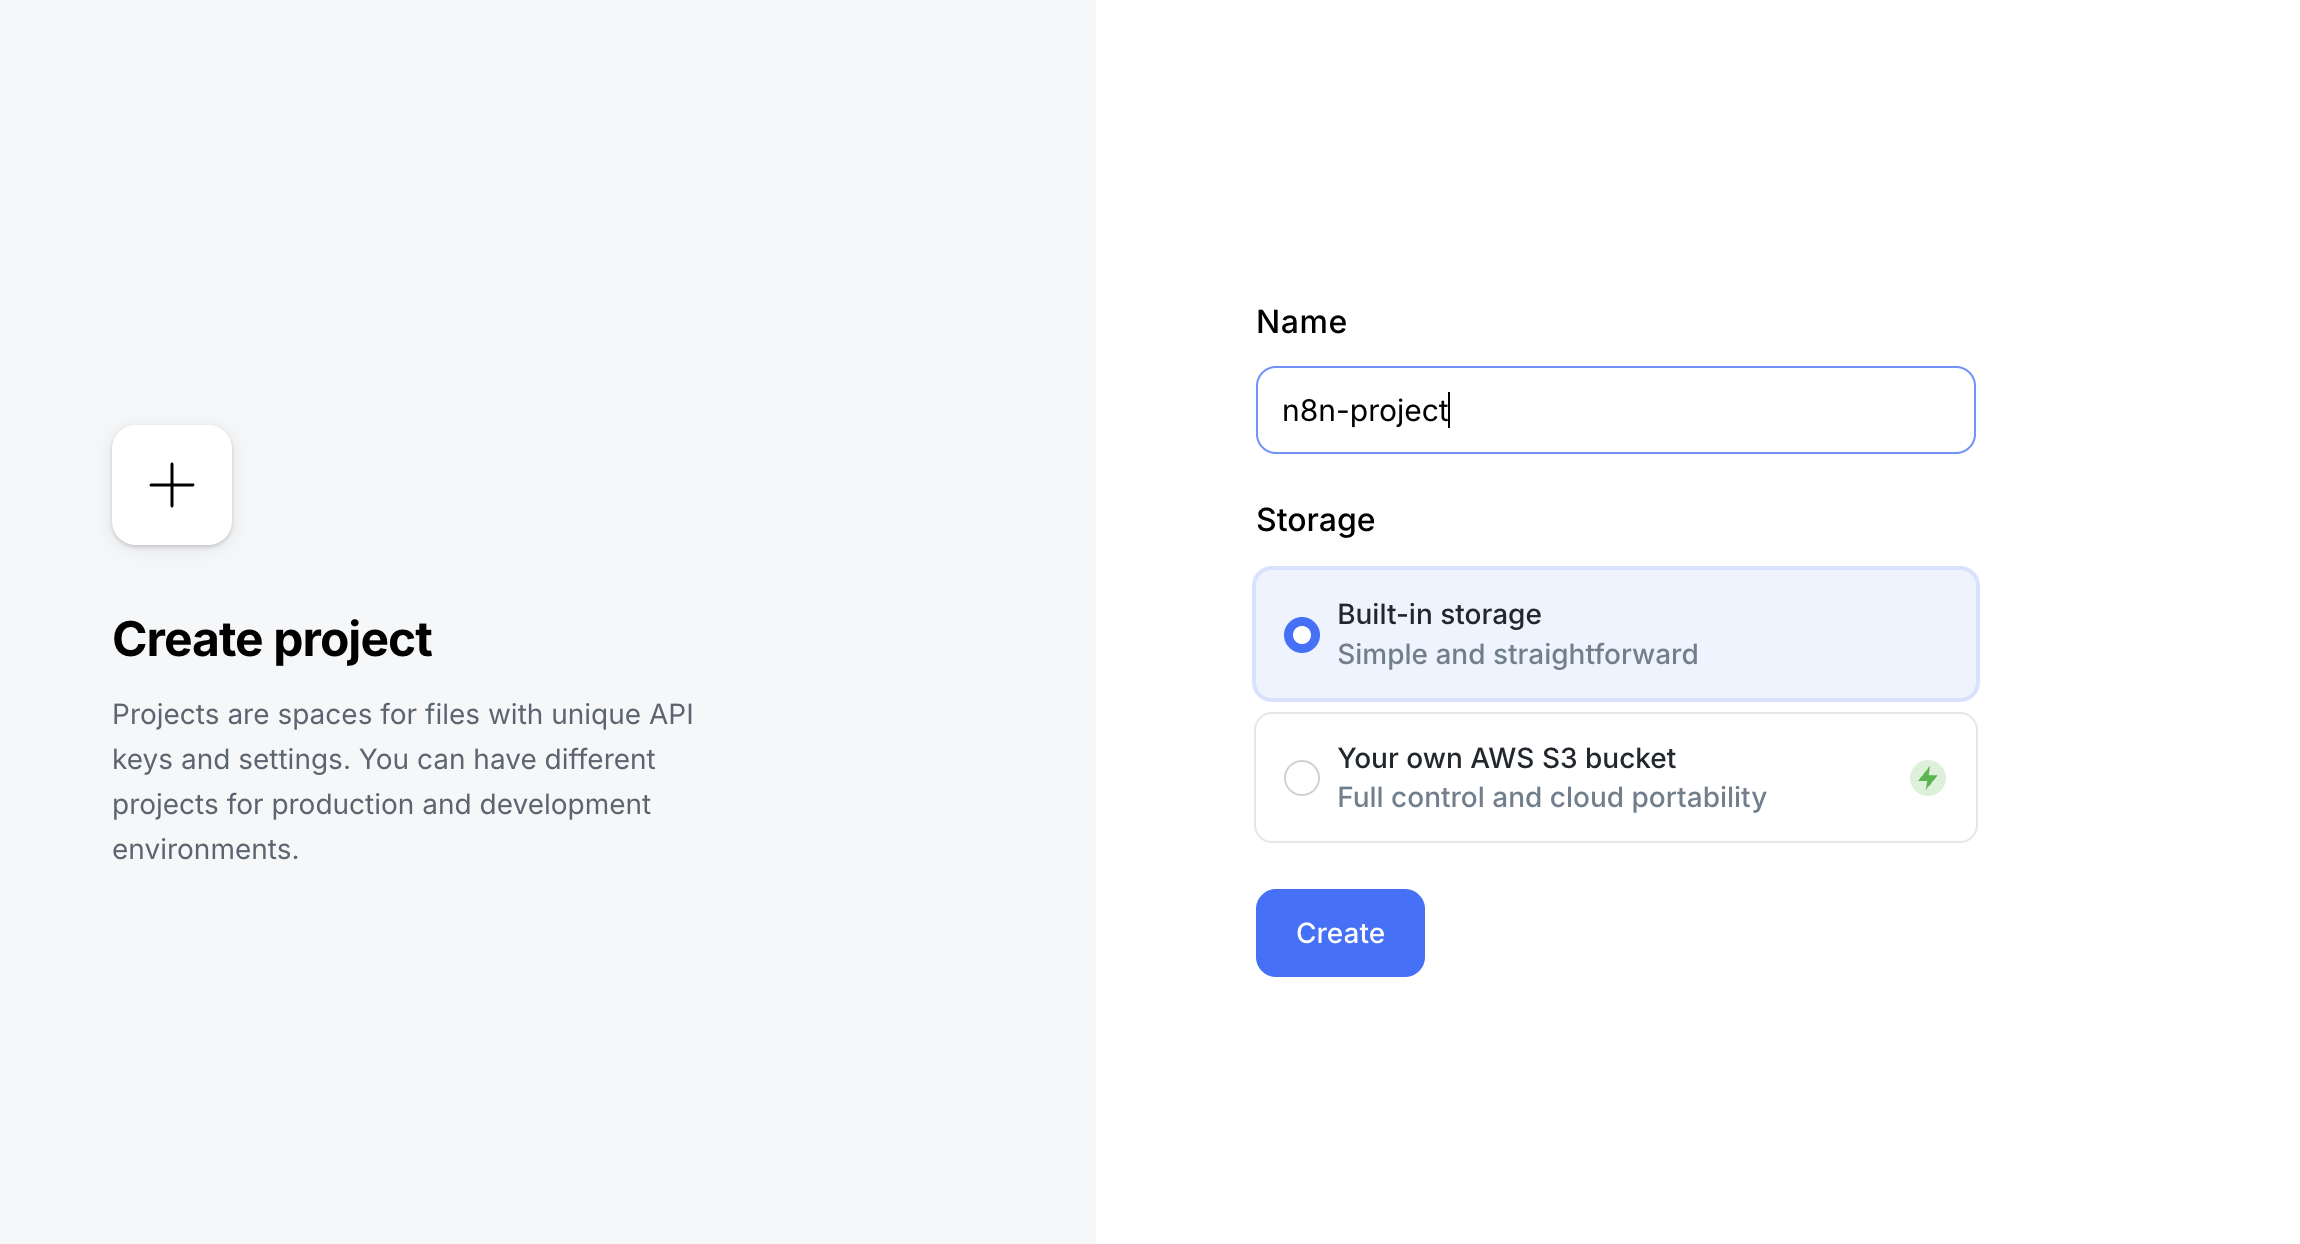 Creating project in Uploadcare
Choose a descriptive name for your project to easily identify it later.
Get your API keys
After creating your project, you’ll need to acquire API keys to authenticate from n8n requests to Uploadcare. API keys in Uploadcare enable secure communication between your application and the Uploadcare service.
In your Uploadcare dashboard, go to the “API keys” section.
Here, you’ll see both your Public key and Secret key.
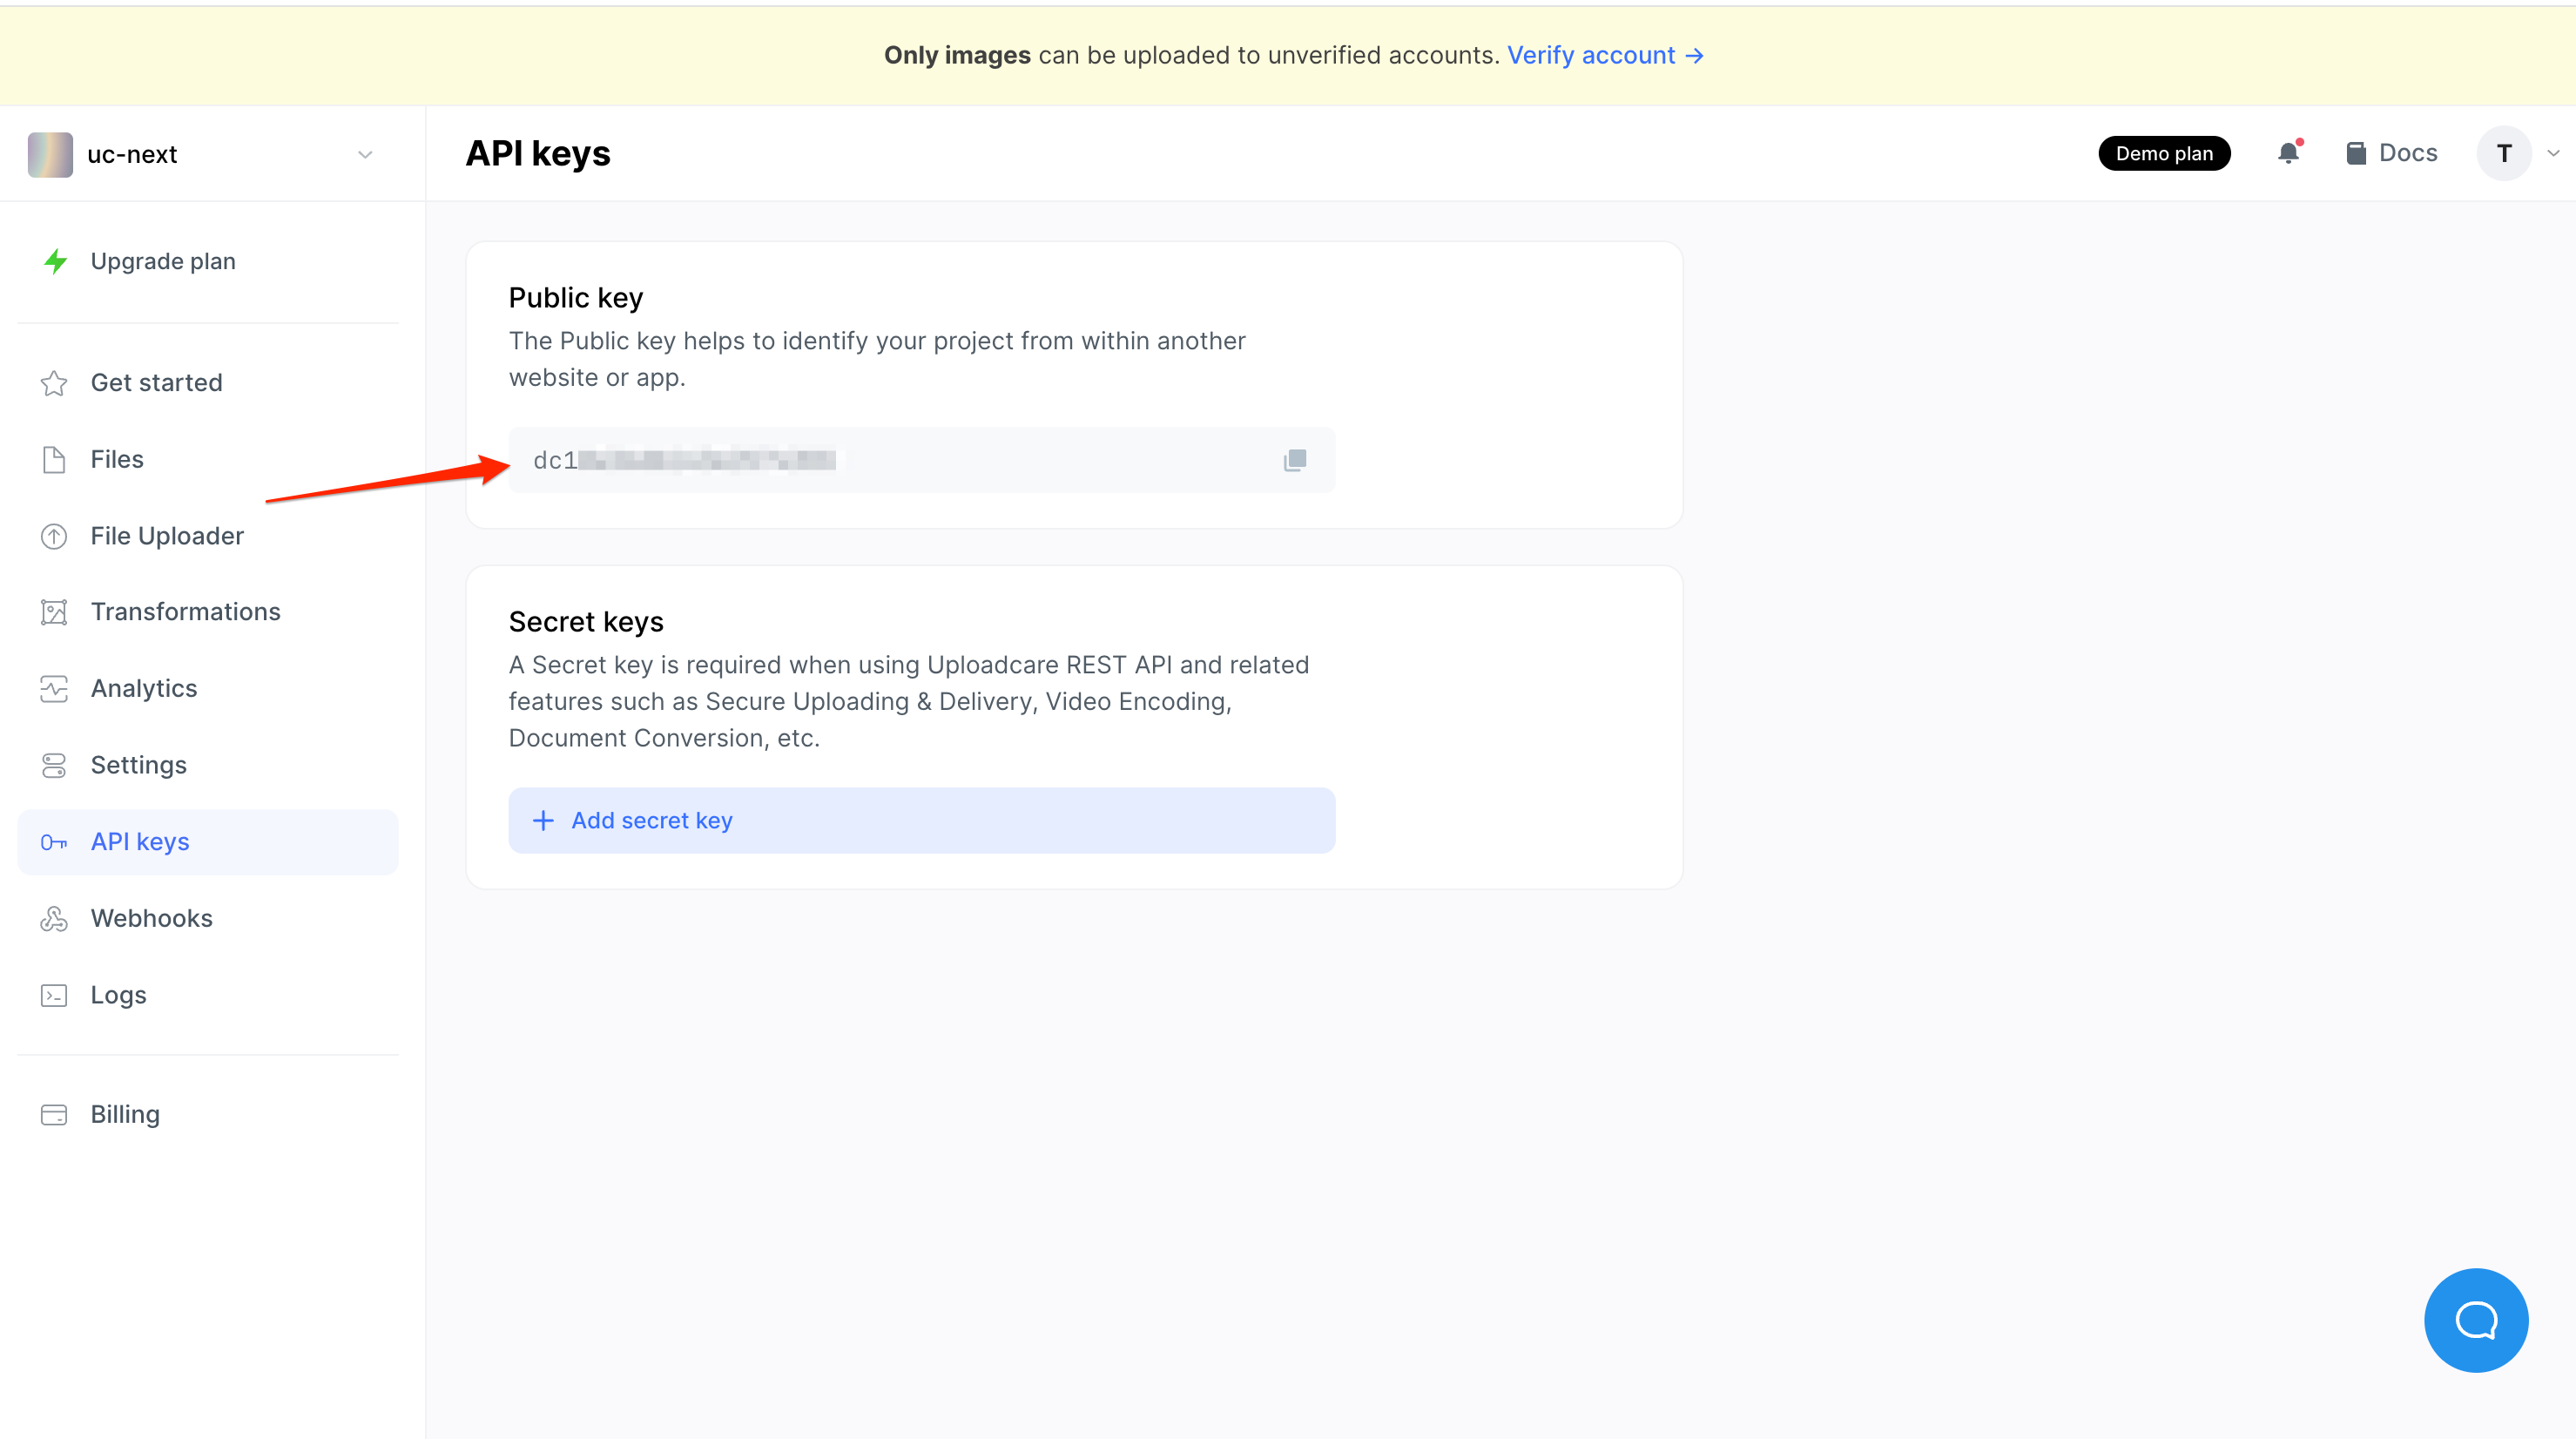 Uploadcare API keys
For uploading files, you’ll primarily use the Public key. Make sure to copy this key, as you’ll need it when configuring the HTTP Request node in n8n.
Understanding Uploadcare’s upload endpoint
Uploadcare provides an Upload API that allows you to upload both simple and very large files in multiparts.
For uploading files from a form or programmatically, you’ll use the following endpoint:
https://upload.uploadcare.com/base/When making a POST request to this endpoint, you’ll need to include the following required fields in the form data:
UPLOADCARE_PUB_KEY: Your Uploadcare public key for authenticationfile: The binary file data you want to upload
Optional metadata fields that contain additional information about the file can also be included.
Step 2: Capture a file in n8n for Uploadcare upload workflows
To upload a file to Uploadcare using n8n, you first need an entry point for the workflow and to capture the file.
There are various ways to capture files in n8n, but the two primary methods are the Form Trigger node or the Webhook node.
Choosing the right method to capture files in n8n depends on your specific use case. Below both methods are outlined so you can decide which one best suits your needs.
Method A: Using the n8n Form Trigger for file uploads
N8n’s Form Trigger node allows you to create forms that users can fill out, including file upload fields.
This method is ideal for scenarios where you want to provide an interactive interface for users to submit files.
In this method, the Form Trigger node automatically handles the multipart/form-data encoding for you.
To set up a Form Trigger for file uploads:
First, create a new workflow in n8n and click on the + button to set up a new trigger node. This will open the node selection menu.
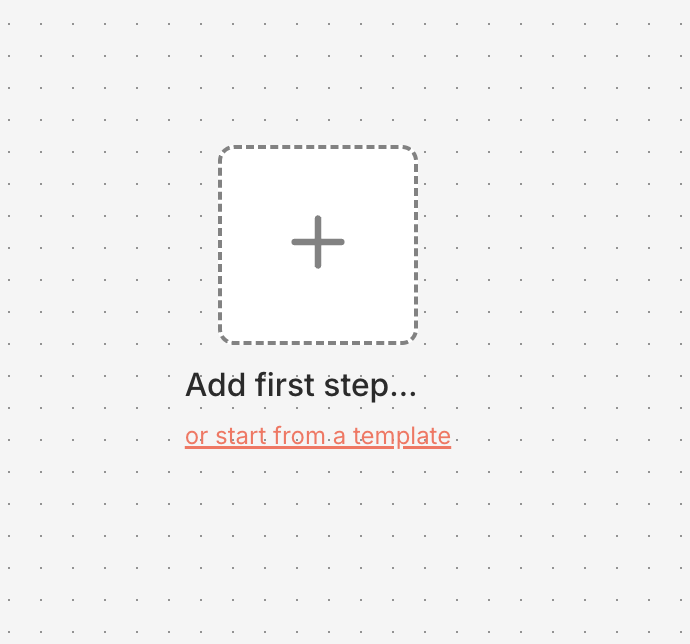 Entry point to add a new node in n8n
Search for the “n8n Form” node from the list of available nodes and select it to add it to your workflow:
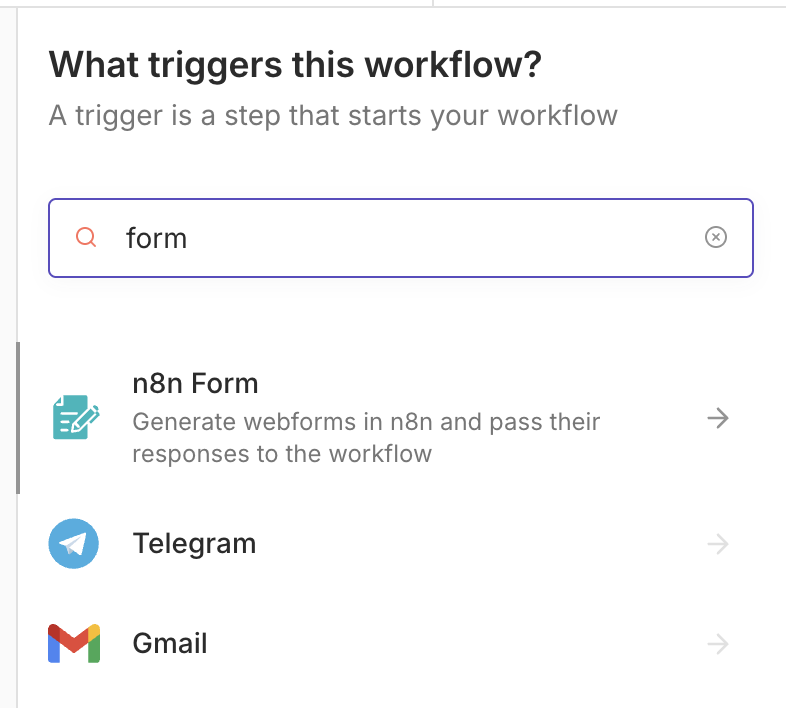 n8n Form Trigger node selection
Next, add Form Title and Description values to provide context to users.
In the Form Elements section, add a new element of type File with a field name (e.g., file)
and label (e.g., Upload your file).
You can also toggle options like Multiple Files to allow users to upload more than one file at a time, or toggle the Required Field switch to require the field be filled out before submission.
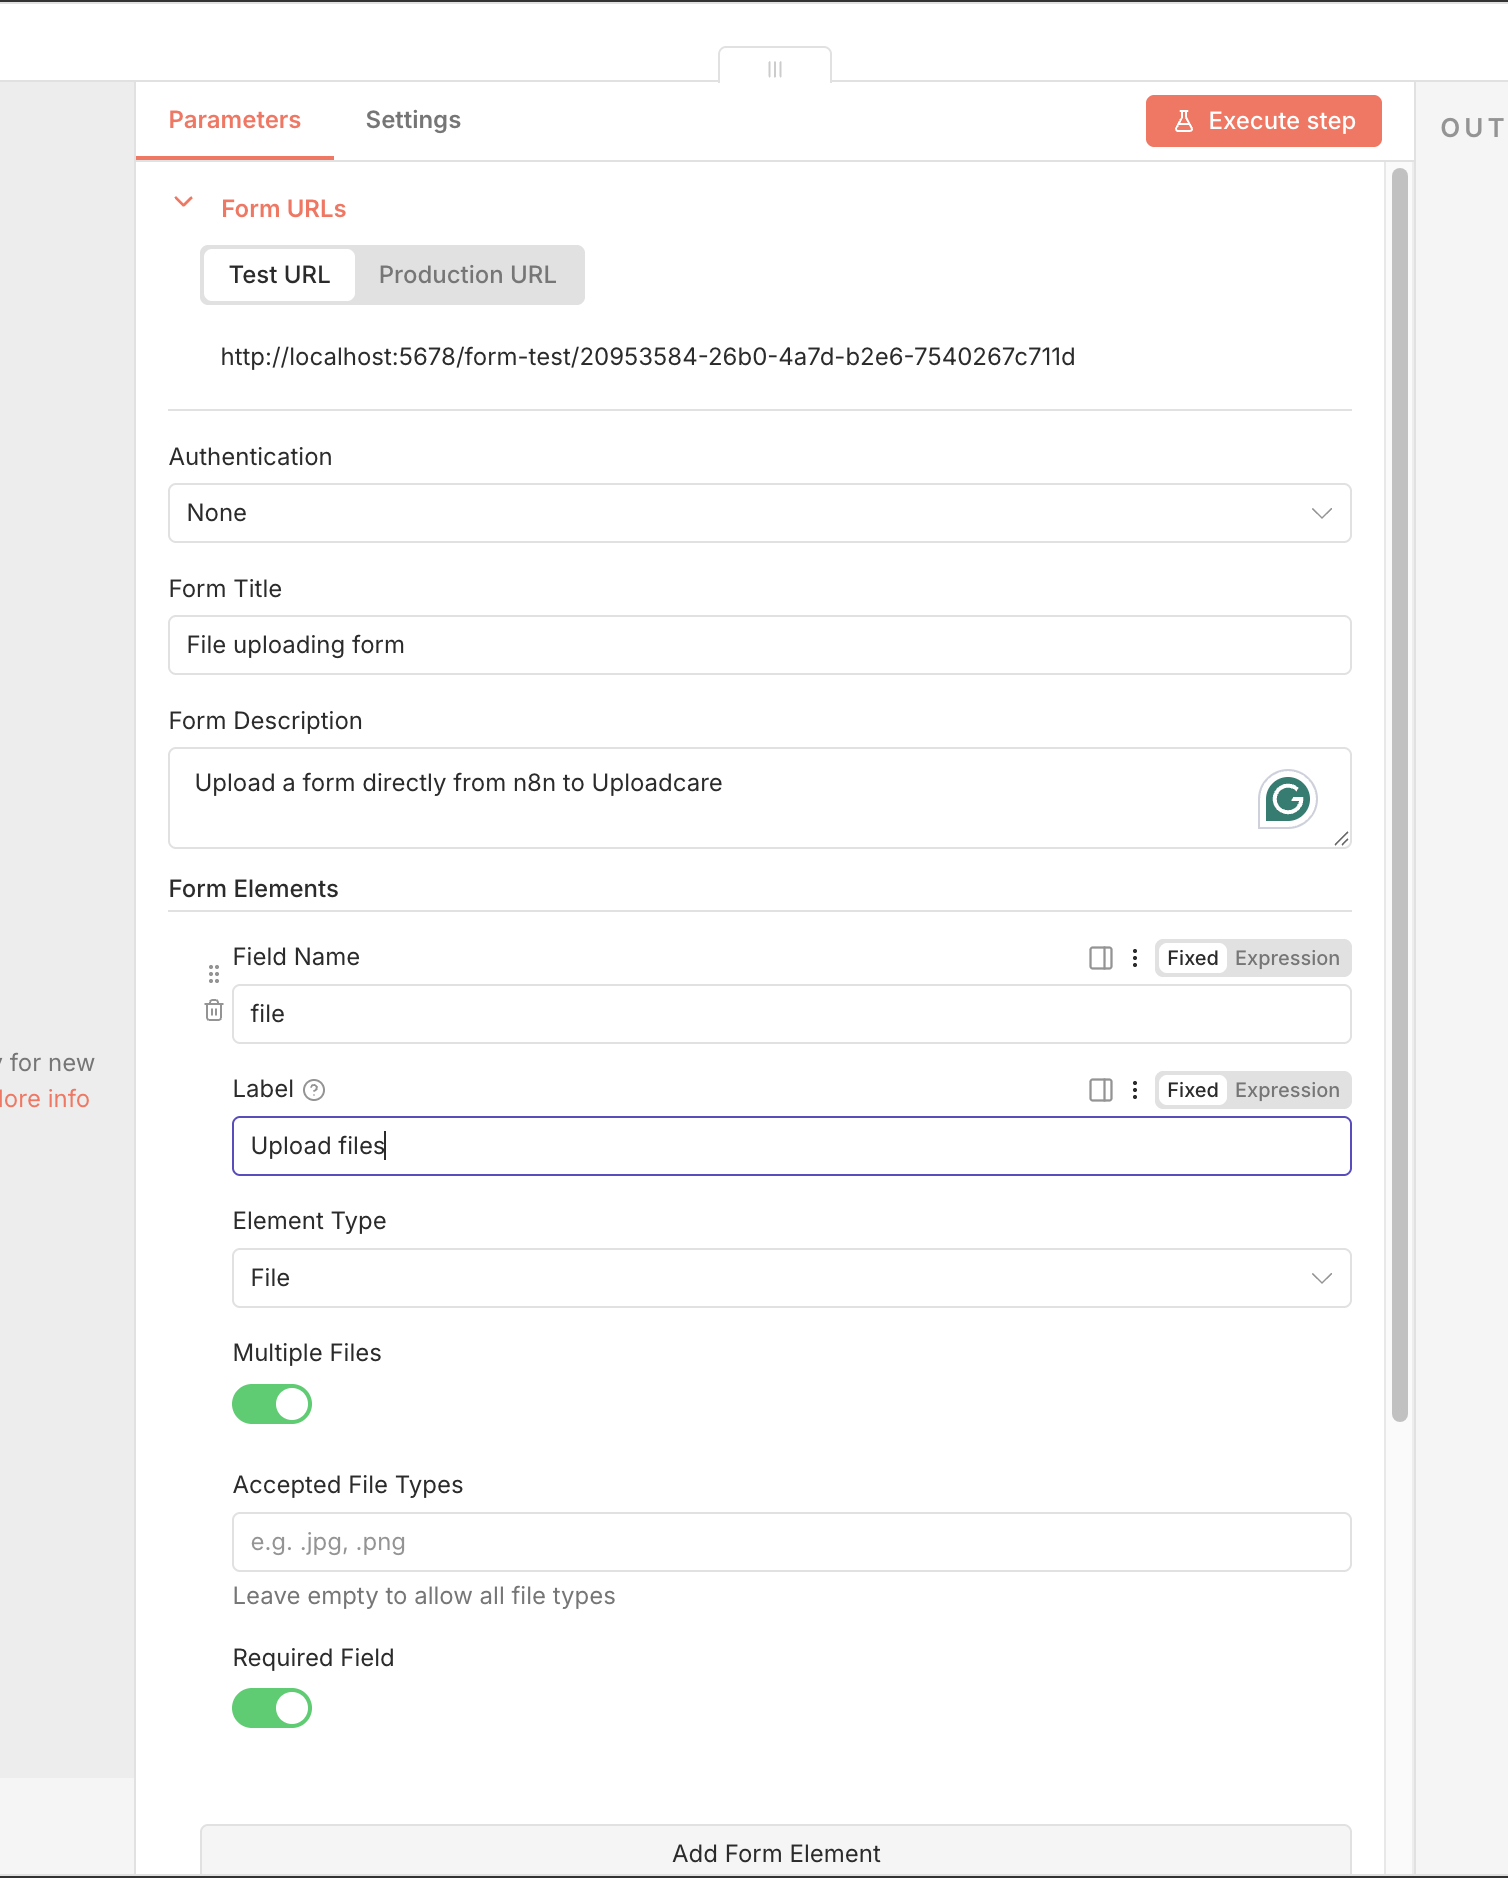 n8n Form Trigger node with file upload field configured
To test the form, click on the “Execute step” button in the top right corner of the n8n interface. This will start the workflow and generate a unique URL for the form in a new browser tab.
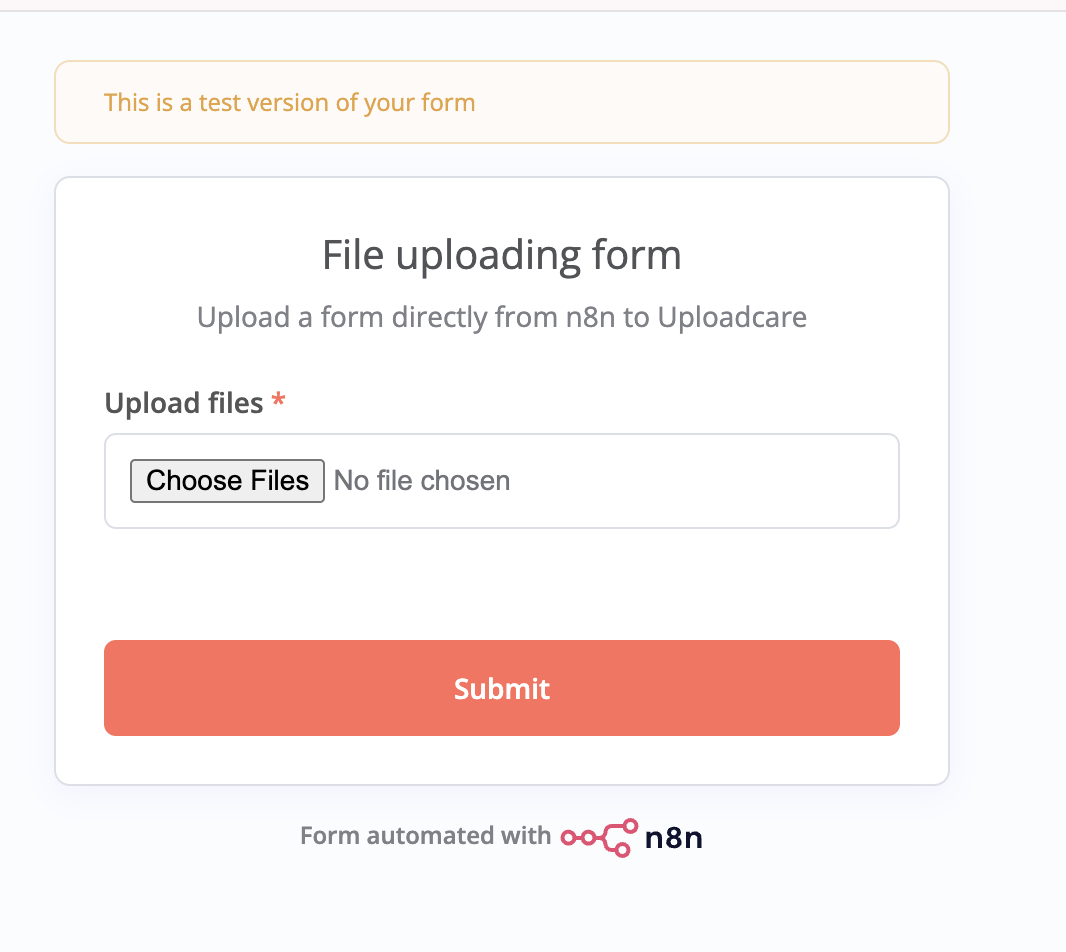 n8n Form Trigger node execution
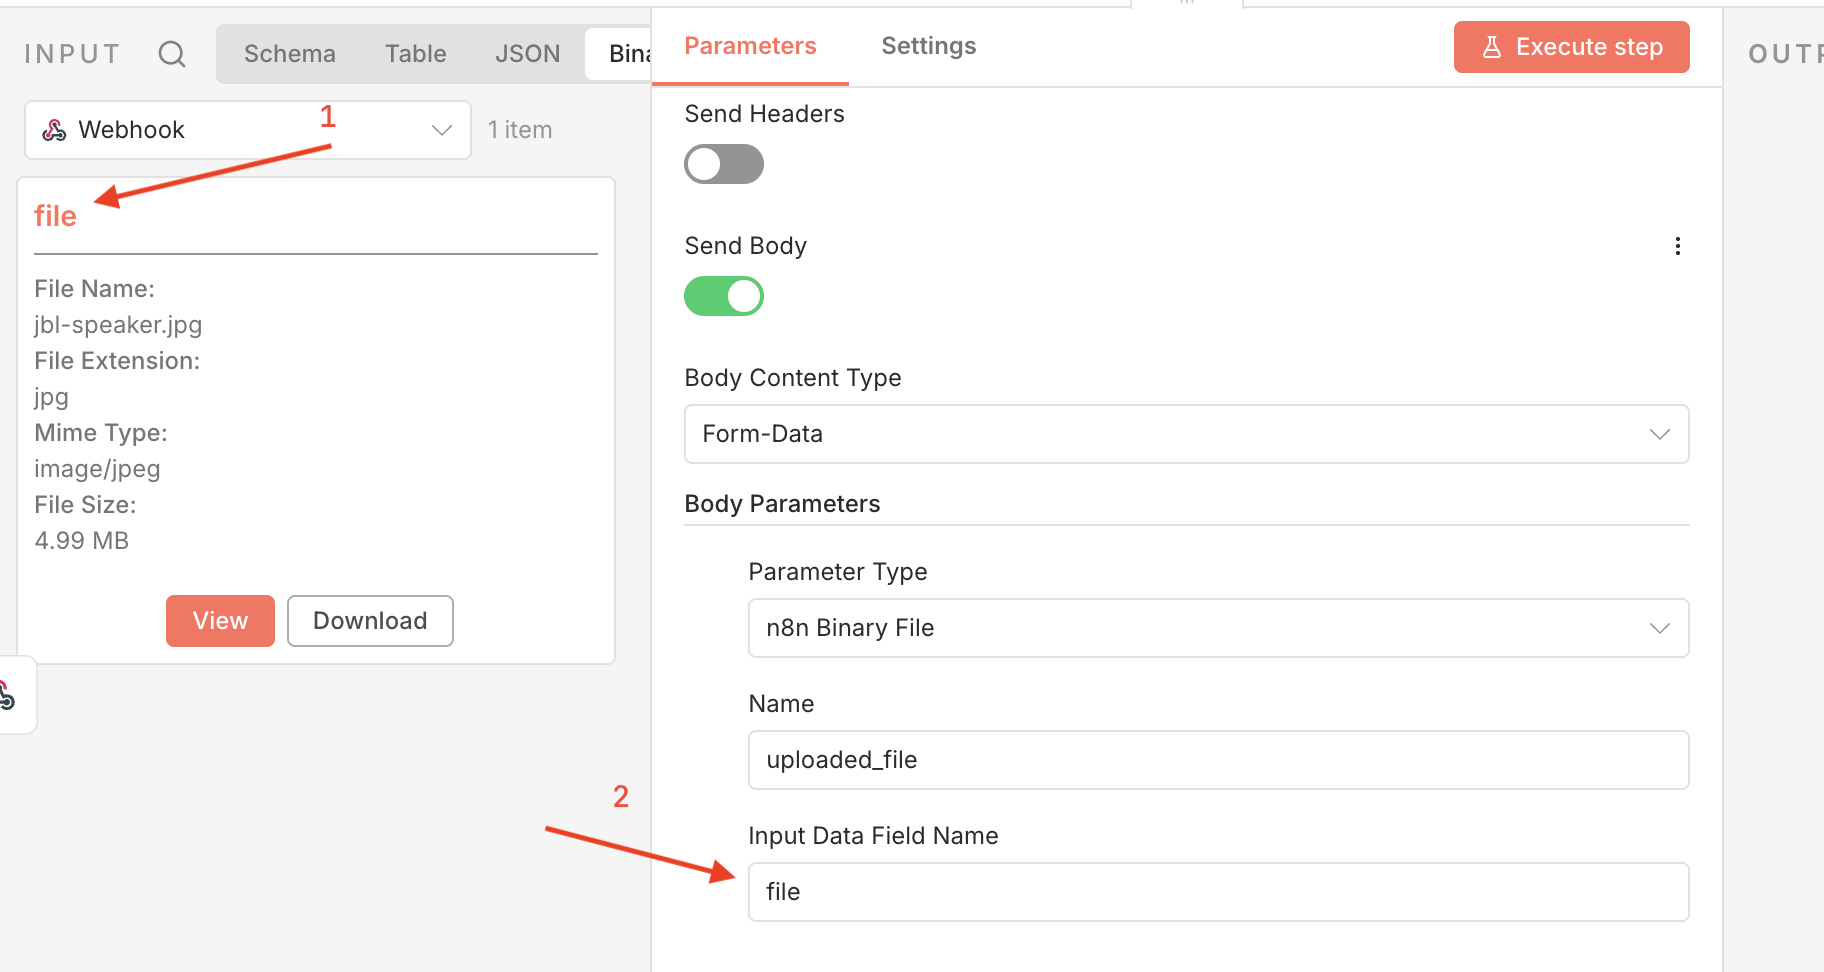
Try uploading a file using the form. After submission, go back to n8n and check the output tab. You should see the uploaded file listed under the Binary tab in the node’s output.
n8n Form Trigger node output showing binary dataNotice the binary property name (file) associated with the uploaded file.
This is the name you’ll use to reference the file in subsequent nodes, such as the HTTP Request node for uploading to Uploadcare.
Method B: Using the n8n Webhook node for file uploads
The Webhook node in n8n allows you to accept file uploads programmatically via HTTP requests. This method is suitable for scenarios where your files are being sent from other applications or services via API calls, and you want to capture them in n8n.
To set up a Webhook for file uploads, create a new workflow in n8n, search for the “Webhook” node in the list of available nodes, and select it to add it to your workflow.
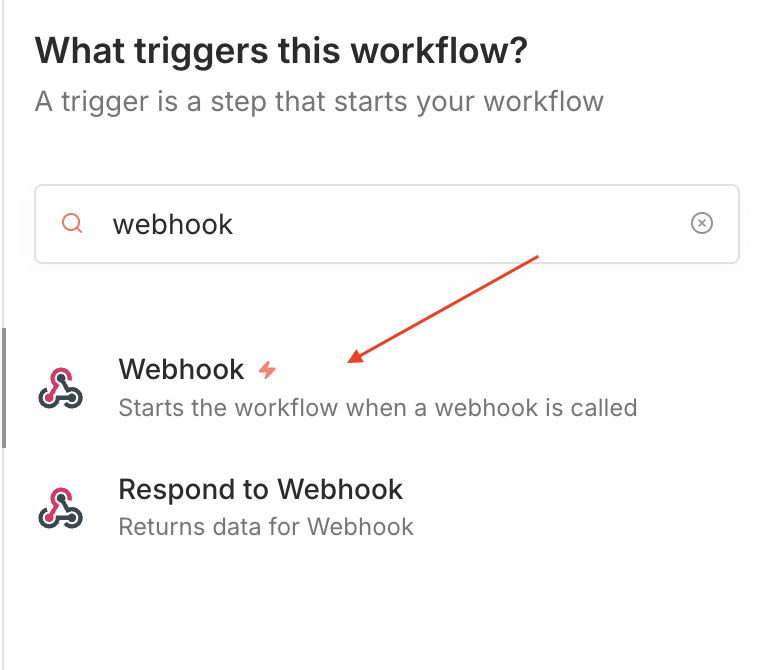 n8n Webhook node selection
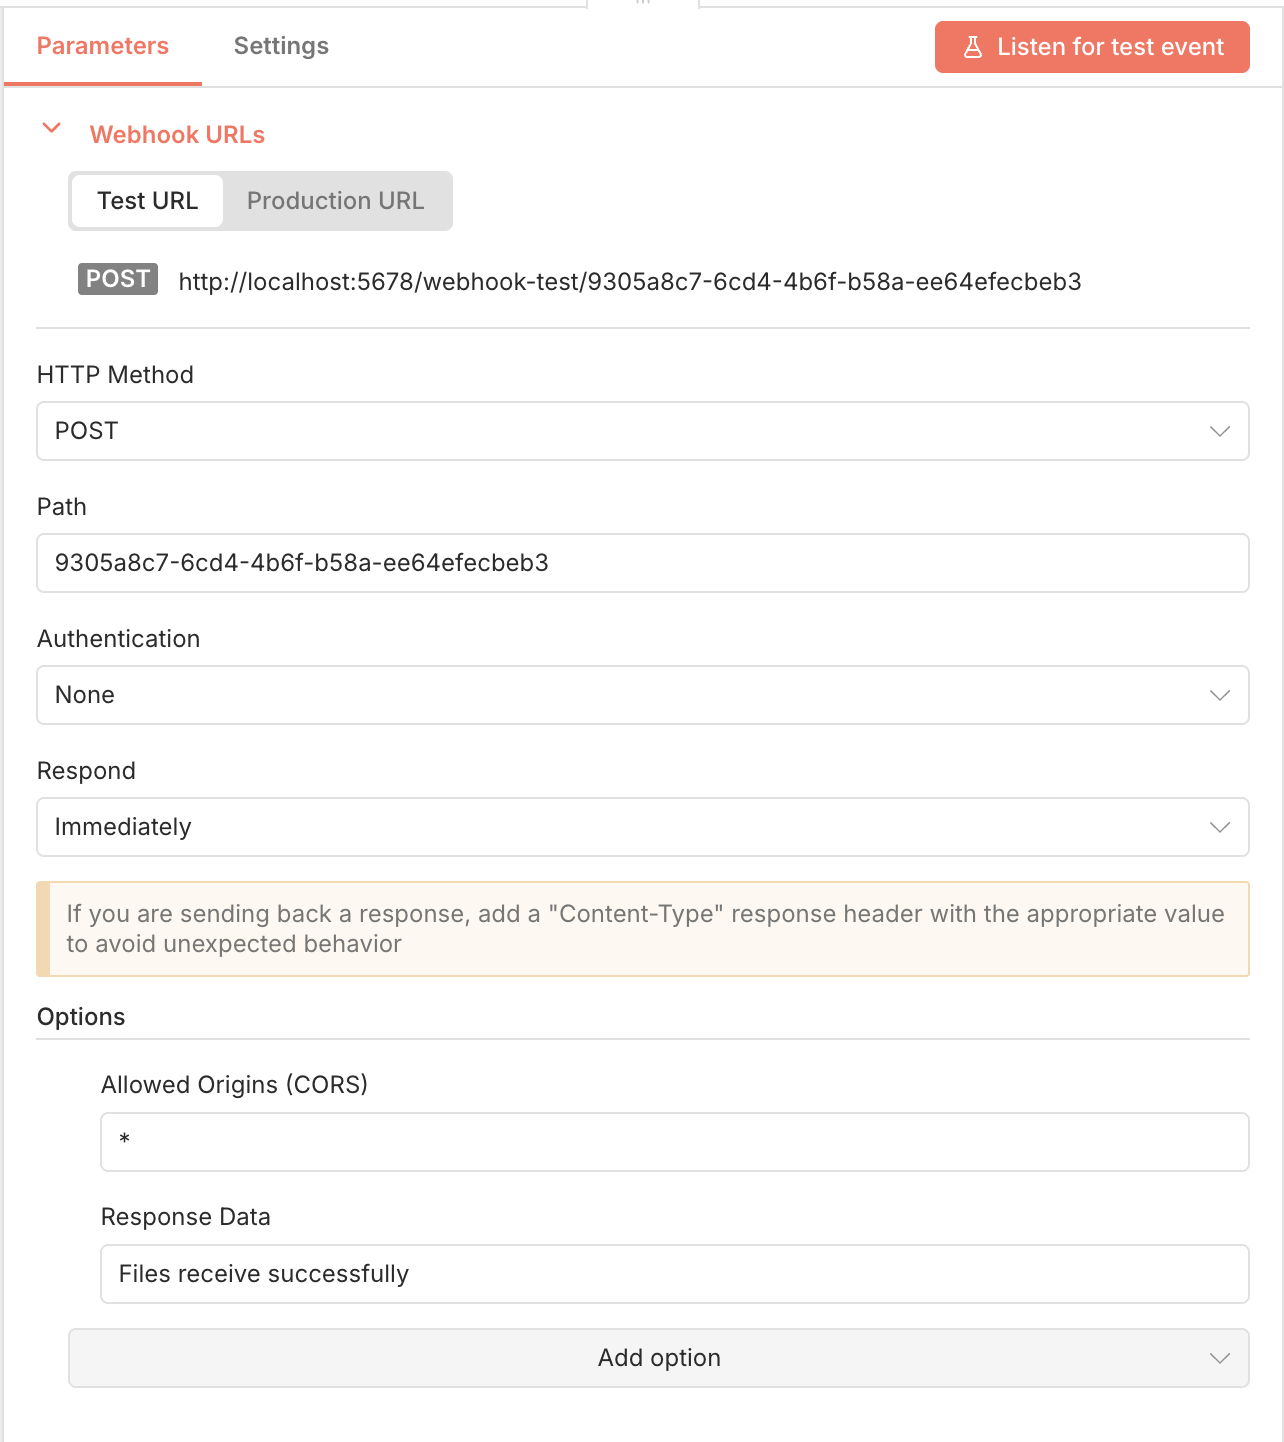
In the Webhook node configuration, set the HTTP Method to POST since file uploads typically use this method.
The webhook URL will be generated automatically. This is the URL where you’ll send your multipart/form-data requests containing file uploads.
If you are running n8n locally, you’ll have a URL that looks like http://localhost:5678/webhook-test/your-webhook-id.
In the Options section, add a Response Header with the key Content-Type and value application/json
to ensure that the response is in JSON format. Then add a Response Data field with a value like File received successfully
to confirm that the file upload was successful.
Also, if you use localhost for testing, make sure to add an Allow Origin (CORS) field set to *
so that n8n can accept requests from any origin.
 n8n Webhook node configured for file uploads
With the webhook set up, you can use it to listen for incoming file uploads. Click on the Listen for test event button to start the webhook and wait for incoming requests.
To test the webhook, you can use a curl command or a tool like Postman to send a multipart/form-data POST request
to the webhook URL with a file attached.
Here is a screenshot of the webhook request in Postman:
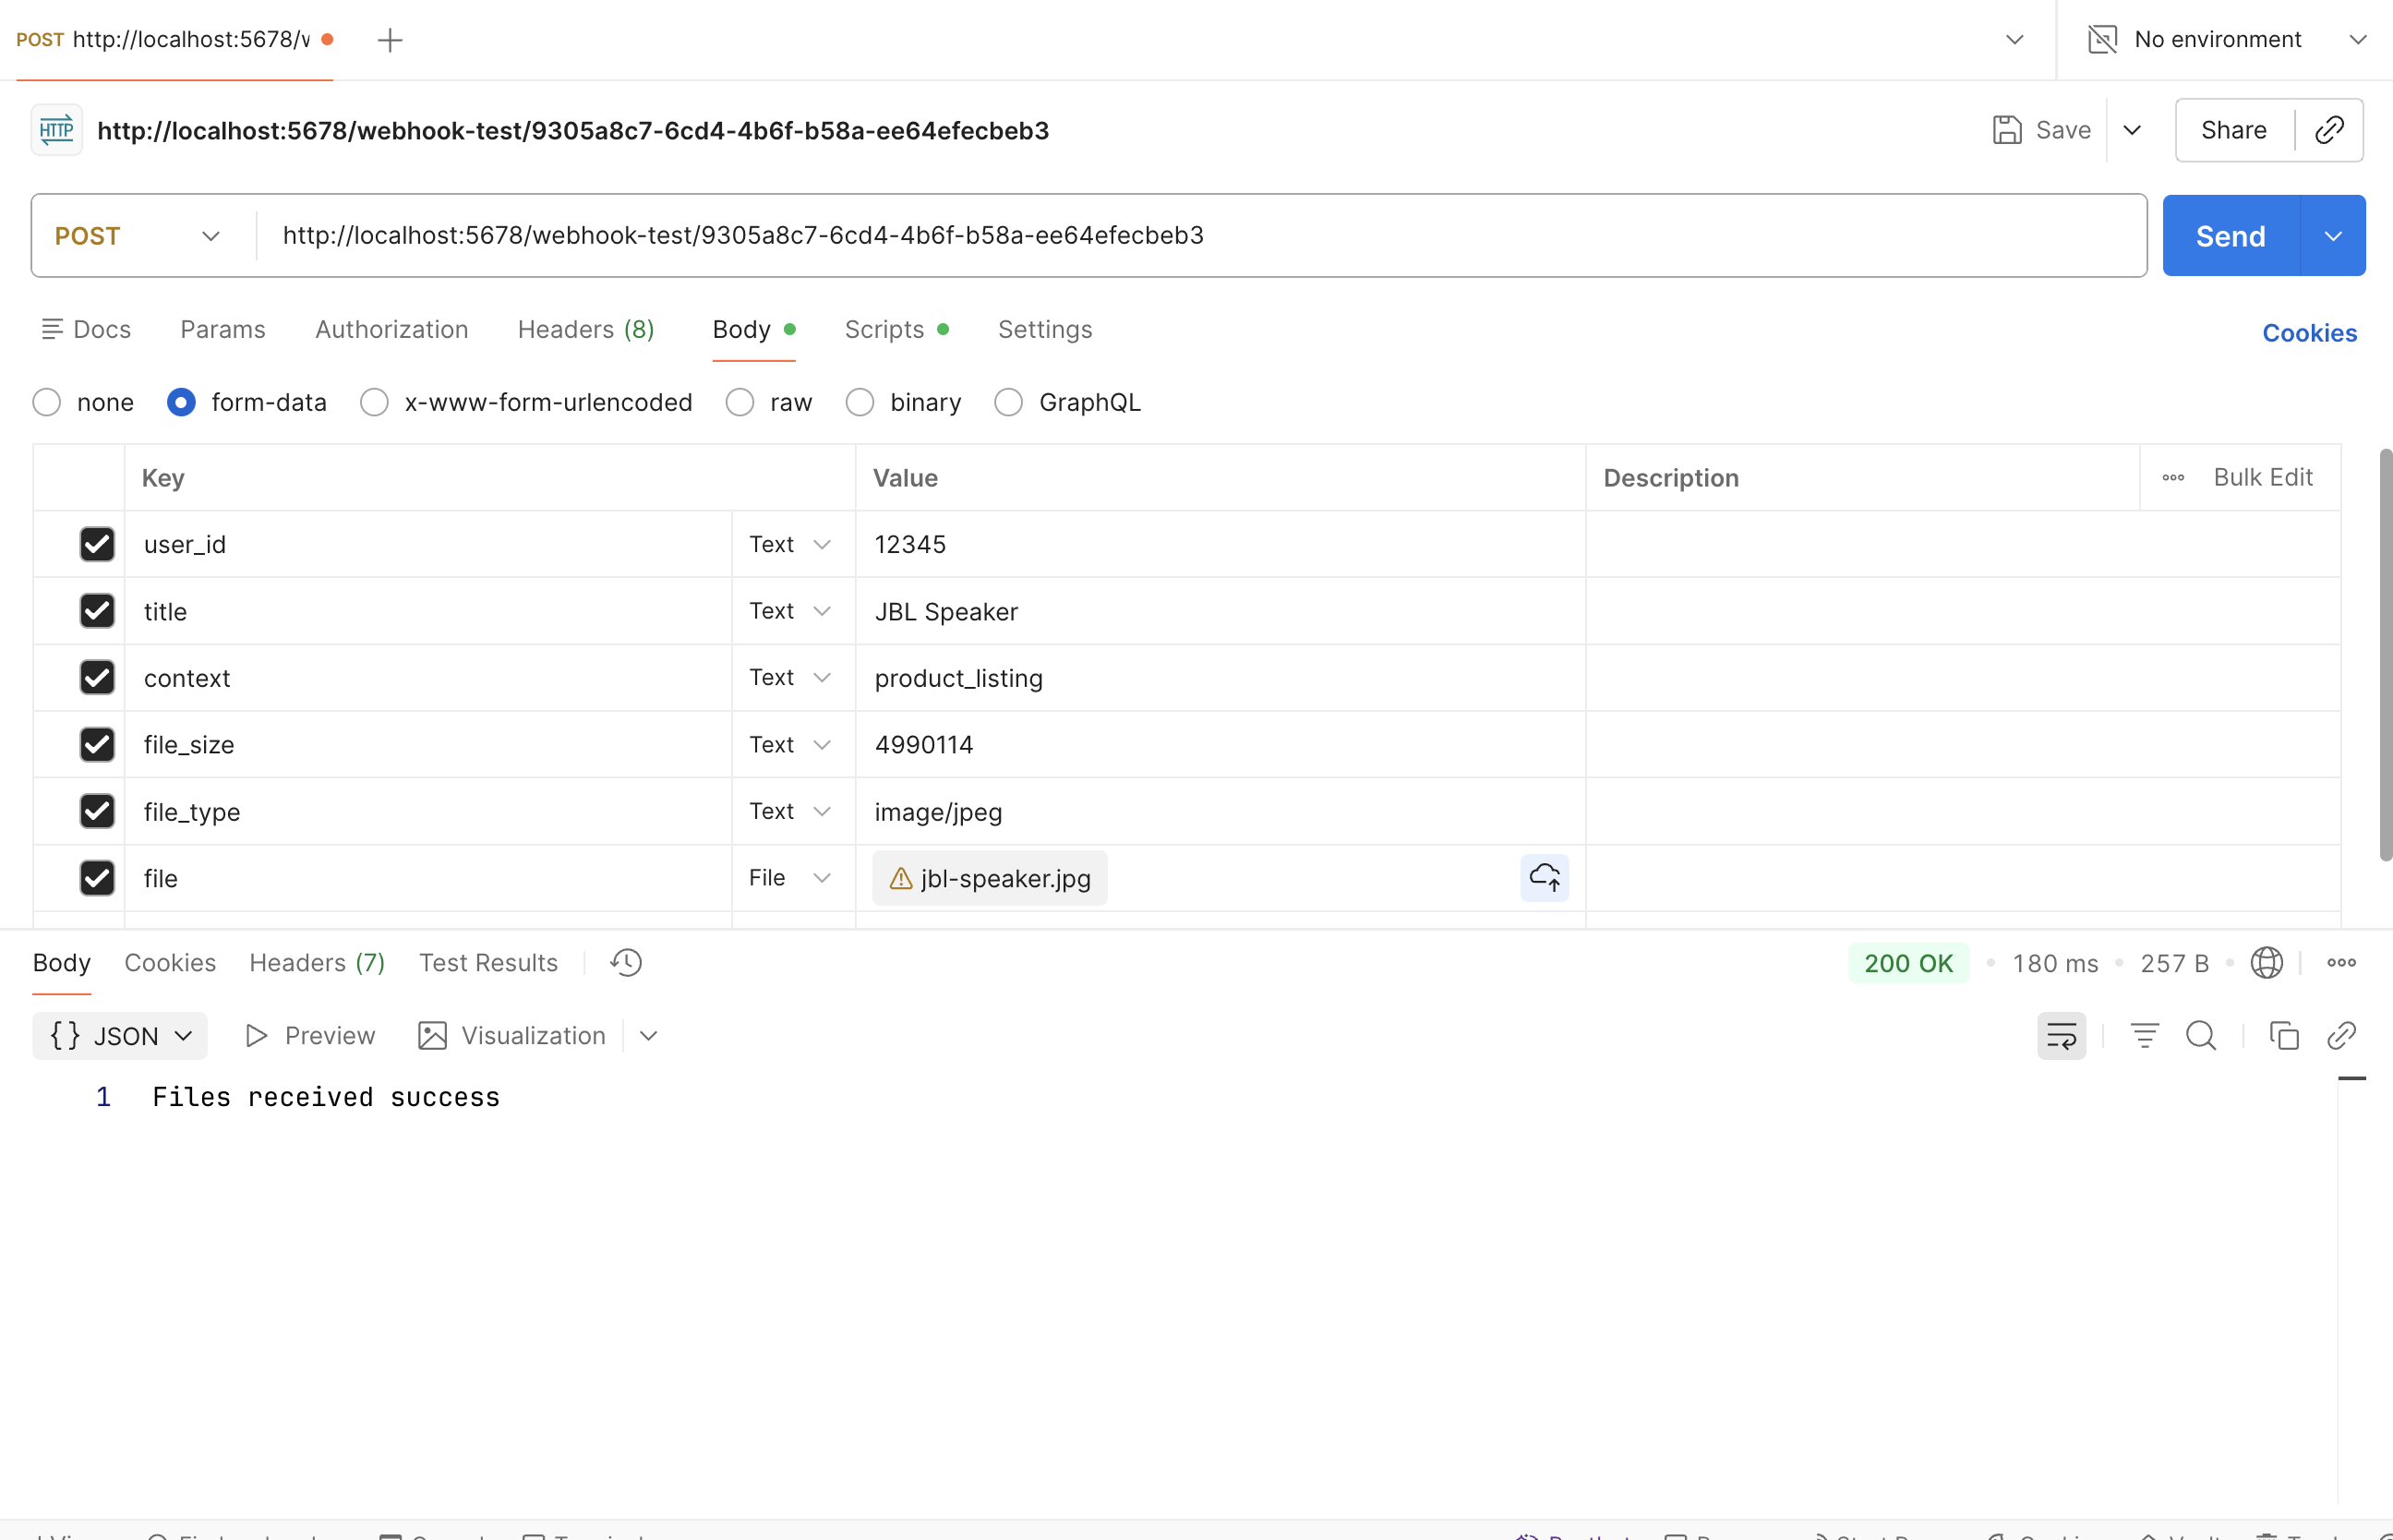 Postman request to n8n Webhook node with file upload
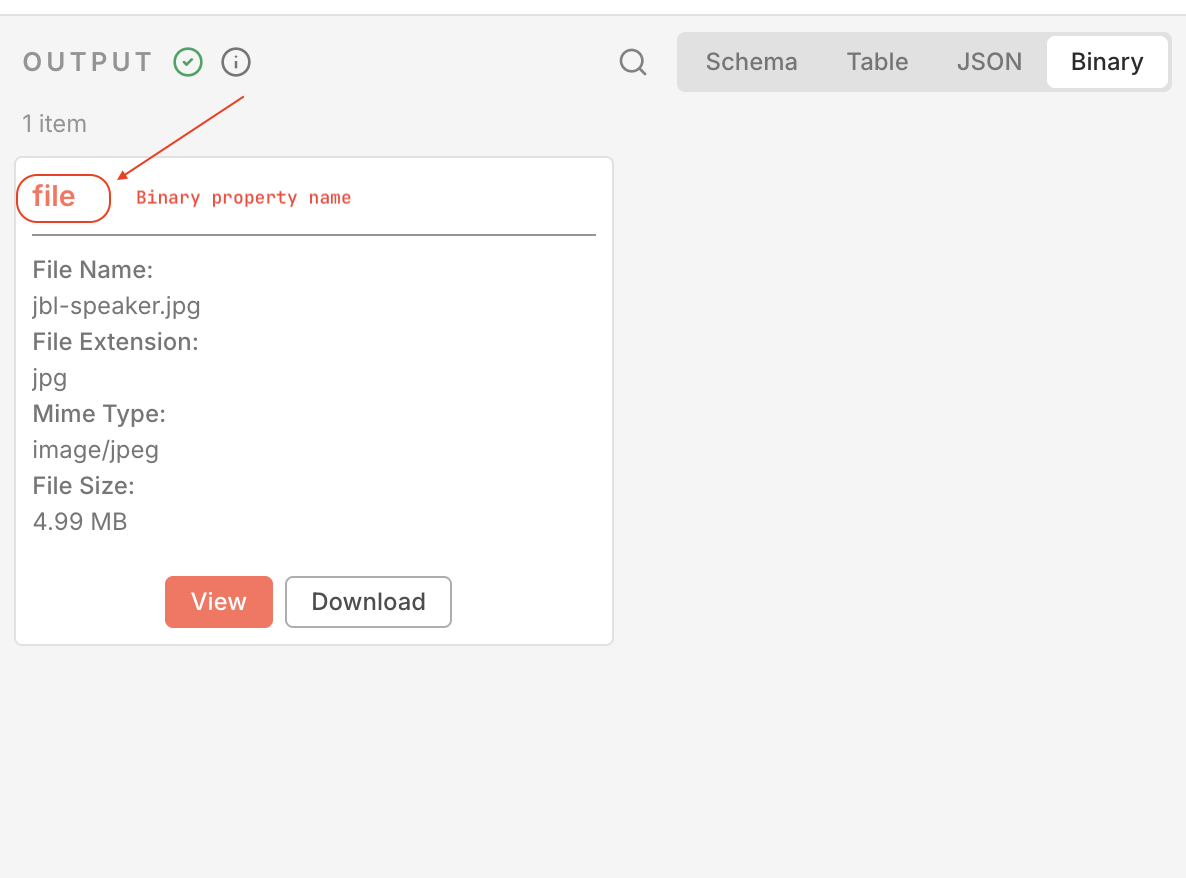
Go back to n8n and check the output tab of the Webhook node. You should see the uploaded file listed under the Binary tab in the node’s output.
n8n Webhook node output showing binary dataNotice the binary property name (file) for the uploaded file.
For backend-driven upload patterns (e.g., Node.js), check out How to upload files in Node.js application for examples you can combine with n8n workflows.
Step 3: Upload the file to Uploadcare using HTTP request node
Once you have captured the file in n8n using either the Form Trigger or Webhook node, the next step is to upload that file to Uploadcare using the HTTP Request node.
Configure the HTTP request node
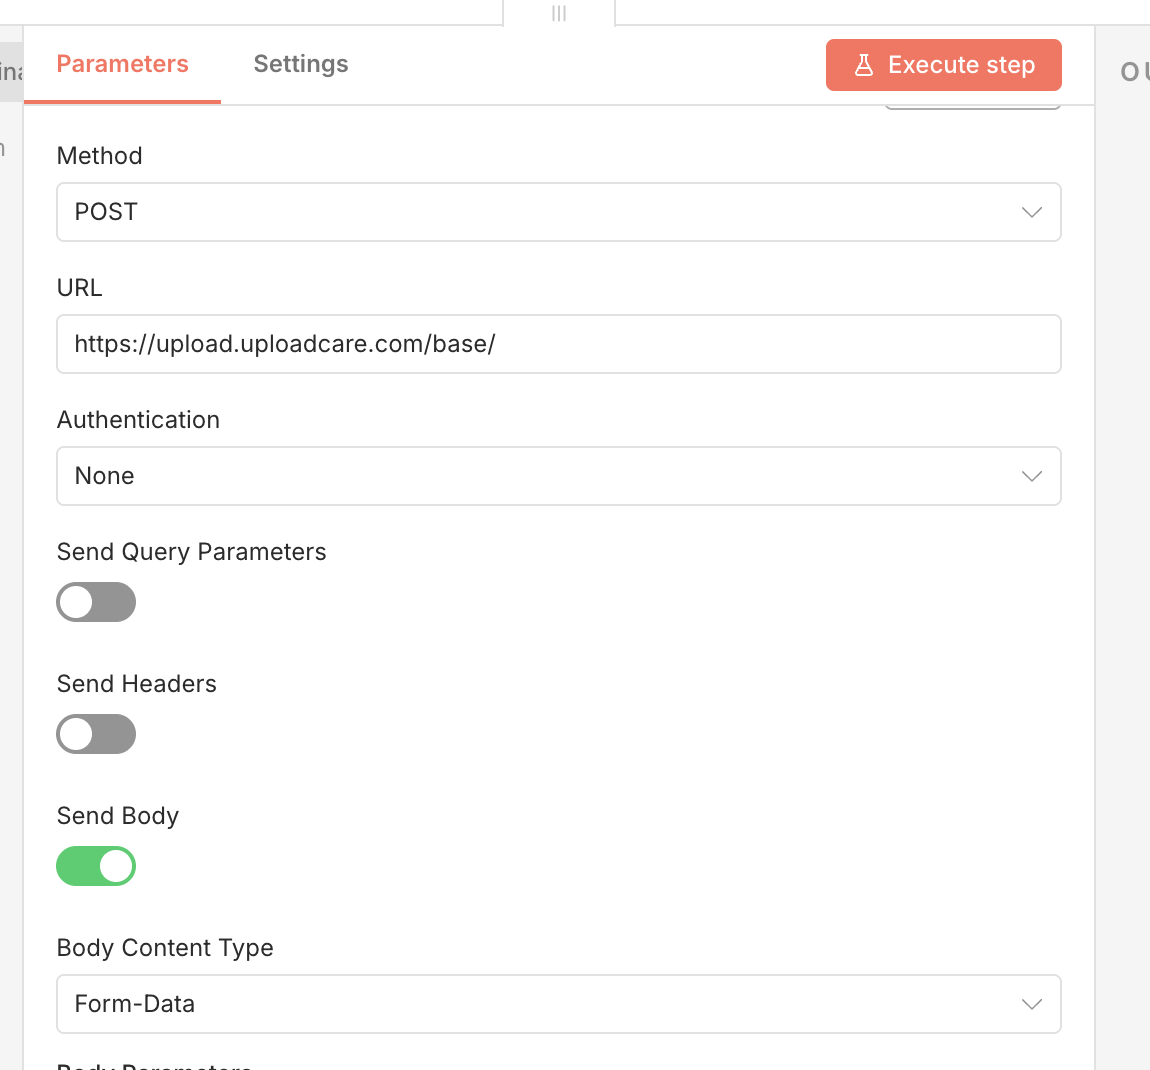
To configure the HTTP request node for uploading files to Uploadcare, follow these steps:
- Click on the + button to add a new node to your workflow
- Search for the HTTP Request node from the list of available nodes and select it to add it to your workflow.
- Set the HTTP Method to
POST. - Set the URL to the Uploadcare upload endpoint:
https://upload.uploadcare.com/base/. - In the Authentication section, you can leave it as “None” since you’ll be passing the public key as part of the form data.
- Toggle the Send Body option to
trueand selectForm-Dataas the Body Content Type.
 n8n HTTP Request node configured for Uploadcare upload
Map the binary file
To upload the file, you’ll need to map the binary data captured in the previous node to the HTTP Request node.
- Under the Body Parameters section, add a new parameter of type
n8n Binary File. - Set the Name of the field to be
uploaded_file - For the Input Data Field Name, choose the binary property name from the previous node (Form Trigger or Webhook) that contains the uploaded file.
- Ensure that the mapping is correct. Common mistakes include selecting the wrong binary property name or not selecting
n8n Binary Dataas the value type.
 n8n HTTP Request node with binary file mapped
To ensure the file is correctly mapped, verify these details:
- The parameter type is set to
n8n Binary File. - Input Data Field Name matches the binary property name from the previous node. In this case,
file. Form-Dataencoding is used and the request is sent asmultipart/form-data.
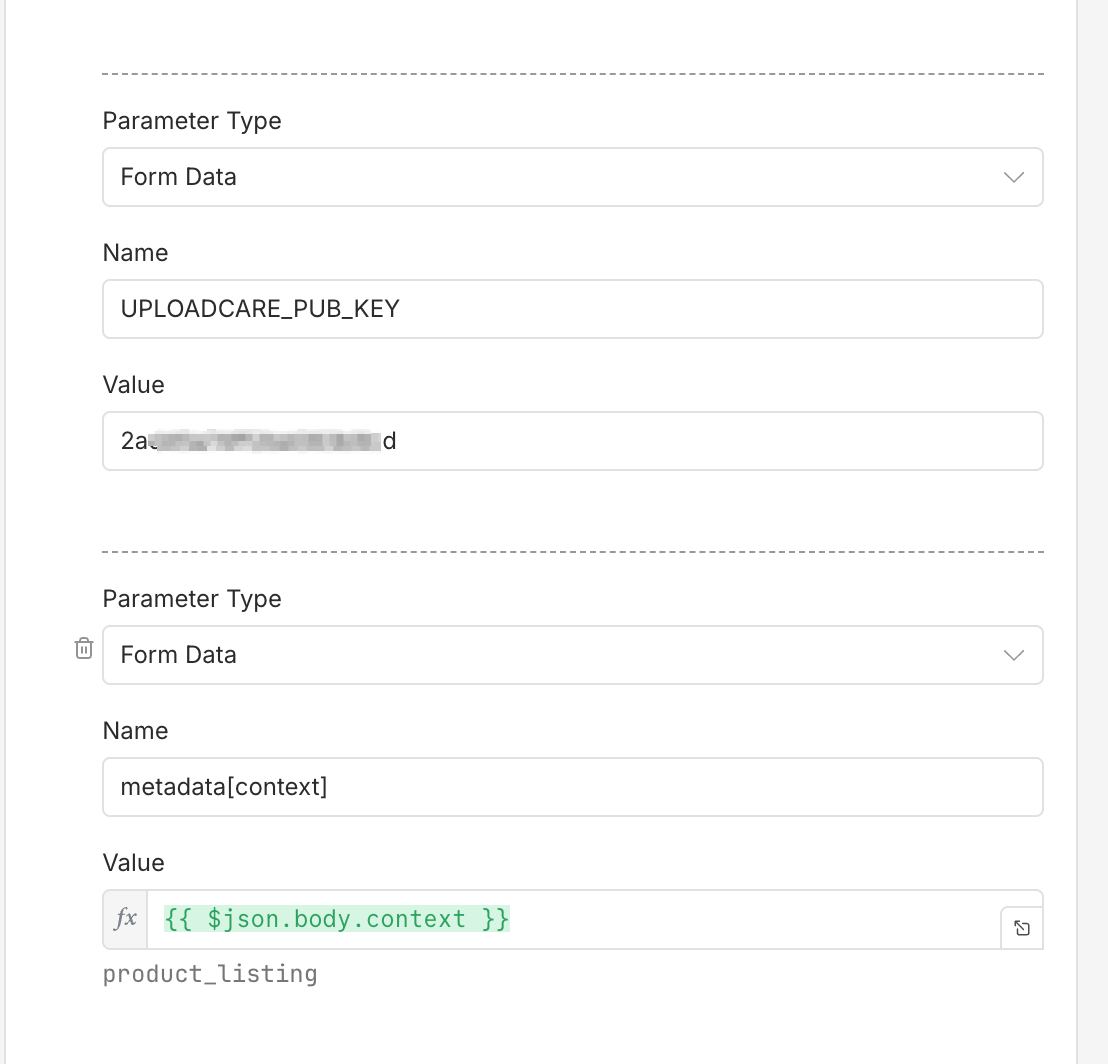
Add required Uploadcare parameters
In addition to the file, you’ll need to include the required Uploadcare parameters in the form data:
-
Add a new field with the key
UPLOADCARE_PUB_KEYand set its value to your Uploadcare public key. -
Optionally, you can add other fields such as
UPLOADCARE_STOREto specify whether the file should be stored immediately or not and metadata fields to include additional information about the file.
If you need to sign your requests for added security, you can explore Uploadcare’s signing options, but this is considered an advanced topic and is outside of the scope of this article.
 n8n HTTP Request node with Uploadcare parameters
Note: The example above adds a metadata field called context to track what the file is related to.
Test the connection
With everything configured, it’s time to test the connection:
- Execute the workflow to send a test file upload to Uploadcare.
- Check the output of the HTTP Request node to see the response from Uploadcare.
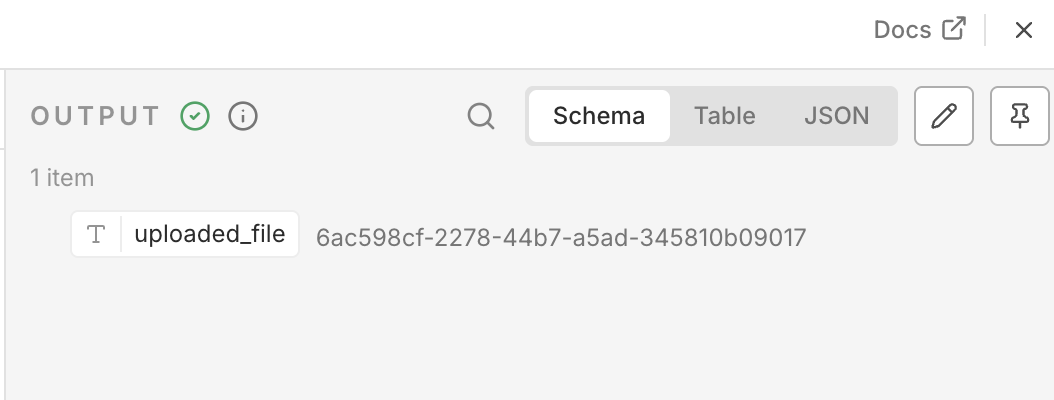
You should receive a response containing the UUID of the uploaded file, like this:
[
  {
    "uploaded_file": "6ac598cf-2278-44b7-a5ad-345810b09017"
  }
]
The schema version may look slightly different, but the key part is the UUID of the uploaded file.
 n8n HTTP Request node output showing Uploadcare response
If you see the UUID in the response, congratulations! You’ve successfully uploaded a file to Uploadcare using n8n.
Step 4: Process and store the Uploadcare response
After successfully uploading a file to Uploadcare, the next step is to process the response and utilize the file information as needed. The Uploadcare API response typically includes the file’s UUID, which can be used for further processing or to access the file via Uploadcare’s CDN.
Extract CDN URL
Every file uploaded to Uploadcare is accessible via a CDN URL, which can be constructed using the file’s UUID. The CDN URL follows this format:
https://{PROJECT_SUBDOMAIN}.ucarecdn.com/{UUID}/Where {PROJECT_SUBDOMAIN} is your Uploadcare project subdomain and {UUID} is the unique identifier of the uploaded file.
The project subdomain can be found in the project’s delivery settings, under CDN domain names.
For example, a file with the UUID da9375b8-4371-4901-a9e4-9c45d719e643 in a project with the subdomain 6ca2u7ybx5 would have the following CDN URL:
https://6ca2u7ybx5.ucarecd.net/da9375b8-4371-4901-a9e4-9c45d719e643/Store file information
Once you have the CDN URL, you can store or utilize this information in various ways depending on your application’s needs. Here are a few examples:
-
Storing in a database: Use n8n’s database nodes (e.g., MySQL, PostgreSQL) to save the CDN URL along with any relevant metadata.
-
Sending to another service: Use the HTTP Request node to send the CDN URL to another API or service for further processing.
-
Triggering content transformations: If you need to perform image transformations, you can use Uploadcare’s CDN modifiers to resize, optimize, or change the format of the image directly via the CDN URL.
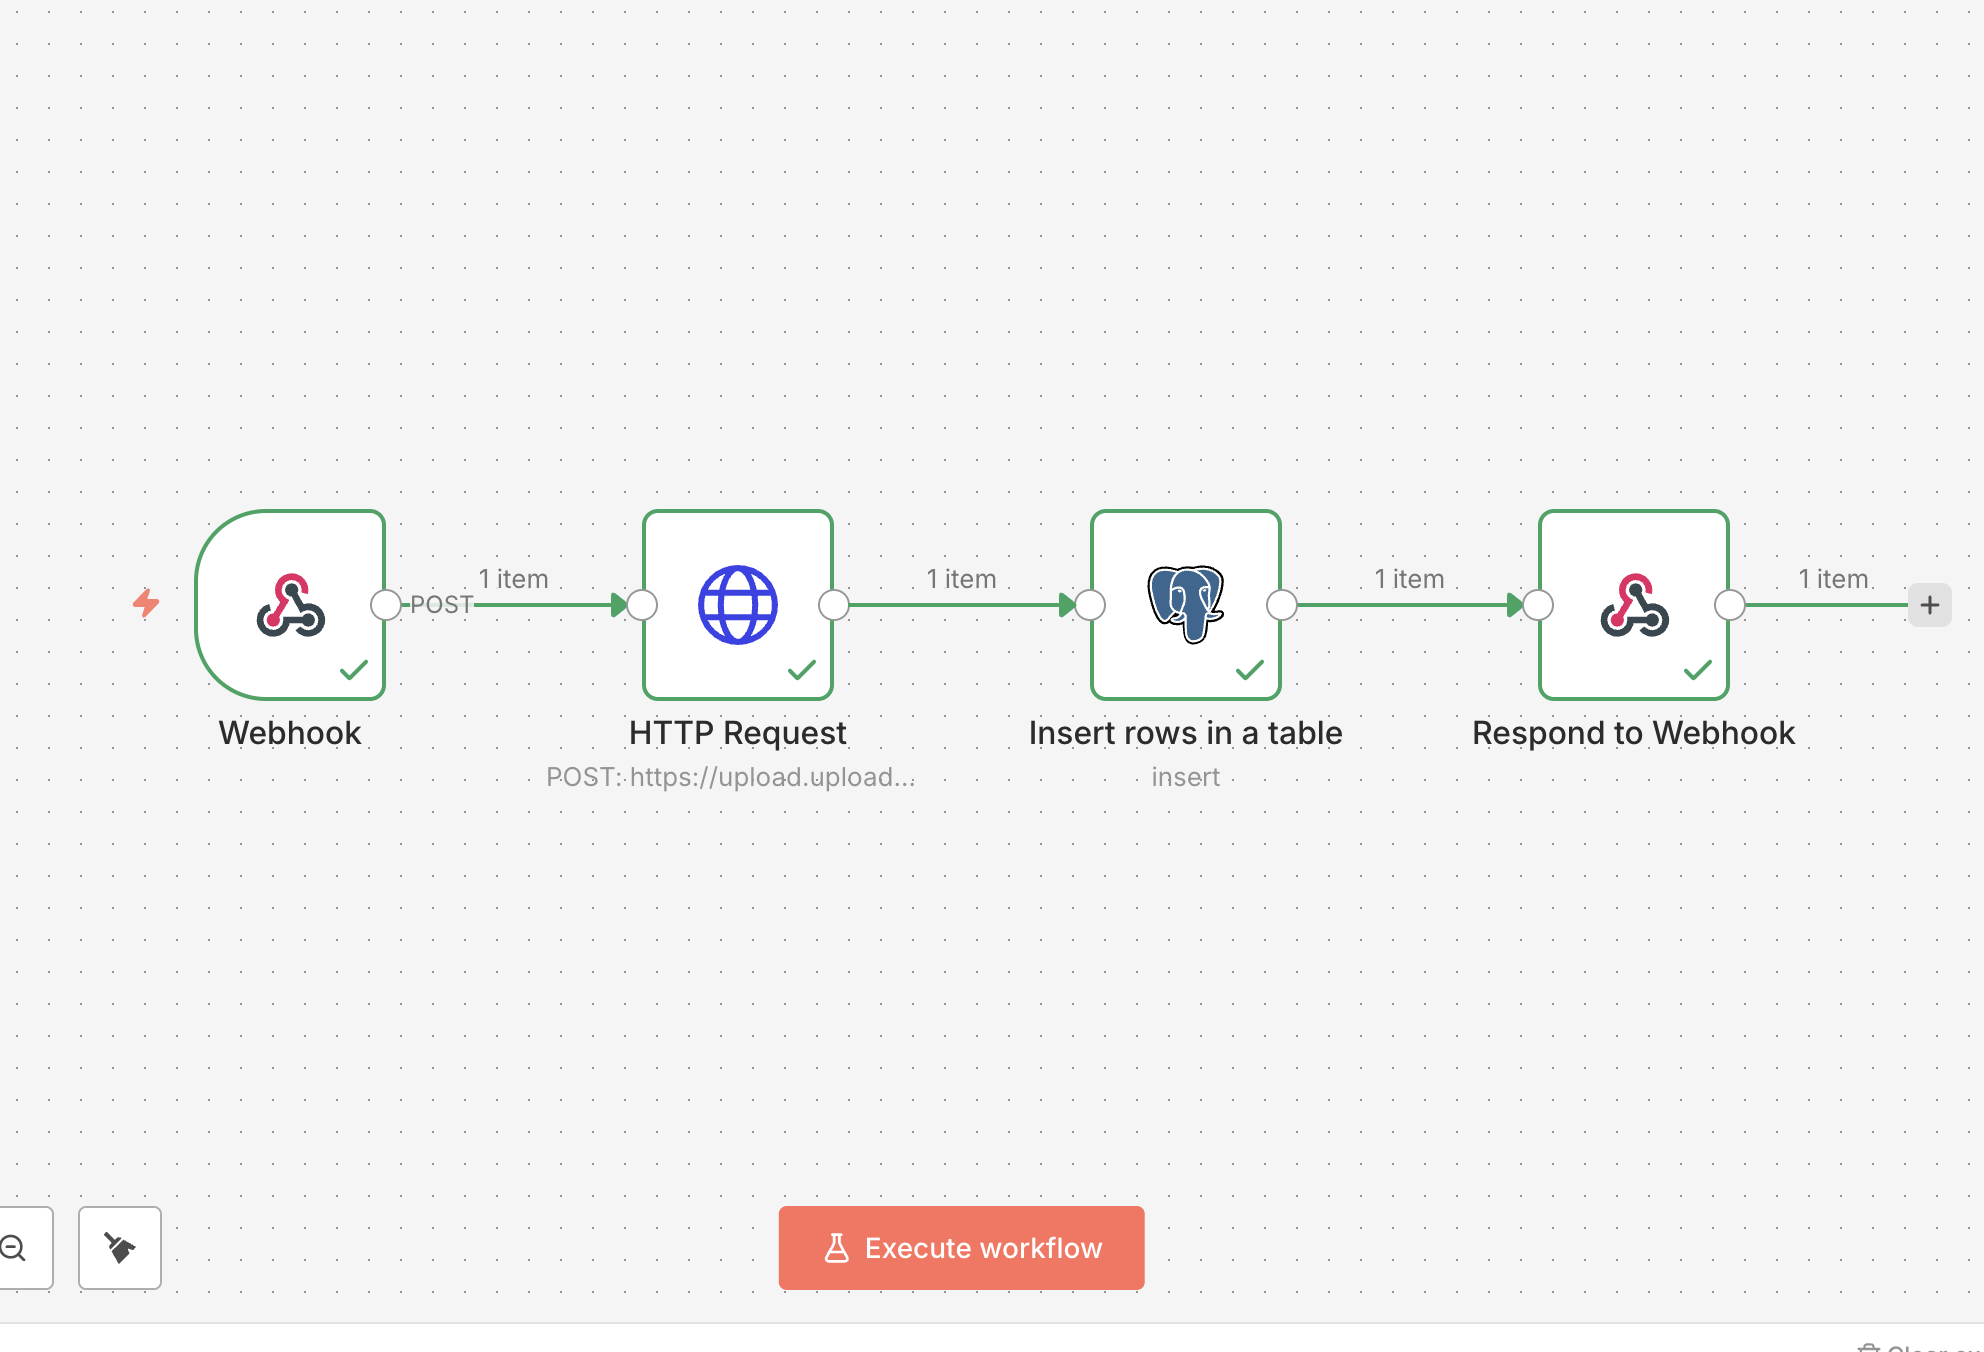
Here is an example of storing the CDN URL in a PostgreSQL database using the PostgreSQL node in n8n, along with other relevant file metadata from a previous Webhook node:
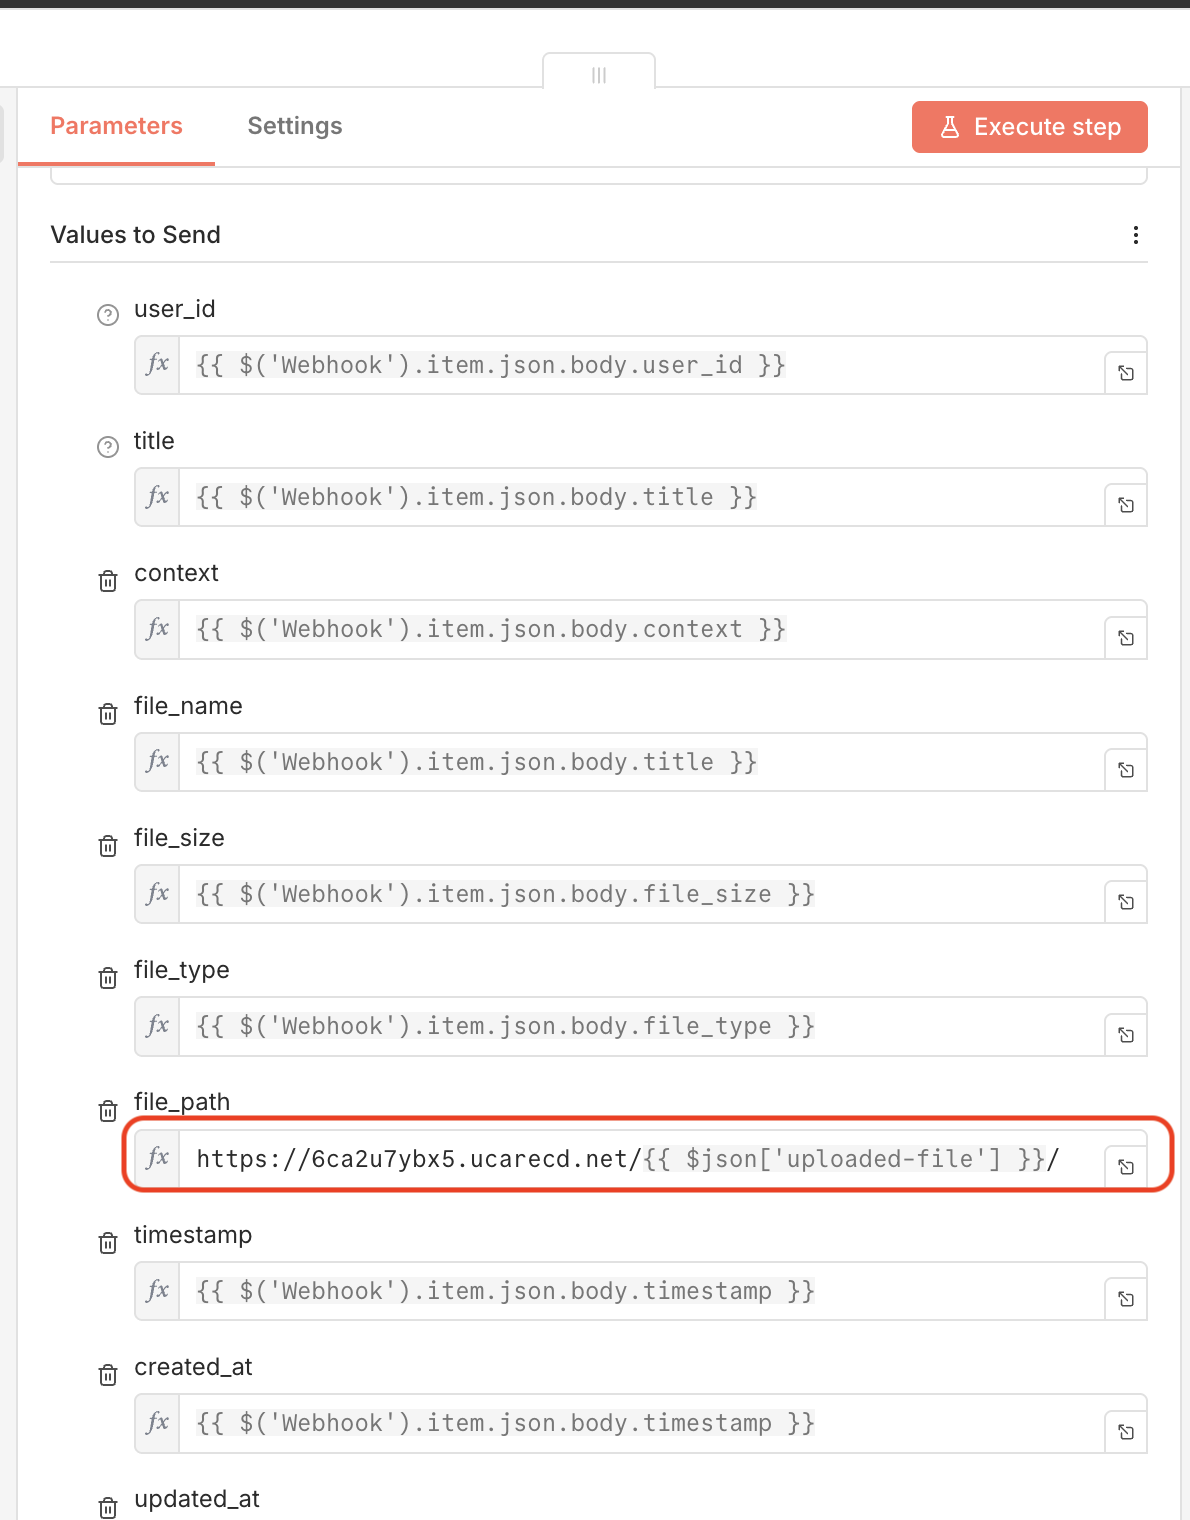 n8n PostgreSQL node storing Uploadcare file info
Return data to client (optional)
If you’re using the Webhook node to capture file uploads, you can use the Webhook Response node to send the CDN URL or a JSON response back to the client that uploaded the file. This is useful for confirming successful uploads and providing immediate access to the uploaded file.
To do this, add a Webhook Response node after processing the Uploadcare response and configure it to respond with all incoming data from the previous node.
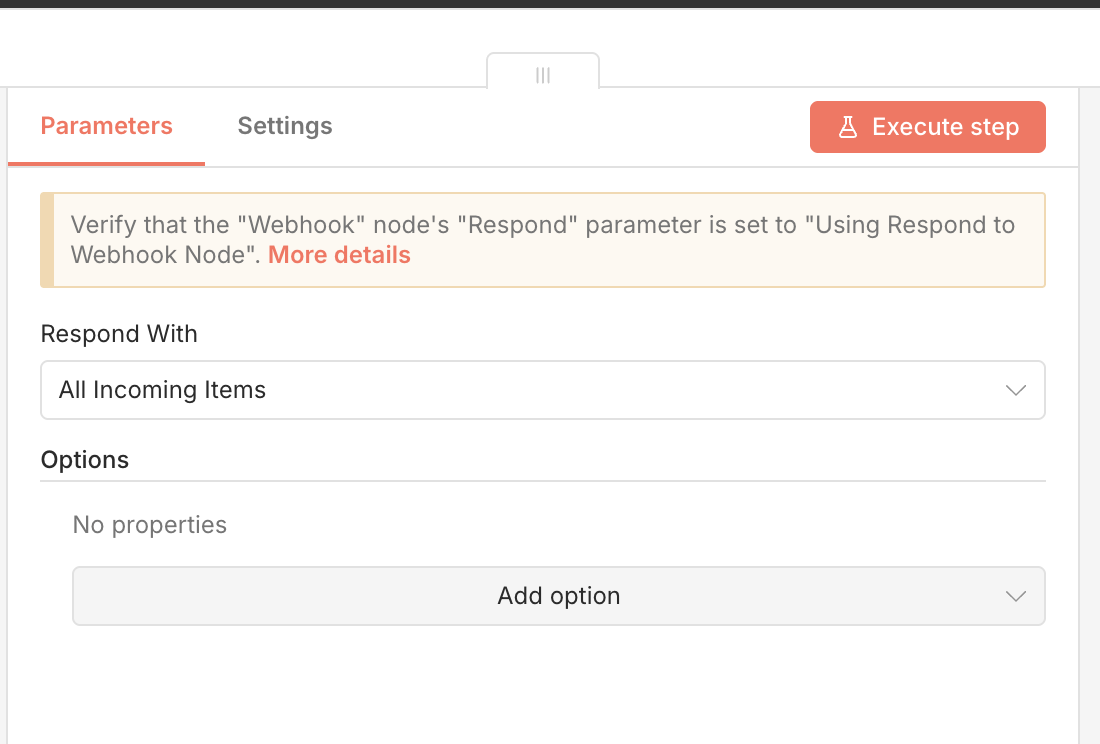 n8n Webhook Response node sending all items including Uploadcare CDN URL
Do note that you’ll also need to update the first Webhook node to respond with Using ’Respond to Webhook’ Node
enabled so that n8n knows to wait for the response from the Webhook Response node before completing the request.
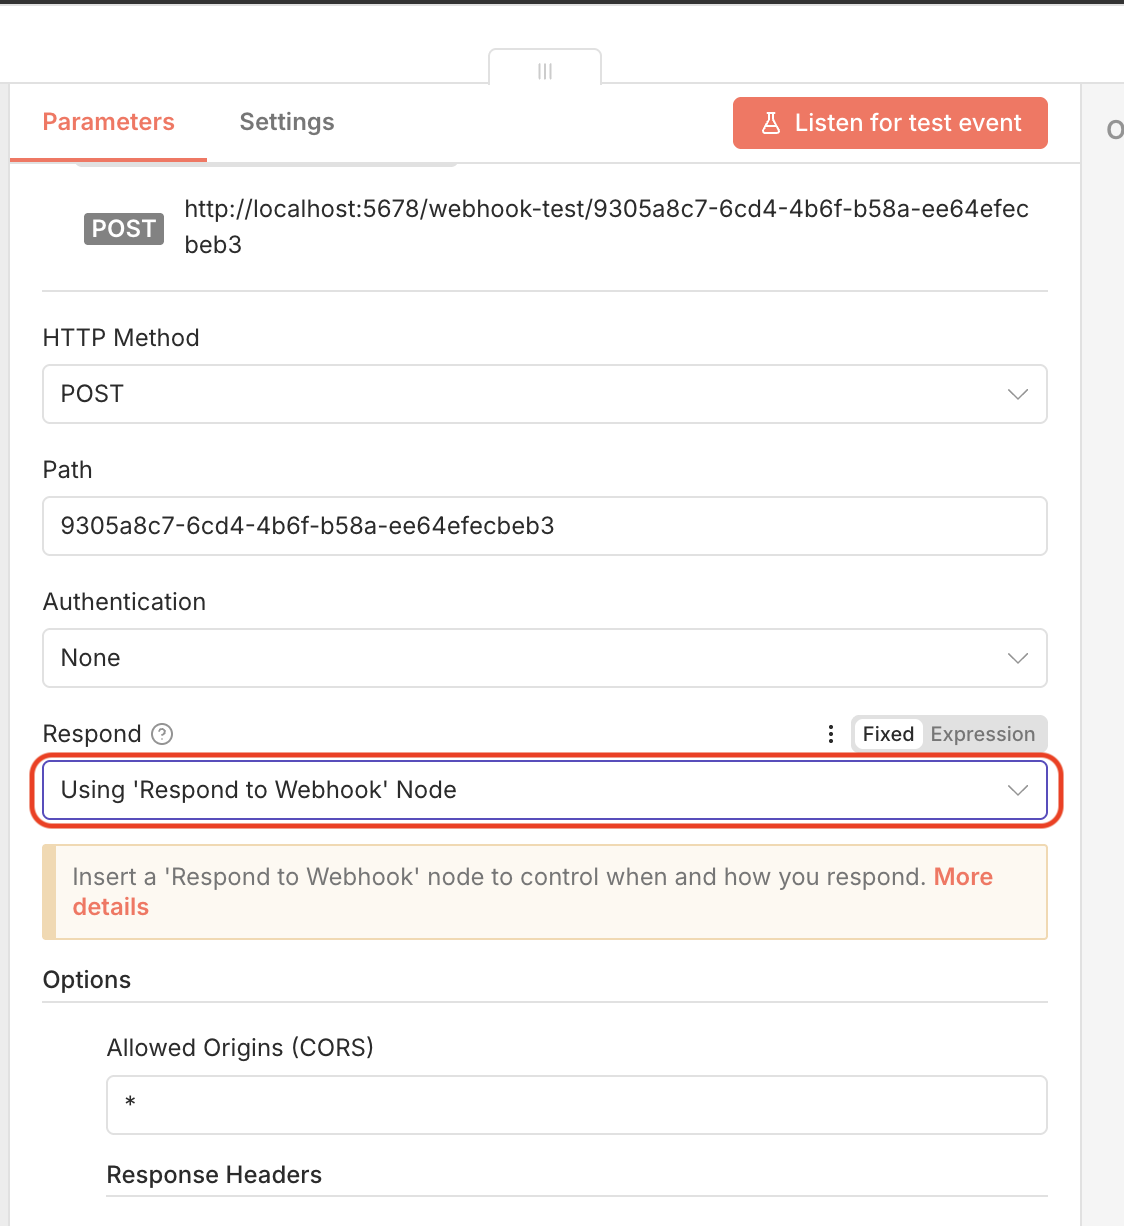 n8n Webhook node configured to use ’Respond to Webhook’ option
Running the workflow now will return the CDN URL and any other data back to the client that made the upload request.
Here is an example JSON response returned to the client:
[
{
"id": 4,
"user_id": "12345",
"title": "JBL Speaker",
"context": "product_listing",
"file_name": "JBL Speaker",
"file_size": 4990114,
"file_type": "image/jpeg",
"file_path": "https://6ca2u7ybx5.ucarecd.net/8e8a70f8-d826-4f9c-a1a4-7280deff014d/",
"timestamp": "2026-01-11T22:37:01.770Z",
"created_at": "2026-01-11T22:37:01.770Z",
"updated_at": "2026-01-12T22:59:22.315Z"
}
]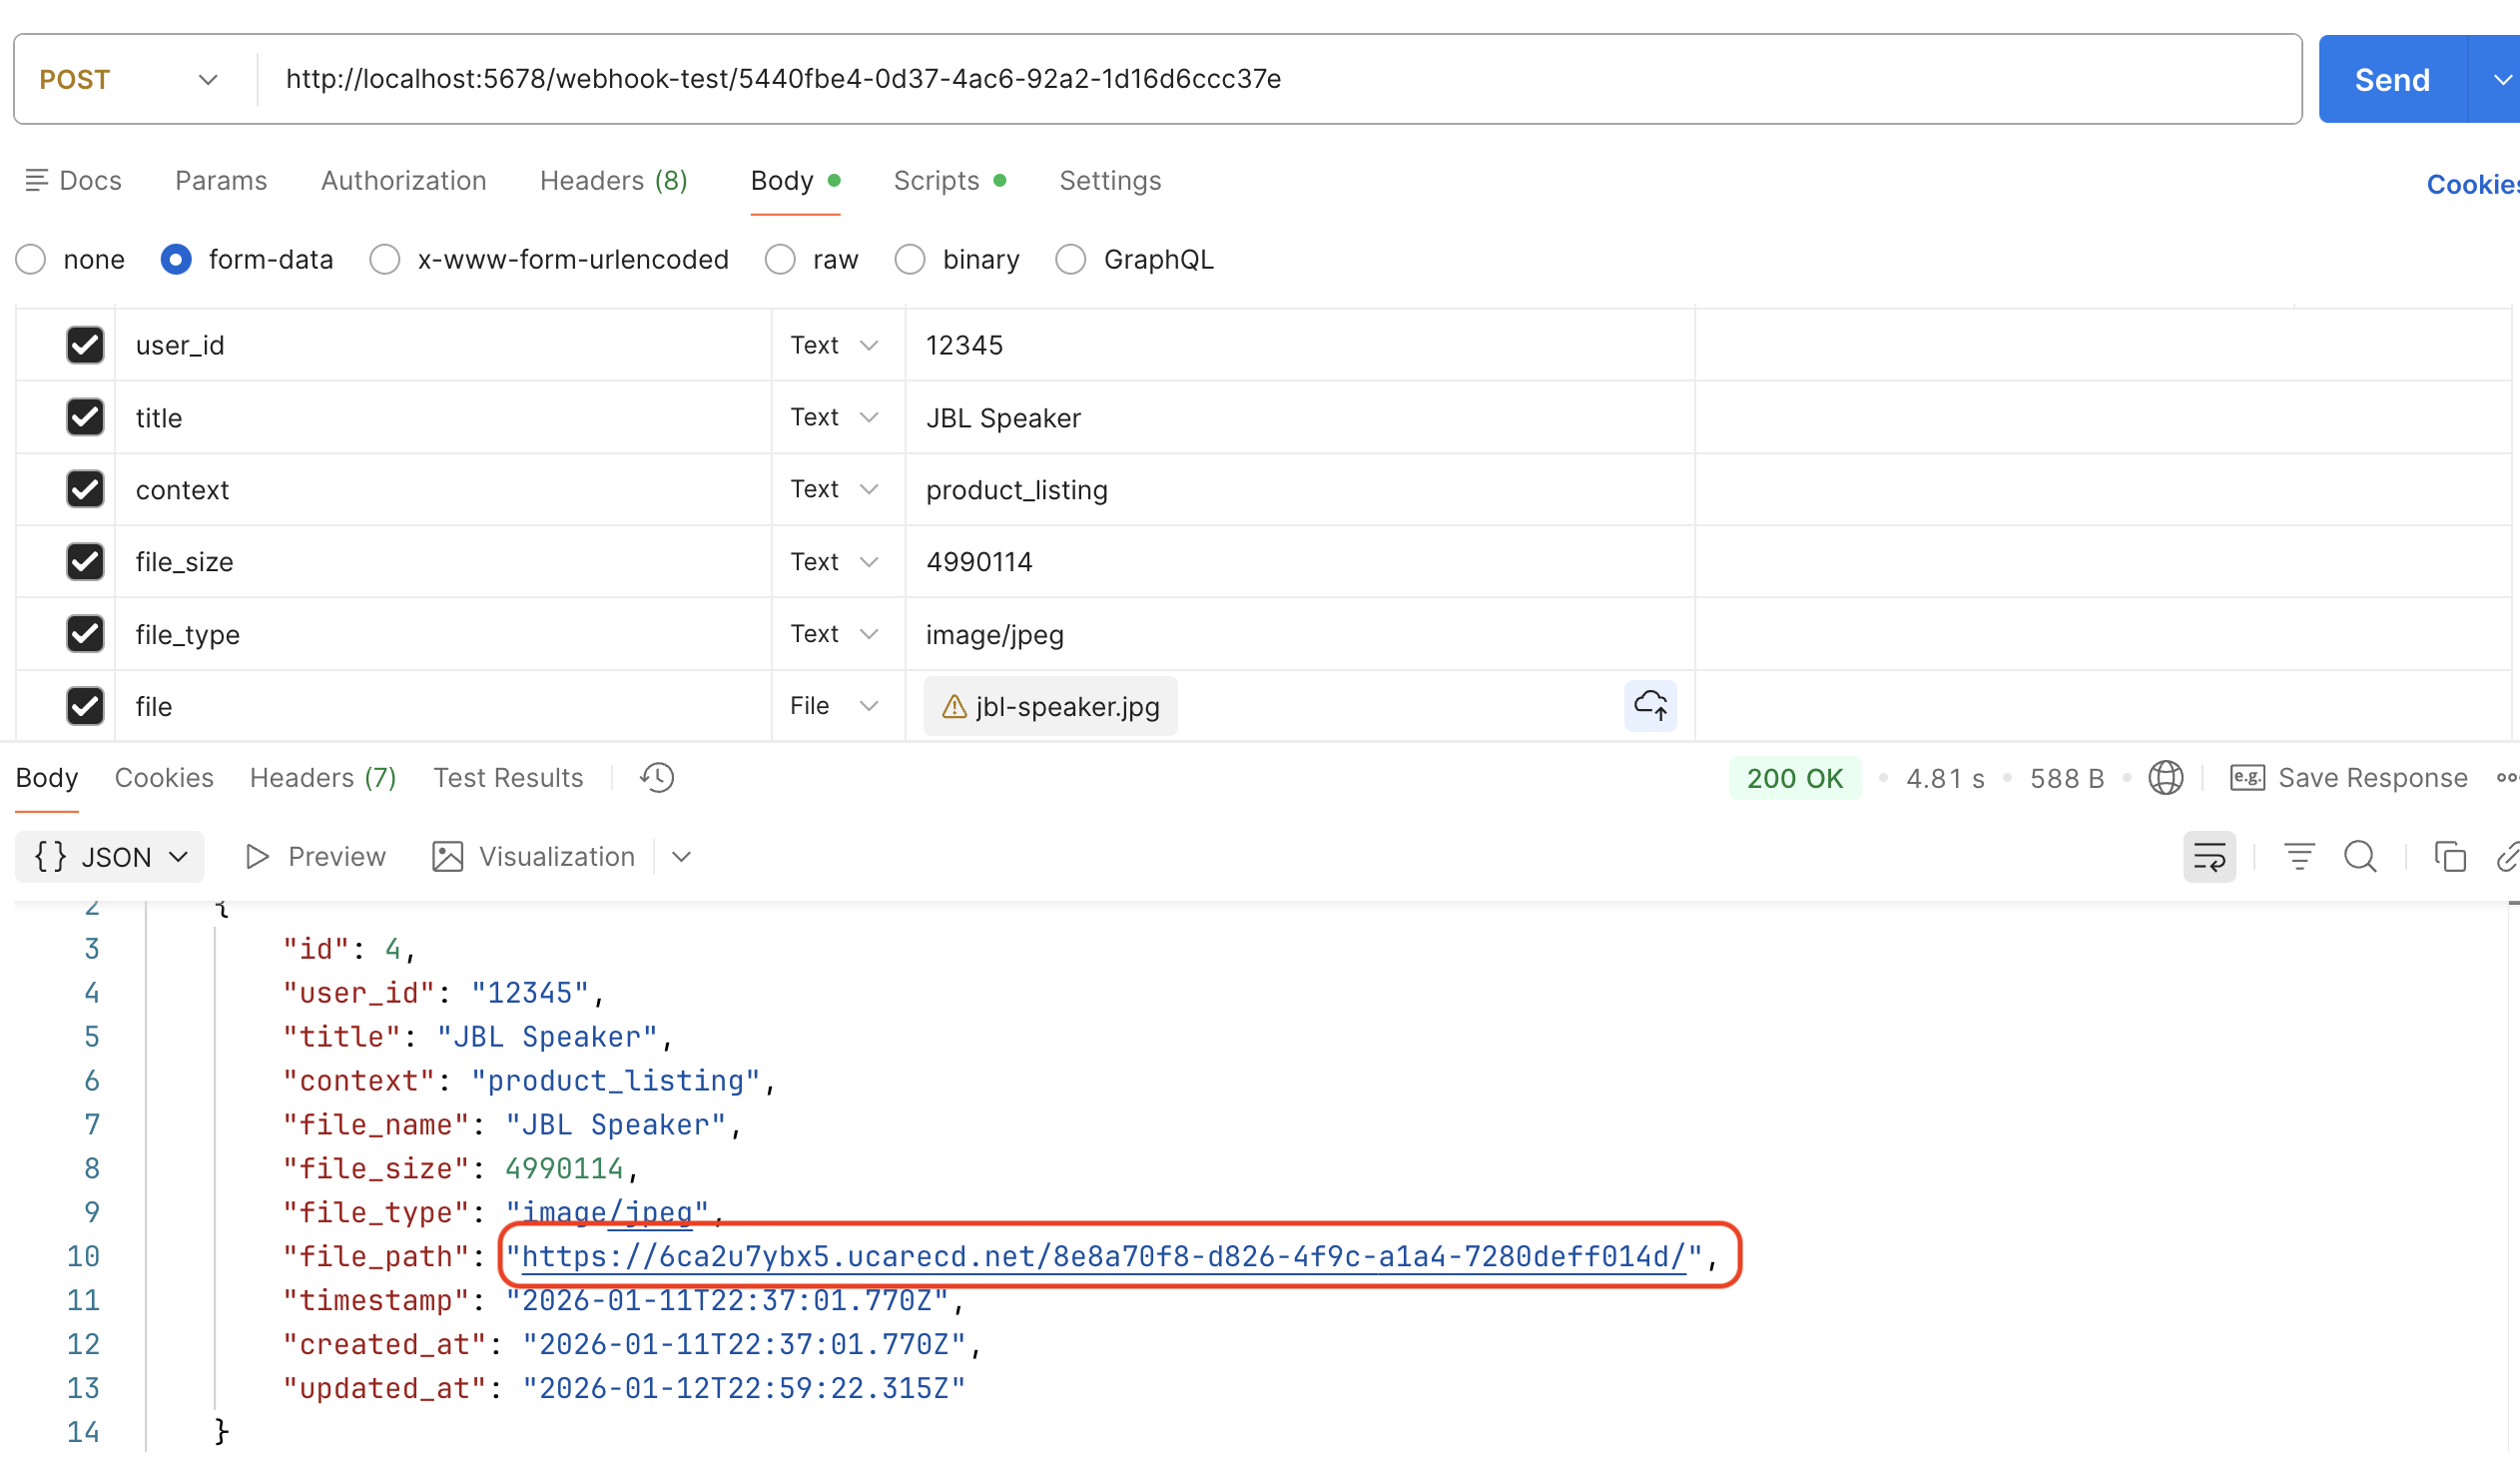 n8n Webhook Response node output showing JSON response with Uploadcare CDN URL
Optional enhancements
Image transformations with Uploadcare CDN
Uploadcare’s CDN offers image transformation capabilities through URL modifiers. By appending specific parameters to the CDN URL, you can easily resize, change format, and optimize images on-the-fly without needing to re-upload or store multiple versions of the same file.
For example, to resize an image to a width of 300 pixels, you can modify the CDN URL like this:
https://{PROJECT_SUBDOMAIN}.ucarecdn.com/{UUID}/-/resize/300x/This flexibility allows you to serve images tailored to different devices and screen sizes efficiently. For more details on available transformations and how to use them, refer to the Uploadcare CDN Transformations documentation.
Handling large files
By default, Uploadcare supports large file uploads by automatically handling chunked uploads behind the scenes. This means that when you upload a large file, Uploadcare breaks it into smaller chunks, uploads them individually, and then reassembles them on the Uploadcare servers.
Using the base upload endpoint at https://upload.uploadcare.com/base/, you can upload files up to 100 MB in a single request.
For files larger than this, consider using Uploadcare’s Multipart Upload API,
which offers more control over the upload process and provides for chunking large files.
Troubleshooting common Uploadcare and n8n file upload errors
Binary property not found
If you encounter an error indicating that the binary property is not found, it usually means that the binary property name you specified in the HTTP Request node does not match the name of the uploaded file in the previous node (Form Trigger or Webhook).
Some common pitfalls when working with binary data include:
- Using an incorrect binary property name that doesn’t match the uploaded file.
- Failing to pass a file, resulting in an empty binary object.
- Not inspecting the binary data properly, leading to confusion about file availability.
To resolve this:
- Double-check the output of the previous node to confirm the correct binary property name.
- Ensure that you have selected the correct binary property name in the HTTP Request node configuration.
multipart/form-data error
If you receive errors related to multipart/form-data, it often indicates that the request is not properly formatted.
Common issues include:
- Missing boundary definitions in the request headers.
- Incorrectly formatted requests that do not adhere to the
multipart/form-dataspecification. - Not mapping the file fields properly in n8n, leading to failed uploads.
- Failing to set the correct binary property name when configuring the Webhook node.
To fix these issues:
- Ensure that the HTTP Request node is set to use
Form-Dataas the body content type. - Verify that the file field is correctly mapped to the binary data from the previous node.
- If using the Webhook node, ensure that the incoming request is correctly formatted as
multipart/form-data.
Upload fails or times out
If the upload to Uploadcare fails or times out, it could be due to several reasons:
- Large files: Ensure that the file size does not exceed Uploadcare’s limits for single uploads.
- API limits: Check if you have reached any API rate limits imposed by Uploadcare.
- Slow connections: A slow internet connection can lead to timeouts. Try uploading smaller files or improving your connection speed.
Unauthorized or incorrect API key
If you encounter unauthorized errors or issues related to incorrect API keys,
ensure that you are using the correct Uploadcare public key for file uploads.
The public key should be included as form data in the UPLOADCARE_PUB_KEY field in the HTTP Request node.
Full workflow example
You can import the following n8n workflow JSON directly into your n8n instance to see a complete example of uploading files to Uploadcare.
Example JSON export
You can copy the complete workflow from this link:
Download n8n Uploadcare integration workflow JSON
Sample curl command
For testing the Webhook node with a file upload, you can use the following curl command:
curl --location 'http://localhost:5678/webhook-test/5440fbe4-0d37-4ac6-92a2-1d16d6ccc37e' \
  --form 'user_id="12345"' \
  --form 'title="JBL Speaker"' \
  --form 'context="product_listing"' \
  --form 'file_size="4990114"' \
  --form 'file_type="image/jpeg"' \
  --form 'file=@"/Users/codejagaban/Documents/products/jbl-speaker.jpg"' \
  --form 'timestamp="2026-01-13 22:37:01.77"'
Don’t forget to replace the URL with your actual n8n Webhook URL and the file path with the path to a file on your local machine.
Alternatively, you can use an API tool like Postman or Insomnia for testing your webhook URL.
Conclusion
In this guide, you’ve learned how to integrate Uploadcare with n8n to handle secure file uploads. By capturing files using either the Form Trigger or Webhook nodes, uploading them to Uploadcare via the HTTP Request node, and processing the returned CDN URL, you’ve set up a robust file upload workflow.
Now that you have a working integration, feel free to experiment with additional Uploadcare features such as image transformations, metadata handling, and large file uploads. The flexibility of n8n, combined with the powerful capabilities of Uploadcare, opens up numerous possibilities for automating your file management workflows.
FAQs
How do I send multipart/form-data in n8n?
You can send multipart/form-data in n8n by using the HTTP Request node and setting the Body Content Type to Form-Data.
Then, you can add fields and map binary files as needed.
How do I map binary files to Uploadcare?
In the HTTP Request node, add a new body parameter of type n8n Binary File, set the name to file,
and select the appropriate binary property name from the previous node that contains the uploaded file.
Where do I find the CDN URL in Uploadcare response?
The CDN URL can be constructed using the file’s UUID returned in the Uploadcare response.
The format is https://{PROJECT_SUBDOMAIN}.ucarecdn.com/{UUID}/.
How can I validate file types before upload?
You can use n8n’s Code node to validate file types before uploading them to Uploadcare. Check the file’s MIME type or extension in the binary data and proceed only if it matches your allowed types.
Does Uploadcare support large files in n8n workflows?
Yes, Uploadcare supports large file uploads. For files larger than 100 MB, consider using Uploadcare’s Multipart Upload API for better handling of large files in your n8n workflows.