Performance comparison: Uploadcare vs traditional REST API upload methods
When handling file uploads in an application, there is often the decision to choose between using a traditional REST API approach or leveraging a specialized file-handling solution like Uploadcare. The decision is not just about functionality but also performance, scalability, security, and ease of maintenance. While Traditional REST API methods require you to manage infrastructure and handle the whole file-uploading logic, Uploadcare provides a streamlined, cloud-based approach that simplifies the entire process.
In this article, we’ll compare Uploadcare’s APIs for file uploads with traditional API methods to help you decide which approach best suits your needs and when to use which.
Understanding how traditional REST API works
Uploading files via a REST API typically involves multiple steps, from selecting a file on the frontend to processing it on the backend. The process ensures that files are properly received, validated, and stored securely.
At a high level, this involves:
- A file uploader that allows users to select a file.
- A backend server that listens for incoming file uploads.
- Processing logic to validate and store the file safely.
Let’s see how this works in action by creating a simple file uploader that upload images to a Node.js server.
Setting up the server
To ensure that the file uploader can send files to the server, you first need to set up a server that is ready to receive a file.
The code below is a simple server in Node.js using express and multer
that accepts image file uploads and saves them to the server’s disk.
import express from 'express';
import multer from 'multer';
import path from 'path';
import fs from 'fs';

const app = express();
const PORT = 3000;

// Ensure necessary directories exist
const uploadDir = './uploads';

fs.mkdirSync(uploadDir, { recursive: true });

// Middleware to parse JSON body
app.use(express.json());

// Serve static files
app.use(express.static('public'));
app.use('/uploads', express.static('uploads'));

// Set up storage engine for multer
const storage = multer.diskStorage({
  // Directory to save uploaded files
  destination: './uploads',
  filename: (req, file, cb) => {
    // Unique file name
    cb(null, `${Date.now()}-${file.originalname}`);
  },
});

// Initialize upload middleware
const upload = multer({
  storage,
  limits: { fileSize: 20 * 1024 * 1024 }, // 20 MB per file
  fileFilter: (req, file, cb) => {
    const fileTypes = /jpeg|jpg|png|gif/;
    const extName = path.extname(file.originalname).toLowerCase();
    const isValid = fileTypes.test(extName) && fileTypes.test(file.mimetype);

    isValid ? cb(null, true) : cb(new Error('Only images are allowed'));
  },
});


// File upload endpoint
app.post('/upload', upload.single('file'), (req, res) => {
  if (req.file) {
    res.status(200).send(`File uploaded successfully: ${req.file.filename}`);
  } else {
    res.status(400).send('File upload failed');
  }
});

// Error handling for file upload
app.use((err, req, res, next) => {
  if (err) {
    res.status(400).send(err.message);
  } else {
    next();
  }
});

// Start server
app.listen(PORT, () => {
  console.log(`🚀 Server running on http://localhost:${PORT}`);
});
That’s quite a bit of a setup to handle a single file upload, isn’t it? But let’s break it down so it all makes sense:
-
First, the code sets up a storage engine for
multerthat specifies where to save the uploaded files and how to name them (inside an/uploadsdirectory with a unique timestamp). -
Next, it initializes the
multermiddleware with the storage engine, a file size limit of 20 MB, and a file type filter that only accepts images (based on the file extension and MIME type). -
Then it creates a POST endpoint
/uploadthat uses themultermiddleware to handle file uploads. Theupload.single('file')middleware specifies that only one file with the field namefilecan be uploaded. -
The endpoint checks if a file was successfully uploaded and sends a success or failure response accordingly.
-
Finally, it adds error handling middleware to catch any
multererrors and send appropriate responses.
With this in place, your server is now ready to receive file uploads from the file uploader on the frontend.
A typical file uploader on the frontend might look like this:
<html>
  <body>
    <h2>Upload a File</h2>
    <input type="file" id="fileInput">
    <button onclick="uploadFile()">Upload</button>

    <div>
      <span>Progress:</span>
      <progress id="progressBar" value="0" max="100"></progress>
    </div>

    <p id="status"></p>

    <script>
      async function uploadFile() {
        const fileInput = document.getElementById('fileInput');
        const progressBar = document.getElementById('progressBar');
        const status = document.getElementById('status');

        if (!fileInput.files.length) {
          status.innerText = 'Please select a file.';
          return;
        } else {
          status.innerText = 'Uploading...';
        }

        const file = fileInput.files[0];
        const formData = new FormData();
        formData.append('file', file);

        const xhr = new XMLHttpRequest();
        xhr.open('POST', '/upload', true);

        // Track upload progress
        xhr.upload.onprogress = (event) => {
          if (event.lengthComputable) {
            progressBar.value = (event.loaded / event.total) * 100;
          }
        };

        xhr.onload = () => {
          if (xhr.status === 200) {
            status.innerText = 'Upload successful!';
          } else {
            status.innerText = 'Upload failed!';
          }
        };

        xhr.onerror = () => {
          status.innerText = 'Error uploading file.';
        };

        xhr.send(formData);
      }
    </script>
  </body>
</html>
The code above:
- Creates an input element for selecting a file and a button to trigger the upload.
- Defines a progress bar and status message elements to show the upload progress and status.
- Defines a function
uploadFilethat handles the file upload process. - Checks if a file is selected and creates a FormData object with the file data.
- Sends a POST request to the
/uploadendpoint on the server with the file data. - Tracks the upload progress and updates the progress bar accordingly.
- Displays a success or failure message based on the upload response.
Uploading multiple files
At this point, there’s a file uploader that can send a file and a server listening to receive that file. But what if you want to upload multiple files at once? You’d need to modify the frontend code to allow users to select multiple files and send them to the server in a single request.
First update the server code to handle multiple file uploads:
// Update the upload endpoint to accept multiple files
app.post('/upload', upload.array('files', 5), (req, res) => {
  if (req.files && req.files.length > 0) {
    const fileNames = req.files.map(file => file.filename);
    res.status(200).json({ files: fileNames });
  } else {
    res.status(400).send('File upload failed');
  }
});
Next, update the frontend code to allow users to select multiple files, to do this you first need to update the HTML section:
<input type="file" id="fileInput" multiple>
<button onclick="uploadFiles()">Upload</button>

<progress id="progressBar" value="0" max="100"></progress>
<p id="status"></p>

<div id="uploadedFiles"></div>
Then update the JavaScript section to handle multiple file uploads:
async function uploadFiles() {
  const fileInput = document.getElementById('fileInput');
  const progressBar = document.getElementById('progressBar');
  const status = document.getElementById('status');
  const uploadedFilesDiv = document.getElementById('uploadedFiles');

  if (!fileInput.files.length) {
    status.innerText = 'Please select files.';
    return;
  }

  const files = fileInput.files;
  const formData = new FormData();
  for (let i = 0; i < files.length; i++) {
    // Use 'files' as key (must match Express multer)
    formData.append('files', files[i]);
  }

  const xhr = new XMLHttpRequest();
  xhr.open('POST', '/upload', true);

  // Track upload progress
  xhr.upload.onprogress = (event) => {
    if (event.lengthComputable) {
      progressBar.value = (event.loaded / event.total) * 100;
    }
  };

  xhr.onload = () => {
    if (xhr.status === 200) {
      const response = JSON.parse(xhr.responseText);
      status.innerText = 'Upload successful!';

      // Show uploaded images
      uploadedFilesDiv.innerHTML = '';
      response.files.forEach(filename => {
        const img = document.createElement('img');
        img.src = `/uploads/${filename}`;
        img.style.maxWidth = '150px';
        img.style.margin = '5px';
        uploadedFilesDiv.appendChild(img);
      });
    } else {
      status.innerText = 'Upload failed!';
    }
  };

  xhr.onerror = () => {
    status.innerText = 'Error uploading files.';
  };

  xhr.send(formData);
}
Handling network interruptions
Say a user was uploading a file, and their network connection dropped. How would you handle this scenario?
When using a traditional REST API, you’d need to implement a custom solution to handle network interruptions and resume uploads. This could involve saving the upload progress on the client side and sending it back to the server when the connection is restored.
Let’s implement a simple solution to handle network interruptions and resume uploads when making an upload request to the server.
To do this, update the script in the frontend code:
async function uploadFiles() {
  const fileInput = document.getElementById('fileInput');
  const progressBar = document.getElementById('progressBar');
  const status = document.getElementById('status');
  const uploadedFilesDiv = document.getElementById('uploadedFiles');

  if (!fileInput.files.length) {
    status.innerText = 'Please select files.';
    return;
  }

  const files = fileInput.files;
  const formData = new FormData();

  for (let i = 0; i < files.length; i++) {
    formData.append('files', files[i]);
  }

  let retries = 3; // Number of retry attempts
  let success = false;

  while (retries > 0 && !success) {
    try {
      const response = await fetchWithProgress('/upload', formData, progressBar);

      if (!response.ok) throw new Error(`Upload failed with status ${response.status}`);

      const data = await response.json();
      status.innerText = 'Upload successful!';
      success = true;

      // Display uploaded images
      uploadedFilesDiv.innerHTML = '';
      data.files.forEach(filename => {
        const img = document.createElement('img');
        img.src = `/uploads/${filename}`;
        img.style.maxWidth = '150px';
        img.style.margin = '5px';
        uploadedFilesDiv.appendChild(img);
      });
    } catch (error) {
      retries--;

      if (retries === 0) {
          status.innerText = 'Upload failed after multiple attempts.';
      } else {
          status.innerText = `Upload failed. Retrying... (${3 - retries} of 3)`;
      }
    }
  }
}

// Function to handle fetch with progress tracking
async function fetchWithProgress(url, formData, progressBar) {
  return new Promise((resolve, reject) => {
    const xhr = new XMLHttpRequest();
    xhr.open('POST', url, true);

    xhr.upload.onprogress = (event) => {
      if (event.lengthComputable) {
        progressBar.value = (event.loaded / event.total) * 100;
      }
    };

    xhr.onload = () => {
      if (xhr.status === 200) {
        resolve(new Response(xhr.responseText, { status: 200 }));
      } else {
        reject(new Error(`Upload failed with status ${xhr.status}`));
      }
    };

    xhr.onerror = () => {
      reject(new Error('Network error occurred'));
    };

    xhr.send(formData);
  });
}
The code above:
- Adds a
fetchWithProgressfunction to handle fetch requests with progress tracking. - Implements a retry mechanism to handle network interruptions and resume uploads.
- Displays a status message indicating the upload progress and success/failure.
With this implementation, the file uploader can handle network interruptions and retry uploads up to 3 times before displaying a failure message. If the connection is restored, the upload will resume from where it left off.
Despite this solution, some edge cases and complexities may pop up, potentially causing the upload to fail during network interruptions. This is where a specialized file-handling solutions like Uploadcare can provide a more robust and reliable approach to file uploads.
Handling large files
Large files can be a challenge to upload using traditional REST API methods. You’d need to consider the server’s memory and disk space limitations and the user’s network bandwidth.
Even with all of these considerations, you still have to ensure the file is uploaded successfully without interruptions.
An effective way to handle large files is to split them into smaller chunks and upload them. This can help optimize the upload process and reduce the chances of network interruptions.
Using the code below, update the server code to handle large files by splitting them into chunks and uploading them:
import express from 'express';
import multer from 'multer';
import path from 'path';
import fs from 'fs';

const app = express();
const PORT = 3000;

// Ensure necessary directories exist
const uploadDir = './uploads';
const tempDir = './uploads/temp';

fs.mkdirSync(uploadDir, { recursive: true });
fs.mkdirSync(tempDir, { recursive: true });

// Middleware to parse JSON body
app.use(express.json());

// Serve static files
app.use(express.static('public'));
app.use('/uploads', express.static('uploads'));

// Multer setup for chunk uploads
const storage = multer.diskStorage({
  destination: tempDir,
  filename: (req, file, cb) => {
    // Extract from headers
    const filename = req.headers['x-filename'];
    const chunkIndex = req.headers['x-chunk-index'];

    if (!filename || typeof chunkIndex === 'undefined') {
      return cb(new Error('Invalid chunk metadata'), null);
    }
    cb(null, `${filename}-chunk-${chunkIndex}`);
  },
});

const upload = multer({ storage });

// Handle chunk upload
app.post('/upload-chunk', (req, res, next) => {
  upload.single('chunk')(req, res, (err) => {
    if (err) {
      console.error('❌ Chunk upload error:', err.message);
      return res.status(400).json({ error: 'File chunk upload failed' });
    }

    const filename = req.headers['x-filename'];
    const chunkIndex = req.headers['x-chunk-index'];

    console.log(`✅ Chunk ${chunkIndex} received for ${filename}`);

    res.status(200).json({ message: `Chunk ${chunkIndex} uploaded` });
  });
});

// Merge chunks once all are uploaded
app.post('/merge-chunks', async (req, res) => {
  const { filename, totalChunks } = req.body;
  if (!filename || !totalChunks) {
    return res.status(400).json({ error: 'Invalid merge request' });
  }

  const finalFilePath = path.join(uploadDir, filename);
  const writeStream = fs.createWriteStream(finalFilePath);

  let chunkIndex = 0;

  try {
    for (; chunkIndex < totalChunks; chunkIndex++) {
      const chunkPath = path.join(tempDir, `${filename}-chunk-${chunkIndex}`);

      if (!fs.existsSync(chunkPath)) {
        throw new Error(`Chunk ${chunkIndex} is missing`);
      }

      // Append chunk to final file
      const chunkData = fs.readFileSync(chunkPath);
      writeStream.write(chunkData);

      console.log(`🔗 Merging chunk ${chunkIndex} for ${filename}`);
    }

    // Close write stream and cleanup chunks
    writeStream.end();
    writeStream.on('finish', () => {
      cleanupChunks(filename, totalChunks);
      console.log(`🎉 File ${filename} successfully merged!`);
      res.status(200).json({ message: `File ${filename} uploaded successfully!` });
    });

  } catch (error) {
    console.error(`❌ Error merging chunks: ${error.message}`);
    res.status(500).json({ error: `Failed to merge file: ${error.message}` });
  }
});

// Cleanup chunks after merging
function cleanupChunks(filename, totalChunks) {
  for (let i = 0; i < totalChunks; i++) {
    const chunkPath = path.join(tempDir, `${filename}-chunk-${i}`);
    fs.unlink(chunkPath, (err) => {
      if (err) console.error(`⚠️ Failed to delete chunk ${i}:`, err);
    });
  }
}

// Error handling
app.use((err, req, res, next) => {
  console.error(`❌ Server error: ${err.message}`);
  res.status(400).send(err.message);
});

// Start server
app.listen(PORT, () => {
  console.log(`🚀 Server running on http://localhost:${PORT}`);
});
The code above:
- Handles chunked file uploads by splitting large files into smaller chunks and saving them to a temporary directory (uploads/temp).
- Provides an endpoint
/upload-chunkto receive and save file chunks. - Implements an endpoint
/merge-chunksto merge all file chunks into a single file once all chunks are uploaded.
And update the frontend code to split large files into chunks and upload them one after the other:
async function uploadFiles() {
  const fileInput = document.getElementById('fileInput');
  const progressBar = document.getElementById('progressBar');
  const status = document.getElementById('status');
  const uploadedFilesDiv = document.getElementById('uploadedFiles');

  if (!fileInput.files.length) {
    status.innerText = 'Please select files.';
    return;
  }

  const files = fileInput.files;
  const chunkSize = 2 * 1024 * 1024; // 2 MB chunk size
  status.innerText = 'Uploading...';

  for (let file of files) {
    const totalChunks = Math.ceil(file.size / chunkSize);
    const filename = `${Date.now()}-${file.name}`;
    let uploadedChunks = 0;

    for (let chunkIndex = 0; chunkIndex < totalChunks; chunkIndex++) {
      const start = chunkIndex * chunkSize;
      const end = Math.min(start + chunkSize, file.size);
      const chunk = file.slice(start, end);

      let retries = 3;
      let success = false;

      while (retries > 0 && !success) {
        try {
          await uploadChunk(chunk, chunkIndex, filename, totalChunks);
          uploadedChunks++;
          progressBar.value = (uploadedChunks / totalChunks) * 100;
          success = true;
        } catch (error) {
          retries--;

          if (retries === 0) {
            status.innerText = 'Upload failed after multiple attempts.';
          } else {
            status.innerText = `Upload failed. Retrying... (${3 - retries} of 3)`;
          }
        }
      }
    }

    try {
      await mergeChunks(filename, totalChunks);
      status.innerText = `Upload successful: ${file.name}`;
    } catch (error) {
      status.innerText = `Upload failed while merging chunks: ${error.message}`;
      console.error('Error merging file chunks:', error);
    }

    // Display uploaded image
    const img = document.createElement('img');
    img.src = `/uploads/${filename}`;
    img.style.maxWidth = '150px';
    img.style.margin = '5px';
    uploadedFilesDiv.appendChild(img);
  }
}

async function uploadChunk(chunk, chunkIndex, filename) {
  const formData = new FormData();

  // Multer expects 'chunk' as a key
  formData.append('chunk', chunk);

  return new Promise((resolve, reject) => {
    const xhr = new XMLHttpRequest();
    xhr.open('POST', '/upload-chunk', true);

    // Set chunk metadata as headers
    xhr.setRequestHeader('X-Filename', filename);
    xhr.setRequestHeader('X-Chunk-Index', chunkIndex);

    xhr.upload.onprogress = (event) => {
      if (event.lengthComputable) {
        console.log(`Chunk ${chunkIndex}: ${(event.loaded / event.total) * 100}% uploaded`);
      }
    };

    xhr.onload = () => {
      if (xhr.status === 200) {
        resolve();
      } else {
        reject(new Error(`Chunk ${chunkIndex} failed`));
      }
    };

    xhr.onerror = () => {
      reject(new Error('Network error occurred'));
    };

    xhr.send(formData);
  });
}

// Merge chunks after all are uploaded
async function mergeChunks(filename, totalChunks) {
  const response = await fetch('/merge-chunks', {
    method: 'POST',
    headers: { 'Content-Type': 'application/json' },
    body: JSON.stringify({ filename, totalChunks }),
  });

  if (!response.ok) {
    throw new Error('Failed to merge chunks');
  }
}
The code above:
- Splits large files into chunks of 2 MB each and uploads them one by one.
- Implements an
uploadChunkfunction to upload file chunks to the server. - Implements a
mergeChunksfunction to merge all file chunks into a single file once all chunks are uploaded.
Notable issues with using traditional REST API implementation
While a lot of the file uploading process can been handled using the code you’ve written, there are some notable issues that can arise when users try to upload files using this method. Some of these issues include:
Potential security risks for file uploading
Say a hacker is able to uploads a file with the same name and extension as one you already have, which results in some very serious problems. The new file overwrites the existing one and the chaos begins. Using the malicious file, the hacker can launch an attack on your server, change security settings, crash your website, or open a faster path for future malware uploads.
Another security issue is file extension manipulations. Attackers can easily rename a malicious .exe file to .jpeg or any other allowed and commonly used file extension to sneak a virus into the server unnoticed.
Large file issues
So, you’ve set up file uploads and even implemented chunking — great! But what happens when a user tries to upload a 1 GB file? Or a 10 GB file? Or even larger? Large files can consume a lot of server resources and bandwidth, leading to slow uploads and potential server crashes. You’d need to implement additional logic to handle large files efficiently.
You’d also need to ensure your server is set up to scale large data file.
Other common issues
Some other issues you might encounter when using traditional REST API methods for file uploads include:
-
Multiple users trying to upload various files at once: Imagine a flood of users trying to upload files all at once — your server might feel like it’s drowning in requests! Since traditional REST API uploads rely on keeping connections open until a file is fully transferred, your server can quickly become overwhelmed, leading to delays, dropped uploads, or even crashes.
-
Scalability issues: As your app grows, so do the number (and size!) of file uploads. A small, personal project might be fine with REST API uploads, but when you start handling gigabytes of user-generated content, things get tricky.
- Can your server handle spikes in traffic without slowing down?
- What happens when multiple large files are being uploaded at once?
- Is your storage solution optimized to scale with demand?
-
Time-consuming implementation and maintenance: Building a reliable, secure, and efficient file upload system isn’t just about writing a quick API endpoint — it’s a long-term commitment. You’ll need to:
- Optimize for performance (handling large files without clogging memory)
- Ensure security (preventing malicious uploads, validating file types, and handling storage properly)
- Implement error handling (handling timeouts, incomplete uploads, and retries)
- Monitor and scale (logging, tracking upload speeds, and optimizing for high traffic)
If not planned well, maintaining your file upload system can turn into a full-time job you never signed up for! 😅
If you’re interested in making a file uploader with security measures set in place we have a video tutorial just for you! It walks you through everything you need to know, file validation, MIME type checking, file renaming, application-level mapping and lots more.
The Uploadcare approach
Uploadcare offers a different approach to file uploading that can address a lot of the issues faced with traditional REST API methods. It provides a file uploader widget that comes built and all of the features you’ve implemented in this article and more. The File Uploader uses Uploadcare’s REST API to upload files directly to the Uploadcare servers, these files are then pushed to the Uploadcare CDN making them readily available to be utilized either as or to apply on the fly transformation for optimization.
Let’s dive into how the File Uploader is implemented to help you handle files more efficiently.
Uploading multiple files
The File Uploader handles multiple file uploads seamlessly. Users can select multiple files at once and upload them in a single request. It does this by uploading files concurrently in parallel making it easy for users to upload multiple files at once.
The uploader begins by allowing users to select multiple files, creating an entry for each file with a unique identifier (UUID) to track its progress. It performs pre-upload checks, ensuring that files meet the required format and size restrictions while enforcing any file upload limits.
Once the upload process starts, Uploadcare uploads multiple files in parallel, significantly reducing the total upload time compared to traditional single-file upload methods. Users can track the upload status in real-time through progress indicators that update dynamically as each file progresses. If any errors occur — such as an unsupported file type or network failure — the affected file is marked as failed, with the option to retry or remove it from the queue.
This is a code sample from the File Uploader that demonstrates how multiple files are uploaded concurrently:
import { uploadFile } from '@uploadcare/upload-client';

export class FileItem extends UploaderBlock {
  constructor() {
    super();

    this.init$ = {
      uid: '',
      itemName: '',
      progressValue: 0,
      progressVisible: false,
      isUploading: false,
      state: FileItemState.IDLE,
      onUpload: () => {
        this.upload();
      },
    };
  }

  async upload() {
    let entry = this._entry;

    if (!this.uploadCollection.read(entry.uid)) {
      return;
    }

    if (entry.getValue('fileInfo') || entry.getValue('isUploading') || entry.getValue('errors').length > 0) {
      return;
    }

    this._debouncedCalculateState();
    entry.setValue('isUploading', true);
    entry.setValue('errors', []);

    try {
      let abortController = new AbortController();
      entry.setValue('abortController', abortController);

      const uploadTask = async () => {
        let file = entry.getValue('file');
        if (file && this.cfg.imageShrink) {
          file = await this._processShrink(file).catch(() => file);
        }

        const fileInput = file || entry.getValue('externalUrl') || entry.getValue('uuid');
        const uploadClientOptions = {
          fileName: entry.getValue('fileName'),
          source: entry.getValue('source'),
          onProgress: (progress) => {
            if (progress.isComputable) {
              let percentage = progress.value * 100;
              entry.setValue('uploadProgress', percentage);
            }
          },
          signal: abortController.signal,
        };
        return uploadFile(fileInput, uploadClientOptions);
      };

      let fileInfo = await this.$['*uploadQueue'].add(uploadTask);
      entry.setMultipleValues({
        fileInfo,
        isUploading: false,
        fileName: fileInfo.originalFilename,
        fileSize: fileInfo.size,
        isImage: fileInfo.isImage,
        mimeType: fileInfo.contentInfo?.mime?.mime ?? fileInfo.mimeType,
        uuid: fileInfo.uuid,
        cdnUrl: entry.getValue('cdnUrl') ?? fileInfo.cdnUrl,
        uploadProgress: 100,
      });

      if (entry === this._entry) {
        this._debouncedCalculateState();
      }
    } catch (cause) {
      entry.setMultipleValues({
        isUploading: false,
        uploadProgress: 0,
        uploadError: cause,
      });

      if (entry === this._entry) {
        this._debouncedCalculateState();
      }
    }
  }
}
The FileItem class manages file uploads using Uploadcare’s uploadFile method from the REST API.
When instantiated, it initializes key properties like the file’s unique ID, name, progress, and upload state.
The upload() method ensures the file is ready for upload by checking for duplicates, previous uploads,
or errors before proceeding.
Once validated, the function sets the upload state to true, clears errors, and creates an AbortController for canceling if needed.
It then defines an uploadTask that processes the file (including optional image shrinking).
Rather than uploading the file immediately, the function submits the uploadTask to an upload queue:
this.$['*uploadQueue'].add(uploadTask).
This queue mechanism ensures that multiple files can be uploaded in an organized manner,
allowing for asynchronous uploads without blocking other operations.
For more details on how uploadQueue and uploadFile work, refer to the Uploadcare REST API client library.
You can find the implementations in the Queue.ts and uploadFile.ts files.
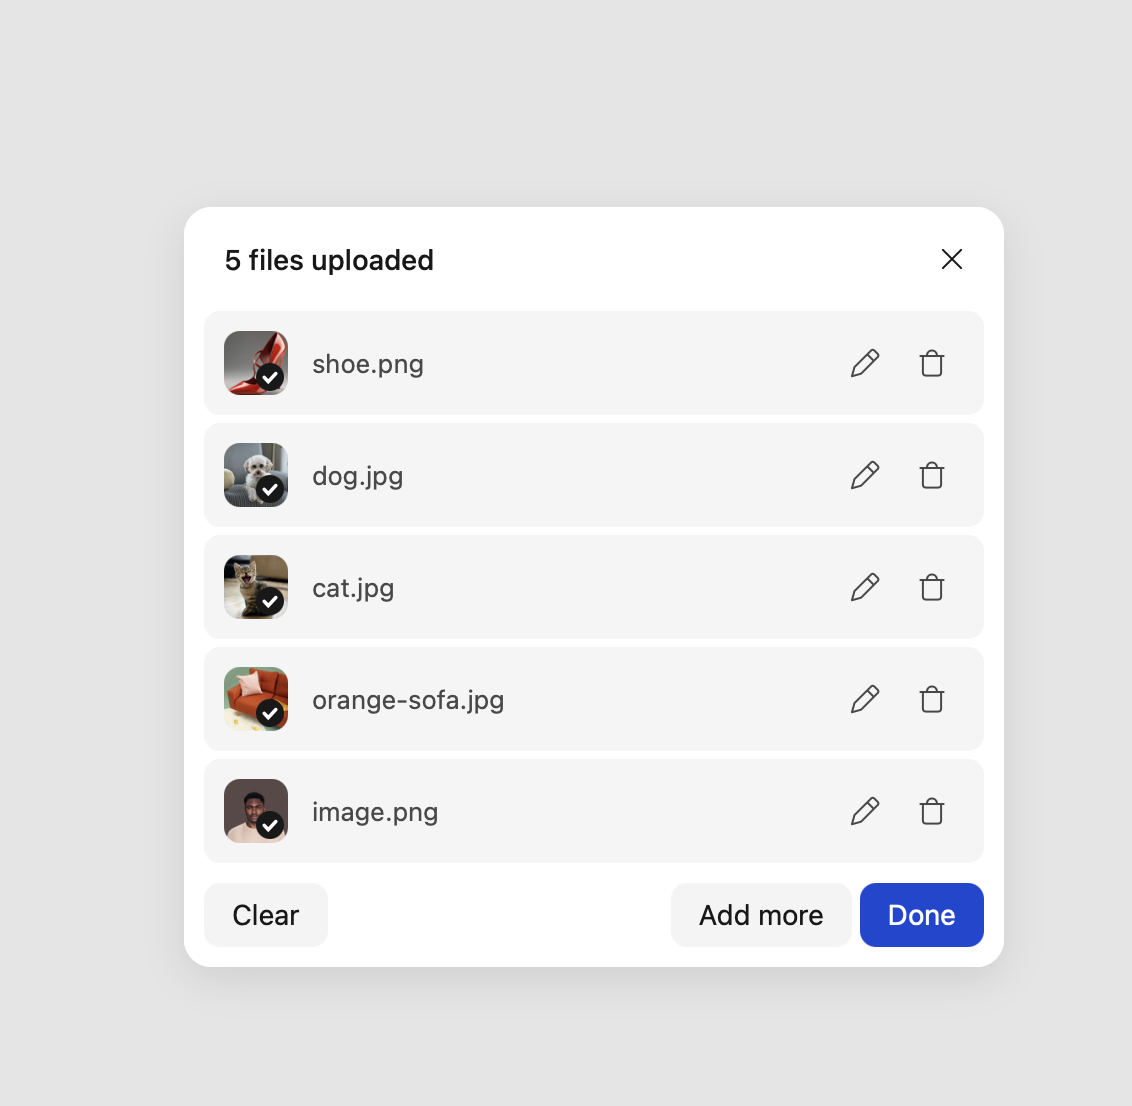 Uploadcare File Uploader
Handling network interruptions
How about in situations where the user’s network connection drops during an upload?
When a user uploads a file, Uploadcare first assigns it a unique identifier (UUID) and begins transferring data in chunks rather than as a single large file. This chunked upload mechanism ensures that if the connection is lost mid-upload, Uploadcare does not discard the progress already made. Instead, it temporarily pauses the upload and keeps track of how much data has already been sent.
During an upload, the uploader constantly monitors the file’s status using progress tracking.
If a connection failure occurs, the AbortController mechanism is triggered,
which stops the upload without removing the file from the queue.
This ensures that the user does not have to restart the upload manually.
Once the network is restored, the uploader automatically resumes the upload from where it left off. It does this by checking the previously uploaded chunks and continuing from the last completed segment, instead of restarting the process from the beginning. Additionally, Uploadcare has a built-in retry mechanism, which attempts to re-upload the file after a short delay if an error occurs. This prevents unnecessary API calls while ensuring that files are successfully uploaded.
The File Uploader uses the following configuration settings to handle network interruptions:
 let options = {
  // 25 MB minimum file size for chunking
  multipartMinFileSize: 26214400,

  // 5 MB chunk size for multipart uploads
  multipartChunkSize: 5242880,

  // Maximum number of concurrent uploads that can happen at the same time
  maxConcurrentRequests: 10,

  // Number of retries per chunk
  multipartMaxAttempts: 3,

  // Number of retries for throttled requests
  retryThrottledRequestMaxTimes: 1,
};- The
multipartMinFileSizesetting ensures that only files exceeding a 25 MB threshold are chunked. - The
multipartChunkSizedefines the size of each chunk to be 5 MB, balancing performance and reliability. - The
maxConcurrentRequestsparameter enables multiple chunks to be uploaded in parallel, speeding up the process. - The
multipartMaxAttemptssetting determines the number of retries per chunk in case of failure. - The
retryThrottledRequestMaxTimessetting specifies the number of retries for throttled requests, ensuring that uploads are not interrupted by server limitations.
When an upload is interrupted, Uploadcare automatically retries the upload. The code below ensures that uploads are resumed from where they left off.
/** @private */
_handleCollectionPropertiesUpdate = (changeMap) => {
if (changeMap.uploadProgress) {
for (const entryId of changeMap.uploadProgress) {
const { isUploading, silent } = Data.getCtx(entryId).store;
if (isUploading && !silent) {
this.emit(EventType.FILE_UPLOAD_PROGRESS, this.api.getOutputItem(entryId));
}
}
this._flushCommonUploadProgress();
}
if (changeMap.isUploading) {
for (const entryId of changeMap.isUploading) {
const { isUploading, silent } = Data.getCtx(entryId).store;
if (isUploading && !silent) {
this.emit(EventType.FILE_UPLOAD_START, this.api.getOutputItem(entryId));
}
}
}
if (changeMap.errors) {
for (const entryId of changeMap.errors) {
const { errors } = Data.getCtx(entryId).store;
if (errors.length > 0) {
this.emit(EventType.FILE_UPLOAD_FAILED, this.api.getOutputItem(entryId));
// If network issue, retry upload
setTimeout(() => {
if (navigator.onLine) {
this.uploadCollection.read(entryId)?.setValue('isUploading', true);
this.upload();
}
}, 3000); // Wait 3 seconds before retrying
}
}
}
};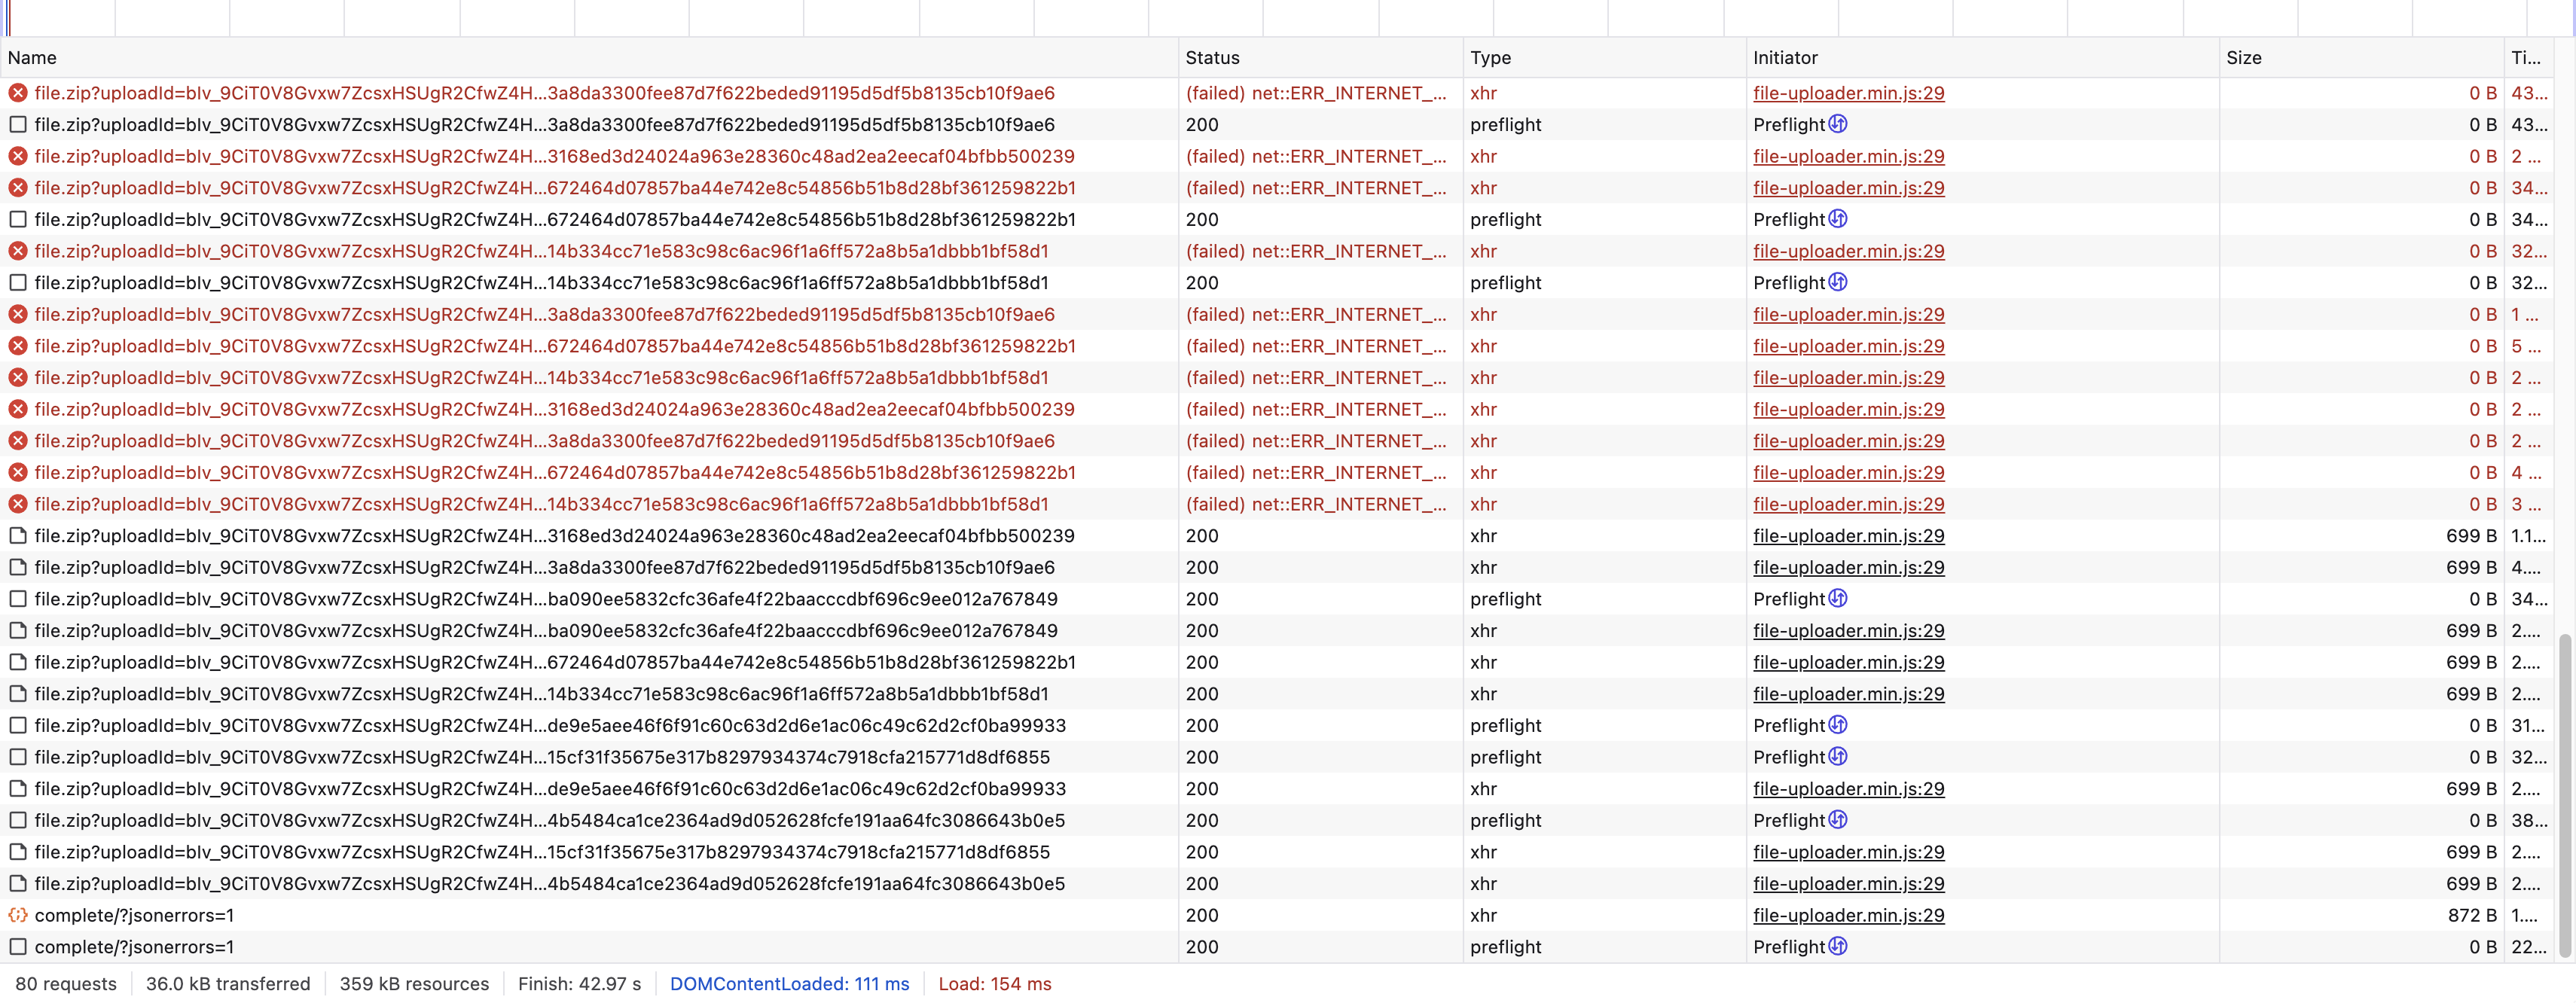 Uploadcare File Uploader retrying chunk uploads during network interruptions
This ensures that users don’t have to manually restart their uploads, even if they lose their connection in the middle of an upload.
Handling large files, server throttling and bandwidth usage
As we’ve seen, the File Uploader automatically switches to multipart uploads, breaking files into smaller chunks before sending them to the server. This prevents the need to load the entire file into memory, reducing the risk of performance bottlenecks.
The chunk size is determined by the multipartChunkSize configuration,
ensuring that large files are uploaded in manageable pieces while maintaining a balance between speed and resource usage.
Additionally, if imageShrink is enabled, the file undergoes a compression process before uploading,
further reducing the file size and upload time.
To prevent server throttling, the uploader implements a queueing system
that controls how many requests can be processed at the same time.
The maxConcurrentRequests setting ensures that uploads are handled sequentially when necessary,
preventing the server from being overwhelmed.
If a request is throttled due to high server load,
the system automatically retries the upload up to the number of times specified in retryThrottledRequestMaxTimes.
This means that temporary network slowdowns or server rate limits won’t immediately result in failed uploads,
improving overall reliability.
For bandwidth usage, the system optimizes bandwidth consumption by leveraging Uploadcare’s image CDN,
ensuring that once a file is uploaded, it is served from a content delivery network instead of directly from the server.
This reduces the number of direct requests to the backend, lightening the server’s workload.
Additionally, if an upload is no longer needed — for instance,
if a user cancels an upload before completion — the process is immediately aborted using the AbortController,
preventing unnecessary data transfer and preserving bandwidth.
What else Uploadcare fixes
How Uploadcare addresses common issues with file uploading
Aside from effectively having a solid API to handle various use cases you might encounter when uploading files, there are also some areas that the Uploadcare API takes care of that you might not have thought of. Here are some of the ways Uploadcare addresses these issues.
Potential security risks for file uploading
Security is a big issue when it comes to building a file uploading solution that is bulletproof, this is because there are various ways that can put you at security risk.
File type validation
Uploadcare automatically validates file types and MIME types, ensuring that only safe files are uploaded. This prevents unauthorized or malicious files from reaching your server. However, file extensions alone aren’t enough to guarantee security—attackers can disguise harmful files by changing their extensions.
To counter this, Uploadcare uses a two-step protection system. First, you can restrict unnecessary or potentially harmful file types from being uploaded. Second, the system goes beyond basic extension checks by verifying the actual contents of the file to ensure they match the declared type. This means only genuinely safe and validated files are saved to your project.
For an extra layer of security, the File Uploader integrates with ClamAV, an industry-standard antivirus scanner, to detect and remove malicious files before they are processed. Additionally, we provide automatic SVG file verification to prevent security risks associated with embedded JavaScript. If an SVG file contains JavaScript code, it is immediately rejected, protecting your system from potential vulnerabilities.
Signing uploads before uploading
File Uploader also secures uploads by generating time-sensitive authentication tokens (signatures) with expiration timestamp,
ensuring that only authorized users can submit files thus preventing unauthorized file access/uploading
and any potential overwrites by malicious actors.
The token is usually generated before an upload starts by a SecureUploadsManager class
that has a getSecureToken function that retrieves the secure token and add a timestamp to it.
async function getSecureToken() {
  const { secureSignature, secureExpire, secureUploadsSignatureResolver } = this._block.cfg;

  if ((secureSignature || secureExpire) && secureUploadsSignatureResolver) {
    console.warn(
      'Both secureSignature/secureExpire and secureUploadsSignatureResolver are set. secureUploadsSignatureResolver will be used.',
    );
  }

  if (secureUploadsSignatureResolver) {
    if (
      !this._secureToken ||
      isSecureTokenExpired(this._secureToken, { threshold: this._block.cfg.secureUploadsExpireThreshold })
    ) {
      try {
        const result = await secureUploadsSignatureResolver();
        if (!result) {
          this._secureToken = null;
        } else if (!result.secureSignature || !result.secureExpire) {
          console.error('Secure signature resolver returned an invalid result:', result);
        } else {
          this._secureToken = result;
        }
      } catch (err) {
        console.error('Secure signature resolving failed. Falling back to the previous one.', err);
      }
    }

    return this._secureToken;
  }

  if (secureSignature && secureExpire) {
    return {
      secureSignature,
      secureExpire,
    };
  }

  return null;
}When a user initiates an upload, the uploader requests a secure signature and an expiration timestamp from a SecureUploadsManager class.
This is done in the getUploadClientOptions() method:
async function getUploadClientOptions() {
  const secureUploadsManager = this.$['*secureUploadsManager'];
  const secureToken = await secureUploadsManager.getSecureToken().catch(() => null);

  let options = {
    store: this.cfg.store,
    publicKey: this.cfg.pubkey,
    baseCDN: this.cfg.cdnCname,
    baseURL: this.cfg.baseUrl,
    userAgent: customUserAgent,
    integration: this.cfg.userAgentIntegration,
    secureSignature: secureToken?.secureSignature, // Signed authentication token
    secureExpire: secureToken?.secureExpire, // Expiration timestamp
    retryThrottledRequestMaxTimes: this.cfg.retryThrottledRequestMaxTimes,
  };

  return options;
}
The secureSignature and secureExpire are then included in the upload request, allowing the server to verify their validity.
If the signature is missing, expired, or incorrect, the server rejects the upload, preventing unauthorized access.
This approach ensures that uploads are tied to authenticated users and expire after a set period, reducing security risks while keeping the upload process seamless.
For other ways on how Uploadcare ensure your files and file uploading processes are secure, checkout this blog post on secure file uploads.
Wrapping it up: Making file uploads easier and more scalable
When it comes to handling file uploads, choosing the right approach can make a huge difference in performance, security, and scalability. Traditional REST API methods give you full control, but they also come with a long list of challenges — from managing infrastructure to handling large files, network interruptions, and security risks.
We’ve walked through building a custom file uploader, handling multiple files, large files, and retries while ensuring users get a smooth experience. However, scaling and maintaining this setup requires constant monitoring and optimization.
This is where Uploadcare shines. Instead of reinventing the wheel, Uploadcare provides a streamlined, scalable, and secure file-handling solution — offering chunked uploads, resumable file transfers, automatic security measures, and CDN-powered file delivery out of the box.
By using Uploadcare’s API and File Uploader, you can eliminate the complexities of managing uploads manually, ensuring users get a fast and reliable experience — while you focus on building great applications instead of debugging file upload issues.
So, whether you’re working on a small project or a large-scale application, choosing the right tool can save you time, headaches, and server costs. Why struggle with maintaining a file upload system when Uploadcare can do the heavy lifting for you?
Try Uploadcare today and see how effortless file uploads can be. Explore Uploadcare upload API.