How to increase image resolution in your website
Last edited:
There are a lot of potential scenarios where you would need to increase the resolutions of multiple images at once. For example, say you’re redesigning your website and need to upscale all your pictures to fit the new design. Or you want to incorporate user-generated content into your site, but the shots provided by the users are too small.
Whatever your situation is, using good old Photoshop for these purposes isn’t an option. It’s a great choice if you need to resize just a few images, but if you have hundreds of them, it’s better to find a way to automate the process. By the way, you’ve just found it.
Before we start, an important note about image quality
You probably know that the side effect of scaling an image larger than its original dimensions is that the image can become less sharp, and compression artifacts can become visible. To avoid ruining your images, follow these rules:
- The bigger you make an image, the more you'll see a difference in quality. Avoid increasing the dimensions by more than 30%. If you increase it too much, the artifacts will be too noticeable.
- Keep in mind that images with simple unicolored backgrounds can be increased more than photos.
- If your image becomes less sharp, use sharpening tools to make it better.
How to increase image resolution in Uploadcare: two options
There are two image resize features in Uploadcare. Both of them allow you to resize images in batches without downloading any additional software.
Regular resize
This feature resizes an image to fit the specified dimensions. Regular resize is best if you want to resize a low-resolution image without changing the orientation. Let’s find out how it works.
To get things rolling, you need to sign up for an Uploadcare account and create your first project from the dashboard.
At Uploadcare, all transformations are done on the fly via CDN image operations. Once an image is uploaded, you receive a CDN link with its own unique identifier (UUID). The link looks like this:
https://6ca2u7ybx5.ucarecd.net/53f663b3-91ed-41b4-b349-9474db59edd3/shelf.jpeg
Where a4adc2bd-452b-4b18-97b5-7beb1886475a is the unique file identifier (UUID) of this image, and shelf.jpeg is the filename (it’s optional, you can remove it).
 And here’s our test image.
Once you get this link, you can implement any of the transformations available in Uploadcare by simply adding different operations to it. To resize an image, you need to add the CDN operation resize and specify the dimensions. You can set two dimensions or go with just one. If you specify a single linear dimension, the tool will preserve your original aspect ratio and resize the image along one of its axes. Note: 3000x3000 is the maximum size you can set.
After adding these parameters, the link will look like this:
https://6ca2u7ybx5.ucarecd.net/53f663b3-91ed-41b4-b349-9474db59edd3/-/resize/700x700/
/-/ is the mandatory delimiter to tell operations from one another. Use it every time you add a new parameter.
 And here’s what we’ve got.
From here, you can use this link in your code and resize multiple images at once.
Uploadcare also allows you to adjust the resizing behavior for the cases when your original image is smaller than the resulting dimensions. To set it up, add the stretch parameter to the link, then add one of the following modes:
- on — stretches the image up (if you don’t specify any mode, it’s the default option)
- off — forbids stretching the image along any dimension that exceeds the image size along any of its axes.
- fill — does not stretch the image; instead, it adds a color-filled frame around the edges.
Here’s what it looks like when you choose the fill mode:
https://6ca2u7ybx5.ucarecd.net/53f663b3-91ed-41b4-b349-9474db59edd3/-/resize/700x700/-/stretch/fill/
 The same photo with a color-filled frame.
Smart resize
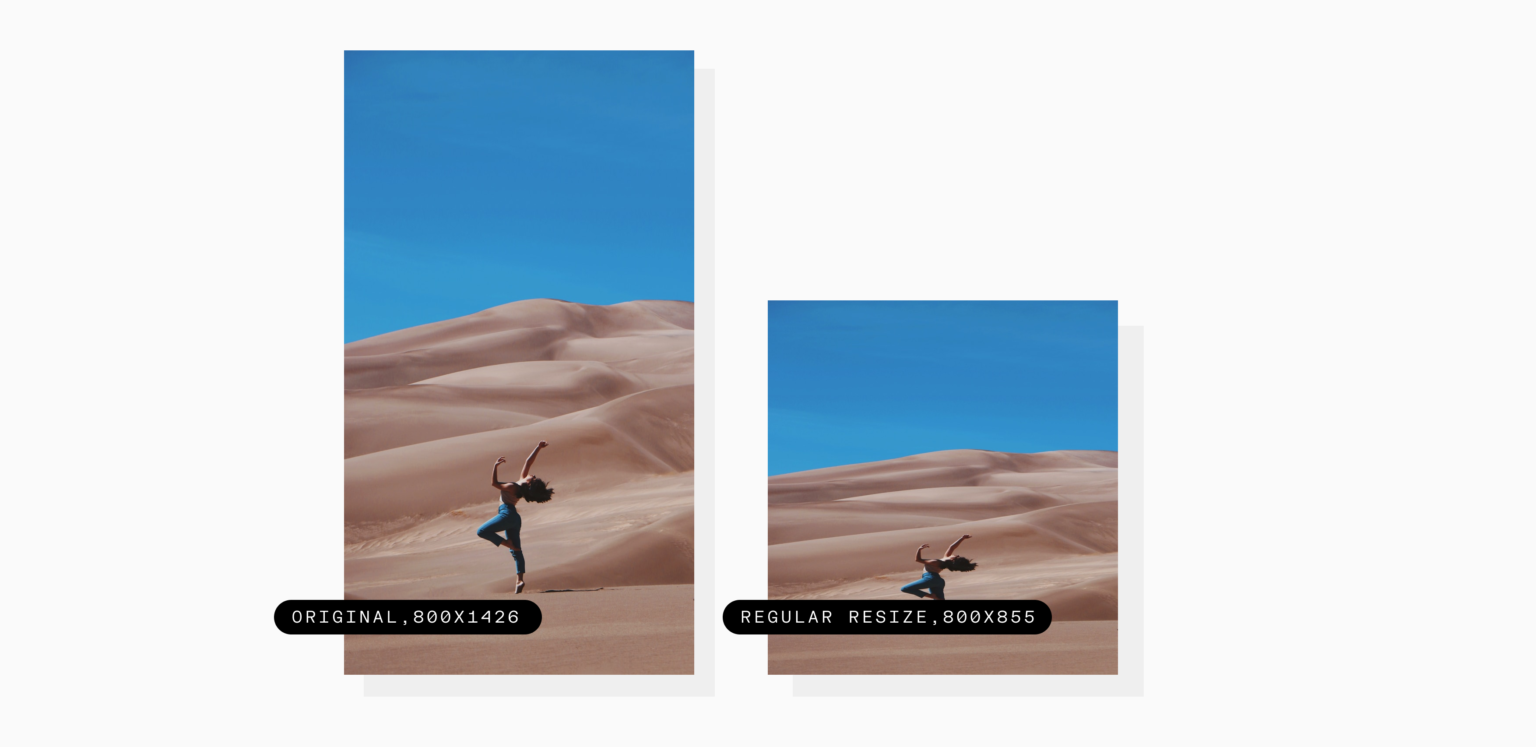
If you want to change the resolution and turn a vertical image into a square one (or vice versa), a regular resize will not work well. It will distort the objects in the photo, making them squashed or stretched out.
 The girl looks a bit squashed in the resized photo.
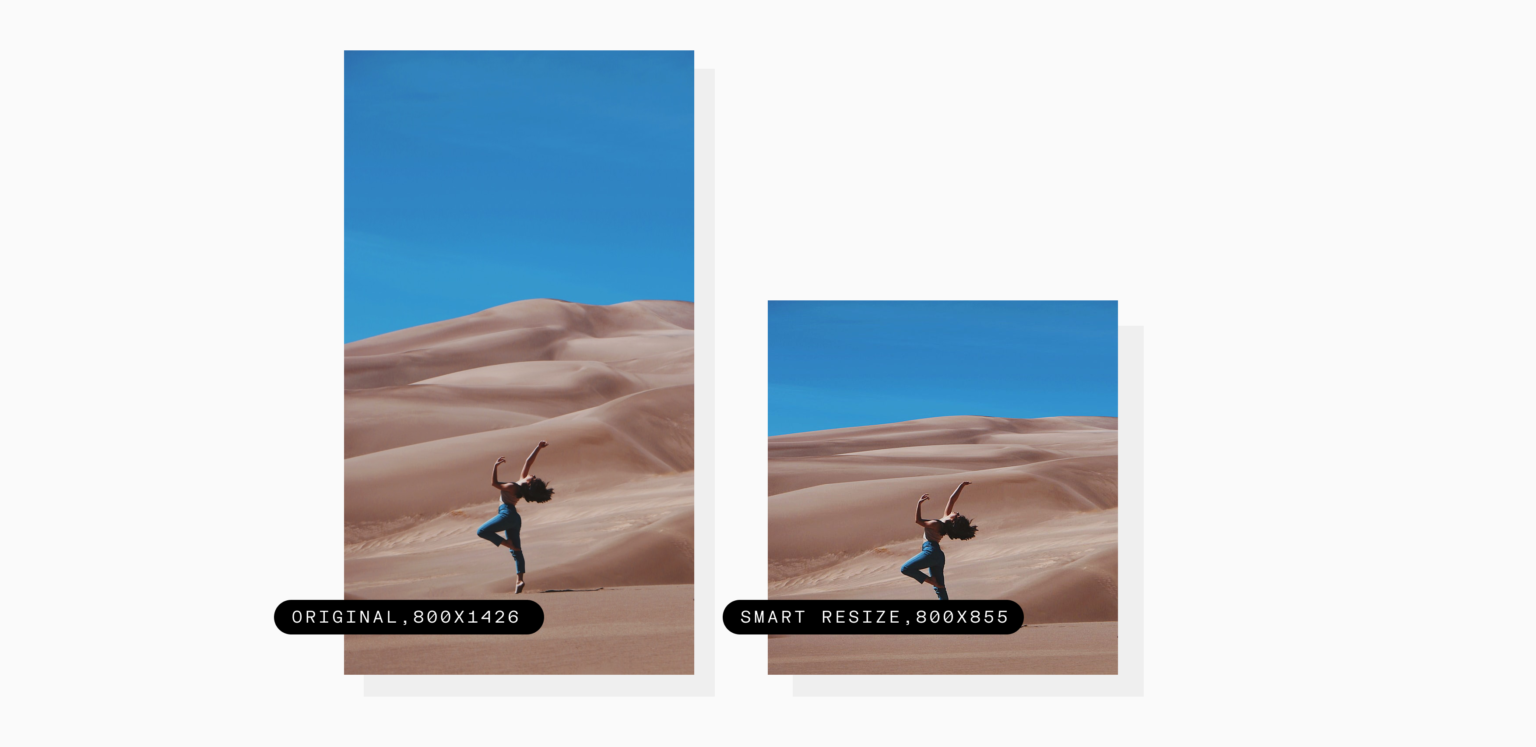
The Smart Resize feature is what can help you get around this issue. It utilizes AI and deep learning neural networks to analyze an image’s contents and resize only the unimportant pixels. Simply put, it preserves the correct proportions of objects, and resizes only the background. Let’s try applying smart resize to the same photo:
 The background is stretched, but the girl is the same.
Note: Although the algorithm works well in most cases, it may not deliver a perfect result if the background consists of many colors and details.
That said, if you run an ecommerce website, most of your product photos probably have a plain monochrome background. In that case, you can safely apply smart resize to all your photos, and it will do just fine.
To apply this feature, you need to use the smart_resize parameter and specify two dimensions. The link will look like this: https://6ca2u7ybx5.ucarecd.net/50683797-ce8e-4051-8e6d-ae136d3264ce/-/smart_resize/800x855/
Enhance your image with the sharpening tool
If your image becomes a bit fuzzy, you can apply another operation: sharp. This operation works the same way as resize and smart resize. Just add it to the link and specify the intensity (strength parameter) of the effect: it can be set anywhere from 0 to 20. If you don’t specify it, the default strength is 5. After adding this parameter, your link will look like this:
 Sharpened image
Wrapping up
Now you know how to quickly increase the resolution of images throughout a web page or an entire website. No need to do everything manually or download photo editing software to your computer. All transformations are done by simply adding parameters to the link. If you’re ready to try, sign up for a free account and automate your image resizing routine once and for all.