How to preload images: HTML and JavaScript methods explained
Last edited:
When loading important resources such as images for your website, using loading techniques like Preload, Preconnect, and Prefetch can help improve your website’s speed, resulting in better Core Web Vitals metrics, including Largest Contentful Paint (LCP).
In this article, we will cover how to preload images in HTML and JavaScript, as well as some best practices to follow for improved web performance when preloading images.
What are Preload, Preconnect, and Prefetch, and how do they work?
Preload, Preconnect, and Prefetch are hints to the browser signalling how to load specific assets, which could be an image, a script, or a stylesheet.
To implement these hints within an HTML page,
you have to add them as rel attribute values to the <link> element when importing a resource.
Each hint tells the browser how to load the resources available in a webpage.
By default, when a browser loads a webpage, it first resolves the domain name,
sets up a connection to the server where the website is hosted, and then fetches the HTML content.
When it gets the HTML content, the browser parses it and builds the DOM structure for the page.
It also loads resources that are needed, such as the CSS, JavaScript code, and images,
when it encounters the corresponding tags in the HTML markup.
For example, an image on the page is requested when the browser comes across the <img> tag.
Although the browser already does a great job prioritizing resources for a web page, you, as the developer, know better which resources are important and should be loaded early.
These hints modify the flow by providing the browser with a heads-up about important resources before they are needed. Let’s look at how each one works.
What is Preload?
Preload hints that the browser should fetch specific resources ahead of time that it usually wouldn’t fetch
until it encounters them in HTML markup; for example,
by using the <link rel="preload" as="image" href="hero.jpeg"> you’re telling the browser,
“Hey, fetch this image early because it is needed soon.”
This allows the browser to load the image while simultaneously parsing the HTML page,
rather than waiting until it encounters the <img> tag in the HTML markup.
As a result, the image will be loaded and ready in the browser’s cache by the time it’s needed, reducing delays and improving perceived performance, especially for critical images such as banners or hero visuals.
What is Prefetch?
The browser uses the prefetch hint to retrieve resources that will likely be needed in the near future, but not at present for the current page. When this hint is provided, the browser will fetch the resources that users are likely to need as they browse the website, including images and scripts.
For example, if you know users usually navigate to a particular product page after visiting your homepage,
you can use the <link rel="prefetch" href="product.html">. This tells the browser,
“Hey, you might need this page soon, go ahead and fetch it in the background so it’s available if it’s needed.”
The browser fetches the page in the background and stores it in its HTTP cache so it doesn’t have to fetch it again when a user navigates to the page.
The hint also works with images as well by using the tag: <link rel="prefetch" as="image" href="hero.jpeg">
Because this is just a hint to the browser, it fetches the resources in idle time without blocking or delaying the current page load. However, there is no guarantee that the browser will load the resources for the next page, as certain conditions, like network issues and device capabilities, can affect the browser’s decision.
What is Preconnect?
Preconnect is a way to hint to the browser to create early connections, which speeds up subsequent requests. This is quite handy for loading resources located on different domains, including third-party APIs and CDNs.
When a browser loads a page, it first performs the initial step of establishing a connection, including DNS lookups, TCP handshakes, and TLS negotiations, before retrieving the data from the server. Preconnect informs the browser to run this initial step in the background, so it doesn’t run at the time it’s needed when navigating to a page on the website.
The Preconnect hint <link rel="preconnect"> is useful when you need to load resources
that are not hosted on the same domain or server as your website.
For example, if your website is hosted at the domain example.com and your resources, like images,
are hosted on an image CDN service, like 6ca2u7ybx5.ucarecd.net,
using the tag <link rel="preconnect" href="https://6ca2u7ybx5.ucarecd.net/"> tells the browser,
“Hey, we are going to need resources from this server soon,
so let’s save some time by preparing the connections to the server now.”
This reduces the time the browser would usually take to fetch those resources when they are eventually needed, because the groundwork has already been completed.
Difference between Preload, Prefetch, and Preconnect
Preload, prefetch, and preconnect all serve different purposes in optimizing resource loading. Although these techniques are often used interchangeably, they serve distinct purposes:
| Technique | Purpose | Use case |
|---|---|---|
| Preload | Fetches resources needed for the current navigation, ensuring they’re available when required. | Important images, scripts, or stylesheets that are essential for the initial rendering of the page. |
| Prefetch | Fetches resources for future navigations, storing them in the cache for quicker access when needed. | Resources that are likely to be needed on subsequent pages, such as images or scripts for the next page a user might visit. |
| Preconnect | Establishes early connections (DNS, TCP, TLS) to external origins, reducing latency for subsequent requests. | Resources hosted on different domains, such as third-party APIs or CDNs. |
Each serves a distinct purpose, but can be combined to provide significant performance gains.
How to preload images with HTML
When you want to preload images using HTML, you can use the <link rel="preload"> tag.
This tag allows you to specify the image you want to preload, ensuring that it’s fetched early in the page load process.
<link rel="preload" href="path/to/image.jpg" as="image">The href attribute points to the image URL, and the as attribute indicates the type of resource being preloaded.
In this case, the as="image" attribute specifies that the resource is an image.
Let’s look at how the browser handles preloading images, using this example list of resources for a live website. Notice how the browser assigns priorities to each resource based on their importance and the order they appear in the HTML:
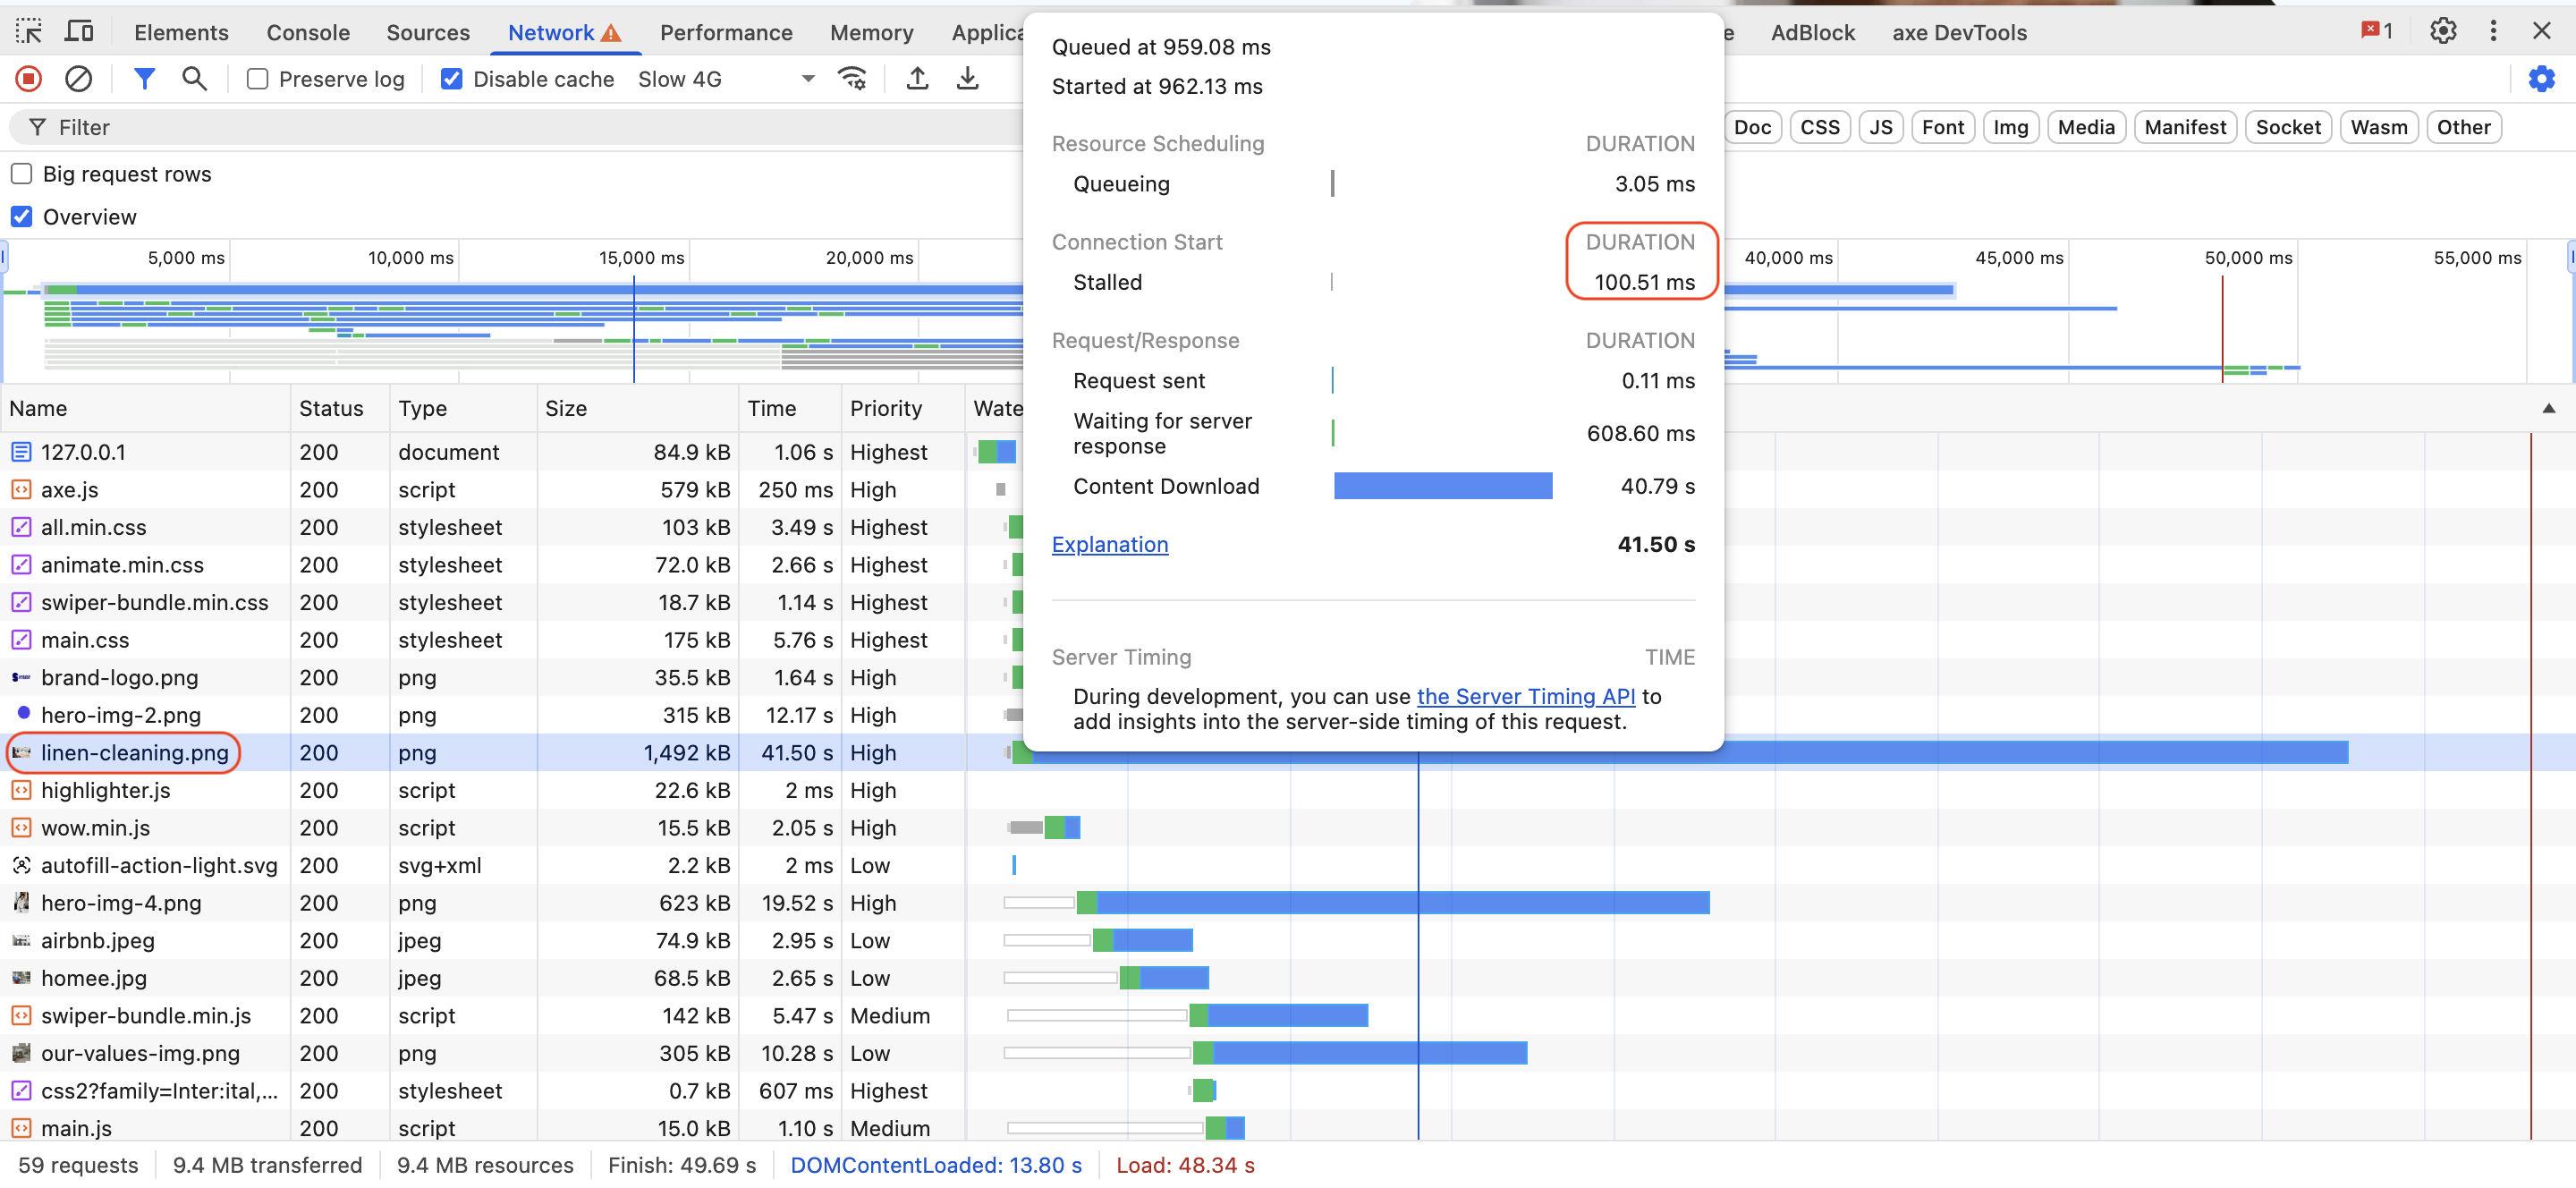 Normal resources loading example
First, the browser loads the HTML document and then loads each resource as it encounters it. The browser prioritizes loading resources on its own. The largest image on the page was stalled while being fetch because other resources were loading, and took about 100 ms to load.
Let’s hint to the browser to start loading the largest image on the page earlier
by adding a <link rel="preload"> tag in the HTML:
<link rel="preload" href="/assets/images/property-details/linen-cleaning.png" as="image">Now, when the browser loads the page, it will prioritize fetching the specified image, ensuring it’s available as soon as possible.
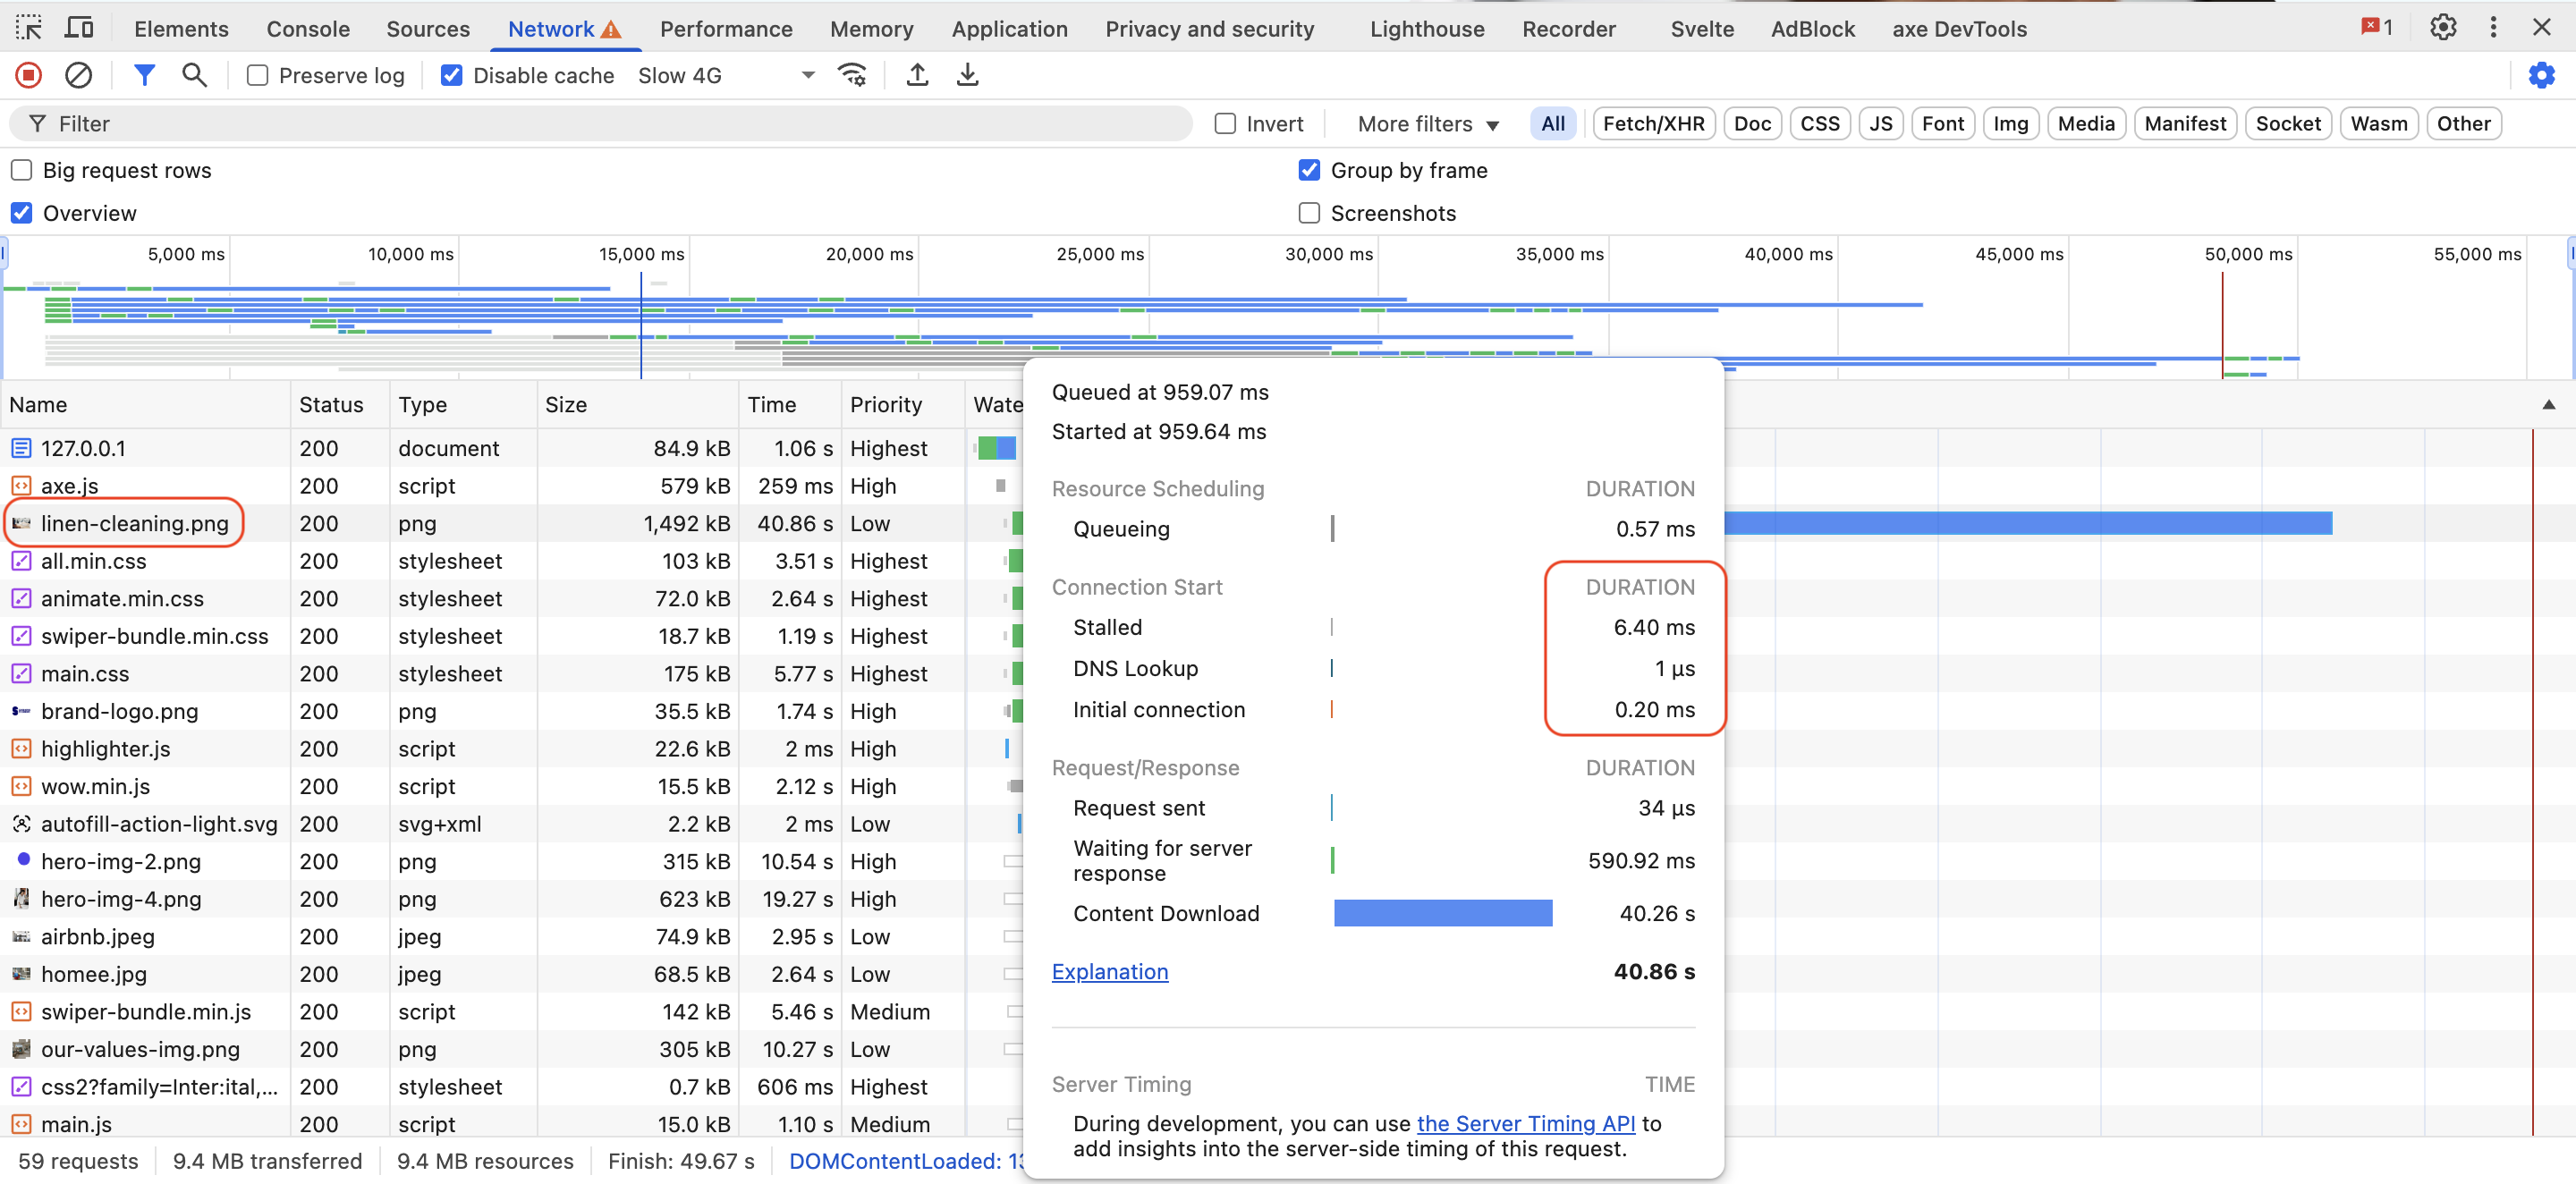 Preloading the largest image on the page example
How to preload images with JavaScript
In addition to using HTML, you can preload images with JavaScript.
This approach gives you more control over when and how images are loaded,
allowing you to load images dynamically based on user interactions or other conditions.
To preload images with JavaScript, you can create a new Image object and set its src attribute to the image URL.
This will trigger the browser to fetch the image in the background.
function preloadImage(url) {
  const img = new Image();
  img.src = url;
}
// Usage
preloadImage('path/to/image.jpg');
You can call this function whenever you want to preload an image, such as when a user hovers over a link or clicks a button.
Preloading multiple images with JavaScript
You can also preload multiple images by iterating over an array of image URLs
and calling the preloadImage function for each. Here’s an example:
const imageUrls = [
  'path/to/image1.jpg',
  'path/to/image2.jpg',
  'path/to/image3.jpg',
];
imageUrls.forEach(url => preloadImage(url));
This is handy when you have a set of images that you want to preload at once, such as images for a gallery, a product list, or a slider.
Preloading responsive images
When dealing with responsive images, you can combine the srcset attribute with the <link rel="preload"> tag
to preload different image sizes based on the screen size of the user’s device.
This method of loading images improves performance and the overall user experience.
For example, say you have a responsive image for various screen sizes:
<img src="dog.jpg" srcset="dog_400px.jpg 400w, dog_800px.jpg 800w, dog_1600px.jpg 1600w" sizes="50vw" alt="Photo of a dog">You can preload them by adding the following code in the header section of the page:
<link rel="preload" as="image" href="dog.jpg" imagesrcset="dog_400px.jpg 400w, dog_800px.jpg 800w, dog_1600px.jpg 1600w" imagesizes="50vw">The browser will use the same logic it uses for determining which image to load when provided with multiple images by looking at the screen size and loading the image that fits the user’s viewport.
Best practices for preloading images
Consider the following best practices when using any of the browser hints in your website:
-
Preload only important images you need: Preloading unnecessary images can negatively impact your website’s page loading speed. Most modern browsers are already good at resource prioritization, so verifying the necessity of the image before preloading it is unnecessary.
-
Use the
asattribute: Theasattribute inside<link rel="preload">tags should always be specified to identify the resource type. The browser uses this information to optimize resource loading and prevent unnecessary delays. -
Monitor performance: Use performance monitoring tools and Core Web Vitals metrics to track the impact of preloading on your page load times and user experience. Adjust your preloading strategy based on the data you collect.
-
Combine with other techniques: Consider combining preloading with other optimization techniques like lazy loading and
fetchpriorityto provide your users with a smoother loading experience, e.g., preloading important images and lazy loading non-important images. -
Test across browsers: Various browsers have their own approach to preloading resources. Ensure that you test your implementation across browsers to ensure consistent performance and a seamless user experience.
FAQ
What is the difference between preload and lazy load?
Preloading informs the browser ahead of time of the resource you want loaded as soon as possible, before it’s discovered in the natural flow of parsing the HTML. Lazy loading, on the other hand, defers the loading of non-essential resources until they are actually needed, such as when they come into the viewport. Preloading is used for critical resources, while lazy loading is used for non-critical resources to improve performance.
Is preload supported in all browsers?
All modern browsers support preload functionality. Testing your preload implementation across multiple browsers can also help you to verify both performance consistency and stability of behavior. You can check browser compatibility with the Can I use resource.
Should I use preload for background images?
Not necessarily; preloading is mainly used for important images that significantly impact the initial rendering of the page, such as hero images or other key visuals. Background images are often used for decorative purposes on a webpage. As such, you may not need to preload them except when they are crucial for the overall user experience of your website. In such cases, it is also important to consider their impact on performance before preloading background images.
Conclusion
Preloading images can improve your webpage’s performance, as it allows you to prioritize essential resources that the browser would usually discover at the end of the loading process.
Interested in learning more about web image optimization? Check out these additional image optimization guides: