Multipart file uploads explained: Scaling large file transfers with Uploadcare
What are multipart file uploads?
Multipart upload is a file transfer technique that splits large files into smaller chunks, uploads each chunk to the server independently, and reassembles them into the original file once all pieces arrive.
Think of it like moving furniture into your apartment. Instead of trying to fit an entire couch through your door in one go (which won’t fit and will be difficult to force through), you disassemble it into smaller pieces, move each piece separately, and reassemble it inside your apartment. Each piece is easier to handle, and if one piece gets stuck, you don’t have to start over with the entire couch.
Why does it matter for large file transfers? Because large file transfers (e.g. 500 MB or� 2 GB) can encounter setbacks and unforeseen issues, such as unstable internet connections, server limits, timeouts, or even user behavior that can cancel the upload.
Difference between single vs. multipart uploads
A single upload method sends an entire file to the server in a single request. For example, the code below uploads a file using the single upload method:
// Traditional single upload
const formData = new FormData();
formData.append('file', largeFile);

await fetch('/upload', {
  method: 'POST',
  body: formData
});
While this works fine for small files, it becomes problematic when dealing with very large uploads.
- Connection failures: If the user’s connection drops, the entire upload fails and must be restarted from scratch.
- Server timeouts: Every server has request time limits. Large file uploads often exceed these limits, causing the connection to be terminated.
- Memory constraints: Uploading large files using this method can spike memory usage on both the client device and the server. If the device doesn’t have enough memory, it can lead to performance issues or crashes.
Multipart uploads, on the other hand, split a single file into multiple parts and upload them in parallel. This ensures that large files are uploaded effectively without overwhelming the server, maintains faster speeds, and improves upload reliability.
Why large file transfers fail without multipart uploads
Large file uploads face several challenges that make using traditional single-request upload methods unreliable.
Unstable internet connections
Network connections aren’t always stable. A single drop in Wi-Fi signal, a mobile network switching between cell towers, or any network interruption means starting over when uploading a large file using the single upload method. In multipart uploads, a dropped connection would affect only the current data chunk. The upload resumes from where it left off, not from the beginning.
Slower upload speed, bandwidth, and latency
The larger a file is, the more bandwidth and time it takes to upload.
Upload speed issues often arise when transferring data to your server in a single upload. This is because, regardless of where your end user is located, all files are sent to the same destination via the same route.
So when users attempt to upload multiple large files at the same time, it can overwhelm your servers, leading to decreased performance and increased latency.
This issue is especially pronounced if your server is not properly configured to handle large file uploads.
Timeout issues
Most web servers and proxies impose timeout limits on HTTP requests. When uploading a large file that takes more time than allotted for a request, a timeout occurs, and the connection is interrupted.
For example, if you’re uploading a 1GB file over a 4 Mbps connection, it will take approximately 33 minutes to complete. Most servers will kill the connection long before that time expires.
Some common timeout limits for servers look like this:
- Nginx default: 60 seconds
- Apache default: 300 seconds
- AWS Application Load Balancer: 60 seconds
- Cloudflare: 100 seconds for free plans
File size limitations
Many platforms impose hard limits on upload sizes. For example:
- A PHP server for uploading files,
upload_max_filesize, is often 2-8 MB by default. - An Nginx server
client_max_body_size, by default, is 1 MB. - AWS API Gateway has a maximum payload of 10 MB.
- Most CDNs and proxies usually have limits between 100 MB and 5 GB.
Using the multipart upload method can bypass these limitations by staying under the threshold for each chunk while allowing unlimited total file sizes.
How multipart uploads work (step-by-step)
Every multipart upload process follows a pattern: split a large file into smaller chunks, upload them to the server, and reassemble the file once the upload is complete.
Uploadcare’s multipart upload, for example, accepts a large file and uses file information (such as file size, and size of each chunk) to generate a set of presigned URLs for uploading each chunk. When the upload completes, it assembles the chunks into one complete file.
Let’s walk through the process.
Step 1: Initialize the upload and generate presigned URLs
First, the Upload API receives the large file along with details needed to process it:
- The file itself
- The file size
- The chunk size, which tells the server how large each chunk should be. The 5 MB default is used unless you specify otherwise.
When received, the Upload API divides the file size by the chunk size to generate presigned URLs for each chunk. A 50 MB file with a 5 MB chunk size will generate 10 presigned URLs, one for each chunk.
Uploadcare’s multipart upload feature uses AWS S3 Transfer Acceleration to speed uploads.
A typical generated presigned URL looks like this:
https://uploadcare.s3-accelerate.amazonaws.com/
5eef12e3-e72a-4bf5-b68a-89953e81c7db/500MBCZIPtestfileorg.zip?
uploadId=0QMRh4VdwZGKMOVZuVsAONK3TmfD0gBwRbgWbmThZZghD9JFe2GY2GRASe5SbbZy2mAo2sXjgpg7l3BdmIvzKV9EOgTQ0B.TYgKyAOd1ZlxtDCbFg2V032nqoMWv7FyR
&partNumber=47
&X-Amz-Algorithm=AWS4-HMAC-SHA256
&X-Amz-Credential=AKIA5C7IQCBHHHZXJRAU%2F20251006%2Fus-east-1%2Fs3%2Faws4_request
&X-Amz-Date=20251006T075132Z
&X-Amz-Expires=86400
&X-Amz-SignedHeaders=host
&X-Amz-Signature=194f63da4c429d2d5af2d7bade6a468ce521987d533af3b2f6ebc2b3f8a21364
Where:
https://uploadcare.s3-accelerate.amazonaws.com: Domain with Transfer Acceleration enabled/5eef12e3-e72a-4bf5-b68a-89953e81c7db/500MBCZIPtestfileorg.zip: File UUID and original filenameuploadId: Multipart session ID that tracks this specific uploadpartNumber=47: This is chunk #47 of the fileX-Amz-Algorithm=AWS4-HMAC-SHA256: Signature algorithm for signing the URLX-Amz-Credential: Access key and AWS region being used (in this case,us-east-1)X-Amz-Date: Timestamp when the URL was created (October 6, 2025, at 07:51:32 UTC)X-Amz-Expires: Duration the URL is valid for in seconds (86400 = 24 hours)X-Amz-SignedHeaders: Which HTTP headers are included in the signatureX-Amz-Signature: Cryptographic proof of authorization
To sum it up, the presigned URL essentially says, “For the next 24 hours, anyone with this URL can upload part #47 of this specific multipart upload, and nothing else.”
Step 2: Upload each chunk in parallel
With the presigned URLs created, the next step is to upload each chunk to its
assigned URL. The Upload API provides a method to do this using the multipartUpload function.
Chunks are uploaded in parallel to maximize throughput.
// Upload multiple chunks simultaneously
const uploadPromises = presignedUrls.map((url, index) => {
  const chunk = getChunk(file, index, chunkSize);
  return uploadChunk(chunk, url);
});

// Wait for all chunks to complete
await Promise.all(uploadPromises);
Uploading 3-4 chunks simultaneously can triple or quadruple your upload speed compared to sequential uploads.
Step 3: Finalize and reassemble the file
When the last chunk uploads successfully, they are all combined to form the original file on the server. You can then retrieve the file using its UUID.
The server verifies all chunks arrived, reassembles them in order, and returns the final file information, including:
- File UUID
- CDN URL for accessing the file
- File size
- MIME type
- Storage status
If you’d like to handle large file uploads by building out this multipart process yourself, check out this article on how to handle large file uploads.
Benefits of multipart and resumable uploads
Multipart uploads provide several advantages that make them ideal for handling large files.
Faster transfer speeds
Parallel chunk uploads can dramatically reduce transfer time. Instead of uploading 1GB sequentially at 10 MB/s (approximately 800 seconds), you can upload four chunks simultaneously:
- Sequential: 1 GB ÷ 10 MB/s = 800 seconds
- Parallel (2 chunks): 1 GB ÷ (10 MB/s × 2) = 400 seconds
That’s a 2x speed improvement just from parallelization.
Upload reliability and better fault tolerance
With multipart uploads, a network interruption does not necessarily mean starting the upload process all over again.
When a chunk fails, you can retry that specific chunk. If, for instance, chunk 47 out of 100 fails, you only try that chunk again, not all 100.
This helps to provide the ability to pause and resume uploads without losing progress on the file being uploaded.
Multipart uploads with Uploadcare
Uploadcare offers a robust upload API that enables you to seamlessly manage large files of up to 5TB with multipart uploads in two ways: by utilizing the File Uploader or the HTTP Upload API (also available in a number of SDKs).
Using the Uploadcare File Uploader
Uploadcare File Uploader is a framework-agnostic component that handles file uploads with any JavaScript framework. The File Uploader automatically manages multipart uploads for large files without any additional configuration.
Instead of managing chunking and retries manually, the File Uploader does it automatically so you can focus on your app logic, not your infrastructure.
An example of integrating the File Uploader in a JavaScript application looks like this:
<!DOCTYPE html>
<html lang="en">
  <head>
    <meta charset="UTF-8">
    <meta name="viewport" content="width=device-width, initial-scale=1.0">
    <title>Document</title>
    <link
      rel="stylesheet"
      href="https://cdn.jsdelivr.net/npm/@uploadcare/file-uploader@1/web/uc-file-uploader-regular.min.css"
    />
    <script type="module">
      import * as UC from 'https://cdn.jsdelivr.net/npm/@uploadcare/file-uploader@1/web/file-uploader.min.js';
      UC.defineComponents(UC);
    </script>
  </head>
  <body>
    <uc-config
      ctx-name="my-uploader"
      pubkey="demopublickey"
      multiple
    ></uc-config>

    <uc-file-uploader-regular
      ctx-name="my-uploader"
    ></uc-file-uploader-regular>

    <uc-upload-ctx-provider
      ctx-name="my-uploader"
    ></uc-upload-ctx-provider>

    <script>
      document.addEventListener('DOMContentLoaded', () => {
        const ctx = document.querySelector('uc-upload-ctx-provider')

        ctx.addEventListener('file-upload-success', e => {
          console.log(e);
        });
      });
    </script>
  </body>
</html>
The code above has the following configurations:
ctx-name: To create a unique context for linking all the file uploader components togetherpubkey: An Uploadcare Public API key that you can find in your project’s API settings.multiple: To allow users to upload multiple files.
The File Uploader automatically:
- Splits large files into chunks.
- Uploads chunks in parallel.
- Resumes failed uploads.
- Provides progress tracking.
- Handles all error recovery.
Using the Uploadcare Upload API for multipart uploads
If you want more control over the file upload process, Uploadcare provides an Upload API available in various SDKs, including JavaScript, Python, PHP, Ruby, and more.
Here’s how to implement the Upload API using the JavaScript SDK:
Step 1: Set up a project and install dependencies
Run the command below to create a new directory.
mkdir multipart-uploads
cd multipart-uploads
Inside the multipart-uploads directory, initialize a new Node.js project.
npm init -yThis creates a package.json file in your project directory with default settings.
Next, install the required dependencies.
npm install express multer @uploadcare/upload-clientThe express package will create the Node.js server,
multer will handle the multipart/form-data forms and @uploadcare/upload-client
communicates with Uploadcare’s server for file uploads.
For live reloading during development, install nodemon as a dev dependency.
npm install nodemon --save-devThen, update the scripts object in package.json:
{
  "scripts": {
    "start": "node index.js",
    "dev": "nodemon index.js"
  }
}
Also add a type field to use ES modules:
{
  "type": "module"
}
Next, create an index.js file in the root directory and add the following code:
import express from 'express';
import multer from 'multer';

const app = express();
const PORT = 3000;

// Store uploaded files in memory
const upload = multer();

// Serve static files for the HTML page
app.use(express.static('public'));

// File upload endpoint
app.post('/upload', upload.single('file'), async (req, res) => {
  try {
    if (!req.file) {
      return res.status(400).json({ error: 'No file uploaded' });
    }

    // File uploading logic will be here

  } catch (error) {
    console.error('Error uploading file:', error);
    res.status(500).json({
      success: false,
      message: 'File upload failed',
      error: error.message,
    });
  }
});

app.listen(PORT, () => {
  console.log(`Server is running on http://localhost:${PORT}`);
});
This code sets up an express server that listens on port 3000
and uses the Multer middleware to retrieve the file when a request is made to the /upload endpoint.
Step 2: Create the frontend upload form
Create a public directory and add an index.html file.
<!DOCTYPE html>
<html lang="en">
  <head>
    <meta charset="UTF-8">
    <meta name="viewport" content="width=device-width, initial-scale=1.0">
    <title>File Upload</title>
  </head>
  <body>
    <h1>Large file uploads</h1>
    <form action="/upload" method="post" enctype="multipart/form-data">
      <input type="file" name="file" required placeholder="Select file" />
      <button type="submit">Upload</button>
    </form>
  </body>
</html>
Step 3: Implement multipart upload in the backend
Now let’s implement multipart uploading with Uploadcare’s JavaScript SDK.
Initialize the Uploadcare client
First, import the Uploadcare Upload SDK and initialize it with your Public API key.
import { UploadClient } from '@uploadcare/upload-client';

const client = new UploadClient({
  publicKey: 'YOUR_PUBLIC_KEY'
});
Replace YOUR_PUBLIC_KEY with your Uploadcare Public API key. You can find your Public API key in your Uploadcare dashboard.
Start the multipart upload
Inside the try block in the file upload endpoint, add the following code:
// Step 1: Start multipart upload
const startResult = await client.multipartStart(req.file.size, {
  fileName: req.file.originalname,
  contentType: req.file.mimetype,
  multipartChunkSize: 10 * 1024 * 1024, // 10 MB chunks
});

console.log('Multipart upload started:', {
  uuid: startResult.uuid,
  totalParts: startResult.parts.length,
  fileName: req.file.originalname,
  fileSize: req.file.size
});
Here’s what this code does:
- Sends a request to Uploadcare’s server to start uploading a large file using the
client.multipartStart. - Provides necessary details such as file size, filename, and chunk size.
The multipartChunkSize parameter determines how many URLs to generate based on the file size (default: 5 MB).
For example, a 50 MB file with a multipartChunkSize of 10 MB will generate five presigned URLs, one for each chunk.
The request returns an object containing:
{
  uuid: '5eef12e3-e72a-4bf5-b68a-89953e81c7db',
  parts: [
    'https://uploadcare.s3-accelerate.amazonaws.com/...',
    'https://uploadcare.s3-accelerate.amazonaws.com/...',
    // ... more presigned URLs
  ]
}
Where the uuid is the unique identifier for the large file and parts array is an array of the presigned URLs
to upload each parts (chunks) of the file
Upload each chunk
Using the presigned URLs from the multipartStart response, send upload requests for each chunk.
// Step 2: Upload file parts using the presigned URLs
const uploadPromises = startResult.parts.map(
  async (presignedUrl, index) => {
    const partSize = 10 * 1024 * 1024; // Must match multipartChunkSize
    const start = index * partSize;
    const end = Math.min(start + partSize, req.file.size);

    const chunk = req.file.buffer.subarray(start, end);

    console.log(`Uploading chunk ${index + 1}/${startResult.parts.length}`);

    return await client.multipartUpload(chunk, presignedUrl);
  }
);

// Wait for all chunks to upload
await Promise.all(uploadPromises);
console.log('All chunks uploaded successfully');
Here’s what this code does:
- Creates an
uploadPromisesarray that loops through the presigned URLs. - Calculates the
startandendpositions of the chunk usingpartSize(same asmultipartChunkSize) for each URL. - Slices each chunk from the original file using the
buffer.subarraymethod. - Sends each chunk to its respective presigned URL using the
multipartUploadmethod. - Uses
Promise.allto execute all upload requests in parallel for maximum speed.
Complete the upload
Once all parts have uploaded successfully, finalize the upload on the server.
// Step 3: Complete multipart upload
const completeResult = await client.multipartComplete(startResult.uuid);

console.log('Upload completed:', {
  uuid: completeResult.uuid,
  isReady: completeResult.is_ready,
  isStored: completeResult.is_stored,
  size: completeResult.size
});

// Verify the upload succeeded
if (!completeResult.is_ready || !completeResult.is_stored) {
  throw new Error('Upload verification failed');
}

// Send success response
res.status(200).json({
  success: true,
  message: 'File uploaded successfully',
  uuid: completeResult.uuid,
  fileUrl: `https://ucarecdn.com/${completeResult.uuid}/`,
  fileName: completeResult.original_filename,
  fileSize: completeResult.size,
  mimeType: completeResult.mime_type,
  isStored: completeResult.is_stored,
});
The multipartComplete method finalizes the upload on the server and accepts the uuid from the multipartStart response.
It returns the complete file information that you can use to access the uploaded file.
At this point, your large file is safely uploaded, verified, and accessible via its unique CDN URL, ready to be served or processed further.
Step 4: Run and test your application
To run the application, start the development server.
npm run devOpen your browser and navigate to http://localhost:3000. You should see the upload form.
Try uploading a large file (100+ MB), and on the server logs, you should see the multipart upload process in action.
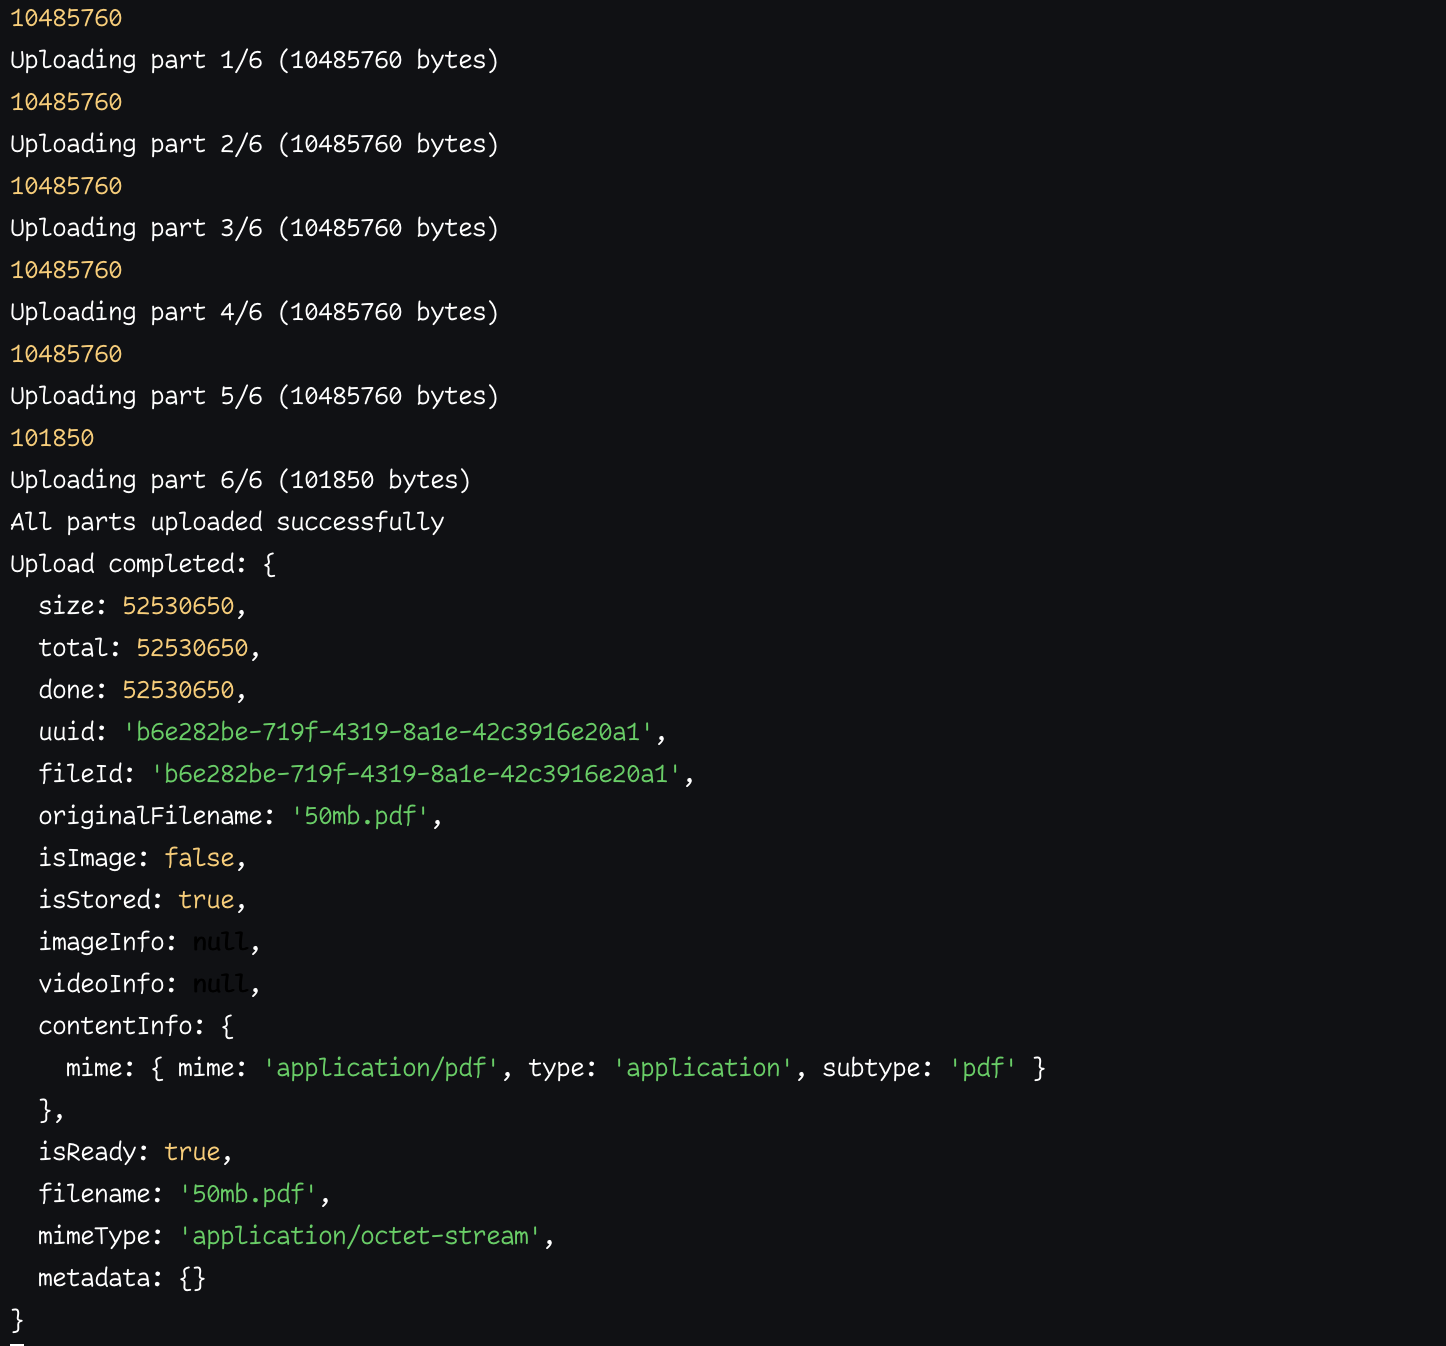 Multipart upload process in server logs
Best practices for implementing multipart uploads
When using the Uploadcare multipart upload feature, consider using these tips to handle large files effectively.
Choose appropriate chunk sizes
Chunk size affects upload performance and reliability, so make sure you’re optimizing your chunk size based on the size of the file being uploaded.
Here’s an example of how this could be implemented:
function calculateOptimalChunkSize(fileSize) {
  if (fileSize < 100 * 1024 * 1024) { // < 100 MB
    return 5 * 1024 * 1024; // 5 MB chunks
  } else if (fileSize < 1024 * 1024 * 1024) { // < 1 GB
    return 10 * 1024 * 1024; // 10 MB chunks
  } else if (fileSize < 10 * 1024 * 1024 * 1024) { // < 10 GB
    return 25 * 1024 * 1024; // 25 MB chunks
  } else {
    return 50 * 1024 * 1024; // 50 MB chunks
  }
}
A general guideline you can follow when chunking a file is:
- 5-10 MB: Good for most use cases; balances speed and reliability.
- 10-25 MB: Better for large files on fast connections.
- 25-50 MB: Only for very large files (10 GB+) on stable, fast networks.
Using smaller chunks increases the number of HTTP requests but provides finer control during retries. In contrast, larger chunks decrease overall request overheads but raise the costs associated with retries.
Implement retry logic effectively
The Uploadcare Upload API by default includes retry logic for throttled requests and unstable network connections when uploading chunks.
You can set how many times retries can be made by entering the following values when you start the multipart upload:
const startResult = await client.multipartStart(req.file.size, {
  store: 'auto',
  fileName: req.file.originalname,
  multipartChunkSize: chunkSize
  retryNetworkErrorMaxTimes: 3
  retryThrottledRequestMaxTimes: 2
});
retryNetworkErrorMaxTimes sets the maximum number of attempts to retry requests that failed with a network error.
retryThrottledRequestMaxTimes sets the maximum number of attempts to retry throttled requests.
Validate completed uploads
Always confirm that the multipart upload has been successful before displaying success messages to your users.
const completeResult = await client.multipartComplete(startResult.uuid);

// Verify the upload
if (!completeResult.isReady || !completeResult.isStored) {
  throw new Error('Upload verification failed - file not ready or stored');
}

// Confirm file size matches
if (completeResult.size !== req.file.size) {
  throw new Error(
    `File size mismatch: expected ${req.file.size}, got ${completeResult.size}`
  );
}

console.log('Upload verified successfully');
Provide clear error messages
Give your users concise error messages that explain why an upload failed and let them know when they need to take action.
try {
  // Upload logic
} catch (error) {
  let userMessage = 'File upload failed. Please try again.';
  let status = 500;

  switch (error.code || error.statusCode) {
    case 'NETWORK_ERROR':
      userMessage = 'Network connection lost. Please check your internet and try again.';
      status = 503;
      break;
    case 'TIMEOUT_ERROR':
      userMessage = 'Upload timed out. Please try uploading a smaller file or check your connection.';
      status = 408;
      break;
    case 'FILE_TOO_LARGE':
      userMessage = 'File is too large. Maximum file size is 5 GB.';
      status = 400;
      break;
    default:
      break;
  }

  res.status(status).json({
    success: false,
    message: userMessage,
    technicalError: error.message || 'Unknown error',
  });
}
Conclusion
Multipart uploads are the foundation of reliable file handling at scale. With Uploadcare’s File Uploader and Upload API, you can implement this workflow in minutes gaining speed, stability, and seamless scalability out of the box.
For more information, check out the Uploadcare documentation and explore additional features like image processing, document conversion, image CDN, and video CDN to further enhance your file-uploading capabilities.