- learning
- guides
- #image-crop
Image Crop for Web and Mobile
Cropping images is a common task and an everyday routine for producing content. We believe image crop should happen right in your browser and be intuitive and simple. Firing a dedicated image editor to do the cropping is an overkill.
This tutorial is about enabling your users to crop images in any browser with Uploadcare, no matter the device or browser they use.
You can get this up and running in 10 minutes with our jQuery File Uploader. The uploader is written in JavaScript; you can customize it to fit your app look and user experience.
There are three simple steps to take:
- Step 1. Set Up Your Uploadcare Account and Project
- Step 2. Pick Where You Want the Crop
- Step 3. Integrate the jQuery File Uploader
Step 1. Set Up Your Uploadcare Account and Project
In case you don’t have an Uploadcare account, Sign Up for one. Once you get it, navigate to your dashboard to create a new project or discover API keys for an existing one.
You will only need the public API Key that points to a target project where the images will go to.
Step 2. Pick Where You Want the Crop
Pick a form in your web app where you want users to crop images. It could be a profile editing form, image upload form, etc.
Note, our jQuery File Uploader enables your users to upload images from their camera, social media, cloud storage, and more. We call those “Upload Sources,” and you can learn more about them in our docs.
Step 3. Integrate the jQuery File Uploader
You install the jQuery File Uploader by adding a couple of <script> elements to your page
<head>. It comes in a variety of bundles and is
usually served from our CDN.
Here’s how it goes. First, add this to your page <head>:
<script>UPLOADCARE_PUBLIC_KEY = 'YOUR_PUBLIC_KEY';</script>
<script src="https://ucarecdn.com/libs/widget/3.7.3/uploadcare.full.min.js" charset="utf-8"></script>
Replace YOUR_PUBLIC_KEY with your public API key.
Next, place this <input> where you want the jQuery File Uploader to appear on your page:
<input
  name="your_form_field_name"
  value=""
  type="hidden"
  role="uploadcare-uploader"
  data-images-only
  data-crop
  />
The jQuery File Uploader looks for inputs with role="uploadcare-uploader" and places its
button there.
Note, the value attribute may either be empty or contain a CDN URL or UUID of
an image on Uploadcare. The non-empty value will preload a file into your uploader dialog. Otherwise, your users will be prompted to load a file from one
of the enabled Upload Sources. You can learn more about default files in the
jQuery File Uploader dialog in our docs.
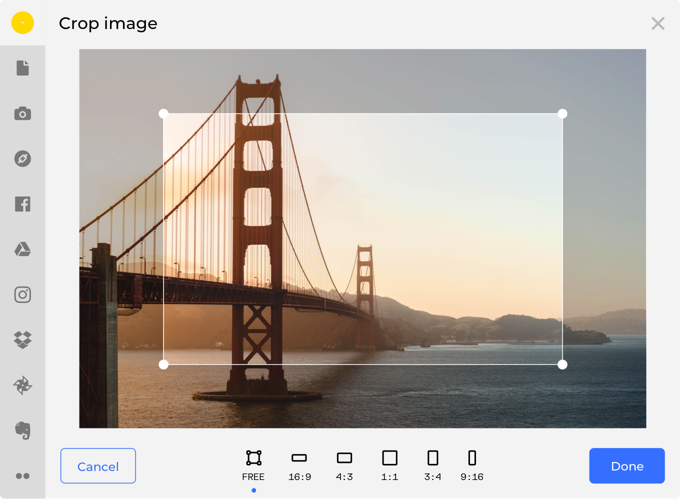
That’s what you should get by now:
Once you’re done cropping, your image CDN URL gets updated with the crop
image processing operation.
The jQuery File Uploader then passes the updated CDN URL to the input value, and from there you
can use it for other routines.
That’s how the updated CDN URL may look like:
http://ucarecdn.com/9dd2f080-cc52-442d-aa06-1d9eec7f40d1/-/crop/400x400/500,500/cropout.jpgYou can define the jQuery File Uploader crop presets by specifying the
data-crop attribute. This is useful when you want
specific aspect ratios, image dimensions, etc.
Yoohoo, That’s it 🚀
You’ve just enabled image crop in your app via Uploadcare without breaking a sweat. Great job!
If you’d like to customize your uploader to your app’s look, check out the docs section on jQuery File Uploader styling.
Our jQuery File Uploader is open source, here's its GitHub repo. Issues and PRs are welcome.