When creating media-heavy websites and applications,
it is important to consider the effect that the loading of the images has on the user.
One way to enhance the user experience is to showcase a placeholder for images while they load.
This can help reduce the perceived load time of the page and give your users a more refined experience.
Using a dummy picture or grey area as a placeholder is a very popular approach,
but there is a far better way of generating placeholders that are actually appealing and related to the image itself:
BlurHash.
In this tutorial, you will learn about BlurHash, how it works,
why it’s beneficial for applications with media-heavy interfaces,
and how to use it to create appealing placeholders for images in your applications when serving images from Uploadcare.
What is BlurHash?
BlurHash is a lightweight way to represent a blurred version of an image that was invented by the Wolt team.
It is represented by a short piece of text that when decoded can produce a low quality version of an image
which can be shown to the user while the actual image is being loaded.
The idea behind BlurHash is to design a placeholder that is close to the original image but has a smaller size.
This makes it possible to send the placeholder to the client side of your application,
which reduces the time that the user spends waiting for the page to load.
How does BlurHash work?
The algorithm works in a relatively simple way; it divides the image into sections
and then determines the color focal point of each section. It then converts this information into a string
that can produce a blurred image.
The result is a small, lightweight string and can be sent to the client side together with the image URL
so that the client can create the placeholder image without having to request the entire image from the server.
This is done in two parts: encoding and decoding!
Encoding (image → BlurHash string)
The encoding process involves the algorithm analyzing the original image
using discrete cosine transforms (DCT) to extract low-frequency patterns.
The output is a small encoded text string (20-30 characters long) that can be stored in a database
or sent as a JSON response.
You should do this on the back-end of your application.
Using the encoded string created, you can then decode it to generate the blurred image.
This process involves the algorithm analyzing the encoded string and decoding it in RGB pixel values
to generate a blurred preview image of the original image.
An example of this in action is shown below:
import{ decode }from'blurhash';// Example BlurHash string from API or databaseconst blurhash ='LEHV6nWB2yk8pyo0adR*.7kCMdnj';const width =32;const height =32;// Decode BlurHash into raw pixelsconst pixels =decode(blurhash, width, height);
console.log(pixels);// Uint8ClampedArray containing pixel data
Using the decoded pixel data, you can then generate a canvas element and display the blurred image to the user.
For example:
const canvas = document.getElementById('blurhashCanvas');const ctx = canvas.getContext('2d');const imageData = ctx.createImageData(width, height);// Set decoded pixels (from the previous step)
imageData.data.set(pixels);// Render on canvas
ctx.putImageData(imageData,0,0);// Display canvas to user however you like
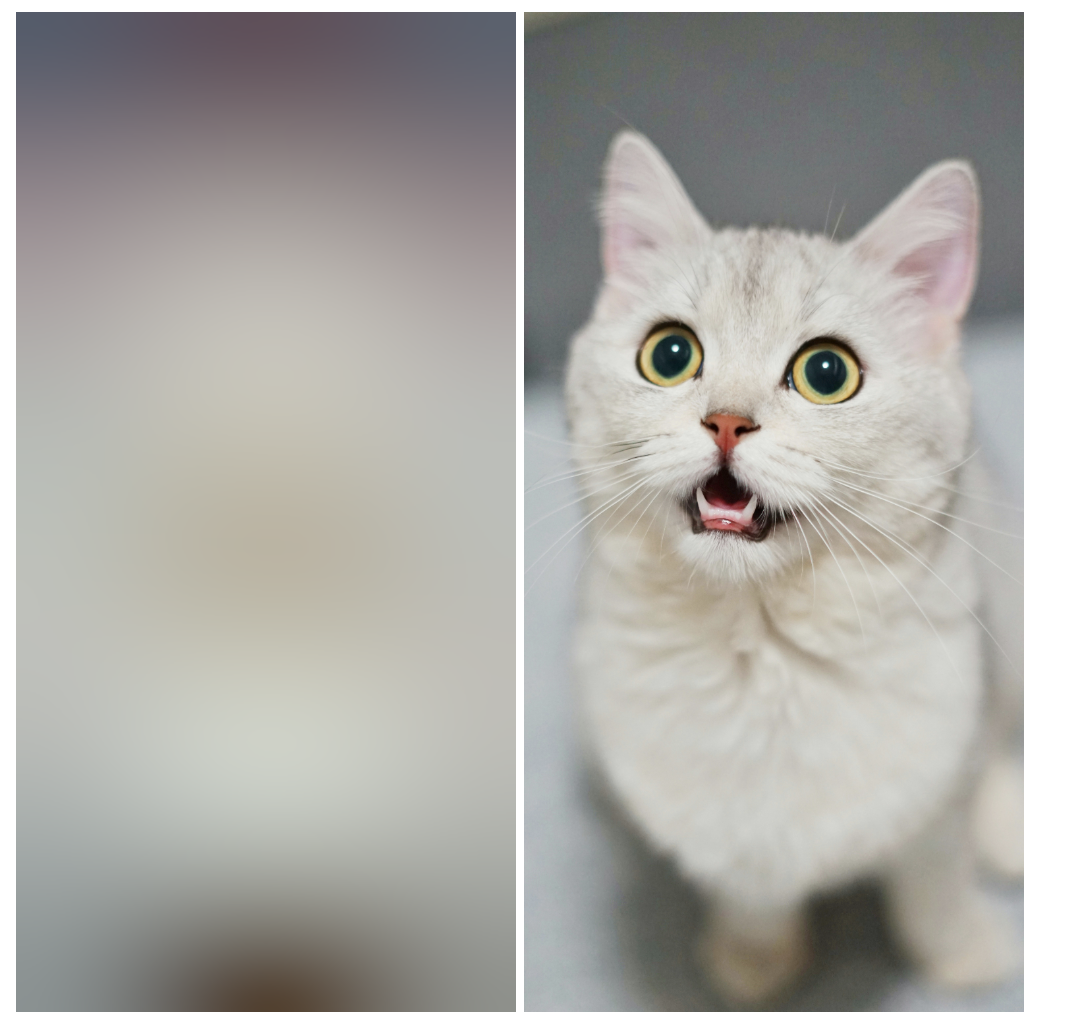
BlurHash image and the original image
Why to use BlurHash?
There are a couple of benefits why you should consider using BlurHash in your applications:
Reduced perceived load time:
This is because you have provided a placeholder image that is close to the actual image.
Thus, your users will have the impression that your page is loaded quickly.
Improved user experience:
A polished user experience is essential for retaining users on your website or application.
Instead of showing your users a blank area while images load, you can show them a placeholder image filled with colors,
which can enhance the user experience.
Smaller image sizes:
The encoded BlurHash string is much smaller than the original image,
allowing you to send the placeholder image to the client side quickly without affecting performance.
No extra API calls or storage:
BlurHash is generated from the image itself, so you won’t have to request an API or save another image copy to use as a placeholder.
You can store the BlurHash string in your database or send it as a JSON response
and use it to show the placeholder image on the client side when required.
How to use BlurHash with Uploadcare
Uploadcare URL API provides a way to quickly generate BlurHash strings for uploaded images to the platform.
This can be done by attaching the original image URL with one of our image processing operations such as -/preview
or -/json/ operation to receive some metadata about the image including a BlurHash string for the image.
We plan to add a BlurHash value to the file response for images uploaded via the File Uploader soon,
but for now, you can use the URL API to generate BlurHash strings for your images.
For example, the file URL https://6ca2u7ybx5.ucarecd.net/221bfe82-cc3d-41ce-b46f-c869b01ce46c/-/preview/-/json/
will return the following JSON response:
Note that the blurhash key in the JSON response contains the BlurHash string for the image.
You can use this string to generate the blurred placeholder image on the client side.
Implementing BlurHash with Uploadcare
With all the things we’ve covered about BlurHash and how Uploadcare helps you generate BlurHash strings for images,
let’s now implement it by building a simple web application.
We will use the BlurHash string from the JSON response to generate the blurred placeholder image on the client side.
Step 1: Setting up the project
Create a new directory and navigate into the directory using the following command:
mkdir uc-blurhash &&cd uc-blurhash
Inside the uc-blurhash directory, run the following command to initialize a new package.json file:
npm init -y
Next, let’s install the required dependencies for the project using the following command:
npminstall parcel blurhash
The blurhash package will be used to decode BlurHash strings, and the parcel will be used to bundle the frontend files.
Next, update the scripts object in the package.json file for running the application:
Create a new directory called src in the root of your project directory.
Inside the src directory, create an index.html file with the following code:
<!DOCTYPEhtml><htmllang="en"><head><metacharset="UTF-8"><metaname="viewport"content="width=device-width, initial-scale=1.0"><title>BlurHash Demo</title></head><body><!-- Canvas for Blurhash --><canvasid="blurhashCanvas"></canvas><!-- The actual image --><imgid="originalImage"src="https://6ca2u7ybx5.ucarecd.net/221bfe82-cc3d-41ce-b46f-c869b01ce46c"alt="Original"width="250"height="350"/><scripttype="module"src="./app.js"></script></body></html>
The index.html contains a Canvas instance for rendering the blurred image and an image element for displaying the original image.
The image URL is hardcoded for demonstration purposes.
Let’s move on to the part where things get interesting.
Create an app.js file inside the src directory with the following code:
import{ decode }from'blurhash';// Function to fetch BlurHash dynamicallyasyncfunctionfetchBlurHash(imageUrl){try{const response =awaitfetch(imageUrl);const data =await response.json();// Ensure we're returning the blurhash valuereturn data.blurhash;}catch(error){
console.error('Failed to fetch BlurHash:', error);returnnull;}}// Function to render BlurHashasyncfunctionrenderBlurhash(){const img = document.getElementById('originalImage');const canvas = document.getElementById('blurhashCanvas');const ctx = canvas.getContext('2d');// Fetch the BlurHash dynamicallyconst blurhash =awaitfetchBlurHash(`${img.src}/-/preview/-/json/`);if(!blurhash){
console.error('No BlurHash found.');return;}// Canvas dimensionsconst canvasWidth =250;const canvasHeight =350;
canvas.width = canvasWidth;
canvas.height = canvasHeight;// Decode the BlurHash into RGB pixel dataconst pixels =decode(blurhash, canvasWidth, canvasHeight);// Create an ImageData object and render itconst imageData = ctx.createImageData(canvasWidth, canvasHeight);
imageData.data.set(pixels);
ctx.putImageData(imageData,0,0);// if the image is already loaded, show the image & hide the BlurHashif(img.complete){
img.style.display ='block';
canvas.style.display ='none';}// Ensure image reloads properly to trigger onload event
img.onload=function(){
canvas.style.display ='none';
img.style.display ='block';};}
document.addEventListener('DOMContentLoaded', renderBlurhash);
The code above does the following:
Fetches the BlurHash string for the image URL using the Uploadcare URL API.
Decodes the BlurHash string into RGB values and renders the blurred image on the canvas element.
Hides the original image while the BlurHash is being rendered and shows the original image when it has loaded.
If the image is already loaded, the original image is shown immediately.
To test the application, run the following command in the terminal:
npm run dev
This will start the development server in http://localhost:1234 and open the application in a browser.
You should see the blurred placeholder image while the original image is loading.
BlurHash Demo
That’s it! You have successfully implemented BlurHash in your application to generate blurred placeholder images for images uploaded to Uploadcare.
Conclusion
In this tutorial, you learned about BlurHash, how it works, and why it is beneficial for applications with media-heavy interfaces.
You also learned how to use BlurHash to generate blurred placeholder images for images uploaded to Uploadcare.
Uploadcare also has other features that can help you optimize your images and enhance the user experience on your website or application.
You can check this interesting guide on uc-image component to learn more about it’s image optimization component
and also our File Uploader for seamless file uploading.
Trust Jamin Okpukoro is a Developer Advocate and Senior Technical Writer with a strong background in software engineering, community building, video creation, and public speaking. Over the past few years, he has consistently enhanced developer experiences across various tech products by creating impactful technical content and leading strategic initiatives. His work has helped increase product awareness, drive user engagement, boost sales, and position companies as thought leaders within their industries.