How to upload files in PHP: Build a PHP file uploader
Last edited:
PHP has excellent built-in support for handling file uploads and validation logic that you can use to create a simple, functional file upload script in under 5 minutes.
However, while a file uploader is relatively easy to create, other tasks, such as fast file delivery to users through a CDN or detecting infected or malicious files, require more complex solutions.
It is also essential to consider security risks and abusive uses of the upload form, which can expose your application to threats if left unchecked.
In this article, we’ll cover two different approaches to implementing the upload functionality and discuss their pros and cons:
- Uploading files onto your own server and developing a PHP script from scratch
- Using a third-party service like Uploadcare that perfectly integrates with any PHP application to upload, store, and deliver files through a CDN
Create a custom file upload in PHP
If you develop a PHP file uploader from scratch, there are some benefits as well as downsides that come with this approach.
Pros
- Complete control over the upload process.
- Customizability to match your specific requirements.
- Cost-effective, assuming development and storage are free on your end.
Cons
- Time-consuming to create and tailor the PHP uploader to your needs, including validation, processing, and other features.
- Not designed to handle heavy loads or prevent errors without additional optimization.
- File delivery may be slower without a CDN. Setting up a CDN uploader is a significant undertaking beyond the scope of this article.
- Ongoing resources needed for script maintenance and support.
- Increased server storage requirements, along with a backup plan.
- Security considerations, including potential risks associated with malicious files, denial-of-service attacks, and validation logic vulnerabilities.
Prerequisites for file uploads in PHP
To follow along with this article, you need PHP 8.x or later installed. You can either use a server like nginx and Apache or try the demo with PHP’s built-in development server.
Configuring PHP
By default, PHP is configured to allow file uploading and has sensible defaults for the maximum number of files and file sizes that can be uploaded.
If you need to troubleshoot file uploading or adjust any limits, you can do this in the php.ini configuration file. The most relevant file upload configuration options are shown here:
;;;;;;;;;;;;;;;;
; File Uploads ;
;;;;;;;;;;;;;;;;

; Whether to allow HTTP file uploads.
file_uploads = On

upload_tmp_dir = /path/to/your/tmp/folder

; Maximum allowed size for uploaded files.
upload_max_filesize = 2M

; Maximum number of files that can be uploaded via a single request
max_file_uploads = 20
Do not forget to set the upload_tmp_dir value according to your own path.
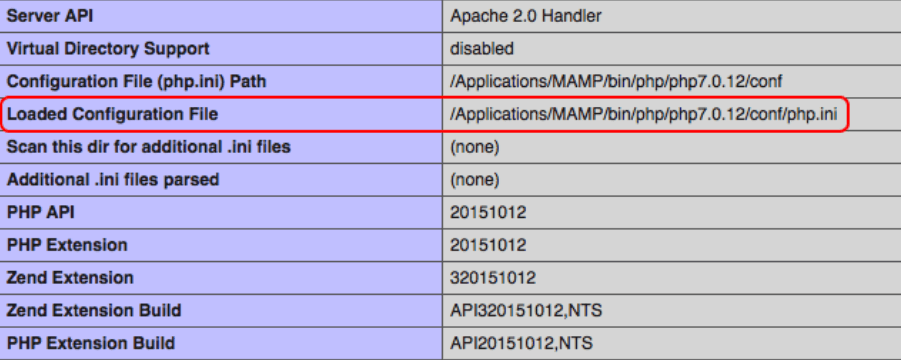
How to locate the php.ini file
If you can’t locate the php.ini file on your computer, add the following code to your PHP webpage:
phpinfo();And then launch it in your web browser. It’ll show you the path to the initialization file, like in the screenshot below:
HTML file uploading methods
HTML provides a file input type to select a file from a local computer.
The input has several attributes for configuring the allowed file types.
The input also requires setting some corresponding attributes on the HTML form.
You can experiment with the allowed file types or allow the selection of multiple files.
However, the most important detail for our needs is an enctype attribute that should be set to multipart/form-data.
That way, we tell a browser that our form contains binary data that should be encoded for transmission.
Also, we should send a POST request by setting the method attribute with the relevant value.
When the user submits the form, the browser sends the file to the server using a single request. Depending on the user’s upload connection speed and the file size, this upload request could take quite some time. Setting reasonable defaults will prevent the request from timing out.
Step 1. Creating an HTML form
First, we need to take care of the client-side code in HTML and create a form to allow users to select files for uploading. We’ll keep this form very basic, but you might want to set attributes to limit file types, file sizes, and more in a real-world application.
Create a new index.html file within your sample web application. Copy the following code into your newly created file.
It features a single-file select input and a submit button.
As you can see, we’ve also made the HTML form with the proper enctype and method attributes to support binary file uploads.
<!DOCTYPE html>
<html>
<body>
  <h1>PHP File Uploader</h1>
  <form action="uploadHandling.php" method="post" enctype="multipart/form-data">
    Select an image to upload:
    <input type="file" name="fileToUpload" id="fileToUpload">
    <input type="submit" value="Upload" name="submit">
  </form>
</body>
</html>
The resulting form should look like this:
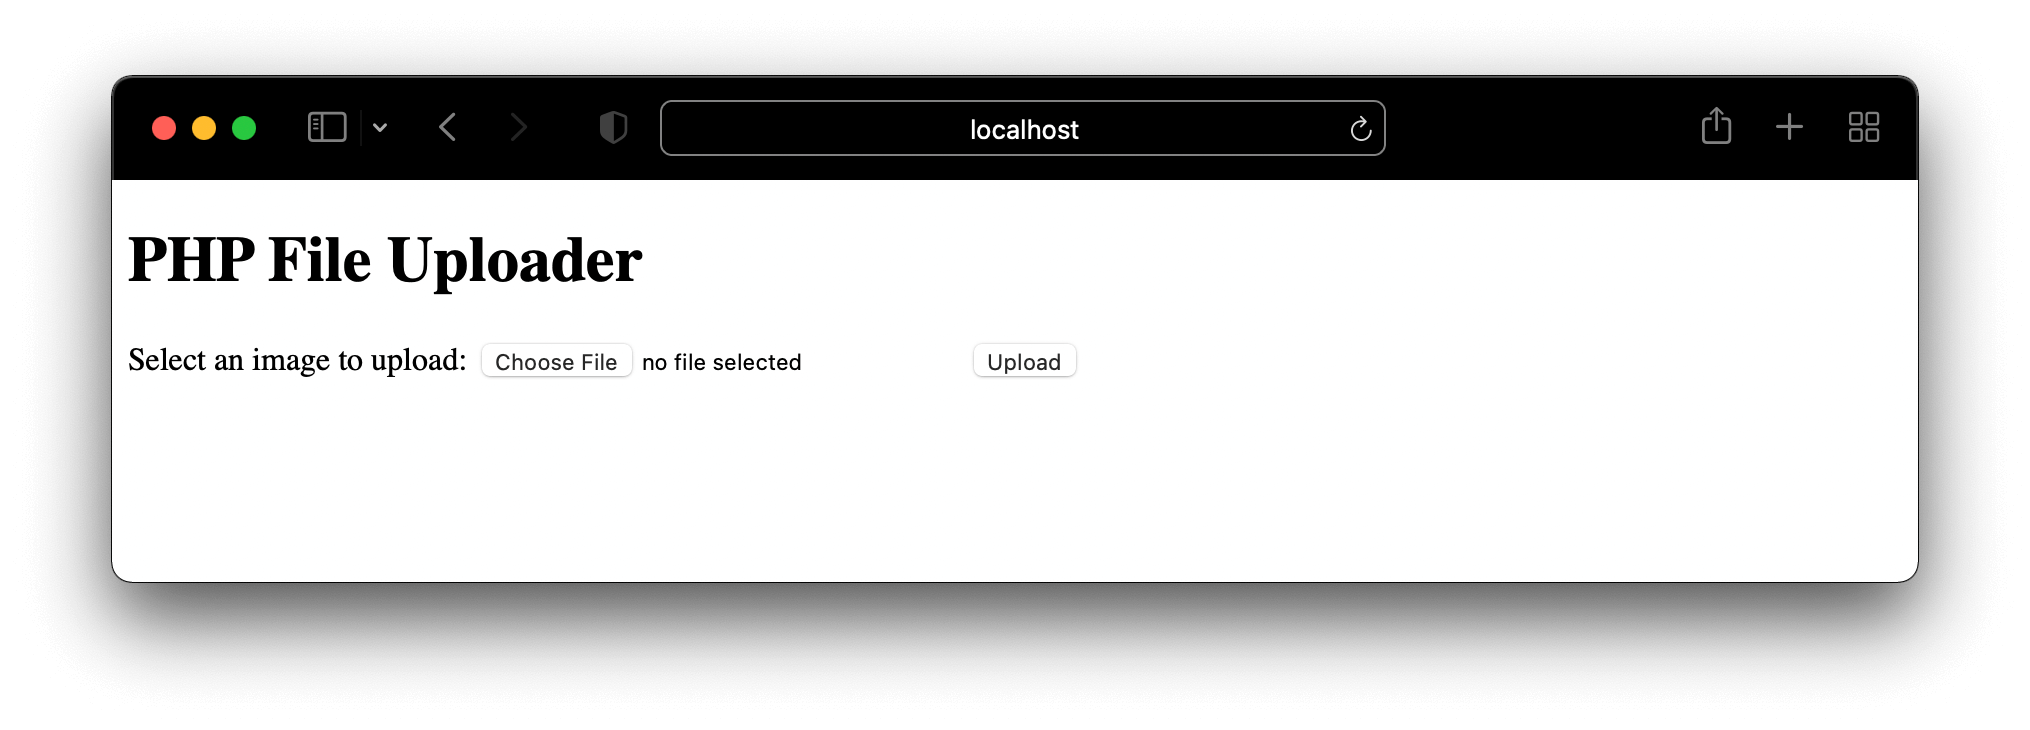
Our form uses default styling. Of course, you can write your own CSS for the uploader to make it look nice or match the look of the rest of your application or brand.
The form’s action attribute refers to the script that will receive and process the uploaded file on the server side.
The next step for us is to develop this script!
Step 2. Creating a PHP file uploading script
The server script name should match the name we mentioned in the HTML.
Create a folder called uploads in the directory of your project. It’ll store the incoming files.
Copy and paste this uploadHandling.php script as a server-side solution for your file/image uploader. We provided some comments to explain the basic functionality of each code section. In this sample code, we’re only allowing certain image file types to be uploaded and limiting the file size to 5 megabytes.
<?php

declare(strict_types=1);

// redirect to upload form if no file has been uploaded or an error occurred
if (!isset($_FILES['fileToUpload']) || $_FILES['fileToUpload']['error'] > 0) {
  header('Location: index.html');
  exit;
}

// configuration
$uploadDirectory = getcwd() . '/uploads/';
$fileExtensionsAllowed = ['jpeg', 'jpg', 'png']; // These will be the only file extensions allowed
$mimeTypesAllowed = ['image/jpeg', 'image/png']; // These will be the only mime types allowed
$maxFileSizeInBytes = 1024 * 1024 * 5; // 5 megabytes

// extract data about the uploaded file
['name' => $fileName, 'tmp_name' => $fileTempName, 'type' => $fileType, 'size' => $fileSize] = $_FILES['fileToUpload'];
['extension' => $fileExtension] = pathinfo($fileName);

$errors = [];

// validate the file extension is in our allow list
if (!in_array($fileExtension, $fileExtensionsAllowed, strict: true)) {
  $errors[] = 'File must have one of the following extensions: ' . implode(', ', $fileExtensionsAllowed) . '.';
}

// validate the file is an allowed mime type based on actual contents
$detectedType = mime_content_type($fileTempName) ?: 'unknown type';
if (!in_array($detectedType, $mimeTypesAllowed, strict: true)) {
  $errors[] = 'File must have one of the following mime types: ' . implode(', ', $mimeTypesAllowed) . '.';
}

// validate if the file already exists
$uploadPath = $uploadDirectory . $fileName;
if (file_exists($uploadPath)) {
  $errors[] = 'File with the same name already exists.';
}

// validate the maximum file size
if ($fileSize > $maxFileSizeInBytes) {
  $errors[] = 'File must not be greater than ' . number_format($maxFileSizeInBytes) . ' bytes.';
}

// verify for errors and move the file upon successful validation
if (count($errors) > 0) {
  echo '<h3>Errors</h3>';
  echo '<ul>';
  foreach ($errors as $error) {
    echo '<li>' . $error . '</li>';
  }
  echo '</ul>';

  exit;
}

if (move_uploaded_file($fileTempName, $uploadPath)) {
  echo 'The file has been successfully uploaded.';
} else {
  echo 'There was an error uploading your file.';
}
When our PHP application receives file uploads, it populates a global $_FILES object with the uploaded file contents
and some file properties, such as name, size, and error status.
Note that we use PHP’s built-in fileinfo extension to determine the actual MIME type for validation because,
in real life, you can’t trust the provided file extension from users.
We also received both the original name of the file and the temporary name that PHP assigned. All uploaded files are placed into a temporary upload directory. If validation passes, and ONLY if it passes, we move the temporary file to the desired location.
For purposes of this example, we’re not allowing a user to upload a file with a name that already exists. In a real production application, you’d likely sandbox user uploads per account or add additional logic to prevent overwriting existing files.
Regarding file size validation, don’t forget that the limits we’re enforcing in this PHP script are separate from any limits enforced in the php.ini configuration or in your web server configuration.
That’s it! You now have a working PHP file uploader.
The complete source code is available in this GitHub repo.
Final thoughts on uploading with your own PHP script
This script provides basic upload functionality. There are many other tasks related to the file uploading process, such as distributing files across servers for optimal delivery, image processing (e.g., cropping and applying other effects), and malicious file detection, among others.
Using Uploadcare as a PHP file uploader alternative
If you need a fast, reliable, and robust solution for your image uploads, you can use a third-party solution. For example, let’s take Uploadcare and use its functions directly from our PHP application. It’ll give you greater reliability, fast uploads, and other features.
Also, you can bypass PHP altogether and embed Uploadcare methods through HTML and JavaScript. If you want to try that approach, check out the step-by-step guide on how to upload files using JavaScript for implementing Uploadcare functionality via JavaScript.
In this tutorial, we’ll continue with the Uploadcare PHP API client, which lets you handle uploads and file operations within your PHP app.
Building a PHP file uploader with a third-party solution, such as Uploadcare, also has its benefits and drawbacks.
Pros
- Super-fast setup and optimized upload speed.
- Manages storage and works with CDN automatically.
- Additional features include resizing, cropping images, inappropriate image detection, etc.
- Stronger security protection, including virus scanning.
- Technical support if you ever run into a problem.
Cons
- Some features are not free, but you can choose the packages according to your business’s needs and budget.
- While Uploadcare stays as light a dependency as possible, it is a third-party service that increases your project size.
Installing Composer
Composer is a PHP dependency manager. First, install it by following the instructions on Composer’s official website.
After that, you can set up the Uploadcare PHP SDK by using the following command:
composer.phar require uploadcare/uploadcare-phpSetting up an Uploadcare account
Sign up for Uploadcare. Once you have an account, create a project to store your images. Then you’ll be able to get your project’s API keys. The Public key helps identify your project from another website or app, and a Secret key is required when using the Uploadcare REST API features.
You’d also need the URL for your project when viewing a file,
which can be found in your project’s Delivery Settings under CDN domain names
and will look something like https://{unique-subdomain}.ucarecd.net/.
Processing uploads with Uploadcare
First, let’s copy and paste an index.html file with the upload form from our previous project:
<!DOCTYPE html>
<html>
<body>
  <h1>PHP File Uploader with Uploadcare</h1>
  <form action="uploadHandling.php" method="post" enctype="multipart/form-data">
    Select an image to upload:
    <input type="file" name="fileToUpload" id="fileToUpload">
    <input type="submit" value="Upload" name="submit">
  </form>
</body>
</html>
Then, create an uploadHandling.php script, include Composer’s autoload file, and add the Uploadcare dependencies:
require_once 'vendor/autoload.php';

use Uploadcare\Configuration;
use Uploadcare\Api as UploadcareApi;
Create a configuration object using a static method of the Uploadcare\Configuration class
and add your personal API keys instead of placeholders.
$configuration = Configuration::create(
  'YOUR_PUBLIC_KEY',
  'YOUR_SECRET_KEY','
);
Now the important part.
First, create an instance of the Uploadcare\Api class by passing it the configuration object.
Then, call the uploader() method on the instance to get the uploader object.
After that, call the fromPath() method on the uploader object to upload the image to Uploadcare.
This method accepts four arguments:
- The file path on your local device.
- The desired filename.
- The MIME type of the file.
- The
UPLOADCARE_STOREoption. It’s set to ’auto’ in this instance, allowing Uploadcare to decide the most suitable storage strategy.
Here is what we get:
$uploader = (new UploadcareApi($configuration))->uploader();

$fileInfo = $uploader->fromPath(
  $_FILES["fileToUpload"]["tmp_name"],
  null,
  null,
  'auto'
);
Finally, let’s display the uploaded image in the browser:
<!DOCTYPE html>
<html>
<body>
  <?php
    echo "<img width='400' src='https://{unique-subdomain}.ucarecd.net/" . $fileInfo . "/-/preview/' />";
  ?>
</body>
</html>
When you launch this code, you can go ahead and start uploading your images.
The complete source code is available in the GitHub repo.
Validating the files
You might notice that we added some rules and restrictions regarding file size and type in the previous section. With Uploadcare, you can do this and more without additional coding. Let’s see how it works.
Open your project settings to find all the file validation and moderation parameters.
You can easily change the maximum file size by editing the related field. In a free Uploadcare plan, you can upload files up to 500 MB.
You can also control the uploaded file type. As long as your account is unverified, you can upload only images. However, providing your debit or credit card details lets you choose any file type you need. It’s important to note that upgrading to a paid plan isn’t necessary to start using this feature.
So, that’s it. There are many more Uploadcare features you can set up through the dashboard. Don’t hesitate to explore it with the Uploadcare Getting Started guides.
PHP file upload script vs Uploadcare: What’s best for you?
Building your own PHP upload script
Creating a custom upload script provides complete control and customization options but demands a substantial time investment for development, scalability, and security measures. It’s a free solution, assuming there is no need for external services.
Leveraging Uploadcare
Uploadcare offers a rapid setup, optimized upload speed, and a professional UI that’s easily customizable. It manages storage and leverages CDN for fast delivery. It comes with features like resizing, cropping, and content detection. Additionally, it provides robust security measures and support.
Simplify PHP File Uploads With the Right Tools
When deciding which implementation path is right for you, consider your project’s specific requirements, resources, and scalability needs. For a fast, reliable, and feature-rich solution seamlessly integrating with PHP, Uploadcare stands out. It simplifies the process and enhances security, performance, and user experience.