How to upload files using JavaScript
Last edited:
In this guide, we’ll learn how to upload files using JavaScript. We’ll create our own file uploader with a user-friendly interface and all the must-have features like file validation, uploading progress tracking, drag-and-drop functionality, and even more.
If you’d rather not build from scratch, Uploadcare’s file uploader gives you validation, progress tracking, and drag-and-drop out of the box — but here we’ll build our own to see how each piece works.
Here’s what our result is going to look like:
Drag-and-drop file uploader
No more ado. Let’s jump into the coding!
Accessing files with HTML
The very first step is accessing files to upload. Let’s start by asking a user to select local files and then read the content of those files.
First, create an index.html with simple input element with a file type attribute:
<input type="file">Actually, a file input isn’t beneficial. It just allows users to select files from their devices.
To send files to a server, we must make an HTTP request.
Well, let’s create a <form> element to wrap our <input> and add a <button> below to submit the form.
Among other things, we need to send a POST request, which we can do by editing the form’s method attribute.
To enable more than one file to upload, we should set a multiple attribute.
Last but not least is setting a Content-Type header with an enctype attribute to send files contents as a payload.
<form method="post" enctype="multipart/form-data">
  <input name="file" type="file" multiple>
  <button type="submit">Upload</button>
</form>
After selecting files and clicking the submit button, you can check your browser’s Network tab to see the requested data details.
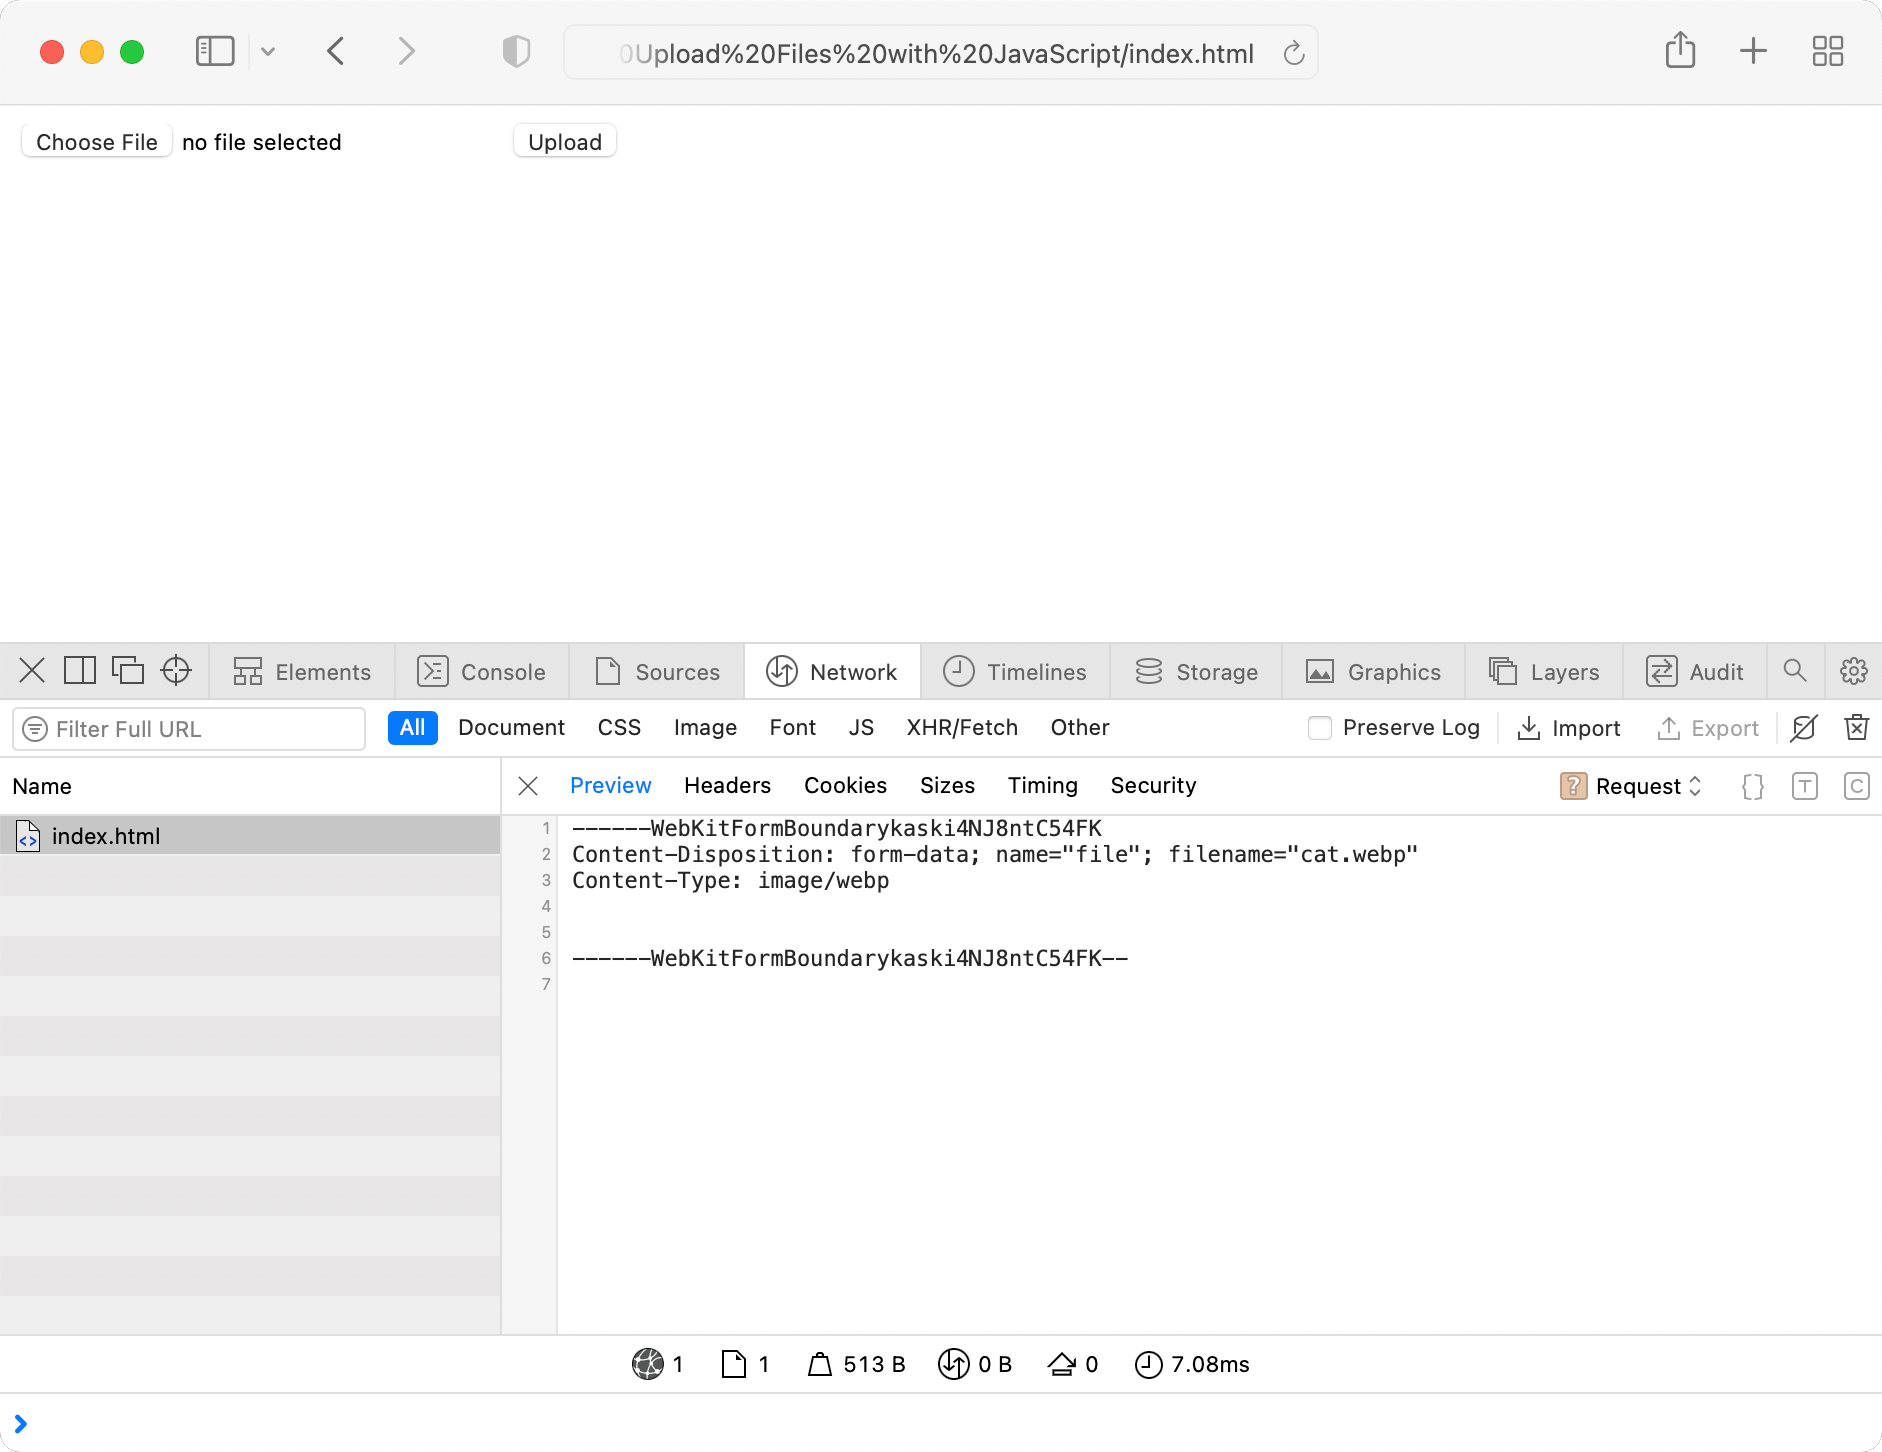 HTTP request on HTML form submit
But where does the data go now? By default, the form data is sent to the URL of the page containing the form — the current page, actually. Generally, all the data should be sent to a server to store and be handled. We can set up a server like Next.js, but it’s a big separate topic to discover. You can learn more about it in our Next.js tutorial. In this post, I suggest concentrating on uploading staff and using httpbin — a simple OSS HTTP Request & Response Service.
Let’s add the action attribute and try it out!
<form action="https://httpbin.org/post" method="post" enctype="multipart/form-data">
  <input name="file" type="file" multiple>
  <button type="submit">Upload</button>
</form>
Now after submitting a form, our page redirects us to an httpbin response:
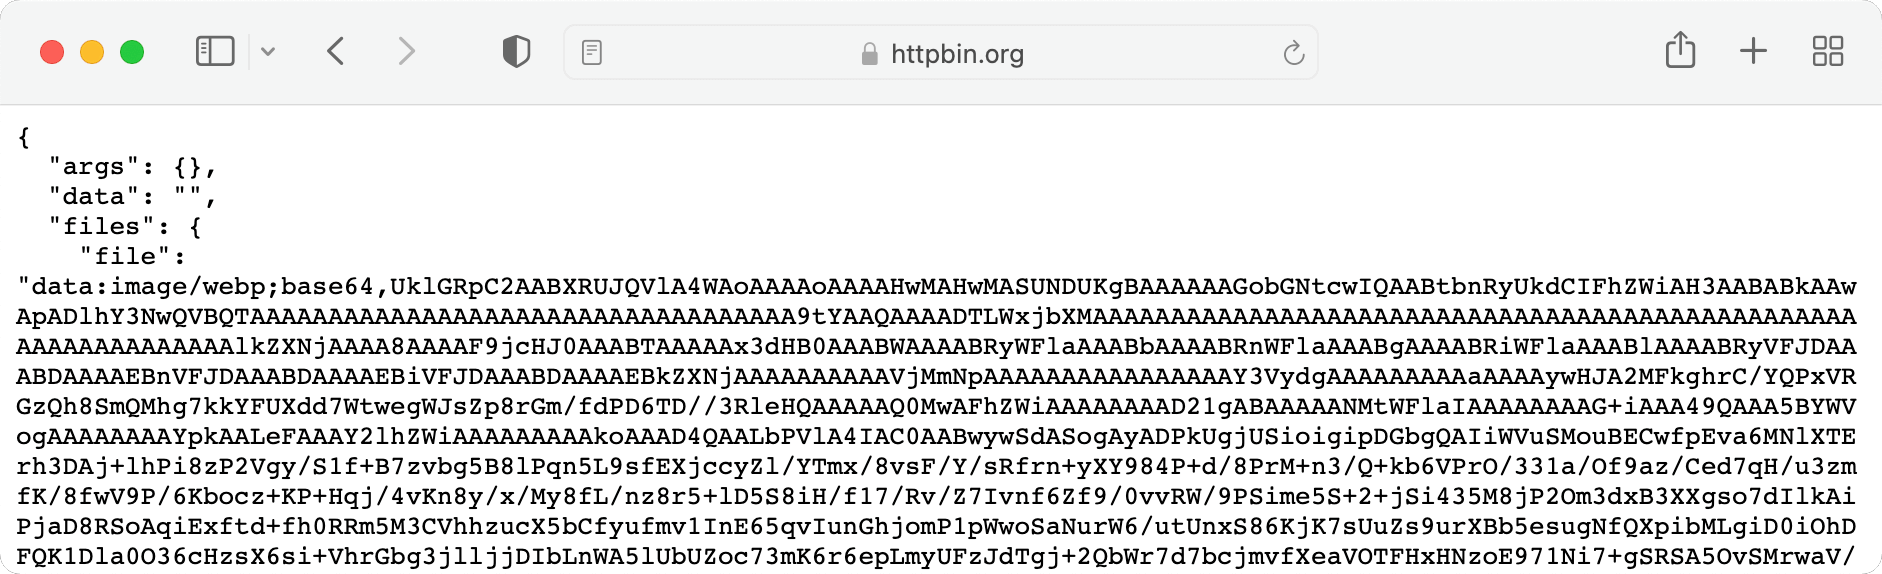 POST-request response from httpbin
So, the boring part is behind us! Let’s move to add a portion of magic with JavaScript ✨
Uploading files using Fetch API
To submit our form, let’s create an index.js file, connect the script to our index.html file, and set up a submit event handler.
The first thing we do here is to stop the browser from sending the file to the server
by calling the event’s method preventDefault:
const form = document.querySelector('form');
form.addEventListener('submit', handleSubmit);

function handleSubmit(event) {
  event.preventDefault();
}
Next, we should construct the HTTP request using the Fetch API.
The Fetch API expects the first argument to be a URL which we can set here instead of the form’s action property.
The second argument is optional and provides an object with custom settings to be applied to the request.
Using it, we can change the default GET method to POST and add the request body using FormData API.
Let’s make a separate function for file uploading called, you guess it, uploadFiles:
function handleSubmit(event) {
  event.preventDefault();

  uploadFiles();
}

function uploadFiles() {
  const url = 'https://httpbin.org/post';
  const formData = new FormData(form);

  const fetchOptions = {
    method: 'post',
    body: formData
  };

  fetch(url, fetchOptions);
}
That’s the bare minimum needed to upload files using Fetch API. Check the result through your browser’s Network tab:
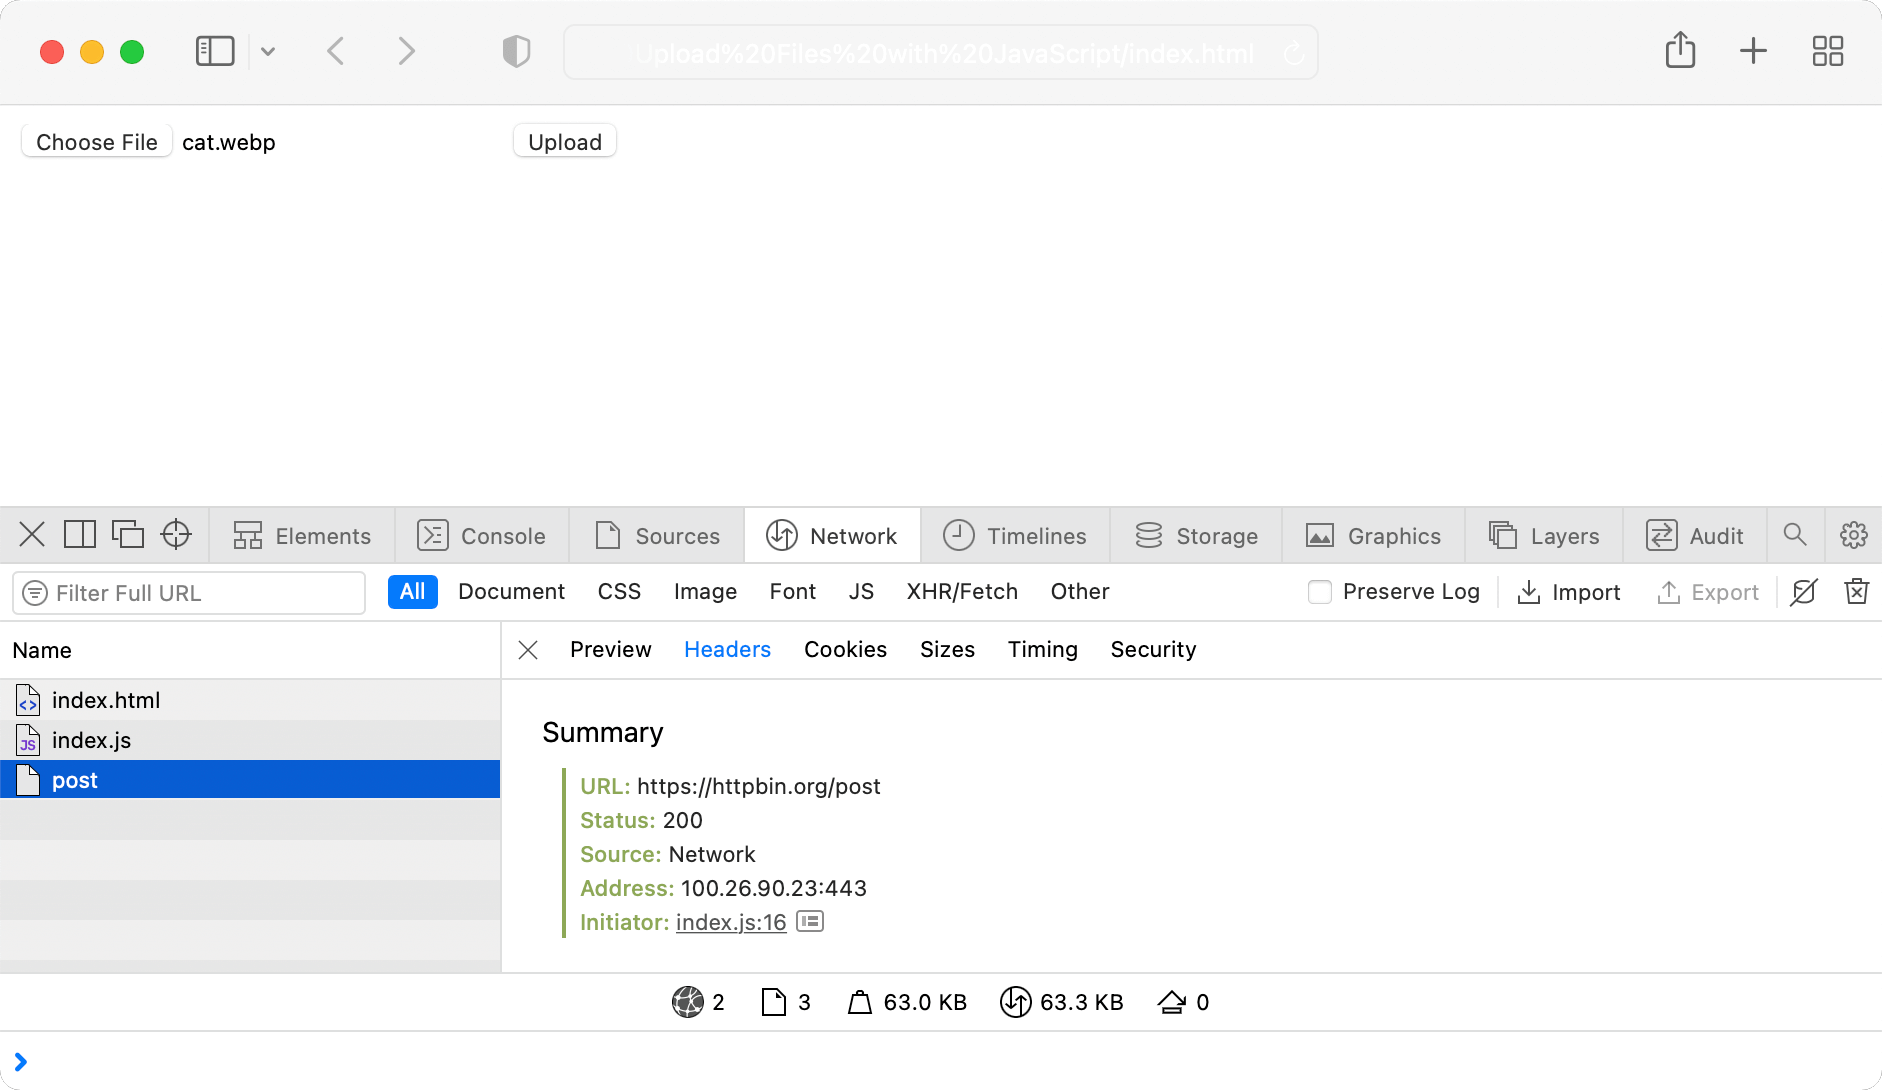 Uploading files with Fetch API
For those who prefer learning through video, our YouTube tutorial offers a visual guide on using the Fetch API for file uploads. It covers the basics and introduces features we’ll explore further in this blog post, including UX-friendly messages, error handling, file validation, and image previews.
Fetch API is a modern way of fetching resources in JavaScript. It is a more powerful and flexible replacement for XMLHttpRequest in most cases. Unfortunately, Fetch API still doesn’t provide any way to track file uploading progress. If we want to implement an ordinary progress bar to improve user experience (and in this article, we will!), we should use the old way of interacting with a server.
With that in mind, let’s refactor our solution!
Uploading files using XMLHttpRequest
Let’s rewrite the uploadFiles function.
We should create a new request with a XMLHttpRequest constructor. The request returns an object which we can use for making requests.
First, we call open() method to initialize the request.
This method expects two required parameters: method and URL.
Then, we call send() method, where we pass the body of the data. I prefer to send a simple object, but it could be FormData, Blob, and even more.
function uploadFiles() {
  const url = 'https://httpbin.org/post';
  const method = 'post';

  const xhr = new XMLHttpRequest();

  const data = new FormData(form);

  xhr.open(method, url);
  xhr.send(data);
}
That’s uploading files with XMLHttpRequest. Don’t hesitate to check your Network tab to ensure the request also works.
So, our file uploader is already performing its essential function. However, for now, we do not handle errors in any way. That allows us to upload files of any size — poor httpbin is hardly designed to accept gigabytes of information from us.
In addition, our file uploader does not look user-friendly at all: we do not track the uploading progress or show information about uploaded files in the interface in any way.
Nobody would want to use such a poor solution. Well, let’s improve it with more features!
Filtering for a particular file type
In some scenarios, you might want to restrict the types of files that users can upload. For example, you may only want to allow video (e.g., MP4, OGG) or documents (e.g., PDF, DOCX) to be uploaded. To achieve this, you can add a client-side check to filter for a particular file extension even before submitting the form.
Let’s transform our file uploader to just an image uploader by adding an accept attribute to our input:
<form>
  <input name="file" type="file" multiple accept="image/*">
  <button type="submit">Upload</button>
</form>
Often you should limit the user to picking any arbitrary file type. For example, if your file input lets users upload a profile picture, you may want them to select web-compatible image formats, such as JPEG or PNG. Acceptable file types can be specified with the accept attribute, which takes a comma-separated list of allowed file extensions or MIME types:
<form>
  <input name="file" type="file" multiple accept="image/webp, image/jpeg, image/png">
  <button type="submit">Upload</button>
</form>
Note that the accept attribute doesn’t strictly validate the selected files.
Instead, it serves as a way to guide users toward choosing the correct file types by providing hints to the browser.
It is still possible for users to override this guidance by modifying options in the file chooser.
That’s why you should ensure the expected requirement is validated server-side.
At the same time, client-side validation is user-friendly. It is a best practice when we validate the file type before submitting it to upload and show related hints to our users. Let’s start enhancing our UX by creating a status markup below the form:
<p>
<strong>Uploading status:</strong>
<span id="statusMessage">🤷♂ Nothing's uploaded</span>
</p>Now we need to get references to the status message node, the submit button, and the file input. Let’s declare variables for them at the very beginning of our script:
const statusMessage = document.getElementById('statusMessage');
const submitButton = document.querySelector('button');
const fileInput = document.querySelector('input');
Having them, we can toggle the submit button and show some messages depending on the uploading state and the list of files the user picked.
To start, let’s create a function that will update the status:
function updateStatusMessage(text) {
  statusMessage.textContent = text;
}
Then, create a function that will throw an error when the file type is unsupported:
function assertFilesValid(fileList) {
  const allowedTypes = ['image/webp', 'image/jpeg', 'image/png'];

  for (const file of fileList) {
    const { name: fileName } = file;

    if (!allowedTypes.includes(file.type)) {
      throw new Error(`❌ File "${fileName}" could not be uploaded. Only images with the following types are allowed: WEBP, JPEG, PNG.`);
    }
  }
}
Now we need to pass a list of files to this function. Let’s create an event handler called handleInputChange:
function handleInputChange() {
  try {
    assertFilesValid(fileInput.files);
  } catch (err) {
    updateStatusMessage(err.message);
    return;
  }

  submitButton.disabled = false;
}
As you see, we get the list of files from the file input and pass it to the assertFilesValid.
If an error is thrown, we show it to our user. Otherwise, we turn off the submit button to allow the uploading.
The last thing is to set up an сhange event handler which is fired each time the user selects files:
fileInput.addEventListener('change', handleInputChange);This is it. Now you can try to upload files in different extensions by yourself to see how it works:
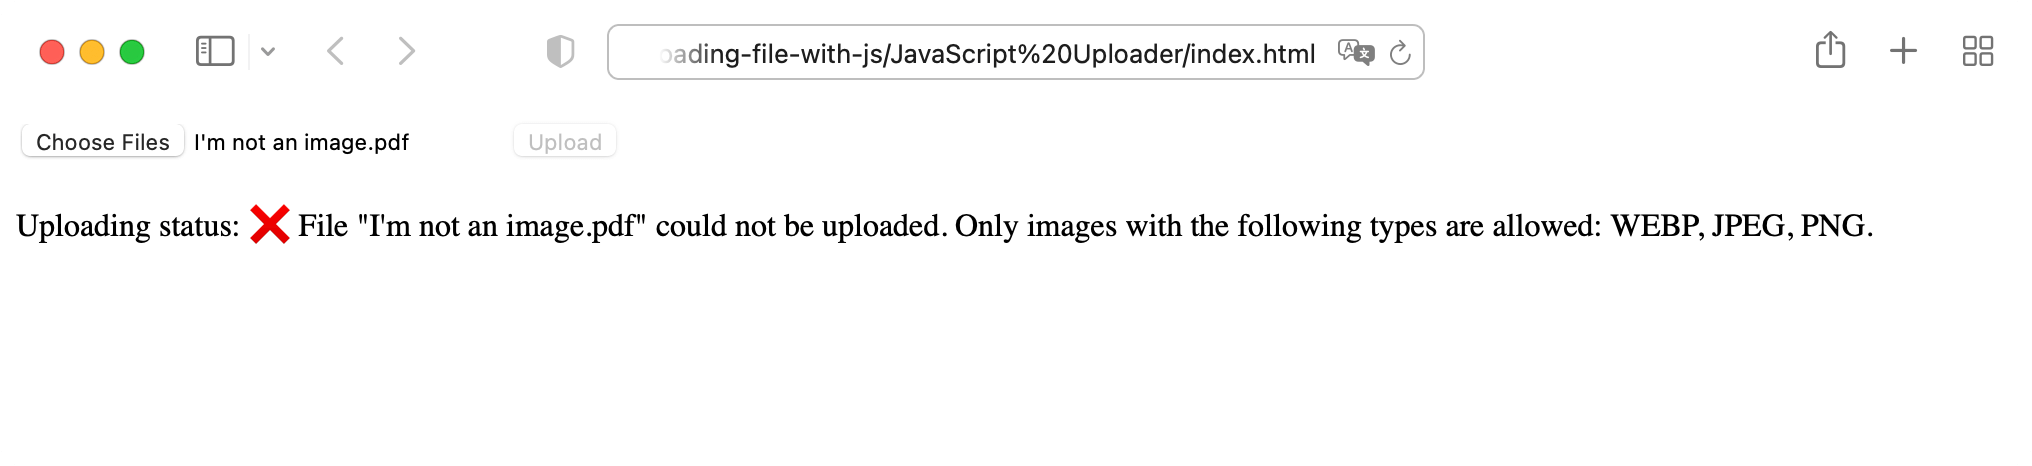 File type validation
If you pick an unsupported file, the uploader will show an error.
However, if then you select the correct file, the uploader won’t remove the error.
To fix this, create a function called resetFormState and call it when the file changes.
Also, it’s worth disabling the submit button here because we’re resetting the form, right?
function resetFormState() {
submitButton.disabled = true;
updateStatusMessage(`🤷♂ Nothing's uploaded`)
}function handleInputChange(event) {
resetFormState();
// the rest of the code goes here
}Cool, it works. But adding more limits can make the uploader even more powerful. Let’s continue improving it!
File size validation
Let’s say we only want to allow uploading up to 1MB. We care about our users, so we don’t want them to wait while the file uploads on the server only to get an error message. So, we can use JavaScript validation to check that the selected file follows the given requirements.
Let’s declare a new variable inside the assertFilesValid function called sizeLimit,
unpack a fileSize property from each file, and add one more condition inside the loop:
function assertFilesValid(fileList) {
  const allowedTypes = ['image/webp', 'image/jpeg', 'image/png'];
  const sizeLimit = 1024 * 1024; // 1 megabyte

  for (const file of fileList) {
    const { name: fileName, size: fileSize } = file;

    if (!allowedTypes.includes(file.type)) {
      throw new Error(`❌ File "${fileName}" could not be uploaded. Only images with the following types are allowed: WEBP, JPEG, PNG.`);
    }

    // ↓ the new condition ↓
    if (fileSize > sizeLimit) {
      throw new Error(`❌ File "${fileName}" could not be uploaded. Only images up to 1 MB are allowed.`);
    }
  }
}
Check your browser to see it in action:
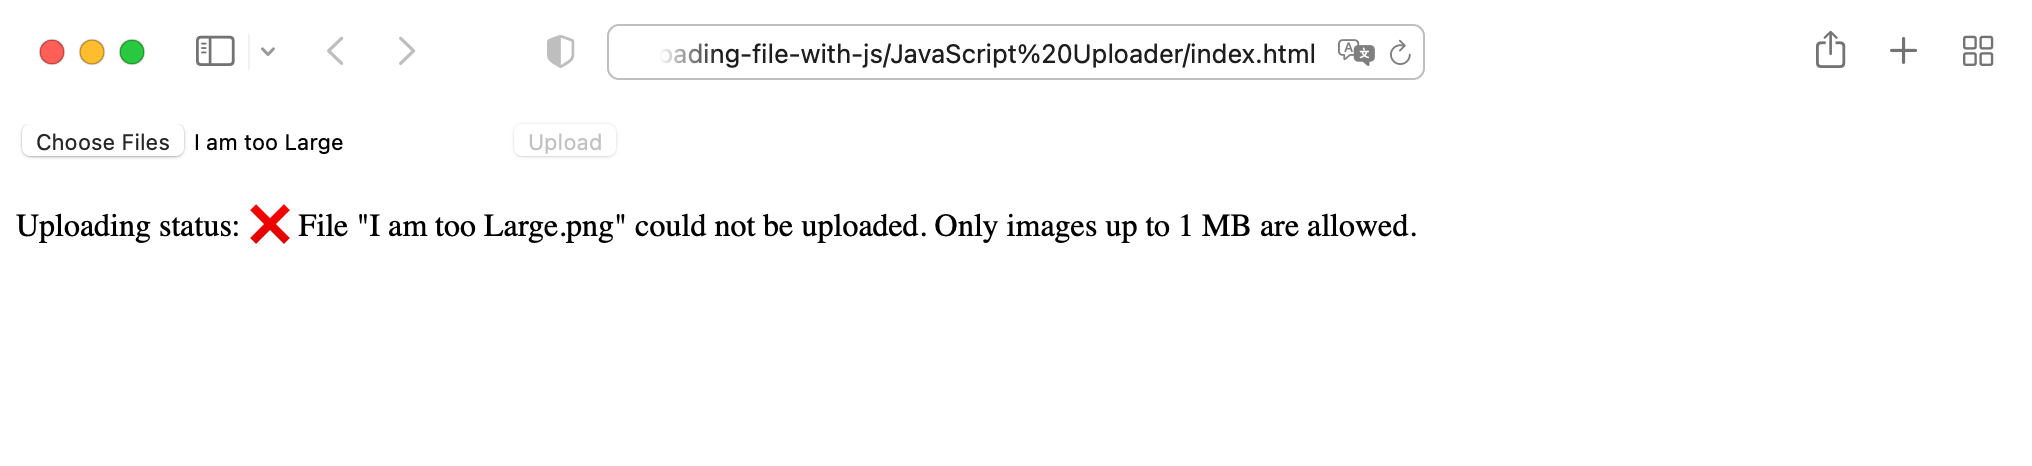 File size validation
Now let’s come back to the uploading. Suppose the user selects a file that satisfies our requirements. In that case, we should build an interface that tracks the uploading process, shows the uploaded file details, and, finally, sends some positive messages.
Tracking file upload progress
Let’s start with a typical progress handler.
The loadend event is fired on an XMLHttpRequest instance when the request has been completed
(doesn’t matter whether it is successful or not). We can use it to show the result message to a user.
Here we enhance the uploadFiles function by adding the event handler prior to sending the request:
function uploadFiles() {
  // XHR and FormData instance creation is here

  xhr.addEventListener('loadend', () => {
    if (xhr.status === 200) {
      updateStatusMessage('✅ Success');
    } else {
      updateStatusMessage('❌ Error');
    }
  });

  // XHR opening and sending is here
}
Hope, while texting that, you’ll see a green tick:
 Successful file upload
It’s also worth showing a user the loading state and disabling the submit button. Otherwise, the user may not understand what is going on and trigger the uploading multiple times. To do this, create a new function:
function showPendingState() {
  submitButton.disabled = true;
  updateStatusMessage('⏳ Pending...')
}
And call prior to uploading:
function handleSubmit(event) {
  event.preventDefault();

  // ↓ here ↓
  showPendingState();

  uploadFiles();
}
We can do even better by checking the uploading status dynamically. Let’s set up a progress handler where we could use the loaded and total properties which indicate the amount of work already performed and total size of the data being processed or transmitted respectively.
Add this handler prior to the code that sends the request:
function uploadFiles() {
  // XHR and FormData instance creation along with 'loadend' listener are here

  xhr.upload.addEventListener('progress', event => {
    updateStatusMessage(`⏳ Uploaded ${event.loaded} bytes of ${event.total}`);
  });

  // XHR opening and sending is here
}
Note that we’re attaching the progress event handler not to the xhr object itself, but to its upload property!
Now you can check the current progress of the upload:
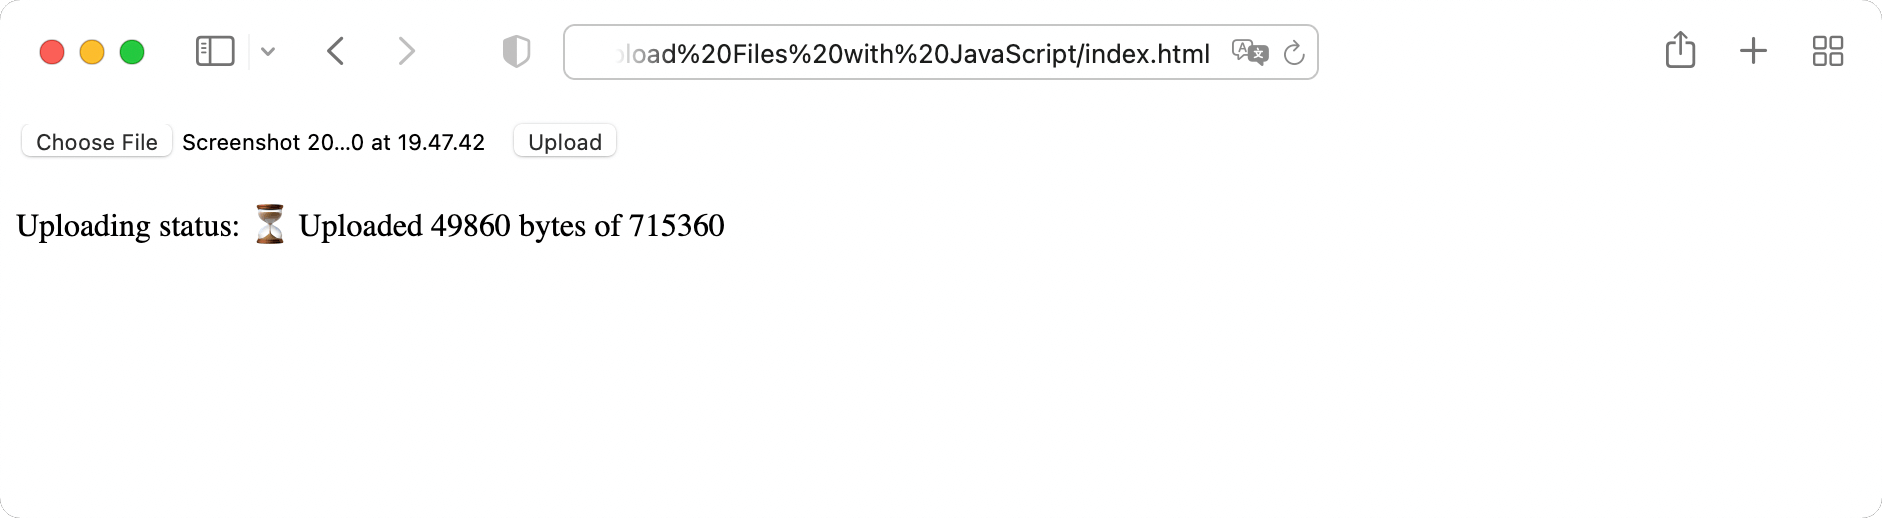 Pending file upload
But what feature provides even a more user-friendly experience? Progress bar, obviously!
File upload progress bar
Actually, we have a <progress> to indicate the completion progress of a task.
It has two attributes: max and value. Let’s add it to our markup:
<progress value="0" max="100"></progress>The max attribute describes how much work the task indicated by the progress element requires.
We set its value to 100 to operate it like a percentage. The value attribute specifies how much of the task has already been completed.
We’ll change it progressively via JavaScript.
First, let’s declare one more variable globally:
const progressBar = document.querySelector('progress');Then create a function that will update the value of this progress bar:
function updateProgressBar(value) {
  const percent = value * 100;
  progressBar.value = Math.round(percent);
}
It gets a fraction value but then transforms it to a percentage, rounds to the nearest integer and then sets it as a progress bar value.
Now call it when the progress event happens:
xhr.upload.addEventListener('progress', event => {
  updateStatusMessage(`⏳ Uploaded ${event.loaded} bytes of ${event.total}`);
  updateProgressBar(event.loaded / event.total);
});
Finally, we reset the value after the uploading completes:
xhr.addEventListener('loadend', () => {
  // the `xhr.status` check is here

  updateProgressBar(0);
});
Well, here we are with a simple progress visualization:
 File upload progress bar
Now it’s time to give our users a little more details about the exact files they have uploaded.
Getting information about uploaded files
The FileList object collects the information about all the files users select. For instance, that allows us to determine the number of selected files. Let’s prepare the markup for our counter:
<p>
  <strong>Uploaded files:</strong>
  <span id="fileNum">0</span>
</p>
Then declare a global fileNum variable that stores the counter element:
const fileNum = document.getElementById('fileNum');Create a function that will update the counter:
function renderFilesMetadata(fileList) {
  fileNum.textContent = fileList.length;
}
Finally, fire the function once the files have been uploaded:
xhr.addEventListener('loadend', () => {
  if (xhr.status === 200) {
    updateStatusMessage('✅ Success');

    // ↓ here ↓
    renderFilesMetadata(fileInput.files);
  } else {
    updateStatusMessage('❌ Error');
  }

  updateProgressBar(0);
});
Alright folks, now we talk numbers!
 Count the number of files uploaded
Actually, we can extract more information from the uploaded files. Let’s try it out.
First, introduce a list to our markup:
<ul id="fileListMetadata"></ul>Then get access to the list by its ID:
const fileListMetadata = document.getElementById('fileListMetadata');Now we can extract the information from each uploaded file in a loop and render it to the page by using insertAdjacentHTML method.
function renderFilesMetadata(fileList) {
  fileNum.textContent = fileList.length;

  fileListMetadata.textContent = '';

  for (const file of fileList) {
    const name = file.name;
    const type = file.type;
    const size = file.size;

    fileListMetadata.insertAdjacentHTML(
      'beforeend',
      `
        <li>
          <p><strong>Name:</strong> ${name}</p>
          <p><strong>Type:</strong> ${type}</p>
          <p><strong>Size:</strong> ${size} bytes</p>
        </li>
      `,
    );
  }
}
The last thing is to add these two lines to resetFormState function to make sure that metadata resets correctly:
fileListMetadata.textContent = '';
fileNum.textContent = '0';
Well, here we are now:
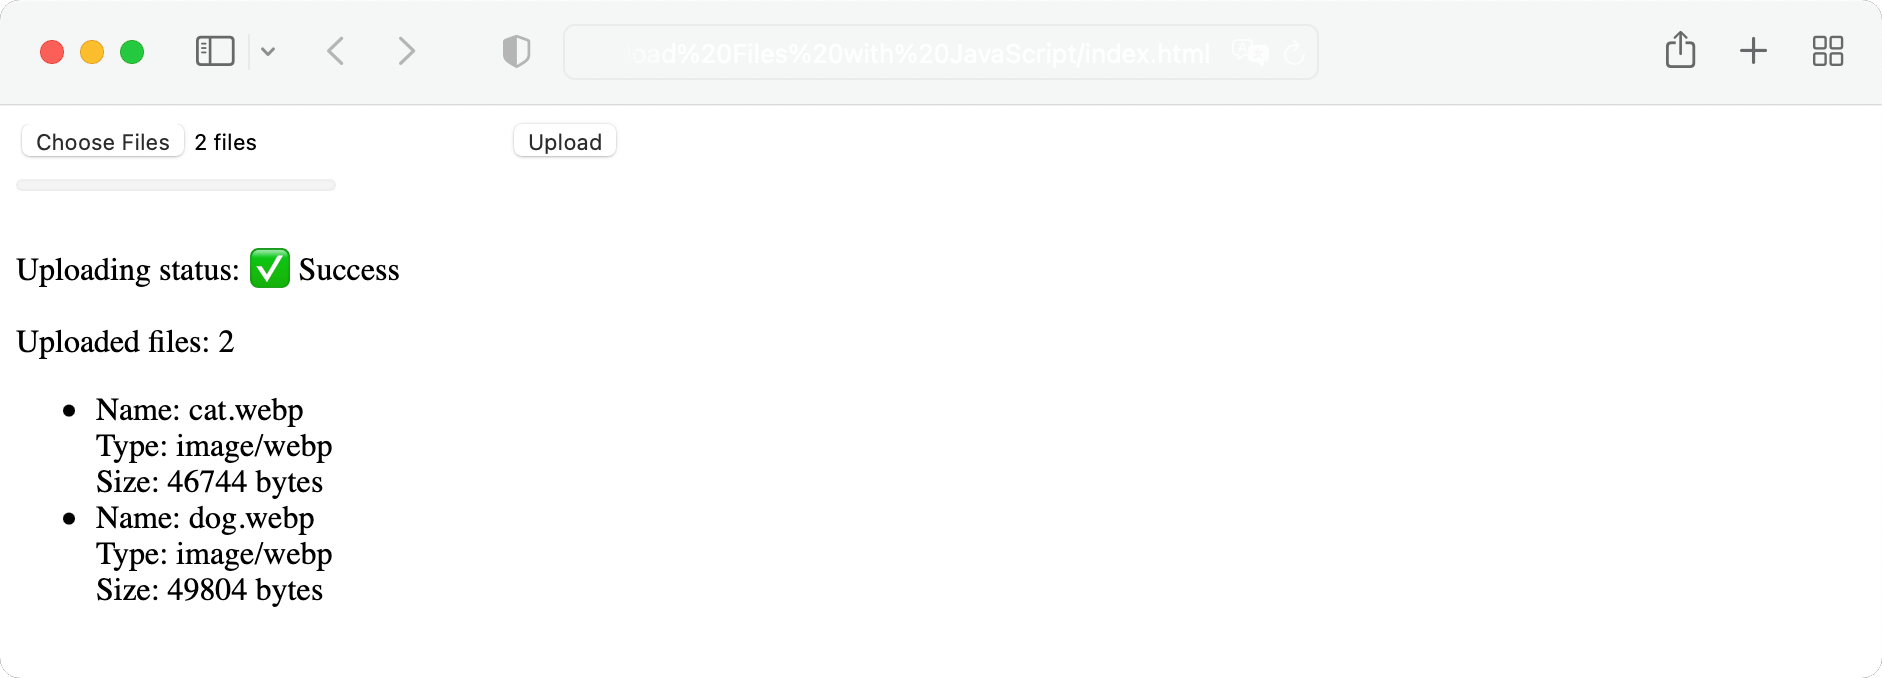 Getting meta data of a file
Feel free to try it out in this sandbox:
I believe we now have all the basic functionality for a simple but powerful file uploader. However, it still looks so... boring. Isn’t it? How about adding some styles to make our uploader, you know, awesome? Something like that, huh?
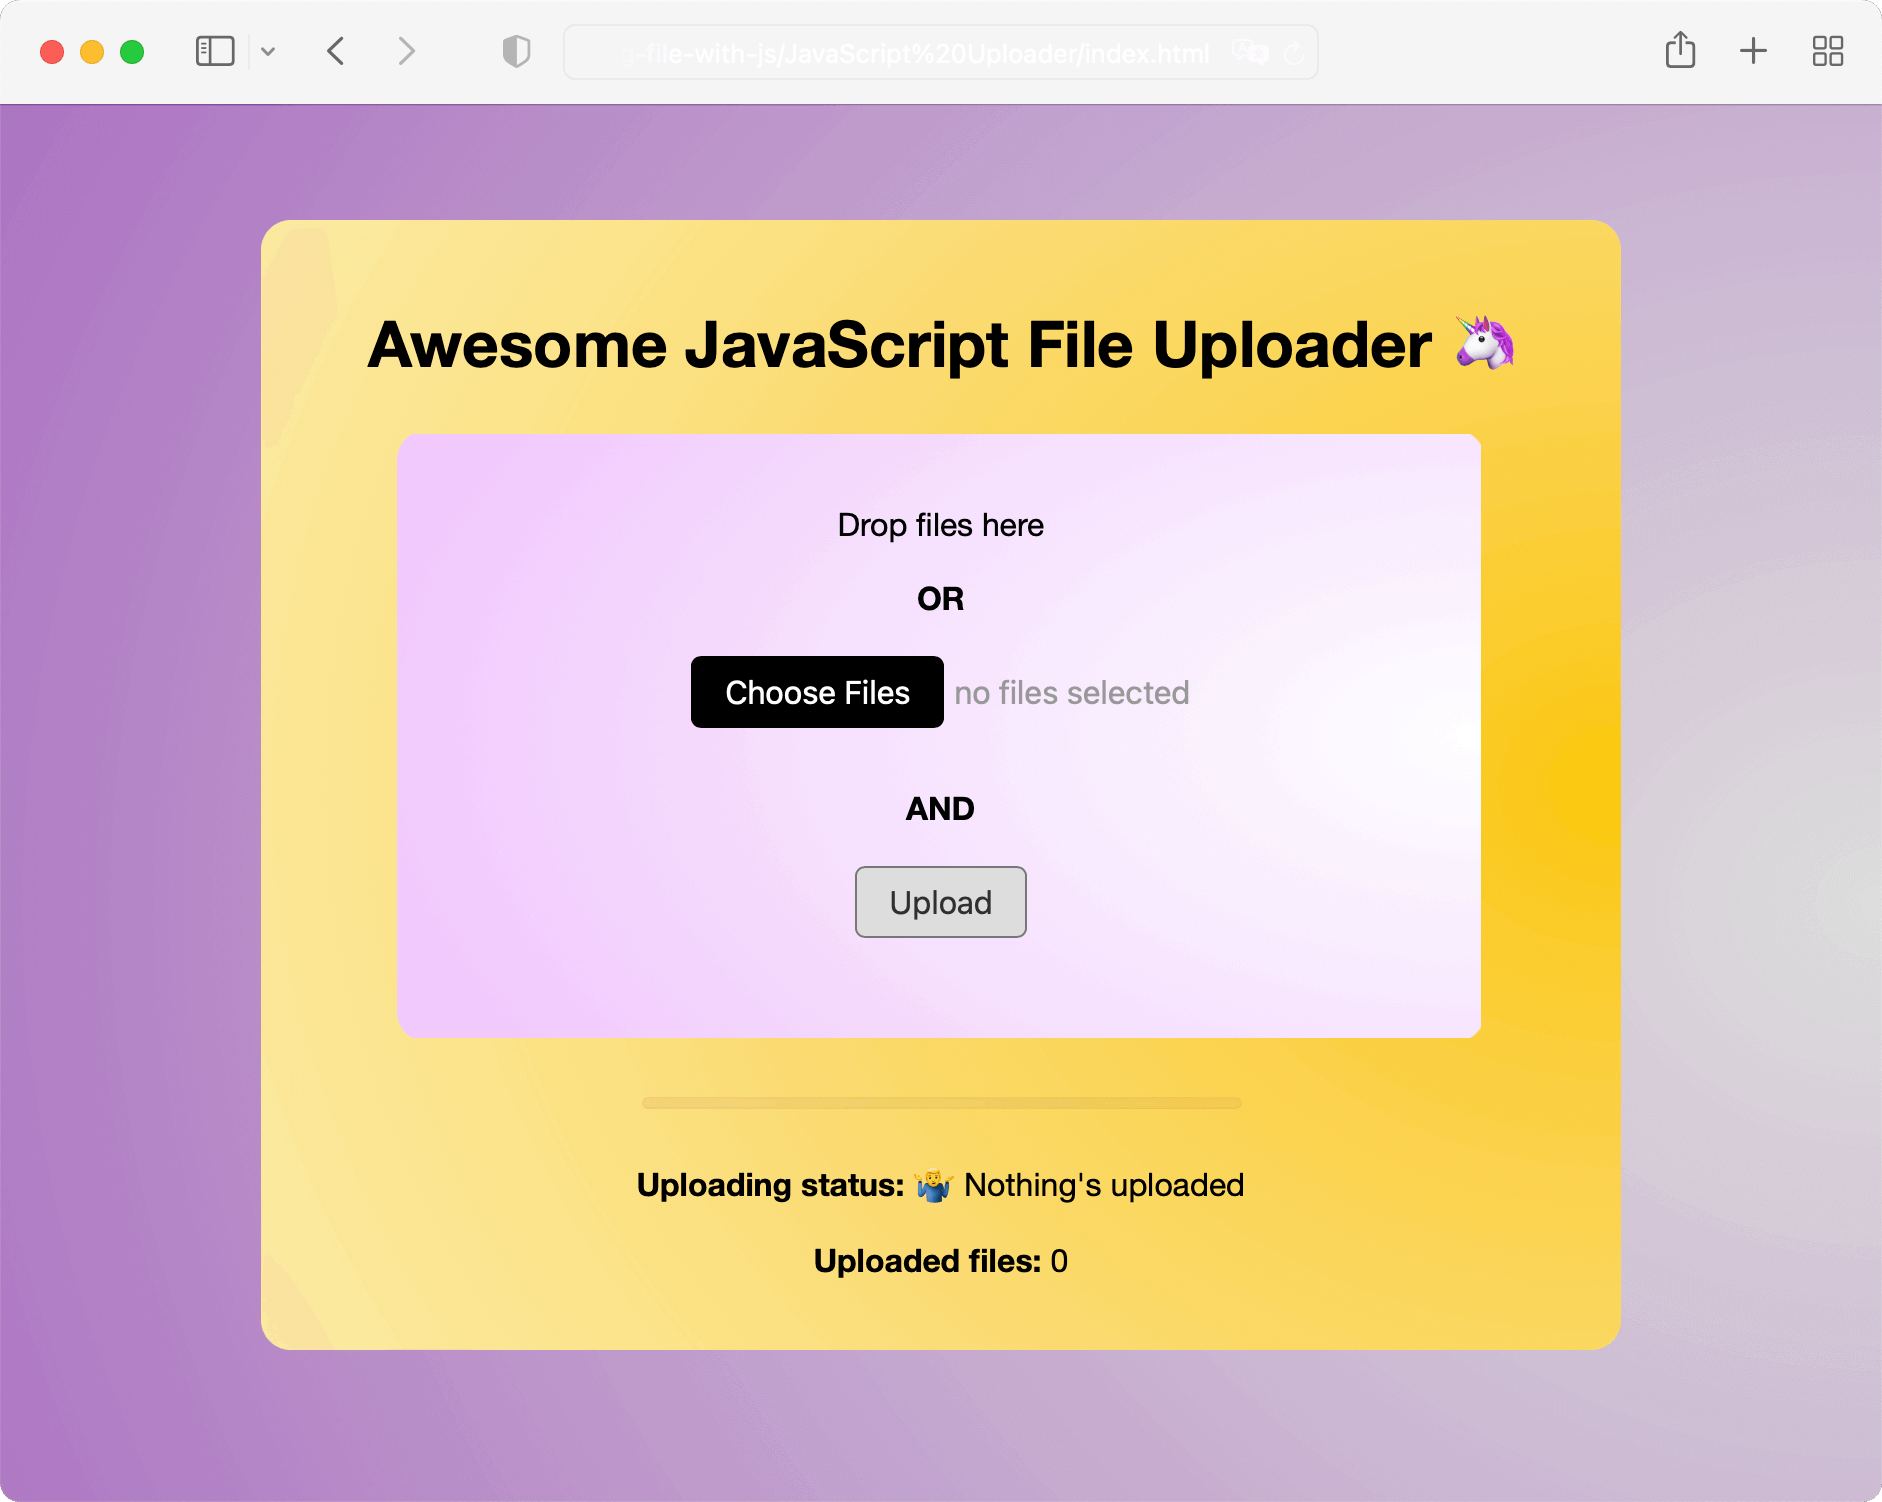 File uploader with JavaScript
And you may notice yet another spoiler on the screenshot — our final touch — implementing a drag-and-drop file uploading.
Drag-and-drop hints
It is well-known that utilizing drag and drop functionality is trivial user interaction with file uploading. It’s a more friendly approach than triggering the file selection dialog. Fortunately, modern browsers provide APIs that enable us to implement a drag-and-drop file selector and uploader.
Since we’re focusing on writing JavaScript logic in this tutorial, I won’t dive into customizing our components. You can find the final markup and styles in my repository. Next, we will concentrate on the part directly related to implementing drag-and-drop functionality.
First, wrap our form with a new element that would be a drop area:
<div id="dropArea">
  <form>
    <-- the rest of the form is here -->
  </form>
</div>
Define a new variable in our script:
const dropArea = document.getElementById('dropArea');The best practice to enhance user experience is to provide clear visual hints whenever a file can be securely dropped. It is often achieved by incorporating a dotted or dashed area. Let’s implement the highlighting and start handling the first drag-and-drop events.
In all, there are eight events the browser fires related to drag and drop,
but we’ll be going over just four of them: dragenter, dragleave, dragover, and drop.
Here is a short sum up of their functionality:
dragenteris fired when the dragged item enters over a drop area, making it the target for the drop event.dragleaveis the opposite ofdragenterand is fired when the dragged item leaves a target drop area.dragoveris fired every few hundred milliseconds while the dragged item is over a target drop area.dropis fired once the user drops the item onto the target drop area.
As you might expect, you can register event handlers for drag-and-drop events the same way you register event handlers for most browser events. However, there are a lot of tricky parts related to them.
For instance, you can not intercept drop event
if you do not prevent default behavior on dragenter and dragover (read more on MDN).
Or it’s hard to determine where exactly user is going to drop something because drag-events are fired not only on the drop area itself,
but also on its children.
That’s why usually the code for drag-n-drop is kind of obscure. To simplify the task, I’m going to reuse the code of Uploadcare engineers who implemented drag-n-drop file uploader properly years ago.
So, let’s define a function called initDropAreaHighlightOnDrag,
which will add highlight class to the drop area when the user is dragging the file over it:
function initDropAreaHighlightOnDrag() {
  let dragEventCounter = 0;

  dropArea.addEventListener('dragenter', event => {
    event.preventDefault();

    if (dragEventCounter === 0) {
      dropArea.classList.add('highlight');
    }

    dragEventCounter += 1;
  });

  dropArea.addEventListener('dragover', event => {
    event.preventDefault();

    // in case of non triggered dragenter!
    if (dragEventCounter === 0) {
      dragEventCounter = 1;
    }
  });

  dropArea.addEventListener('dragleave', event => {
    event.preventDefault();

    dragEventCounter -= 1;

    if (dragEventCounter <= 0) {
      dragEventCounter = 0;
      dropArea.classList.remove('highlight');
    }
  });

  dropArea.addEventListener('drop', event => {
    event.preventDefault();

    dragEventCounter = 0;
    dropArea.classList.remove('highlight');
  });
}
We’re counting the events to deal with the problem of event registration described above.
Do not forget to call this function to make everything work!
Drag-and-drop file uploader
Okay, now we can finally implement the behaviour of our uploader that happens right after the user drops the item. Actually, we should do all the same things that we did previously while handling form submit.
Define a drop event handler and attach it to the drop area:
dropArea.addEventListener('drop', handleDrop);

function handleDrop(event) {
  const fileList = event.dataTransfer.files;

  resetFormState();

  try {
    assertFilesValid(fileList);
  } catch (err) {
    updateStatusMessage(err.message);
    return;
  }

  showPendingState();

  uploadFiles(fileList);
}
It looks exactly like handleSubmit, but does not work.
Since we don’t submit our form by using drop event, we should get our dropped files list with a files property of DataTransfer object.
Then we should pass this file list to the assertFilesValid and uploadFiles functions.
But the last one does not know how to deal with it. Let’s teach it!
Instead of sending the full form, as we did before, now we have to get the passed files and append them to the FormData object:
function uploadFiles(files) {
  // XHR-related code stays the same

  const data = new FormData();

  for (const file of files) {
    data.append('file', file);
  }

  // XHR-related code stays the same
}
Yet another minor thing to update here is passing files to the renderFilesMetadata function:
renderFilesMetadata(files);Also, do not forget to change the handleSubmit handler to work with this new uploadFiles function:
function handleSubmit(event) {
  event.preventDefault();

  showPendingState();

  // ↓ pass `fileInput.files` here! ↓
  uploadFiles(fileInput.files);
}
If you’d like to add accessibility to the file uploader, we have a video tutorial just for you! It walks you through everything you need to know, including how to enhance keyboard navigation, use ARIA attributes, and even test accessibility using a screen reader like VoiceOver. It’s a great way to make your uploader user-friendly for everyone!
That’s all you need to know to create a file uploader with JavaScript.
See how it changes upon we start with a simple input element:
Drag-and-drop file uploader
Now it’s a really awesome uploader, isn’t it? 🦄
Building a file uploader from scratch is fun but not time-saving. Actually, file uploaders could be much more powerful: control who can upload files by authenticating requests, set up server-side validation, and edit files right before uploading by cropping, rotating, and filtering them.
There is no need to build all those features yourself since the already-baked solution already exists. Let’s look at my favorite one — Uploadcare File Uploader.
Uploading files with Uploadcare File Uploader
Uploadcare provides is a robust JavaScript library designed to build personalized file-handling services. File Uploader come with diverse interactive and customizable UI components, elevating users’ overall file uploading and processing experience. Additionally, by leveraging Uploadcare’s versatile file-handling capabilities, you gain access to features such as MIME-type filtering, signed uploads, image editor, and much more.
Getting started with Uploadcare File Uploader takes just a couple of minutes.
Let’s create a new HTML document to connect the script and register Uploadcare components:
<script type="module">
  import * as UC from 'https://cdn.jsdelivr.net/npm/@uploadcare/file-uploader@v1/web/file-uploader.min.js';
  UC.defineComponents(UC);
</script>
<link
  rel="stylesheet"
  href="https://cdn.jsdelivr.net/npm/@uploadcare/file-uploader@v1/web/uc-file-uploader-inline.min.css"
>
Note that we manually specify the File Uploader version, so you should replace it with the latest release while implementing.
Start using the File Uploader in your newly created application markup.
Uploadcare provides three solution to install the file uploader, so you can choose one that best fits your needs.
For instance, let’s try inline mode:
<uc-file-uploader-inline
  ctx-name="my-uploader"
>
</uc-file-uploader-inline>
The ctx-name attribute specifies the name of the uploader context, which allows wire blocks together.
Last but not least is configuring the uploader by adding <uc-config>.
The ctx-name attribute should be similar to the previous one. The pubkey attribute should include your public key.
Sign up to Uploadcare, get a public API key in Uploadcare project’s dashboard,
and replace YOUR_PUBLIC_KEY with your personal one.
<uc-config
  ctx-name="my-uploader"
  pubkey="YOUR_PUBLIC_KEY"
></uc-config>
Perfect, now we have a three-minutes-set powerful file uploader right in our application:
Uploadcare file uploader
Awesome wrapping up
Now you’re familiar with all significant concepts of uploading files with JavaScript: multiple file uploads,
uploading files using Fetch API and XMLHttpRequest, filtering for a particular file extension,
file size validation, implementing a progress bar, extracting file information, implementing drag-and-drop functionality,
and, finally, how to use all that staff and even more using Uploadcare and not wasting time by writing any code from scratch.
You are welcome to explore the source code on GitHub and discover a live demo implementation.
Feel free to learn more about Uploadcare, and explore other tutorials, such us how to upload files with React or how to upload file in Angular, or considering what kind of magic you can do with the uploaded images following our extracting colors guide 🎨
That is all for today. Until we meet again, happy reading and stay awesome (just like our uploader) 🦄