React file upload: How to upload files in React
Last edited:
React is one of the popular tools for building user interfaces and is a skill worth knowing. If you're building something with React, you will face the challenge of uploading files sooner or later. Do not worry; writing a file-uploading logic in React is straightforward, and this post will show you exactly how to do it.
We'll cover how to upload a single file, upload multiple files, and see how you can use a prebuilt file uploader that does the heavy lifting for you. But first, let's dive into uploading a single file in React with fetch.
Uploading a single file in React with fetch
Firstly, we will create a boilerplate app that we'll use to add the file upload markup and logic. We will use Vite and TypeScript.
npm create vite@4 react-file-upload -- --template react-tsDo not forget to install the deps as the scaffolding command described above tells you in the output.
Then, we'll create a new component called SingleFileUploader in src/components/SingleFileUploader.tsx. For starters, we will show how to add a file picker in React and have the user interact with it. Here's the code:
import React, { useState } from 'react';

const SingleFileUploader = () => {
  const [file, setFile] = useState<File | null>(null);

  const handleFileChange = (e: React.ChangeEvent<HTMLInputElement>) => {
    if (e.target.files) {
      setFile(e.target.files[0]);
    }
  };

  const handleUpload = async () => {
    // We will fill this out later
  };

  return (
    <>
      <div className="input-group">
        <input id="file" type="file" onChange={handleFileChange} />
      </div>
      {file && (
        <section>
          File details:
          <ul>
            <li>Name: {file.name}</li>
            <li>Type: {file.type}</li>
            <li>Size: {file.size} bytes</li>
          </ul>
        </section>
      )}

      {file && (
        <button
          onClick={handleUpload}
          className="submit"
        >Upload a file</button>
      )}
    </>
  );
};

export default SingleFileUploader;
To make it work add these styles to App.css:
#root {
  text-align: left;
}

.input-group {
  display: flex;
  flex-direction: column;
  align-items: flex-start;
  margin-bottom: 1rem;
}

.submit {
  margin-top: 1rem;
  background-color: #4f8c00;
}

.submit:hover {
  border-color: #d6d8fa;
}
Then replace App.tsx content with:
import './App.css';

import SingleFileUploader from './components/SingleFileUploader';

function App() {
  return (
    <>
      <h1>React File Upload</h1>

      <SingleFileUploader />

      <p className="read-the-docs">This app is built with Vite and React.</p>
    </>
  );
}

export default App;
Now, a user can pick a file they want to upload. When a user chooses a file, we show a summary (file name, file type, and file zie) of the selected file under the file input.
But all in all, here's how the file input and the showing of details work.
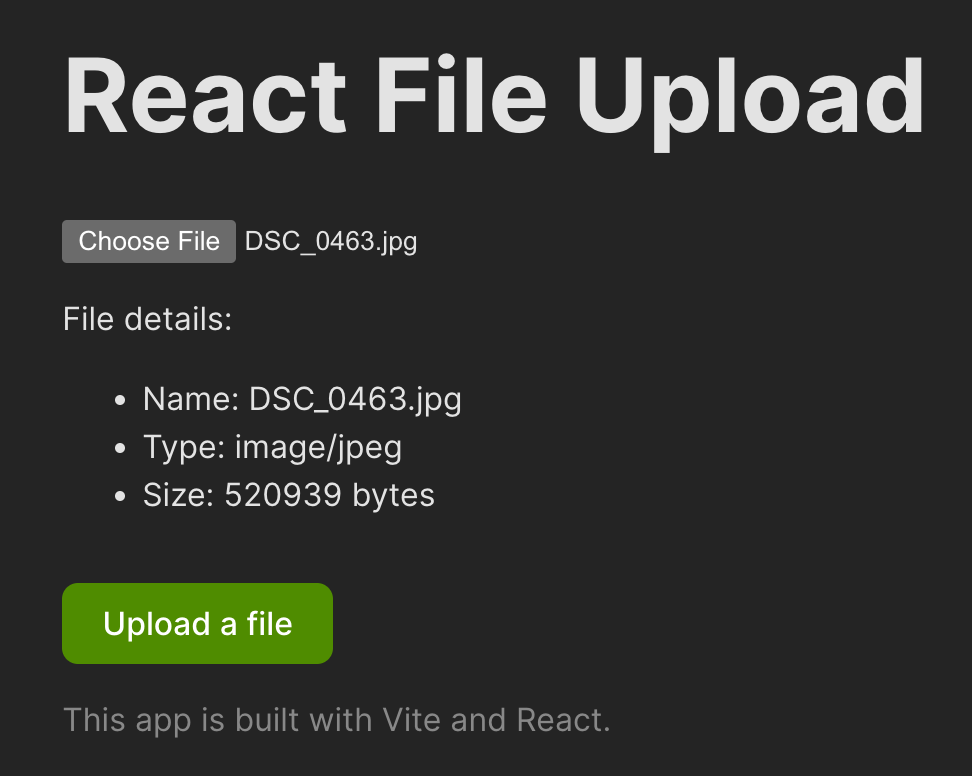 File summary
Now, we have to write the logic inside the handleUpload function that will actually upload the selected file. For that, we're going to use fetch and FormData. Let's see what those are below.
Using Fetch API and FormData
To make things as simple as possible, we're going to utilize two APIs that are available in almost all modern browsers:
- Fetch API with its fetch method - a handful method to make a request call
- FormData interface to easily append files to the
fetchpayload we'll send
Here's how those two will look in the code:
const handleUpload = async () => {
  if (file) {
    console.log('Uploading file...');

    const formData = new FormData();
    formData.append('file', file);

    try {
      // You can write the URL of your server or any other endpoint used for file upload
      const result = await fetch('https://httpbin.org/post', {
        method: 'POST',
        body: formData,
      });

      const data = await result.json();

      console.log(data);
    } catch (error) {
      console.error(error);
    }
  }
};
Here, we first check whether the file is present so we have something to upload. After that, we initiate the new FormData object with new FormData() and assign it to formData. Now, formData allows us to append a file to it with formData.append(file). Then, we call fetch with the URL endpoint for uploading files. There's a random URL in the example, but in reality, it should be an endpoint you're working with (usually your backend or a 3rd party service).
Then, in the fetch call, we simply pass the formData object inside the body like so:
const result = await fetch('https://httpbin.org/post', {
  method: 'POST',
  body: formData,
});
The fetch and FormData work flawlessly together, and that's all you have to do to ensure a file is sent properly. When we tie the file input component and the new logic we wrote into one piece of code, here's how it will look:
import React, { useState } from 'react';

const SingleFileUploader = () => {
  const [file, setFile] = useState<File | null>(null);

  const handleFileChange = (e: React.ChangeEvent<HTMLInputElement>) => {
    if (e.target.files) {
      setFile(e.target.files[0]);
    }
  };

  const handleUpload = async () => {
    if (file) {
      console.log('Uploading file...');

      const formData = new FormData();
      formData.append('file', file);

      try {
        // You can write the URL of your server or any other endpoint used for file upload
        const result = await fetch('https://httpbin.org/post', {
          method: 'POST',
          body: formData,
        });

        const data = await result.json();

        console.log(data);
      } catch (error) {
        console.error(error);
      }
    }
  };

  return (
    <>
      <div className="input-group">
        <input id="file" type="file" onChange={handleFileChange} />
      </div>
      {file && (
        <section>
          File details:
          <ul>
            <li>Name: {file.name}</li>
            <li>Type: {file.type}</li>
            <li>Size: {file.size} bytes</li>
          </ul>
        </section>
      )}

      {file && (
        <button
          onClick={handleUpload}
          className="submit"
        >Upload a file</button>
      )}
    </>
  );
};

export default SingleFileUploader;
And here's how it works:
Upload single file in React
We select a file, view its details and click "Upload a file" button. Then, after some time, in the browser's console, we can view the result of the file upload request meaning our file got uploaded successfully. To make things easier to follow through and avoid relying on the browser's console, we can make a simple section in the UI to show whether the upload started and if it was successful or not.
Show upload result indicator
We can make the result indicator based on state of the uploading. I created four states:
- Initial - the upload hasn't started yet ✅
- Uploading - the upload started
- Success - the upload finished properly
- Failure - the upload, unfortunately, failed
And here's the code that makes the upload status indicator work:
import React, { useState } from 'react';

const SingleFileUploader = () => {
  const [file, setFile] = useState<File | null>(null);
  const [status, setStatus] = useState<
    'initial' | 'uploading' | 'success' | 'fail'
  >('initial');

  const handleFileChange = (e: React.ChangeEvent<HTMLInputElement>) => {
    if (e.target.files) {
      setStatus('initial');
      setFile(e.target.files[0]);
    }
  };

  const handleUpload = async () => {
    if (file) {
      setStatus('uploading');

      const formData = new FormData();
      formData.append('file', file);

      try {
        const result = await fetch('https://httpbin.org/post', {
          method: 'POST',
          body: formData,
        });

        const data = await result.json();

        console.log(data);
        setStatus('success');
      } catch (error) {
        console.error(error);
        setStatus('fail');
      }
    }
  };

  return (
    <>
      <div className="input-group">
        <input id="file" type="file" onChange={handleFileChange} />
      </div>
      {file && (
        <section>
          File details:
          <ul>
            <li>Name: {file.name}</li>
            <li>Type: {file.type}</li>
            <li>Size: {file.size} bytes</li>
          </ul>
        </section>
      )}

      {file && (
        <button
          onClick={handleUpload}
          className="submit"
        >Upload a file</button>
      )}

      <Result status={status} />
    </>
  );
};

const Result = ({ status }: { status: string }) => {
  if (status === 'success') {
    return <p>✅ File uploaded successfully!</p>;
  } else if (status === 'fail') {
    return <p>❌ File upload failed!</p>;
  } else if (status === 'uploading') {
    return <p>⏳ Uploading selected file...</p>;
  } else {
    return null;
  }
};


export default SingleFileUploader;
Now, we can close the browser console and view the upload state in the UI directly like so:
Single file upload in React with status indicator
Great, now that we covered the basics on how to show file input, selected file details, how to upload a single file in React - let's show how to upload multiple files.
Upload multiple files in React with fetch
The majority of the code will stay the same from the previous section where we show how to upload the single file. The only part that will change is the part where the user can choose multiple files to upload. For that purpose, we'll create a new component called MultipleFileUploader.tsx in src/components:
import React, { useState } from 'react';

const MultipleFileUploader = () => {
  const [files, setFiles] = useState<FileList | null>(null);
  const [status, setStatus] = useState<
    'initial' | 'uploading' | 'success' | 'fail'
  >('initial');

  const handleFileChange = (e: React.ChangeEvent<HTMLInputElement>) => {
    if (e.target.files) {
      setStatus('initial');
      setFiles(e.target.files);
    }
  };

  const handleUpload = async () => {
    if (files) {
      setStatus('uploading');

      const formData = new FormData();
      [...files].forEach((file) => {
        formData.append('files', file);
      });

      try {
        const result = await fetch('https://httpbin.org/post', {
          method: 'POST',
          body: formData,
        });

        const data = await result.json();

        console.log(data);
        setStatus('success');
      } catch (error) {
        console.error(error);
        setStatus('fail');
      }
    }
  };

  return (
    <>
      <div className="input-group">
        <input id="file" type="file" multiple onChange={handleFileChange} />
      </div>

      {files && [...files].map((file, index) => (
        <section key={file.name}>
          File number {index + 1} details:
          <ul>
            <li>Name: {file.name}</li>
            <li>Type: {file.type}</li>
            <li>Size: {file.size} bytes</li>
          </ul>
        </section>
      ))}

      {files && (
        <button
          onClick={handleUpload}
          className="submit"
        >
          Upload {files.length > 1 ? 'files' : 'a file'}
        </button>
      )}

      <Result status={status}/>
    </>
  );
};

const Result = ({ status }: { status: string }) => {
  if (status === 'success') {
    return <p>✅ File uploaded successfully!</p>;
  } else if (status === 'fail') {
    return <p>❌ File upload failed!</p>;
  } else if (status === 'uploading') {
    return <p>⏳ Uploading selected file...</p>;
  } else {
    return null;
  }
};


export default MultipleFileUploader;
Do not forget to update _App.tsx` by replacing the uploader there, like this:
import './App.css';

import MultipleFileUploader from './components/MultipleFileUploader';

function App() {
  return (
    <>
      <h1>React File Upload</h1>

      <MultipleFileUploader/>

      <p className="read-the-docs">This app is built with Vite and React.</p>
    </>
  );
}

export default App;
Now, we set files inside the component's state and have it as FileInput type instead of File type previously. With that, we get all the e.target.files and save it in the state. Then, in the handleUpload logic, we iterate through files with a simple trick append each file to formData with formData.append('files', file). The trick to iterate through FileList is to destructure it into an JavaScript array like so:
[...files].forEach(...)Unfortunately, we have to do that because the FileList doesn't have the typical Array methods like map or forEach. Later, in the markup, we do the same trick when showing each file's data.
Awesome, we set up everything, and now this is how multi-file upload works in React:
Multiple files upload in React with status indicator
But, what if we can make that easier and if we try to use an already-baked solution? Let's try out Uploadcare's File Uploader for file upload in the next section.
Uploading files in React with Uploadcare File Uploader
Uploadcare has a fully customizable uploader built with Web Components.
To get started, you need to install the Uploadcare File Uploader with the following command:
npm install @uploadcare/react-uploaderNext, go to the Uploadcare dashboard and create an account. After that, you will get an API key for your default project, which you will use in the next step.
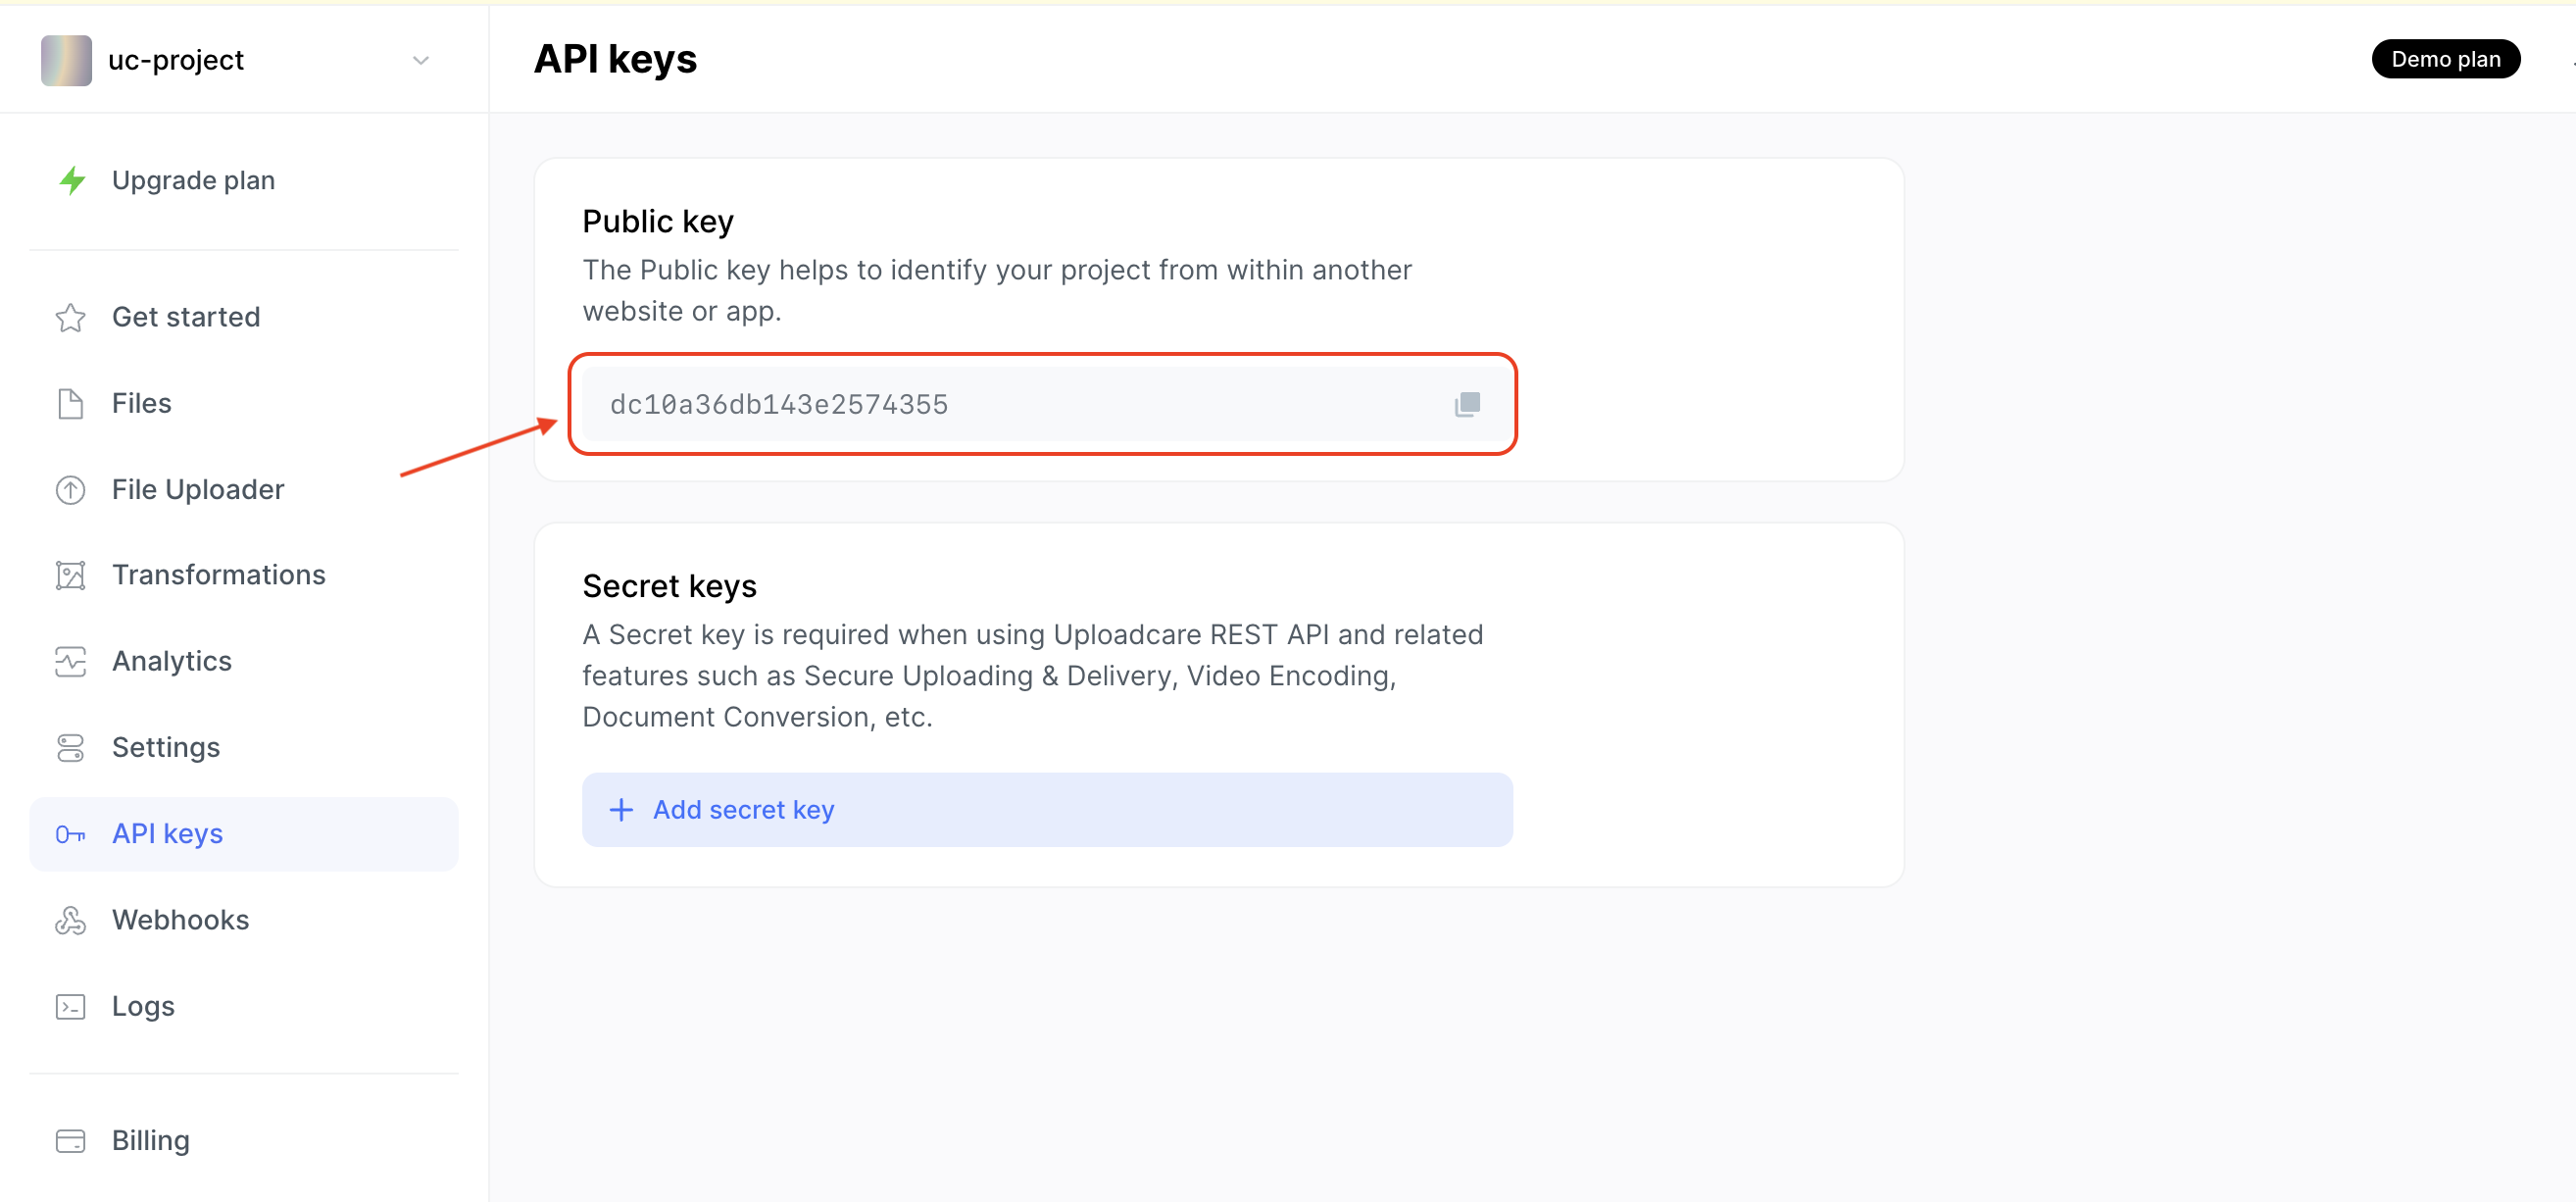 Uploadcare API key
Create a .env file in the root of your project and add the following line:
VITE_UPLOADCARE_PUBLIC_KEY=YOUR_PUBLIC_KEYReplace YOUR_PUBLIC_KEY with the public key from the Uploadcare dashboard.
Then, we'll create a small component for the Uploadcare File Uploader called UploadcareUploader in src/components. It will look like this:
import React, { useRef, useState } from 'react';
import {
  FileUploaderRegular,
  OutputFileEntry,
  UploadCtxProvider,
} from '@uploadcare/react-uploader';
import '@uploadcare/react-uploader/core.css';

const UploadcareUploader = () => {
  const [files, setFiles] = useState<OutputFileEntry[]>([]);
  const uploaderRef = useRef<InstanceType<UploadCtxProvider> | null>(null);

  const handleFileUpload = (file: OutputFileEntry) => {
    setFiles((prevFiles) => [...prevFiles, file]);
  };
  return (
    <section>
      <FileUploaderRegular
        pubkey={`${import.meta.env.VITE_UPLOADCARE_PUBLIC_KEY}`}
        apiRef={uploaderRef}
        onFileUploadSuccess={handleFileUpload}
        />
      <div className="img-gallery">
       {files.map((file) => (
         <img
           key={file.uuid}
           src={file.cdnUrl as string}
           alt="Preview"
           className="img-preview"
         />
       ))}
      </div>
    </section>
  );
};

export default UploadcareUploader;
There's a lot to unravel from the code above, but don't worry. We will do it gradually.
First off, we import the FileUploaderRegular component and its CSS styles.
Then, we see this part of the code:
const UploadcareUploader = () => {
  const [files, setFiles] = useState<OutputFileEntry[]>([]);
  const uploaderRef = useRef<InstanceType<UploadCtxProvider> | null>(null);

  const handleFileUpload = (file: OutputFileEntry) => {
    setFiles((prevFiles) => [...prevFiles, file]);
  };

  // ...
};
There, we are setting a way to get the files from the Uploadcare File Uploader and set them inside the React component state. We create a ref, state for the files, and a handleFileUpload function to process uploaded files.
After that, we come to the markup part of the component:
<section>
  <FileUploaderRegular
    pubkey={`${import.meta.env.VITE_UPLOADCARE_PUBLIC_KEY}`}
    apiRef={uploaderRef}
    onFileUploadSuccess={handleFileUpload}
  />
  <div className="img-gallery">
    {files.map((file) => (
      <img
        key={file.uuid}
        src={file.cdnUrl as string}
        alt="Preview"
        className="img-preview"
      />
    ))}
  </div>
</section>;Here we initialize the FileUploaderRegular component with the pubkey prop that is your Uploadcare API key and also use the handleFileUpload function to handle onFileUploadSuccess event when a file is uploaded.
After that, we show the uploaded files from the files in the React component state. All files (in this case, images) are rendered in the gallery below the uploader.
To get a better idea of it all, let's see how it works. Update the App.tsx file by replacing our hand-made uploader with the Uploadcare version:
import './App.css';

import UploadcareUploader from './components/UploadcareUploader';

function App() {
  return (
    <>
      <h1>React File Upload</h1>

      <UploadcareUploader/>

      <p className="read-the-docs">This app is built with Vite and React.</p>
    </>
  );
}

export default App;
Uploadcare File Uploader
And that's it, Uploadcare will take care of the uploading for you and make it faster with its uploading network (it works like CDN). You also get the tracking of uploading of each file and the option to choose where you'd like to upload files from (from the device, from a link, local camera, Dropbox, Google Drive etc.)
You can check out the official docs on File Uploader here and see how you can configure it and tailer it for your needs.
Conclusion
In this blog post, we went through a few things related to uploading files in React. We covered:
- how to show a proper file input and show selected file details,
- how to work with FormData interface and
fetchto upload one or multiple files, - how to show a simple upload indicator in the UI,
- how to iterate over
FileListwith a neat trick, - and how to efficiently use Uploadcare File Uploader to upload data without writing much code.
I hope you enjoyed and learned something from this post. All the code you've seen here is at the GitHub repository here and there's a live playground here.
If you prefer watching a video instead, have a look at this short 3 minutes tutorial on our YouTube channel:
Thanks for reading, and catch you in the next one.