Serverless file upload for Meteor applications
Last edited:
Get a complete uploading infrastructure in 8 minutes
If you use Meteor.js, chances are you’re planning to bring your web application to market as fast as possible. Here’s an idea on how to go live even faster: integrate a complete file uploading infrastructure into your Meteor app with minimal coding. The solution includes an easy-to-use jQuery File Uploader, image processing engine, reliable storage, and delivery around the world via CDN.
Sound interesting? This integration guide will walk you through the process step by step so you can get your file infrastructure up and running in about 8 minutes. Let’s get started!
Before digging in, a word on Uploadcare features
First, let’s talk about the features and benefits of the file uploader and make sure it’s exactly what you’re looking for. Uploadcare jQuery File Uploader is basically a file upload form that allows your users to upload images, videos, PDFs and other files of any size to your website.
It has a simple and intuitive UX: a tab-based interface, a drag-and-drop field, and a progress bar for each file. Underneath the simple interface, there’s a bunch of advanced features that can streamline file uploading and manipulation in your project. With jQuery File Uploader, you can:
- Allow uploading from over a dozen upload sources including local storage, webcam, social media platforms, cloud services, URL, and more;
- Edit images right in the browser (crop, resize, rotate, apply filters, etc.);
- Deliver images fast no matter the user's location: every file gets cached by a CDN with more than 280K nodes around the world;
- Serve images perfectly adapted to the end user: in the right format, size, and compression, depending on the viewing device, internet connection speed, etc.
By the end of this guide, you’ll get something like this:
 A file upload form that allows you to upload images to Meteor
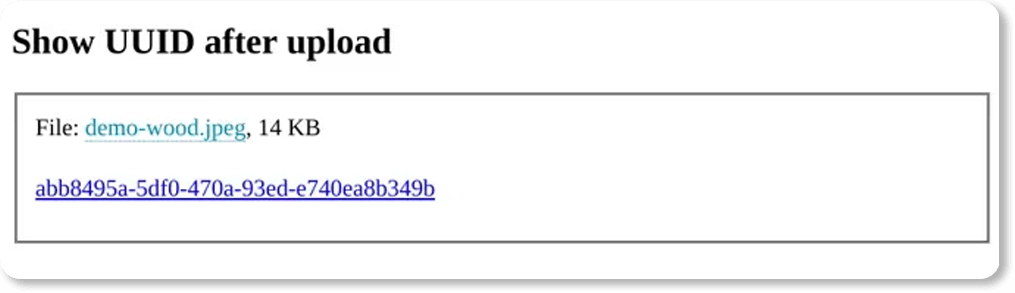 A JPEG image uploaded to Meteor
If you click on the Choose a file button, you’ll open a file uploader window that looks like this:
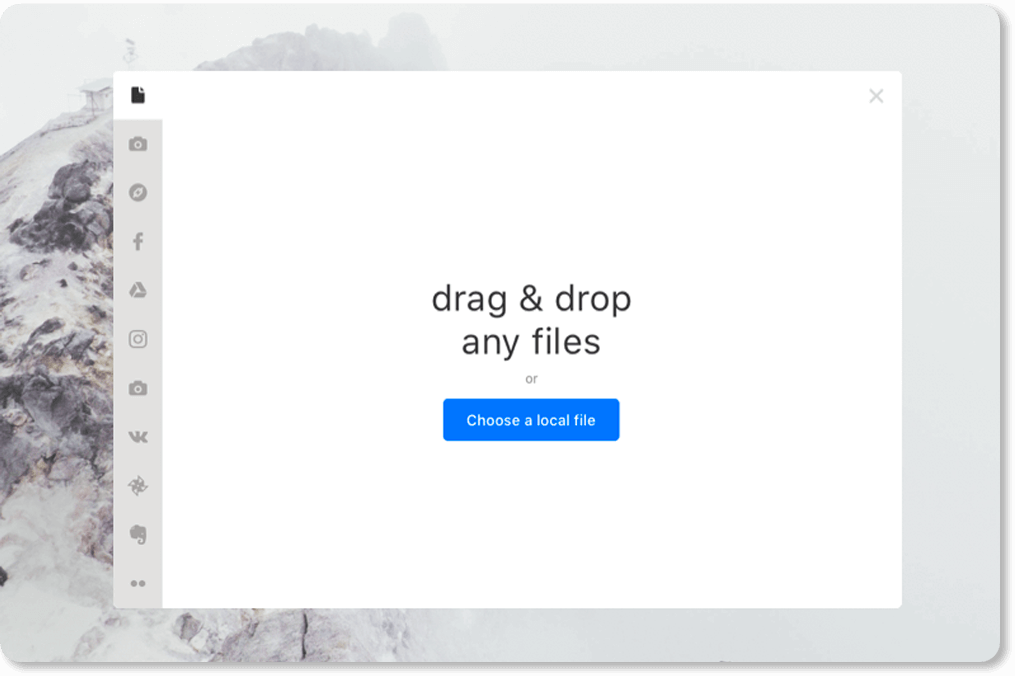 jQuery File Uploader interface
Looks like something you need to have on your website? If so, let’s dig in to a detailed tutorial on how to upload files, images, and docs to Meteor with Uploadcare.
Step 1. Create an account with Uploadcare
To integrate jQuery File Uploader into your Meteor app, you need to sign up for a new Uploadcare account. After a quick registration and email confirmation, you will be transferred to the Dashboard. From the API Keys tab, grab your Public API Key — we’ll need it in the next step.
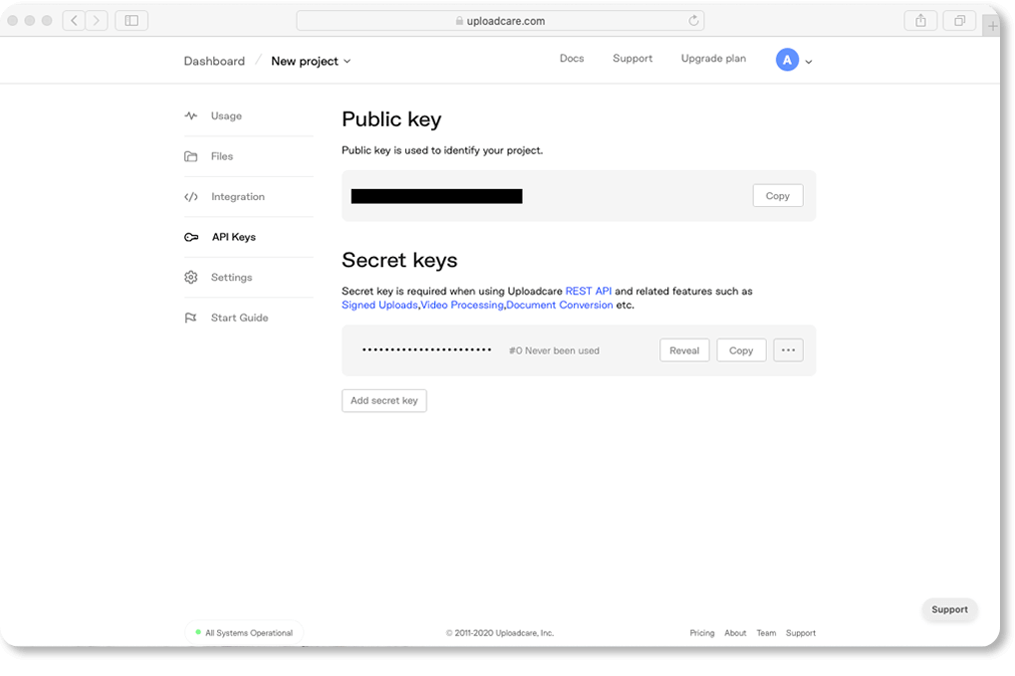 Find your Public key in the Dashboard
New accounts come with a 14-day free trial of all Pro features, no billing information required, so you can test everything out and decide if it fits your needs.
Step 2. Install jQuery File Uploader to Meteor
Uploadcare has an official Meteor package. To install it, run this console command:
$ meteor add uploadcare:uploadcare-widgetThen, specify the Public API Key that you got on the previous step in settings.json:
{
  "public": {
    "uploadcare": {
      "publicKey": "YOUR_PUBLIC_KEY"
    }
  }
}
Congratulations, it’s installed! Now there are just three more steps to get it up and running.
Step 3. Add jQuery File Uploader to client HTML
Now we need to decide where the uploader will be positioned on the page. Add an <input> element with the specified uploadcare-uploader role to client/main.html in a place where you want your uploader to appear:
<input type="hidden" id="file-show" role="uploadcare-uploader" />Our library will look for inputs with the role attribute and put a file uploader there. Once a file gets uploaded, that input receives a CDN link with its own unique identifier (UUID).
Here’s a simple example of what it looks like:
<template name="show">
<h2>Show UUID after upload</h2>
<fieldset>
<div>
<label for="file-show">File:</label>
<input type="hidden" id="file-show" role="uploadcare-uploader" />
</div>
<p>
<a href=""></a>
No UUID found, upload a file.
</p>
</fieldset>
</template>Step 4. Handle events with JavaScript API
You can use Javascript events with our library and adjust everything the way you need it: for instance, redesign the user experience or leave just a few essential features and remove the rest.
For example, here’s how you handle the onUploadComplete event with the JavaScript API of our uploader:
import uploadcare from 'meteor/uploadcare:uploadcare-widget';

const widget = uploadcare.Widget('[role=uploadcare-uploader]');

widget.onUploadComplete(info => {
  // Handle the uploaded file info
  this.uuid.set(info.uuid);
  this.cdnUrl.set(info.cdnUrl);
});
Learn more about supported events in our documentation.
Step 5. Customize your jQuery File Uploader
Uploadcare jQuery File Uploader is highly customizable: just go to our live file uploader configurator and adjust the uploader’s behavior without coding. Click on the Integrations button, then click Customize Uploader.
 Configure file uploader without coding
Here are a few examples of what you can do here:
- disable unnecessary upload sources
- accept images only
- allow multiple uploading in one go
- turn on the preview option
- allow users to remove, crop, and/or edit uploaded files
- shrink images before uploading
You can check out other ways of setting options and the full list of file uploader options in our documentation.
Every option gets added to the configurator’s URL query string:
/widget/configure/?effects=crop+enhance&imagesOnly=true&multiple=trueHere’s what it looks like if you, for example, set the option to allow image-only uploads:
<input type="hidden" role="uploadcare-uploader" data-images-only />Note that any options changed while the jQuery File Uploader is running won’t affect its behavior.
And there you go!
That’s it. Now you have a full-featured jQuery File Uploader embedded into your Meteor application. Your users will be able to easily upload images, videos and any other files to your app. All uploaded files will be automatically optimized for fast load speed, adapted for any screen, and swiftly delivered around the world via CDN.
Visit the meteor-uploadcare-widget-demo repository on GitHub to check the source code and feel free to ask your questions in our community area.