How to upload files in Framer using the Uploadcare component
Trust Jamin OkpukoroThis tutorial shows you how to add a fully configured Uploadcare File Uploader to your Framer website, including form integration, submission handling, and custom CSS styling using the Uploadcare Framer component.
Prerequisites
To follow along with this tutorial, you’ll need:
- A free Uploadcare account
- A free Framer account
Obtain a public API key
Head over to your Uploadcare dashboard and copy your public API key. The public key for a project is located in your Uploadcare Project Dashboard -> API keys.
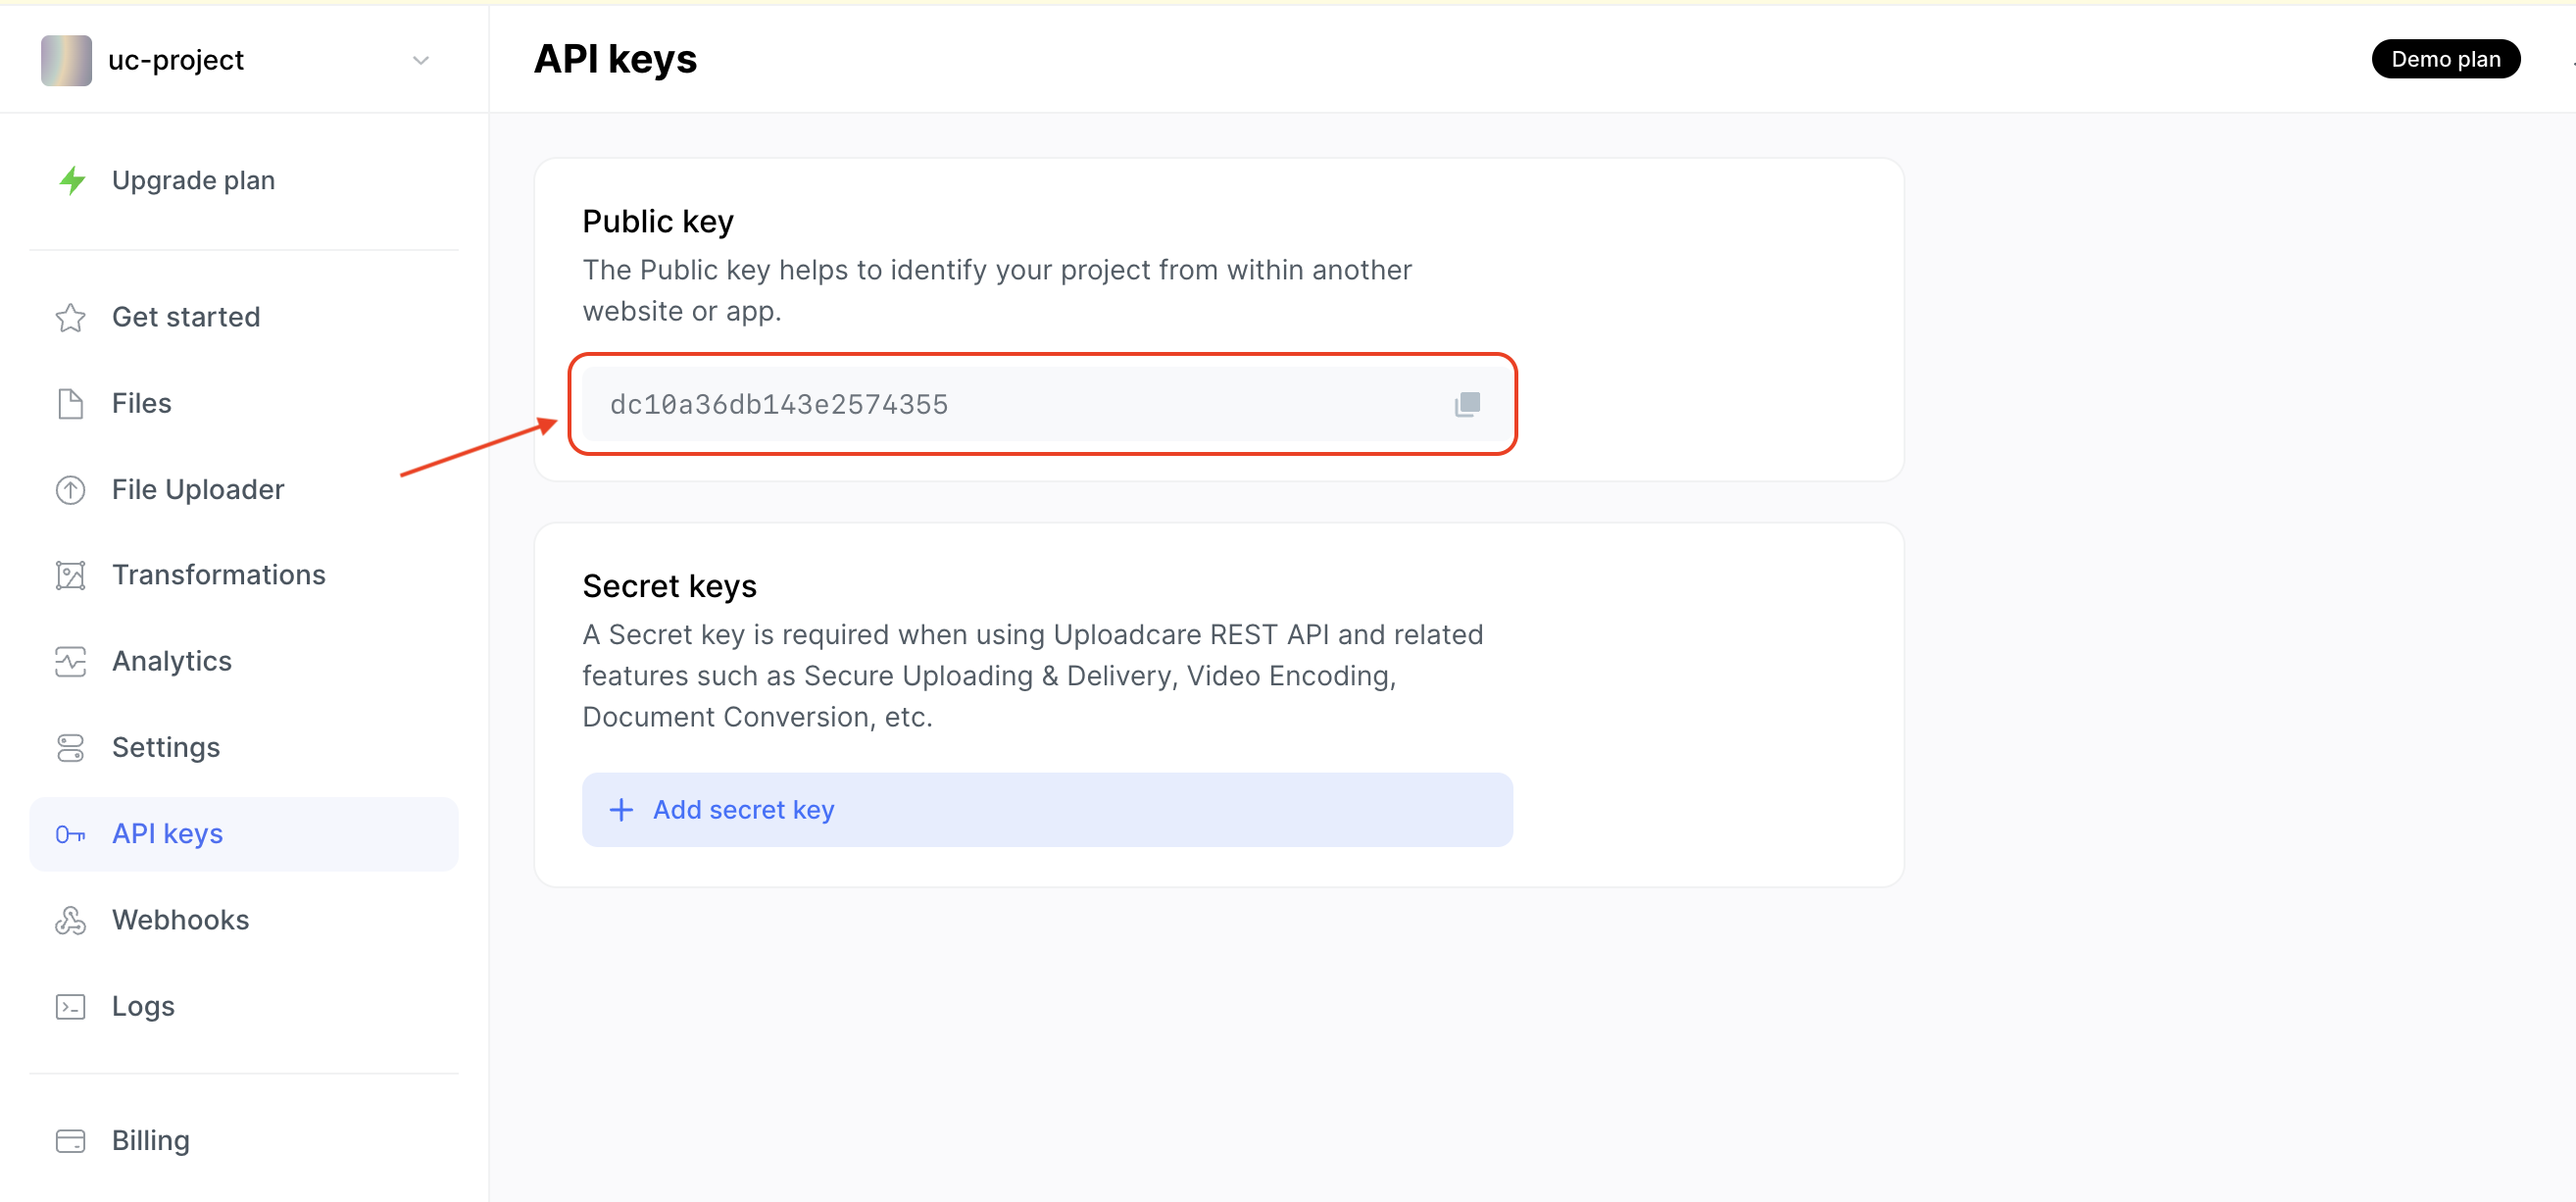 Uploadcare Public API key in the Uploadcare dashboard
You will use the public key in the next steps of this tutorial.
Create a page in Framer
From your Framer dashboard, create a new Framer project or open an existing one.
Inside your Framer project, navigate to the page where you want to add the file uploader. If you don’t have a page yet, click the + icon next to Pages in the left sidebar to create one.
Add a form to the page
To use the Uploadcare File Uploader, you need a form on your page for users to submit their files.
To add a form to your Framer page:
- Click on the Insert menu (or press I) to open the insert panel.
- Search for form in the search bar or scroll down to find the Form Builder element under the Elements section.
- Drag the Form Builder element onto your page canvas.
Adding a Form element in Framer page
Once placed on the canvas, click on the Form Builder element to select it.
Add the Uploadcare File Uploader to the form
Inside the Form Builder element, paste the following component URL to import the Uploadcare File Uploader component:
https://framer.com/m/FileUploaderWidget-EaMiTy.js@esjt9RuNH8KSOgN6OXyIThis will add the Uploadcare File Uploader component to your Framer project and render it inside the Form Builder.
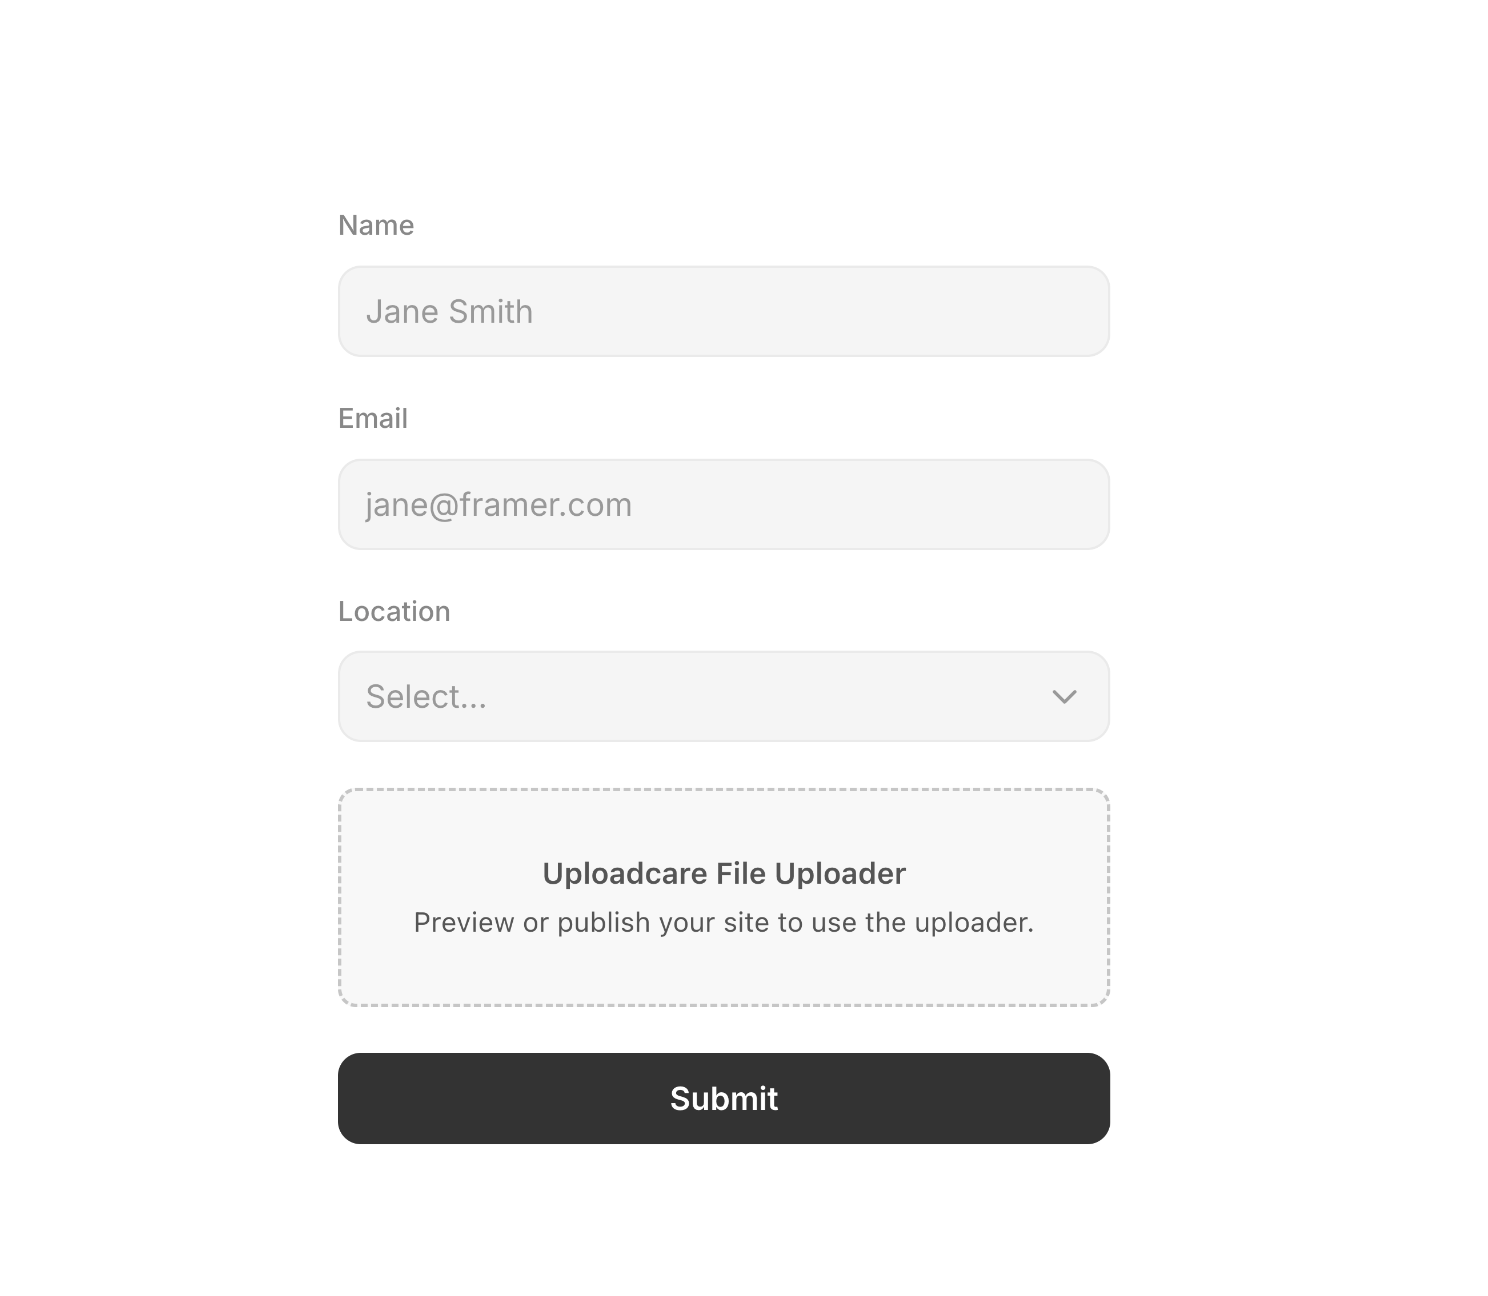 Adding the Uploadcare File Uploader component to a Framer page
Configure the File Uploader
When you add the File Uploader component to your Framer project, you need to configure it with your Uploadcare public API key and any additional settings you want to apply.
On the right sidebar, with the File Uploader component selected, you’ll find a section called FileUploaderWidget. This is where you can add your public API key and configure the uploader’s behavior.
Paste your Uploadcare public API key into the Public API key field. This connects the File Uploader to your Uploadcare account, allowing it to upload files to your project.
You can also configure additional options for the File Uploader to customize the user experience and control which file types can be uploaded. Some of the available configuration options include:
- Mode: Choose between the regular uploader (an upload button with a modal), the minimal uploader (a simple drag-and-drop area), or an inline uploader
- Wrapper class: Adds a custom CSS class to the uploader wrapper for styling purposes this is set to
uc-file-uploader-wrapperby default - Field Name: Specify the name of the form field that will contain the uploaded file URLs (default is
files) - Theme: Select a theme for the uploader (light, dark, auto, or custom)
- Sources: Choose which sources users can upload from (e.g. local device, URL, Google Drive, Dropbox, etc.)
- Multiple Files: Allow users to upload multiple files at once
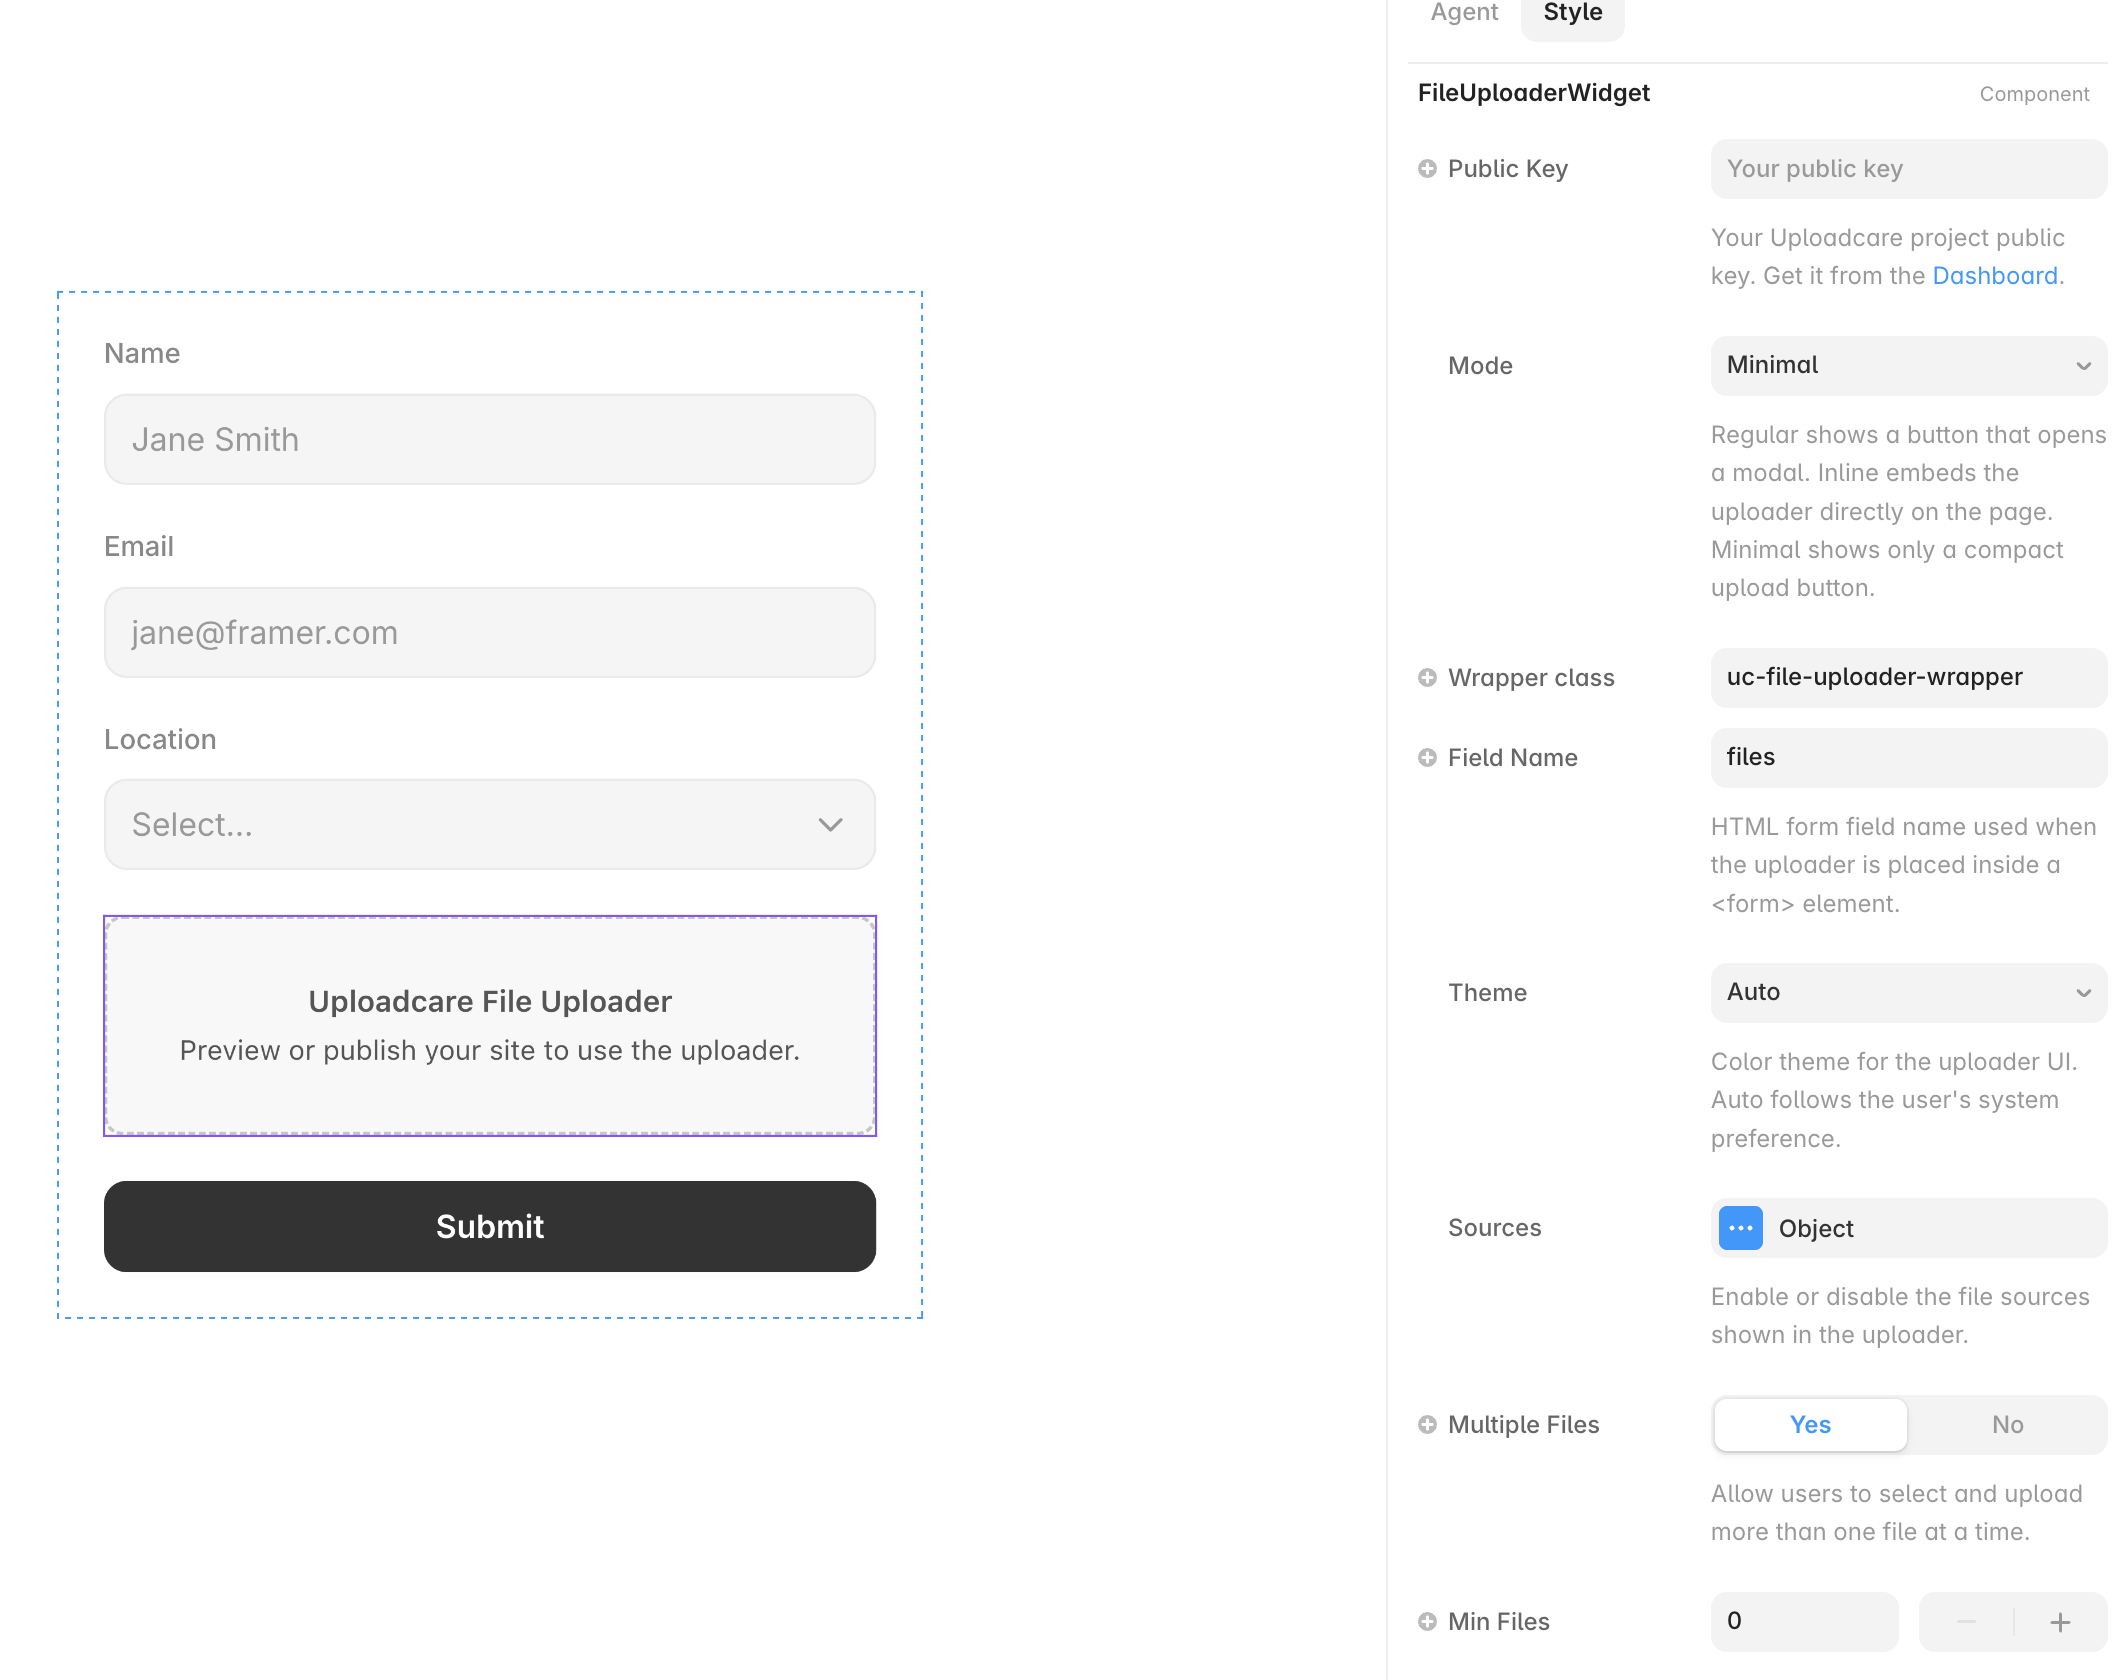 Uploadcare File Uploader configuration options in Framer
For a full list of available configuration options, check out the Uploadcare File Uploader options.
Enable form submission
To enable form submission, make sure to move the File Uploader component inside the Form Builder element in your Framer page.
You can then configure the form’s submission behavior (e.g., sending data to a webhook, integrating with a third-party form service, etc.) in Framer’s form settings.
You can use the following steps to enable form submission to an email address using Framer’s built-in form handling:
- Select the Form Builder element in your Framer page
- In the right sidebar, scroll down to the Form section
- Click on the Sent To dropdown and select Email
- Enter the email address where you want to receive form submissions in the Email Address field and customize the email subject and message if desired.
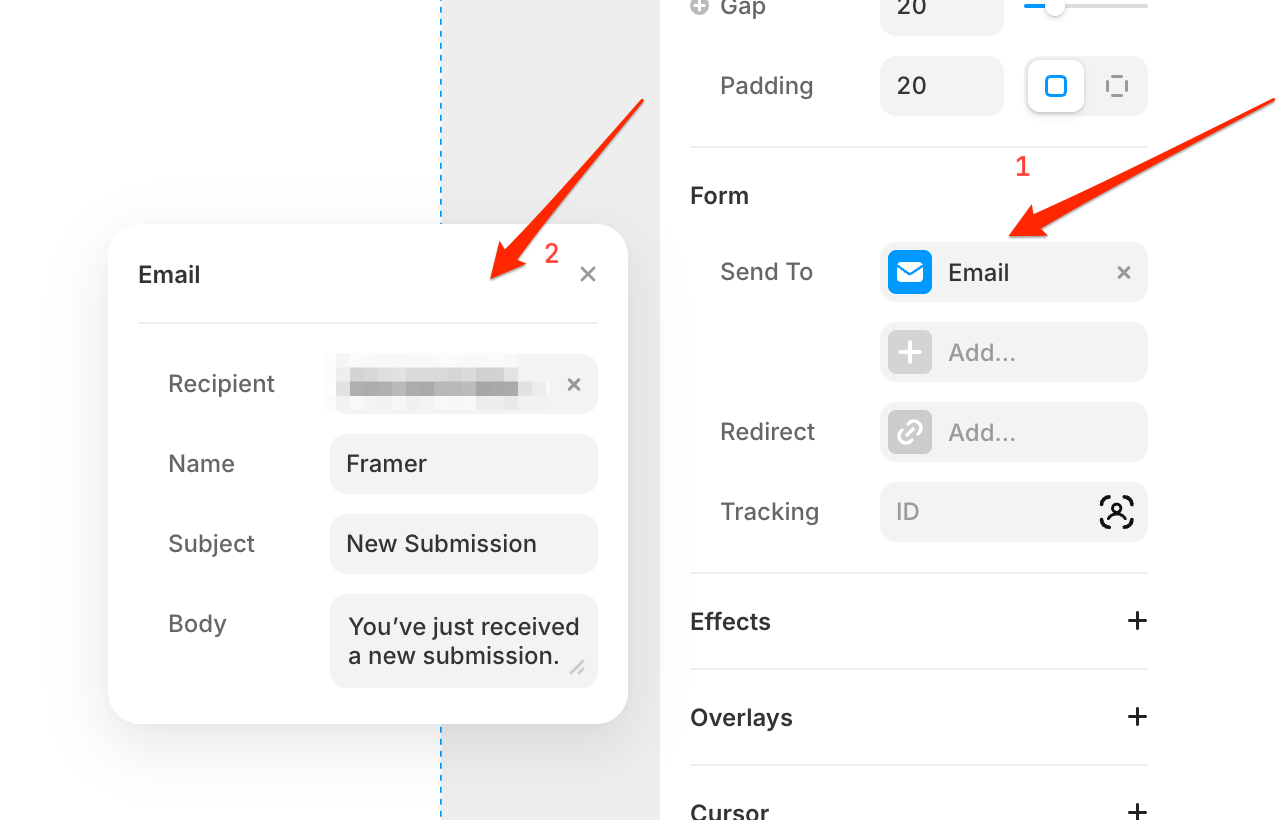 Configuring form submission to email in Framer
Now, when a user fills out the form and uploads a file using the File Uploader, the form submission will include the uploaded file URLs and will be sent to the specified email address.
Publish your Framer site
Publish the page to see the File Uploader in action on your live site.
To publish your Framer project:
- Click on the Publish button in the top-right corner of the Framer editor.
- Choose your domain (Framer provides a free
*.framer.appsubdomain, or you can connect a custom domain). - Click Publish to deploy your site.
Once published, open your site in a browser. You should see a page with a file uploader that looks like this:
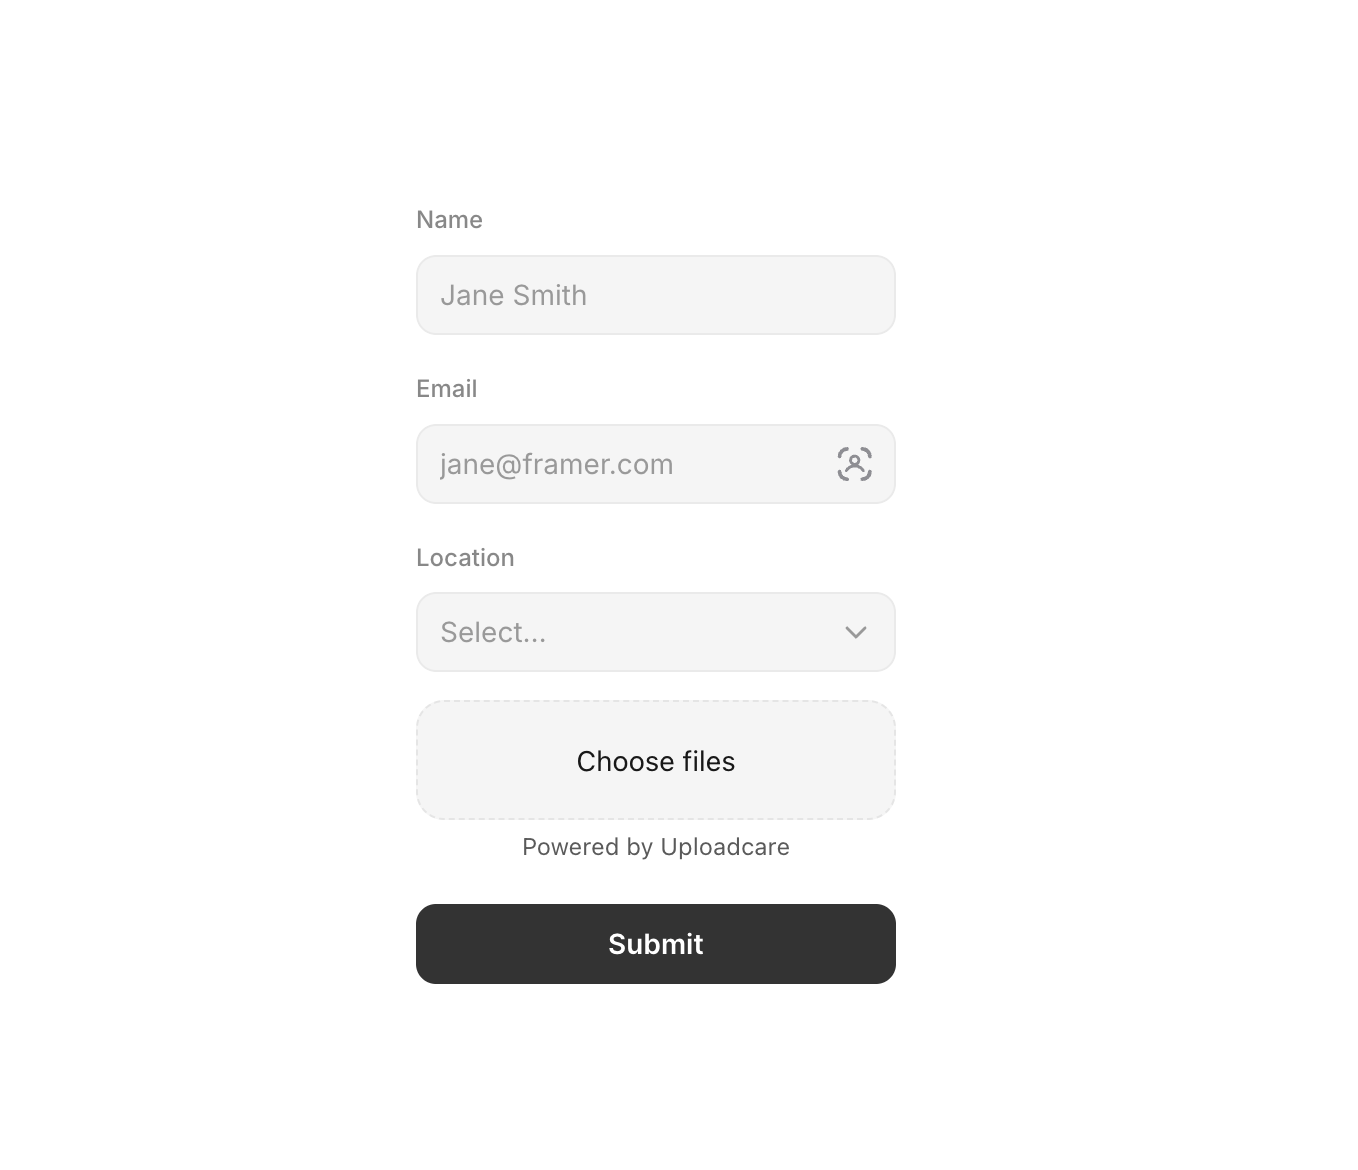 Framer page with Uploadcare File Uploader integrated
Clicking the Choose files button opens the File Uploader modal, where users can drag and drop files, browse their device, or upload from a URL.
File Uploader modal for uploading files in Framer
Customize the File Uploader
Aside from the configuration options available in the right sidebar, you can also customize the styling of the File Uploader using custom CSS.
To do this, you can use the following steps:
-
Click the Framer icon with a dropdown, navigate to Site Settings → Custom Code, and click Add Script.
-
A modal will open where you can add custom code to your Framer site. Add a name for your script (e.g., “File Uploader Customization”) and select End of
<head>in the Placement dropdown. You can also select the Page for the script to apply to all pages or to a specific page where the File Uploader is located. -
In the code editor, add your custom CSS to style the File Uploader.
Styling the upload button
With the added wrapper class, you can target specific parts of the File Uploader using CSS. For example, to style the upload button area of the minimal uploader, you can apply the following CSS:
<style>
  .uc-file-uploader-wrapper uc-file-uploader-minimal uc-drop-area {
    width: 100%;
    padding: 16px;
    background-color: #8b49e2;
    color: #fff;
    border-radius: 8px;
    font-size: 16px;
  }
</style>
The code above makes the button full-width, gives it a purple background, white text, and rounded corners.
Save your custom code and re-publish your site to see the changes applied to the File Uploader.
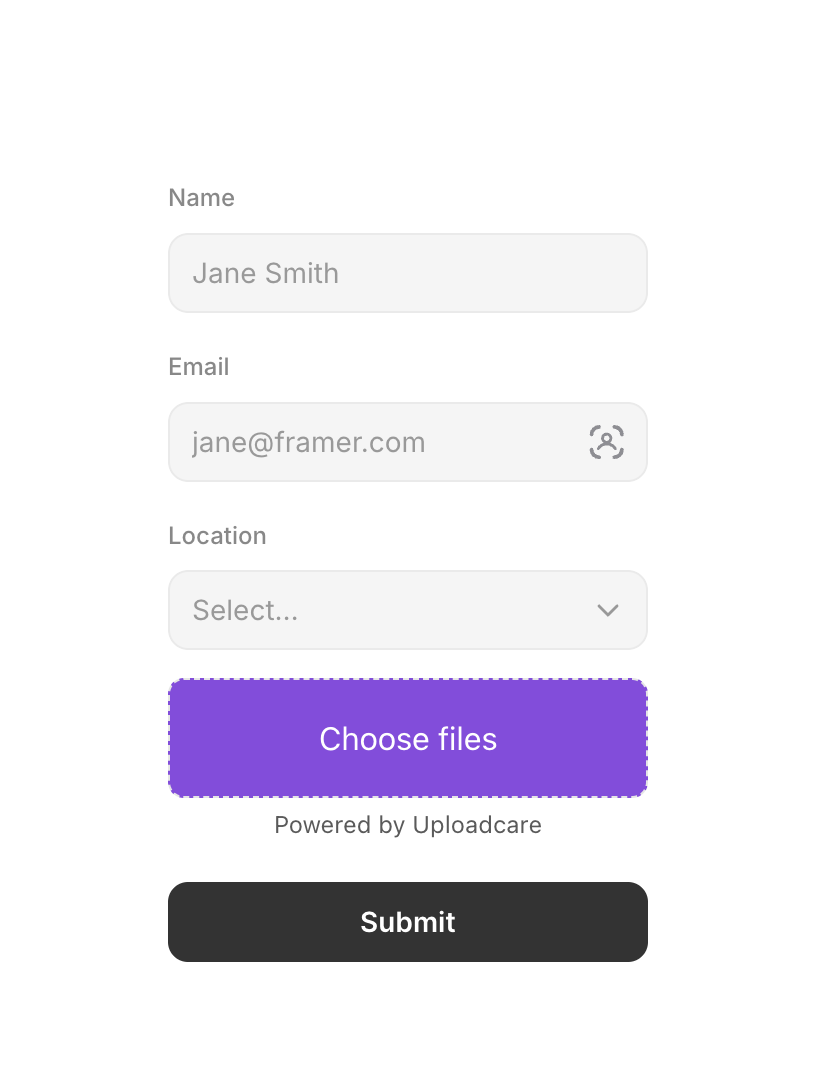 Customized upload button in Framer
For a full reference of all available CSS properties and customization options, check out the styling documentation.
Conclusion
In this tutorial, you’ve successfully integrated the Uploadcare File Uploader into your Framer website using the Uploadcare File Uploader component.
You also learned how to configure and customize the uploader with custom CSS.
Uploadcare also offers advanced features, including image editing, file conversion, adaptive delivery, and more.
To learn more about these features, check out the Uploadcare documentation.