JavaScript upload image tutorial (upload to server & more)
In this article, we’ll show you how to create an image uploader using JavaScript. You can either build the entire file uploader script from scratch or streamline the process with a powerful JavaScript file upload library.
Using a prebuilt solution can make the implementation much faster, safer, and more scalable. For a deeper dive into topics like secure uploads and in-browser image editing, check out our complete guide to file uploading.
If you’re just getting started, this HTML file upload button tutorial covers the simplest way to add image upload functionality to your web page.
JavaScript setup for image upload
Uploading images with JavaScript involves two important steps. First, you need to retrieve the image using the file input from the frontend via JavaScript and then set up a server with backend code to handle the upload.
You can use any backend language you prefer, such as PHP or Node.js. This tutorial uses PHP as an example, but the same concepts can apply to any backend language of your choice.
More on this topic: 👉 Check out this tutorial on how to upload files with Node.js for a Node.js example.
Client-side setup for uploading an image
To set up the client-side (frontend) for uploading images, first create a simple HTML file with a form that contains the input:
<!DOCTYPE html>
<html lang="en">
  <head>
    <meta charset="UTF-8">
    <meta name="viewport" content="width=device-width, initial-scale=1.0">
    <title>Document</title>
  </head>
  <body>
    <input type="file" id="fileInput" accept="image/*" />
    <button onclick="uploadFiles()">Upload</button>
    <div id="message"></div>
  </body>
</html>
The code above:
-
Creates an HTML form with an
inputelement type offilefor users to select any file that is an image. Themultipleattribute allows the user to select multiple files at once. -
Adds a button that calls an
uploadFiles()function when clicked. Currently, this function has not been created yet, but you will add it soon. -
Adds a
divelement with an id ofmessageto display messages to the user after the upload, like success or error messages.
Now, let’s add the JavaScript code to handle the file upload process.
Just below the </body> tag, add the following JavaScript code:
<script>
function uploadFiles() {
  const input = document.getElementById('fileInput');
  const files = input.files;

  if (!files.length) {
    displayMessage('No files selected.', 'red');
    return;
  }

  const formData = new FormData();
  for (let file of files) {
    formData.append('upload[]', file);
  }

  // CSRF token simulation
  formData.append('csrf_token', generateToken());

  fetch('upload.php', {
    method: 'POST',
    body: formData,
  })
  .then(res => res.json())
  .then(data => {
    if (data.status === 'success') {
      displayMessage('Upload successful!', 'green');
    } else {
      displayMessage(data.error || 'Upload failed.', 'red');
    }
  })
  .catch(() => displayMessage('Upload error occurred.', 'red'));
}

function displayMessage(msg, color) {
  const box = document.getElementById('message');
  box.innerText = msg;
  box.style.color = color;
}

function generateToken() {
  return Math.random().toString(36).slice(2);
}
</script>
We’ll take a look at the script for the file uploader, line by line, but before explaining the code, let’s break the script down into its main parts. It has three main functions:
uploadFiles: This function handles the file upload processdisplayMessage: This function displays messages to the user, such as success or errorgenerateToken: This function simulates generating a CSRF token for security purposes
First, the uploadFiles function retrieves the file input element by its ID and gets the selected images from the input element.
It then checks if any images were selected.
If no images are selected, the displayMessage function is called to show a an error message to the user,
and the function returns early, preventing further execution of the script.
In a case where images are selected, it creates a new FormData object to contain the images to be uploaded.
Then it iterates through the selected files, attaching each image to the FormData object under the key upload[].
Next, to ensure that any images are secure and prevent cross-site request forgery attacks,
the generateToken function is called to simulate generating a CSRF token and attach it to the FormData object.
After that, the script uses the Fetch API to send a POST request to a server-side script
(in this case, upload.php) with the FormData object as the request body.
Based on the server’s response to the request, it displays a success or error message to the user. If the upload is successful, a success message is displayed; otherwise, an error message is displayed.
Now, let’s move on to the server-side code that will handle the uploaded images.
Server-side setup for uploading an image
To handle the uploaded images on the server side, you need to create a PHP file, and name it something like upload.php.
This file will process the uploaded images and save them to a specified directory on the server.
Go ahead and create the file in the same directory as your HTML file, and add the following code:
<?php
header('Content-Type: application/json');

if ($_SERVER['REQUEST_METHOD'] === 'POST') {
  if (!isset($_POST['csrf_token']) || empty($_FILES['upload'])) {
    echo json_encode(['status' => 'error', 'error' => 'Missing CSRF token or file']);
    exit;
  }

  $uploadDir = __DIR__ . '/uploads/';
  if (!is_dir($uploadDir)) mkdir($uploadDir, 0777, true);

  foreach ($_FILES['upload']['tmp_name'] as $i => $tmp) {
    $name = basename($_FILES['upload']['name'][$i]);
    move_uploaded_file($tmp, $uploadDir . $name);
  }

  echo json_encode(['status' => 'success']);
} else {
  echo json_encode(['status' => 'error', 'error' => 'Invalid method']);
}
?>
Let’s break down the PHP code step by step:
-
First, the
header(’Content-Type: application/json’)sets the content type of the response to JSON, indicating that the server will return a JSON response. -
It then checks if the request method is
POST, which is the method you used for uploading the image. -
If the request method is correct, it then checks if a token and file are attached to the request. If not, it sends an error message in JSON format.
-
If a token and file are present, it sets up a directory (
/uploads/) where the uploaded images will be saved. Theis_dirfunction checks if the directory exists, and if it doesn’t, it creates the directory with the appropriate permissions. -
Next, it loops through the uploaded files, retrieves the name of each file, and moves the temporary file to the specified upload directory using the built-in
move_uploaded_filePHP function. -
If the upload is successful, a JSON response is sent with a status of ’success’. If an error occurs, a JSON response with an error message is sent.
Best libraries for image uploading
Here are some popular JavaScript libraries to manage file uploads in your web application:
In a case where you’d rather not build your own file uploader from scratch and save some time in the development process, there are a few libraries available that help you upload files and images quickly. Here are some popular JavaScript libraries to manage file uploads in your web application:
Uppy
Uppy is a sleek, modular JavaScript file uploader that supports drag-and-drop, image preview, and image uploading from multiple sources. Uppy also offers a user-friendly interface and is highly customizable, making it a good choice if you’re looking for a simple and free solution for uploading files to your web applications’ storage.
Uploadcare
Uploadcare is a complete file uploading, processing, and delivery platform. It’s an all-in-one platform for anything related to uploading and processing images, allowing you to easily integrate file uploading into your web application.
Uploadcare also supports image resizing, cropping, and optimization, as well as file validation and security features.
These features make it a solid choice if you’re looking for an all-in-one solution for file uploading and delivery. Instead of building your own infrastructure for storage, processing, and security, Uploadcare lets you skip the complexity and get up and running faster.
Dropzone
Dropzone.js is an open-source file uploader that supports drag-and-drop functionality and can be integrated with any server-side platform. It allows you to upload multiple files at once to validate file type, size, and more. It is also possible to set up a custom preview for each file type. If you want a simple file uploader with drag-and-drop capabilities that can quickly upload files to a server, Dropzone is a good choice.
FileSaver.js
FileSaver.js is a lightweight library that enables users to upload files via AJAX and then download them after the upload is complete. It is possible to select multiple files and set a custom filename, as well as to set the save path. FileSaver.js is designed to save files on the client-side, and is perfect for web apps that generate files on the client-side and need to save them.
FilePond.js
FilePond.js is a JavaScript library for uploading files that provides a modern and flexible interface. It supports features like drag-and-drop and image preview. FilePond.js also has an inbuilt editor for image resizing, cropping, and optimization.
JS image upload with Uploadcare
To use Uploadcare for uploading an image, include this in the <head> section of your HTML:
<link
rel="stylesheet"
href="https://cdn.jsdelivr.net/npm/@uploadcare/file-uploader@1/web/uc-file-uploader-regular.min.css"
>
<script type="module">
  import * as UC from 'https://cdn.jsdelivr.net/npm/@uploadcare/file-uploader@1/web/uc-file-uploader-regular.min.js';
  UC.defineComponents(UC);
</script>
Now you can use the Uploader:
<uc-config
  ctx-name="my-uploader"
  source-list="local, url, camera, dropbox"
  pubkey="YOUR_PUBLIC_KEY">
</uc-config>

<uc-file-uploader-regular ctx-name="my-uploader">
</uc-file-uploader-regular>
YOUR_PUBLIC_KEY is your Uploadcare public key. You can get it from your Uploadcare dashboard.
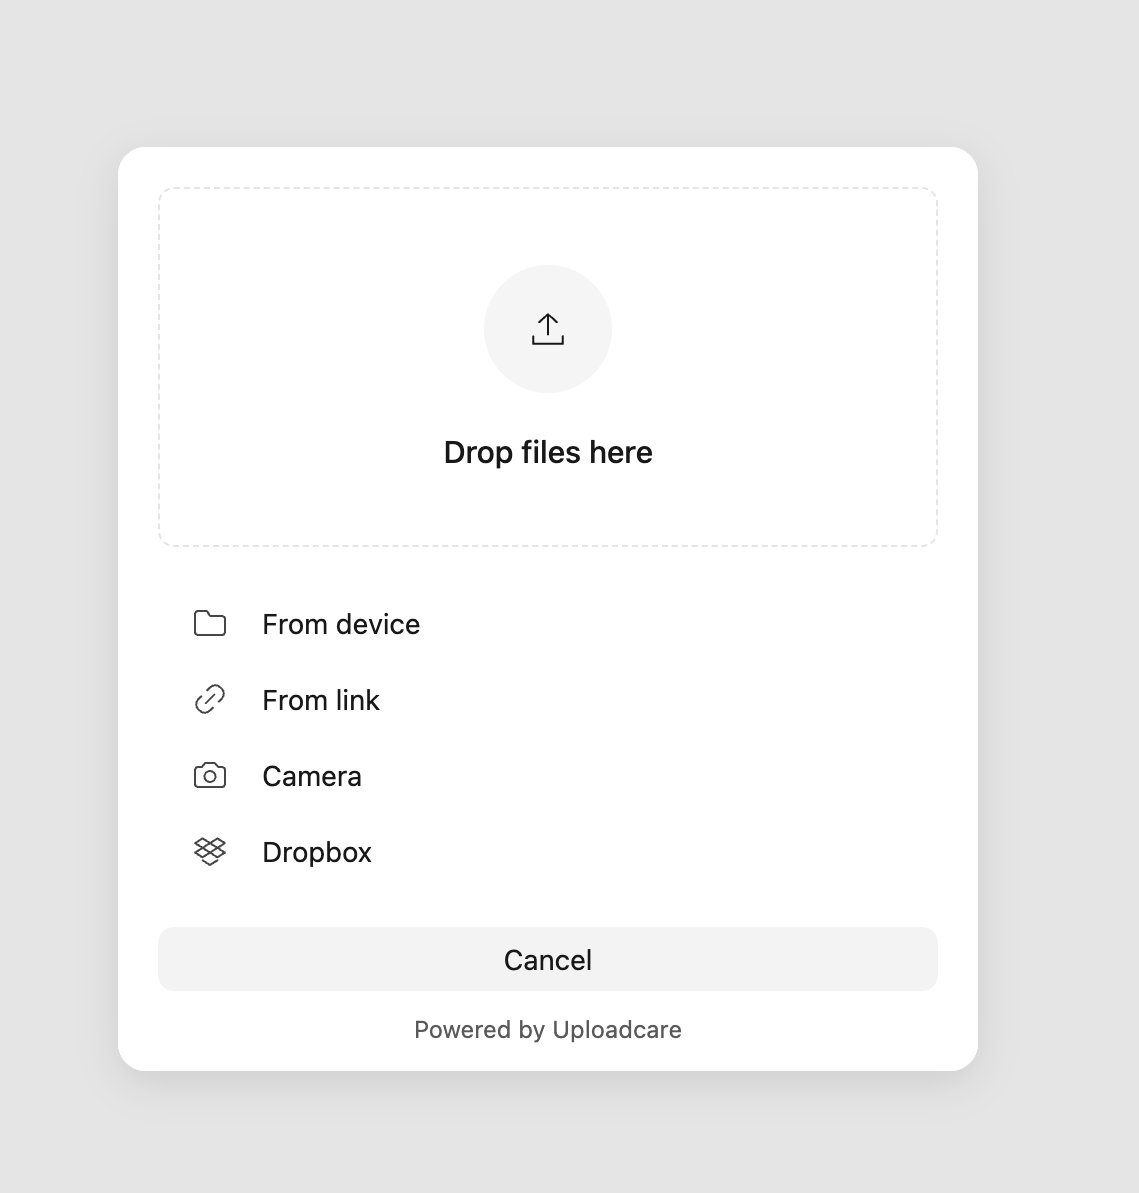 Uploadcare File Uploader example
For full setup instructions and advanced options, explore the Uploadcare File Uploader documentation.
Conclusion
There you have it! A complete guide to implementing image upload with JavaScript, from setup to server-side handling.
Want to try Uploadcare? You can start today for free and add file uploading capabilities to your application in minutes.