In this guide, you’ll learn how to auto-tag every image upload in n8n with the Uploadcare
Object Recognition add-on. By the end, you’ll have a workflow where each file.uploaded event runs
the add-on and writes high-confidence labels to your database or CMS.
The Object Recognition add-on is an
Uploadcare REST API feature that runs an uploaded image through
AWS Rekognition and stores the detected labels on the file. Each label carries a Name and a
Confidence score, so you can keep only the tags the model is sure about.
Access to an n8n instance (self-hosted or n8n.cloud)
A database, CMS, or HTTP endpoint to receive the tags.
What we’re building
An Uploadcare webhook fires on file.uploaded and hits an n8n Webhook node.
n8n triggers the aws_rekognition_detect_labels add-on for that file UUID.
The workflow polls the add-on status until it reports done.
n8n reads the labels from the file’s appdata and keeps only high-confidence tags.
The tags are written to your DB or CMS for organization and search.
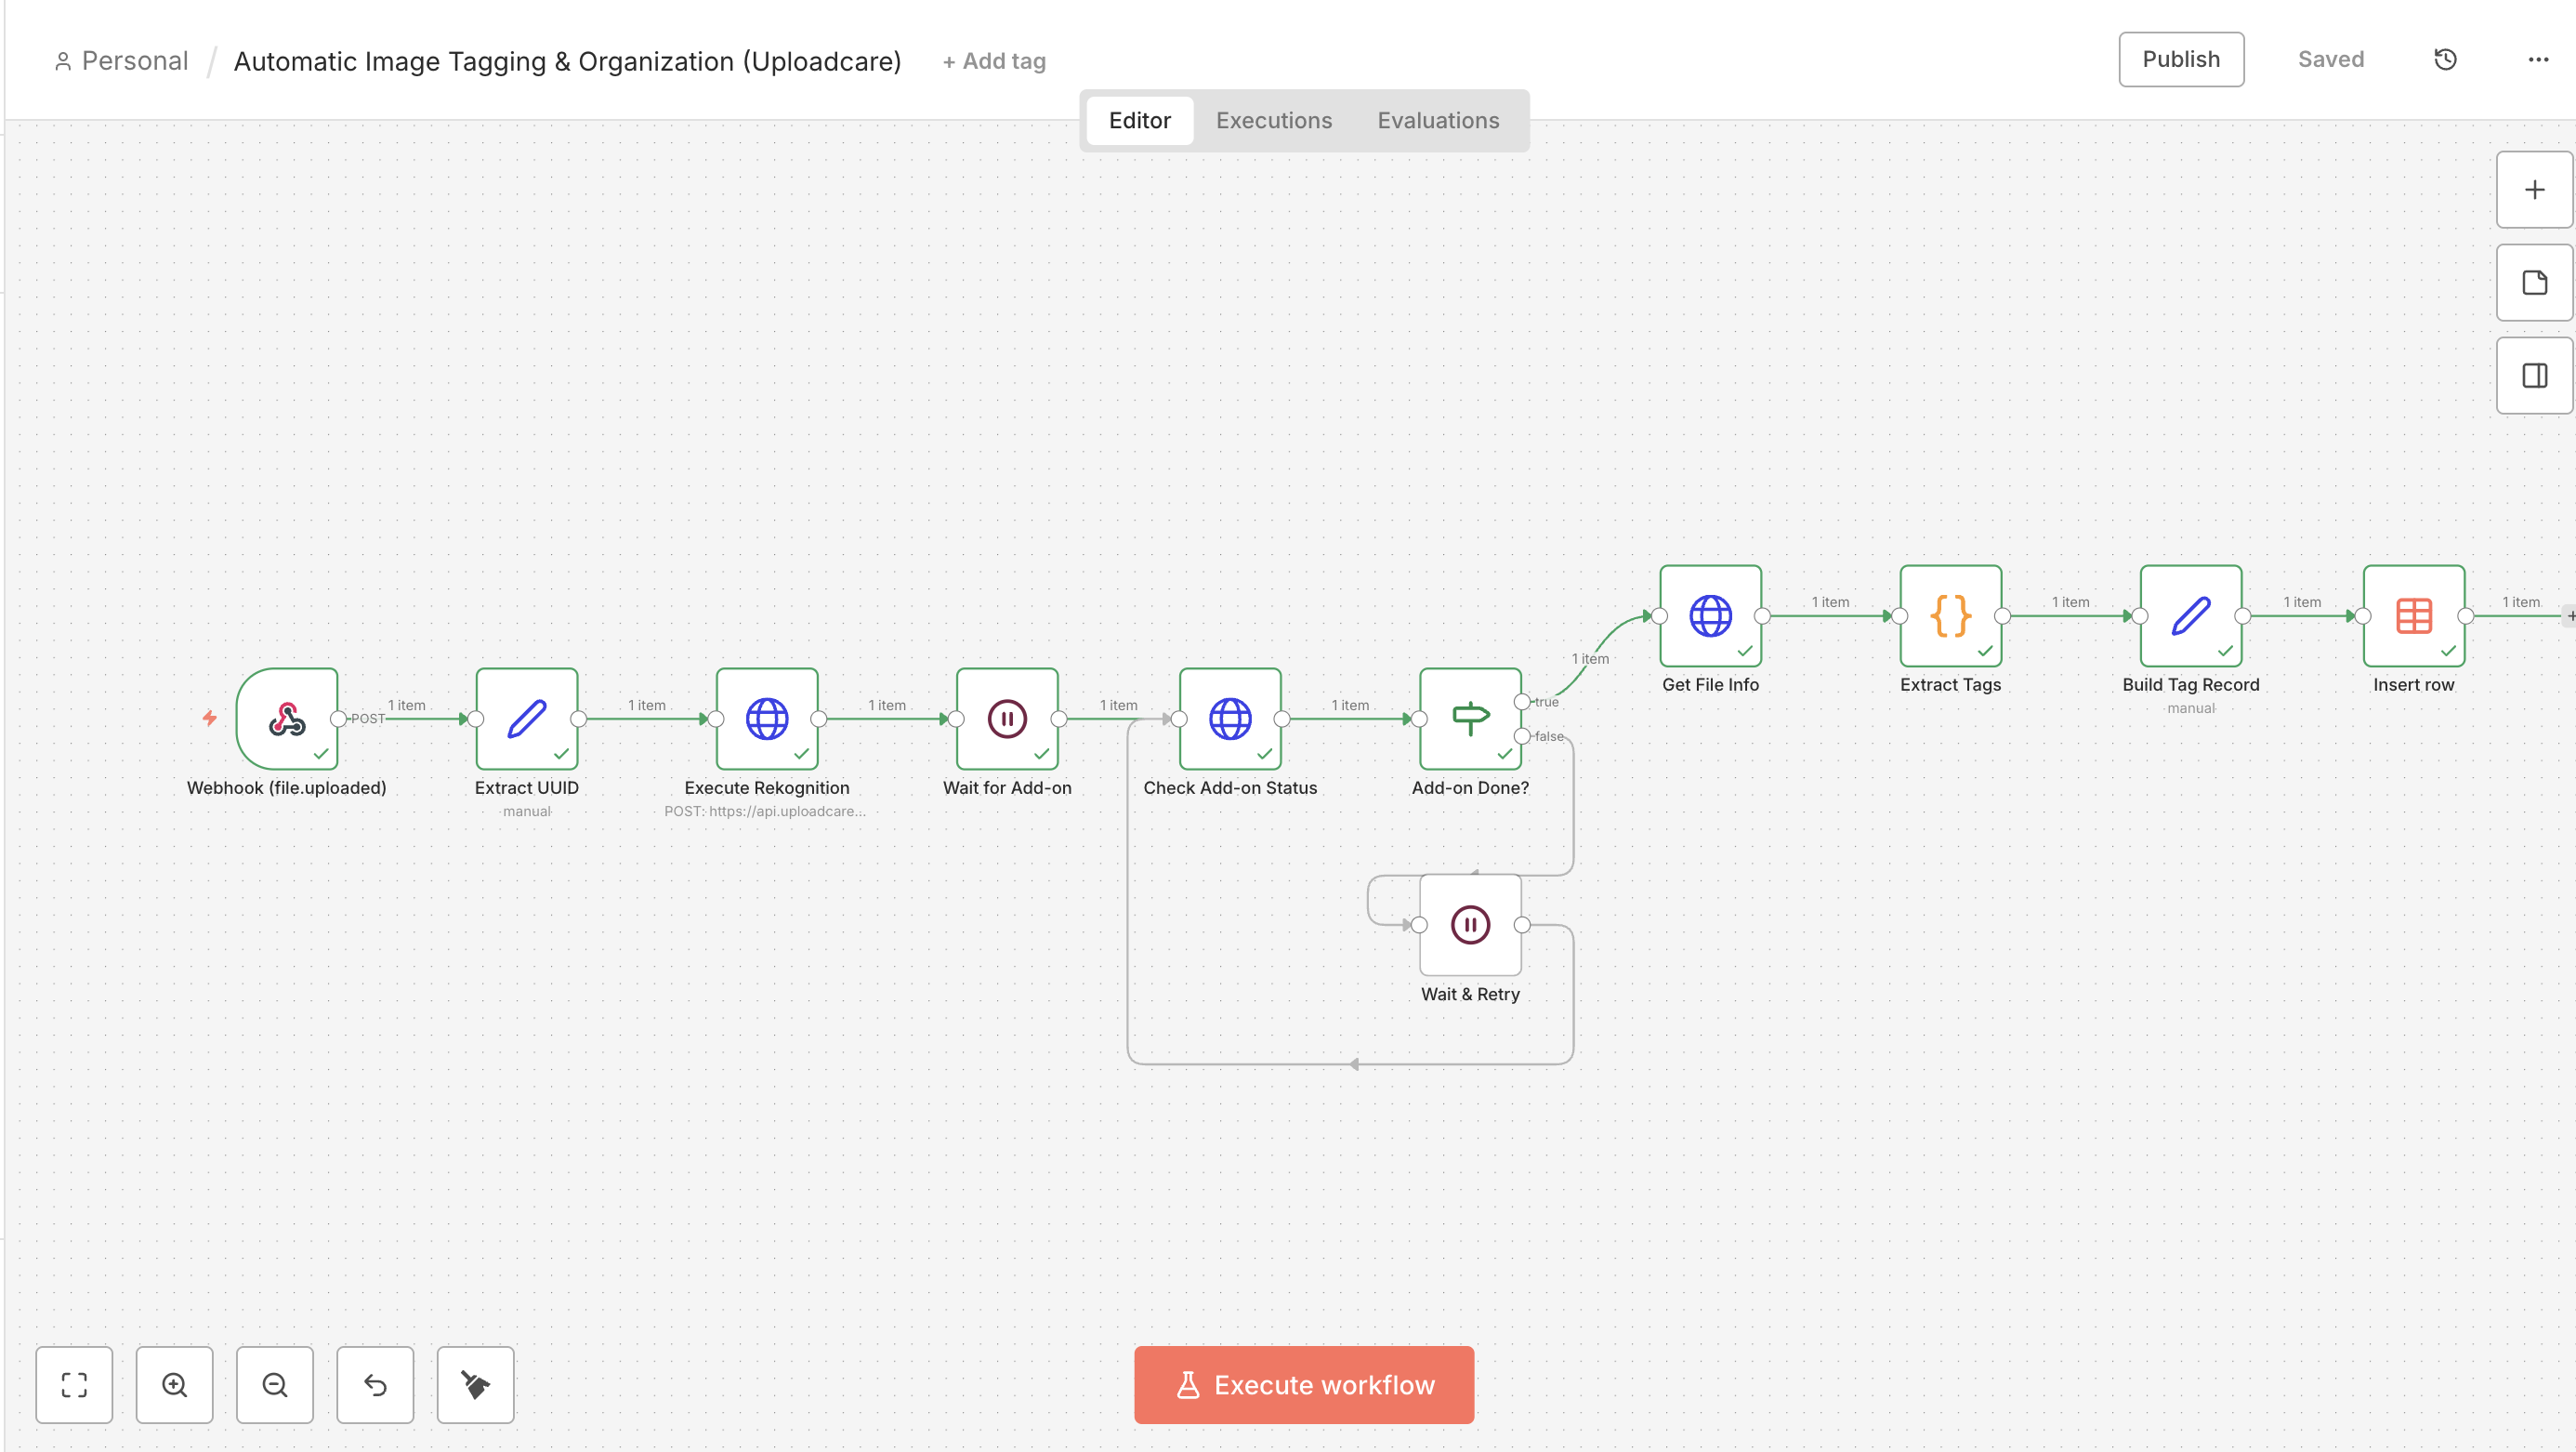
The n8n workflow for auto-tagging images with Uploadcare’s Object Recognition add-on
Step 1: Receive the upload event
The workflow starts when Uploadcare tells n8n a file landed. A Webhook node gives you a URL to register,
and a Set node pulls the file UUID out of the payload so the rest of the workflow can
reference it cleanly.
Add the Webhook node
Click the + button to add a new node and search for the Webhook node.
Set the HTTP Method to POST.
Copy the node’s Production URL.
In the Uploadcare Dashboard, go to API → Webhooks, paste the URL, and subscribe
to the file.uploaded event.
Uploadcare then POSTs a JSON payload to that URL on every new upload. The JSON is shaped like this:
{"event":"file.uploaded","data":{"uuid":"..."}}
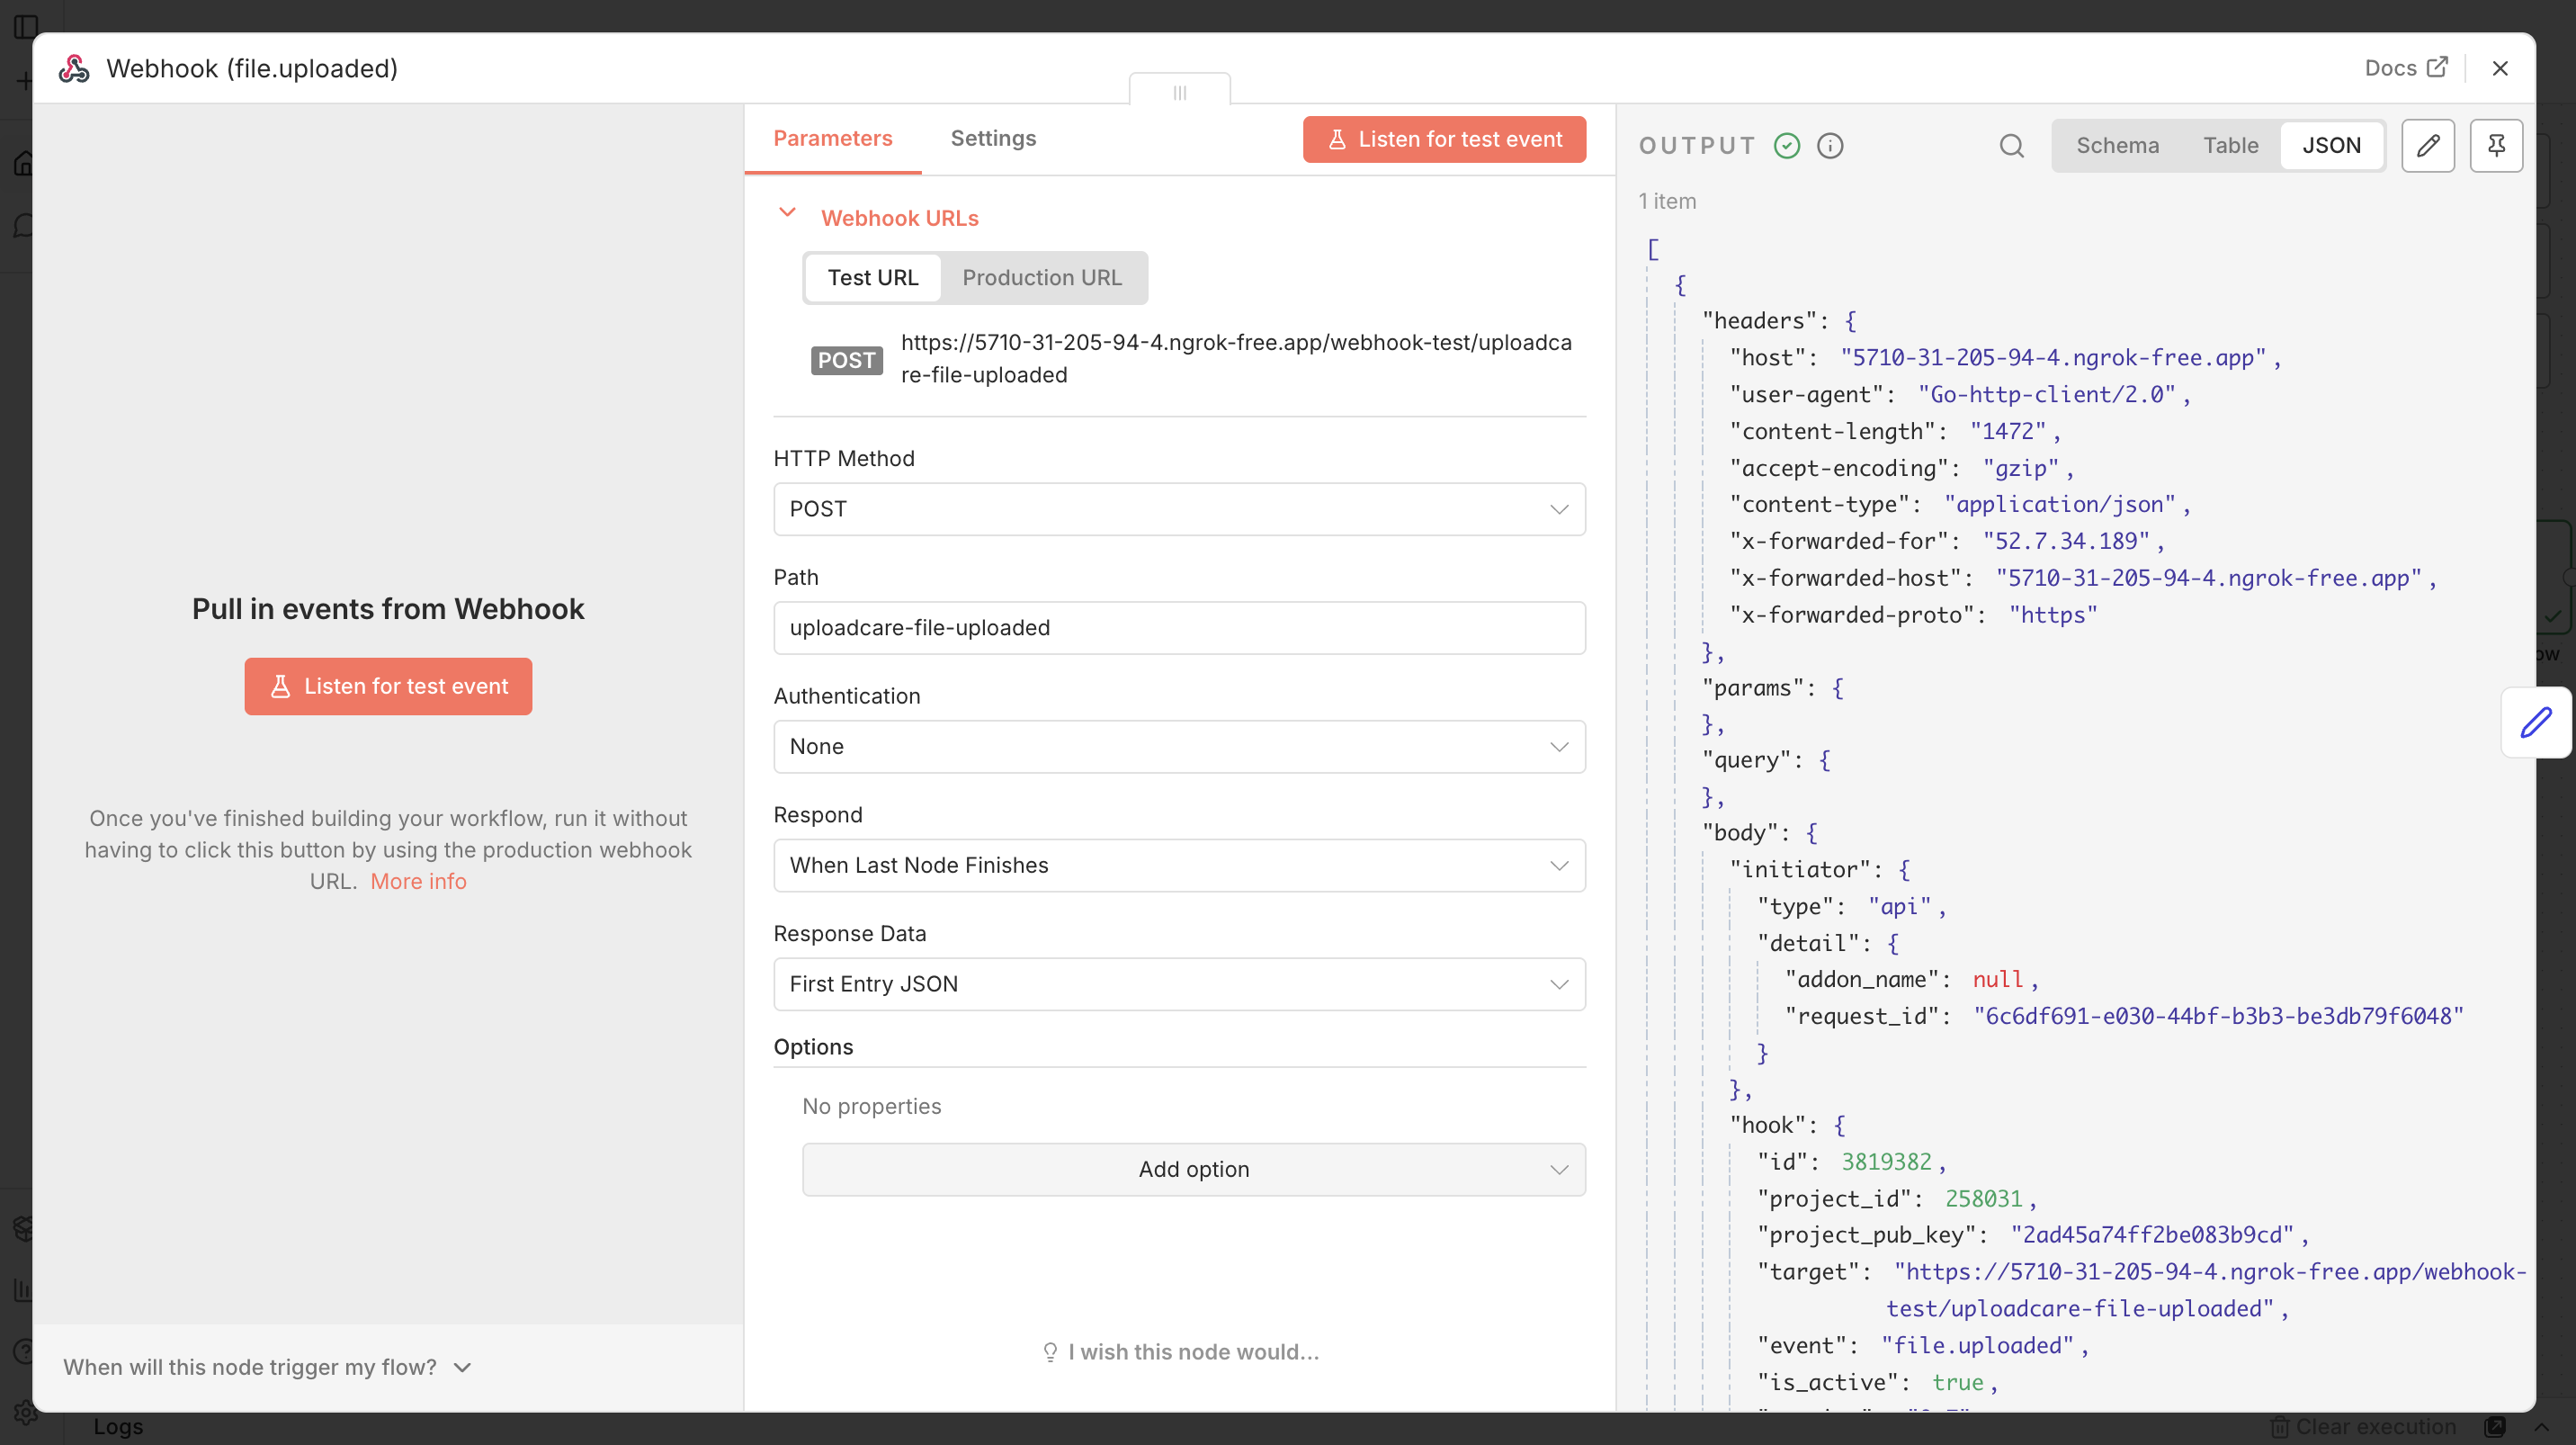
n8n Webhook node configured for the Uploadcare file.uploaded event
Extract the UUID
Add a Set node after the Webhook node and rename it Extract UUID.
Add a field, set its Name to uuid, and set its Type to String.
For the value, enter the expression {{ $json.body.data.uuid }}.
This reads body.data.uuid from the incoming webhook payload, which is where
Uploadcare puts the file identifier, and stores it as a clean uuid field. Every downstream node can
then reference {{ $json.uuid }} without digging back into the raw event body.
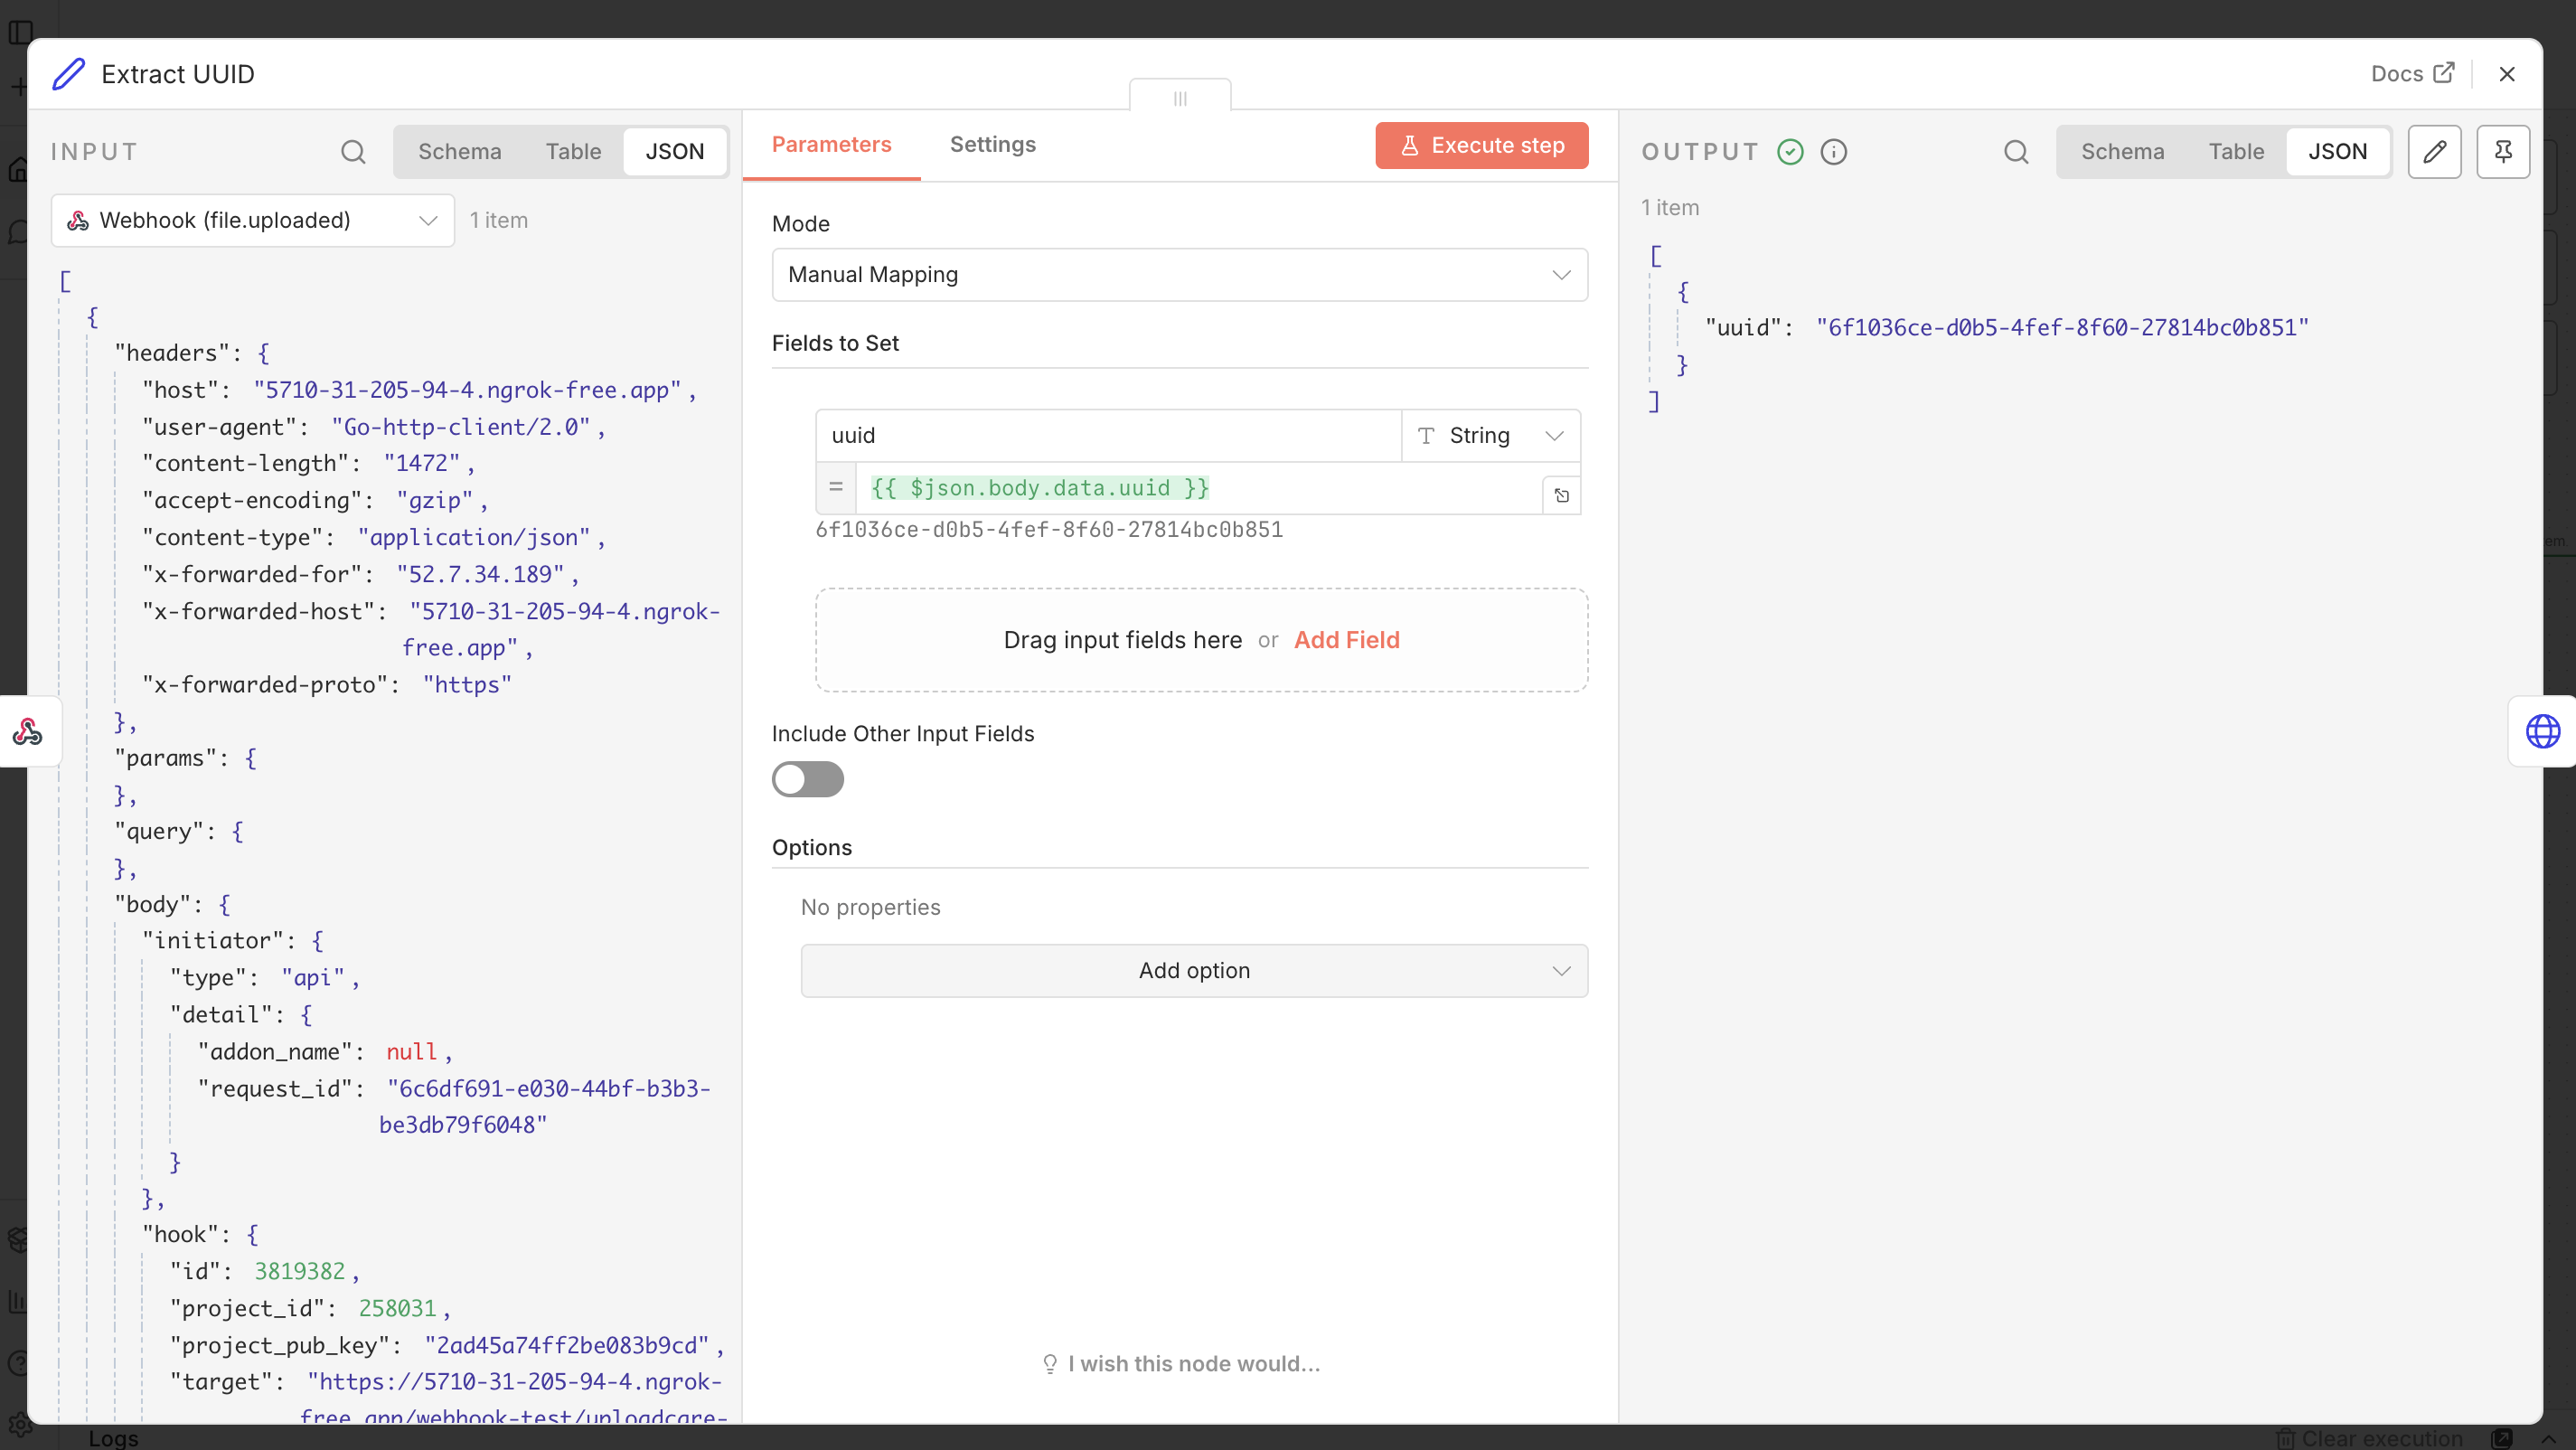
n8n Set node extracting the file UUID from the webhook payload
Step 2: Trigger the Object Recognition add-on
The add-on runs server-side and asynchronously, so you start it with an HTTP Request node.
The execute call (Add-Ons REST API reference) doesn’t return labels right away.
Instead, it returns a request_id that you poll in the next step.
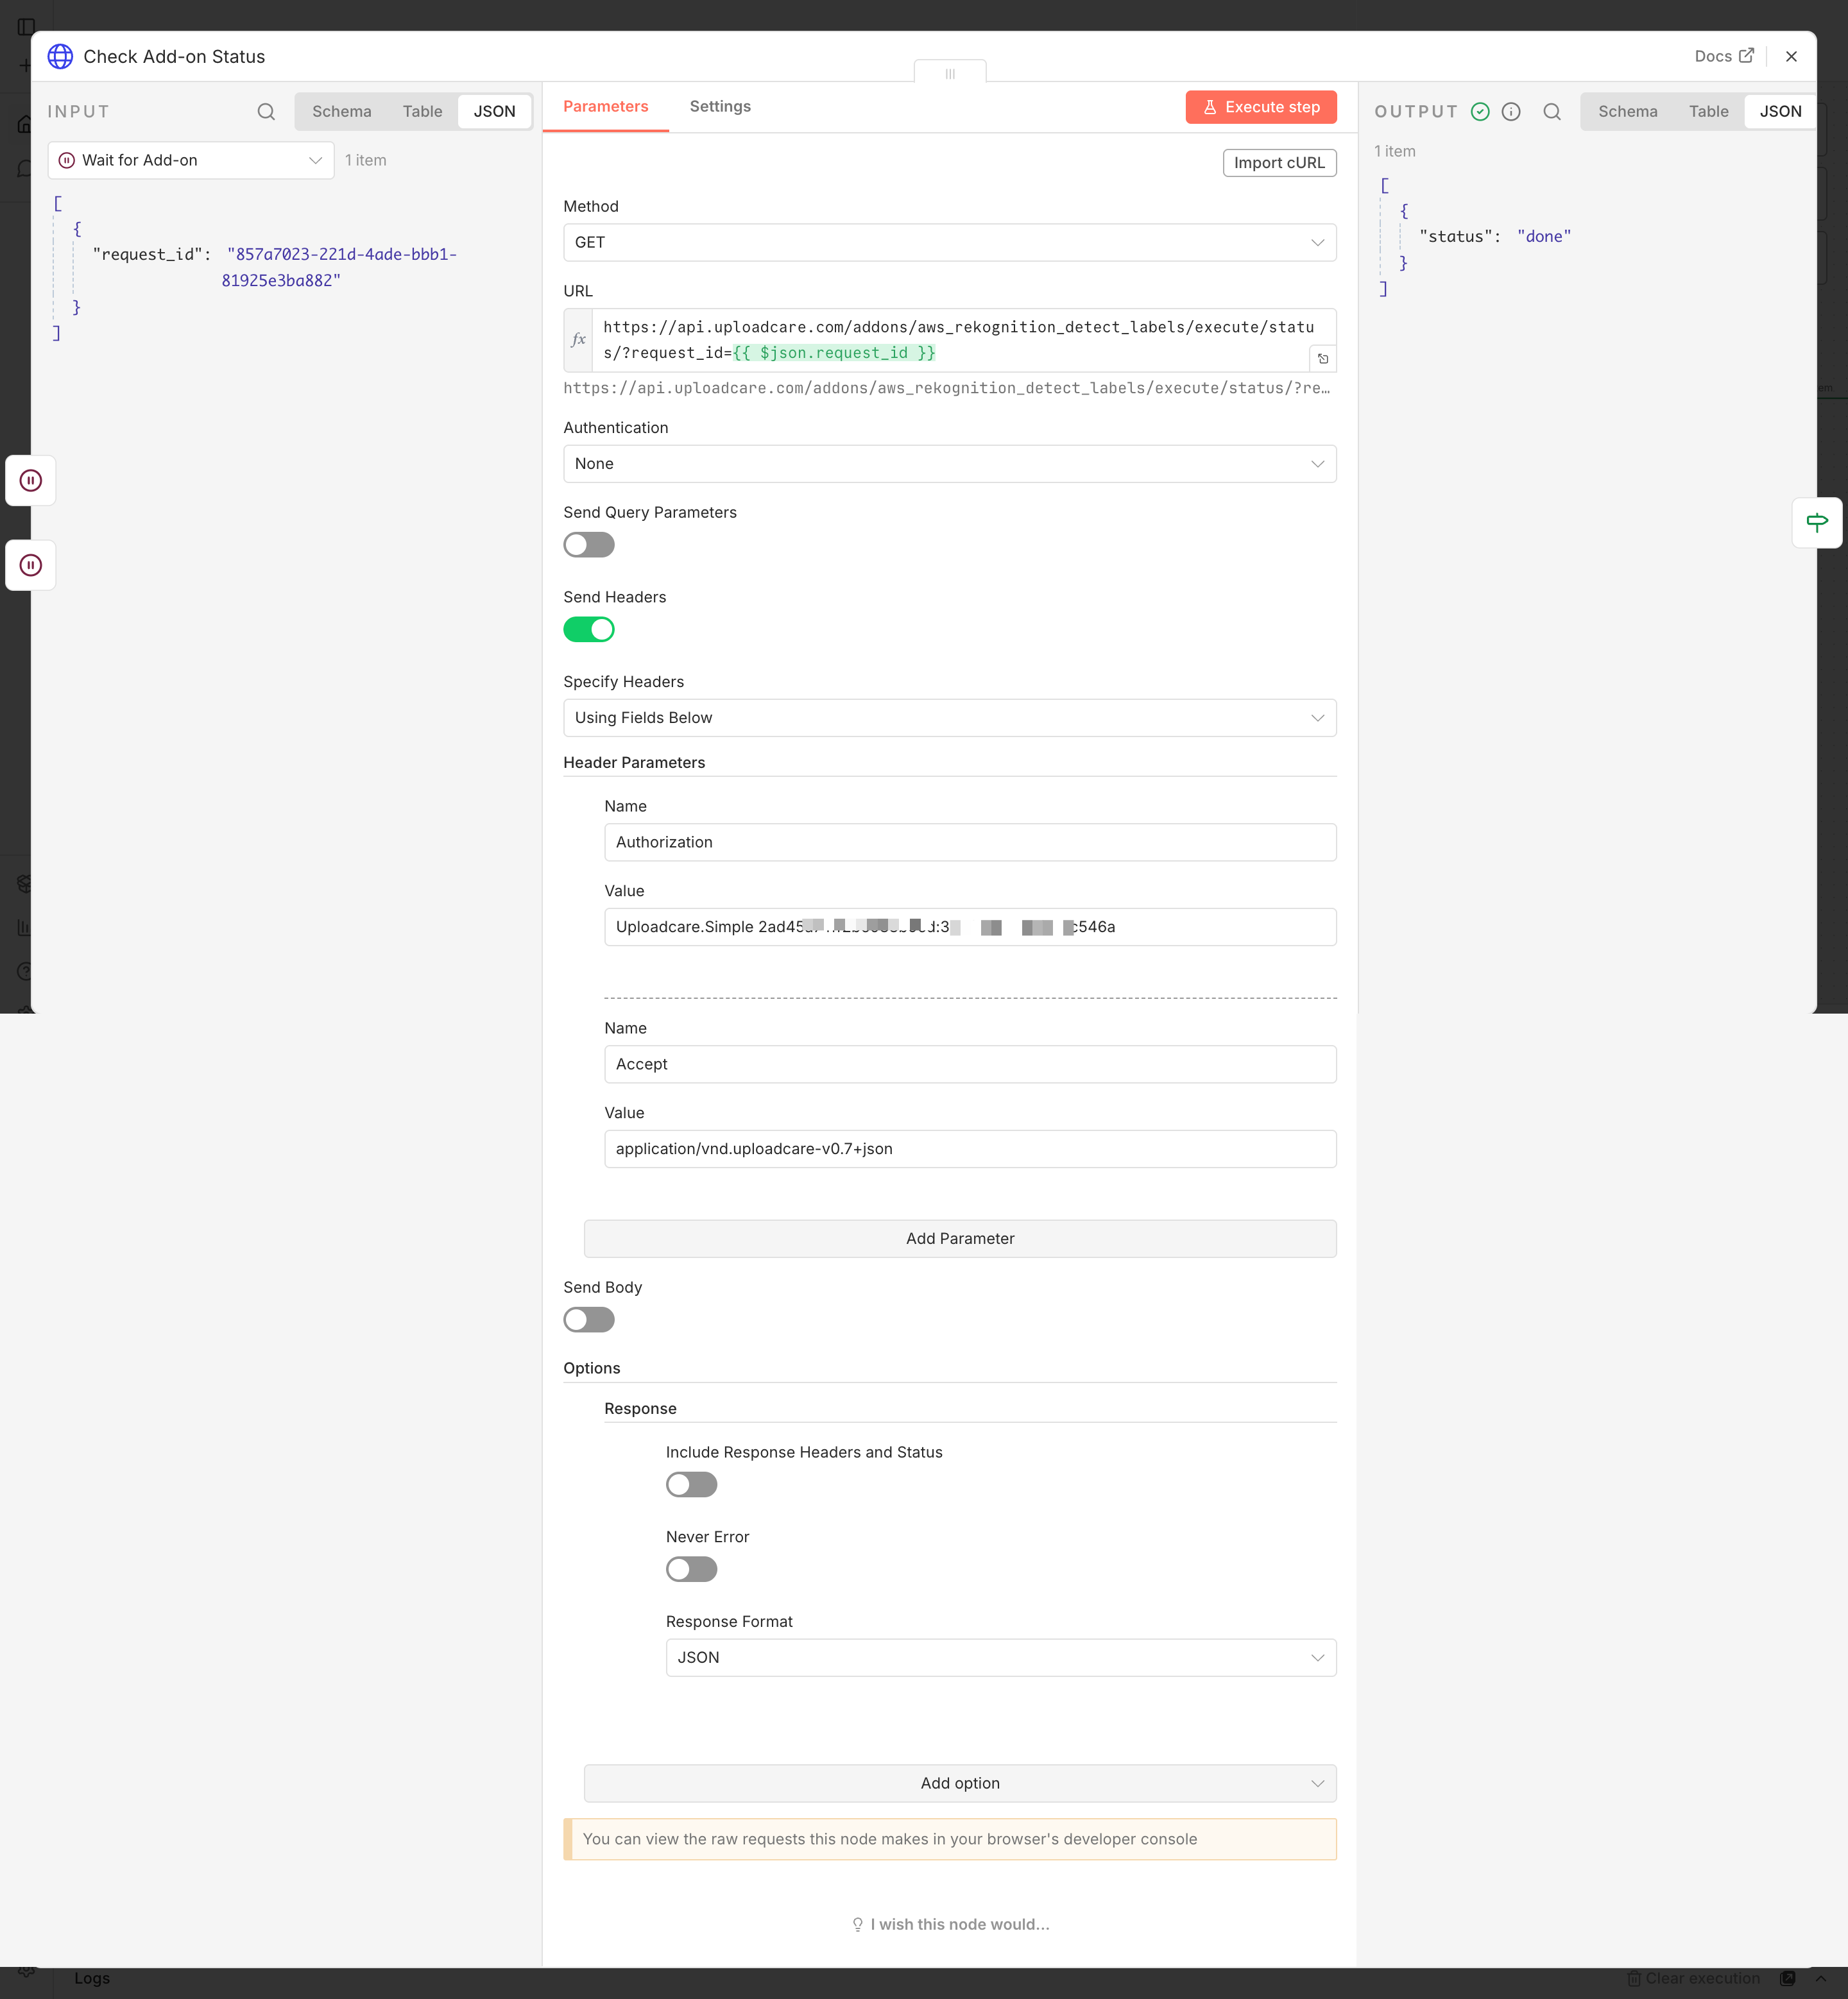
Configure the execute request
Add an HTTP Request node after the Set node and rename it Execute Rekognition.
Set the Method to POST.
Set the URL to https://api.uploadcare.com/addons/aws_rekognition_detect_labels/execute/.
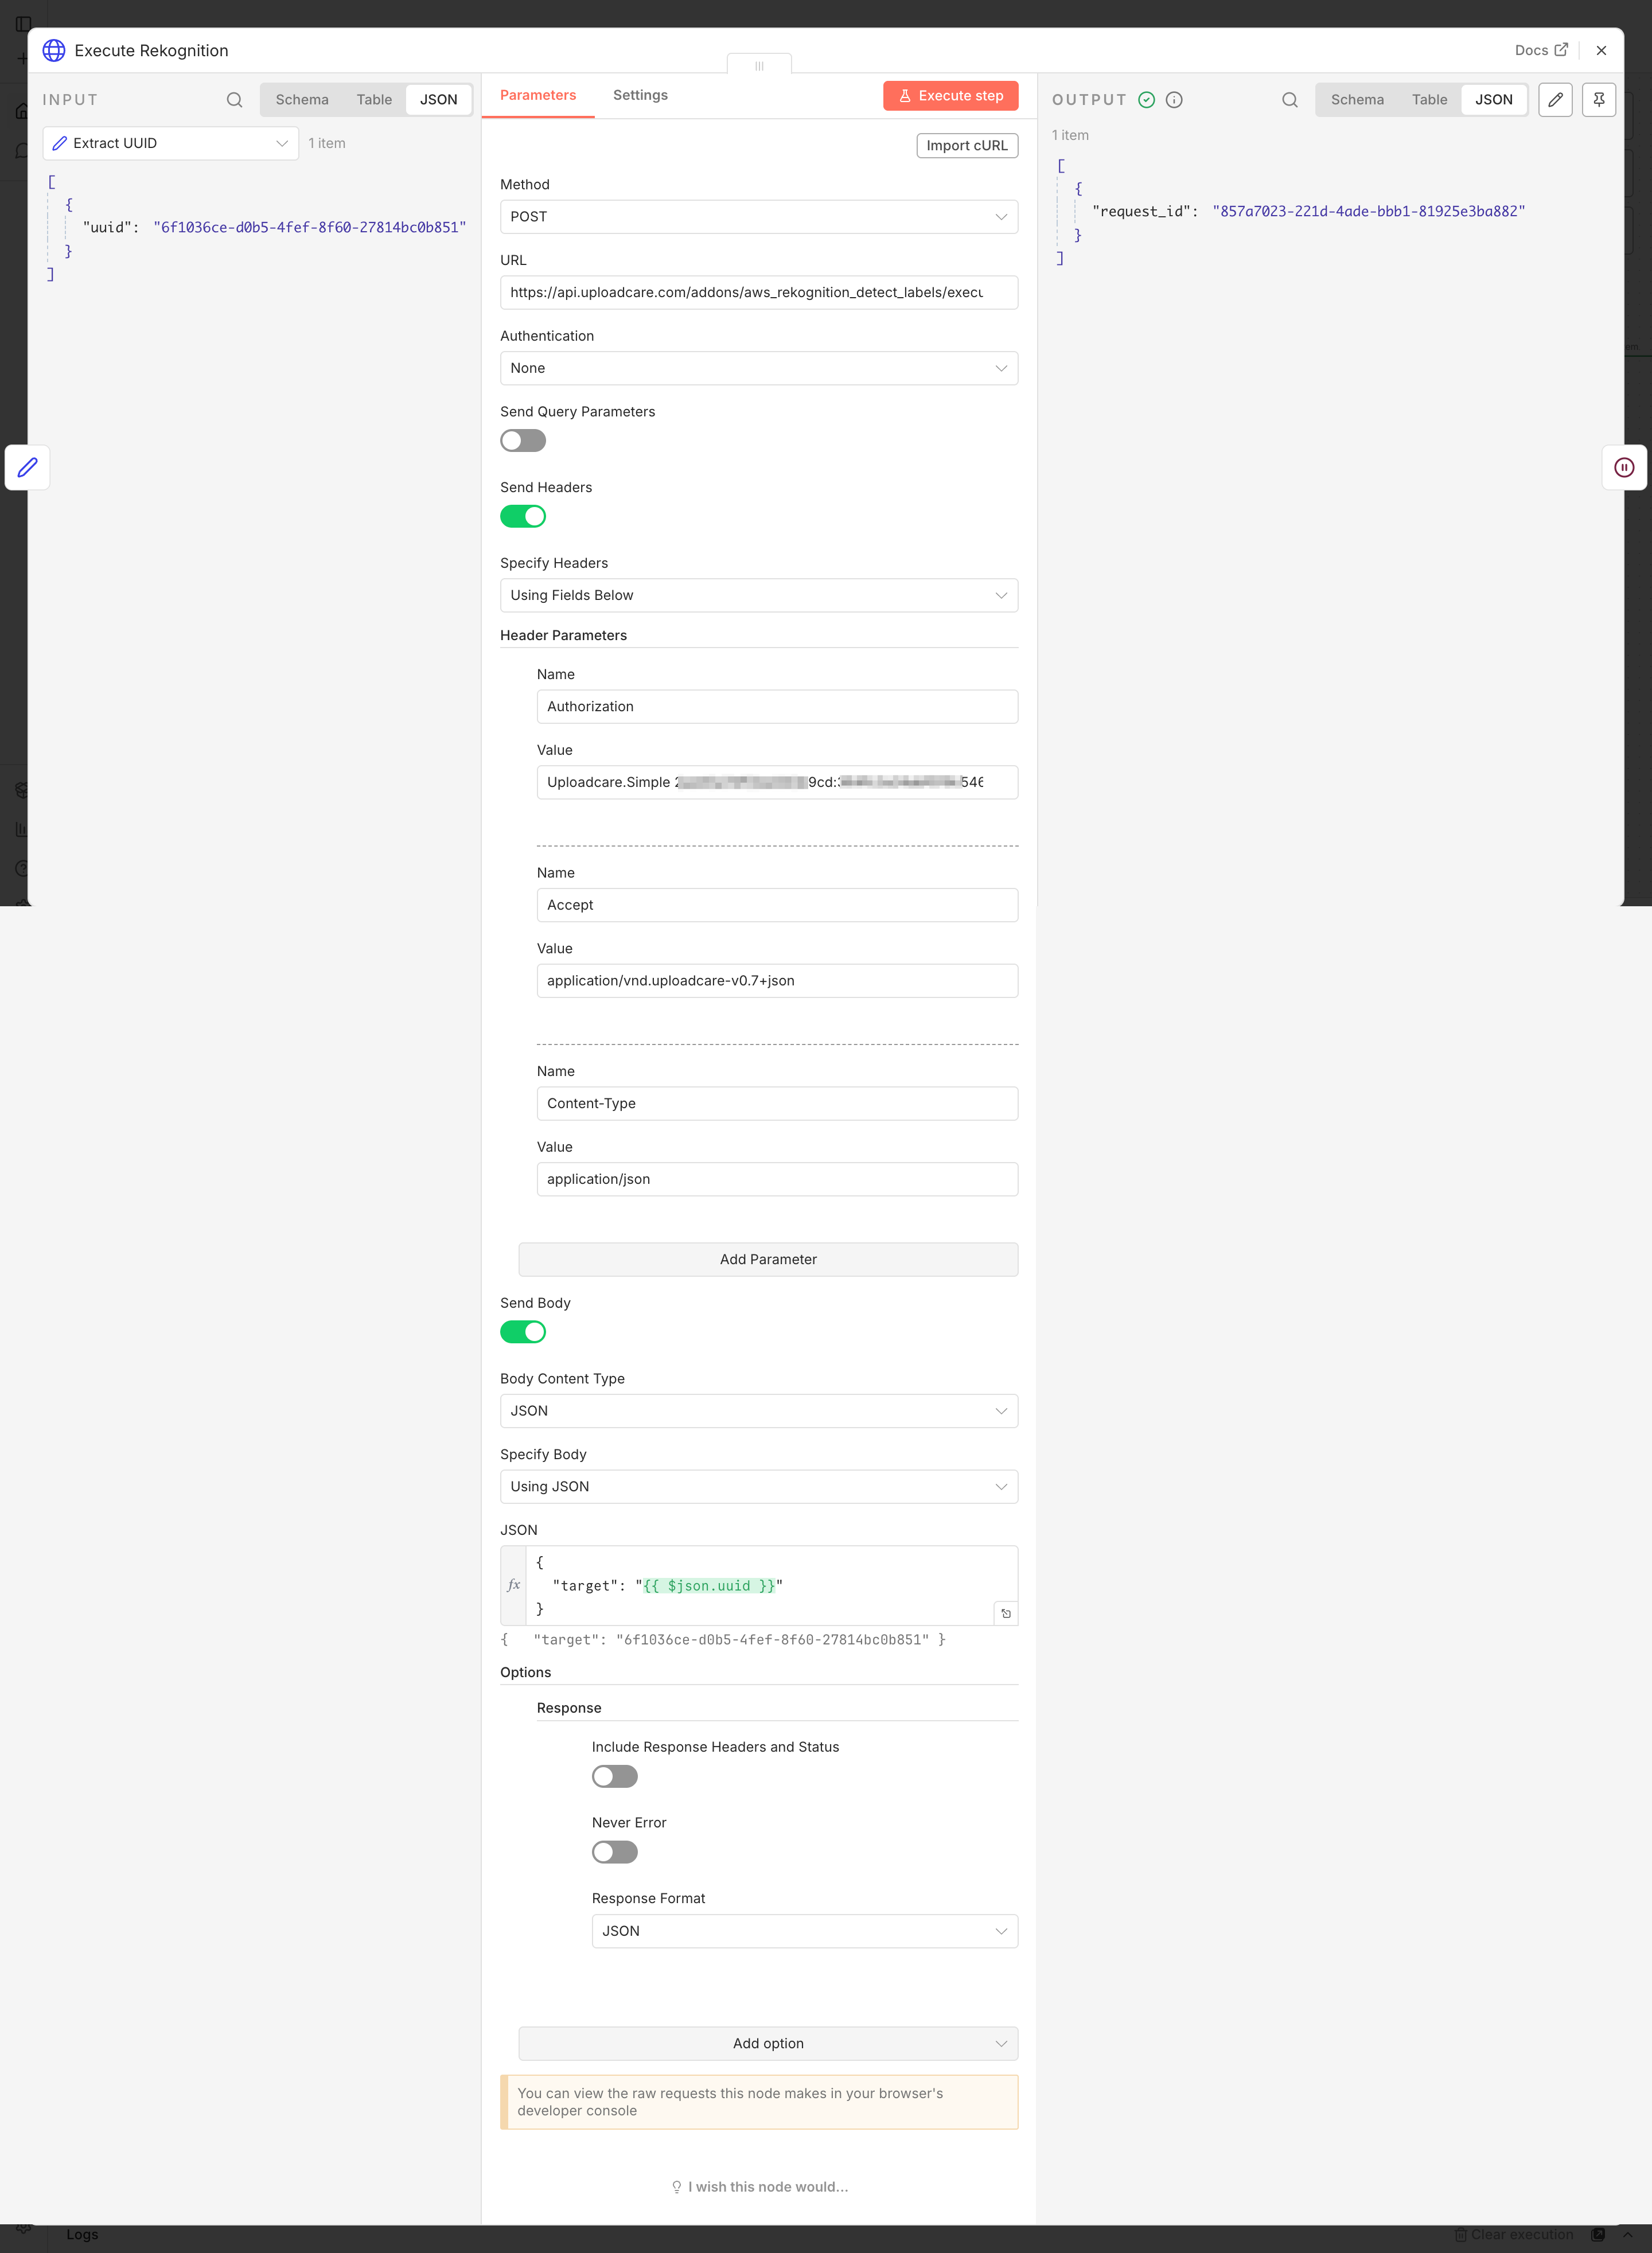
n8n HTTP Request node set to POST the Object Recognition execute endpoint
Add the authentication headers
Every Uploadcare REST API call needs the Authorization and Accept headers, and because this auth
is server-side only, never ship it to a browser.
Toggle Send Headers on and set the Specify Headers field to Using Fields Below.
Add a header with NameAuthorization and ValueUploadcare.Simple YOUR_PUBLIC_KEY:YOUR_SECRET_KEY.
Add a second header with NameAccept and Valueapplication/vnd.uploadcare-v0.7+json.
Send the target UUID
Toggle Send Body on and set the Body Content Type to JSON.
Set Specify Body to Using JSON.
Enter this JSON body, where target is the file the add-on should analyze:
{"target":"{{ $json.uuid }}"}
Open Options → Response and set Response Format to JSON.
Note: Uploadcare’s REST API responds with the content type application/vnd.uploadcare-v0.7+json.
n8n doesn’t auto-detect that vendor +json type as JSON, so without Response Format set to JSON
it hands you the body as a raw string under a data field, and expressions like {{ $json.request_id }}
come back empty. Set Response Format to JSON here and on every Uploadcare REST call in this
workflow so n8n parses the body and you can read its fields directly.
The response includes a request_id you’ll use to poll for completion in the next step.
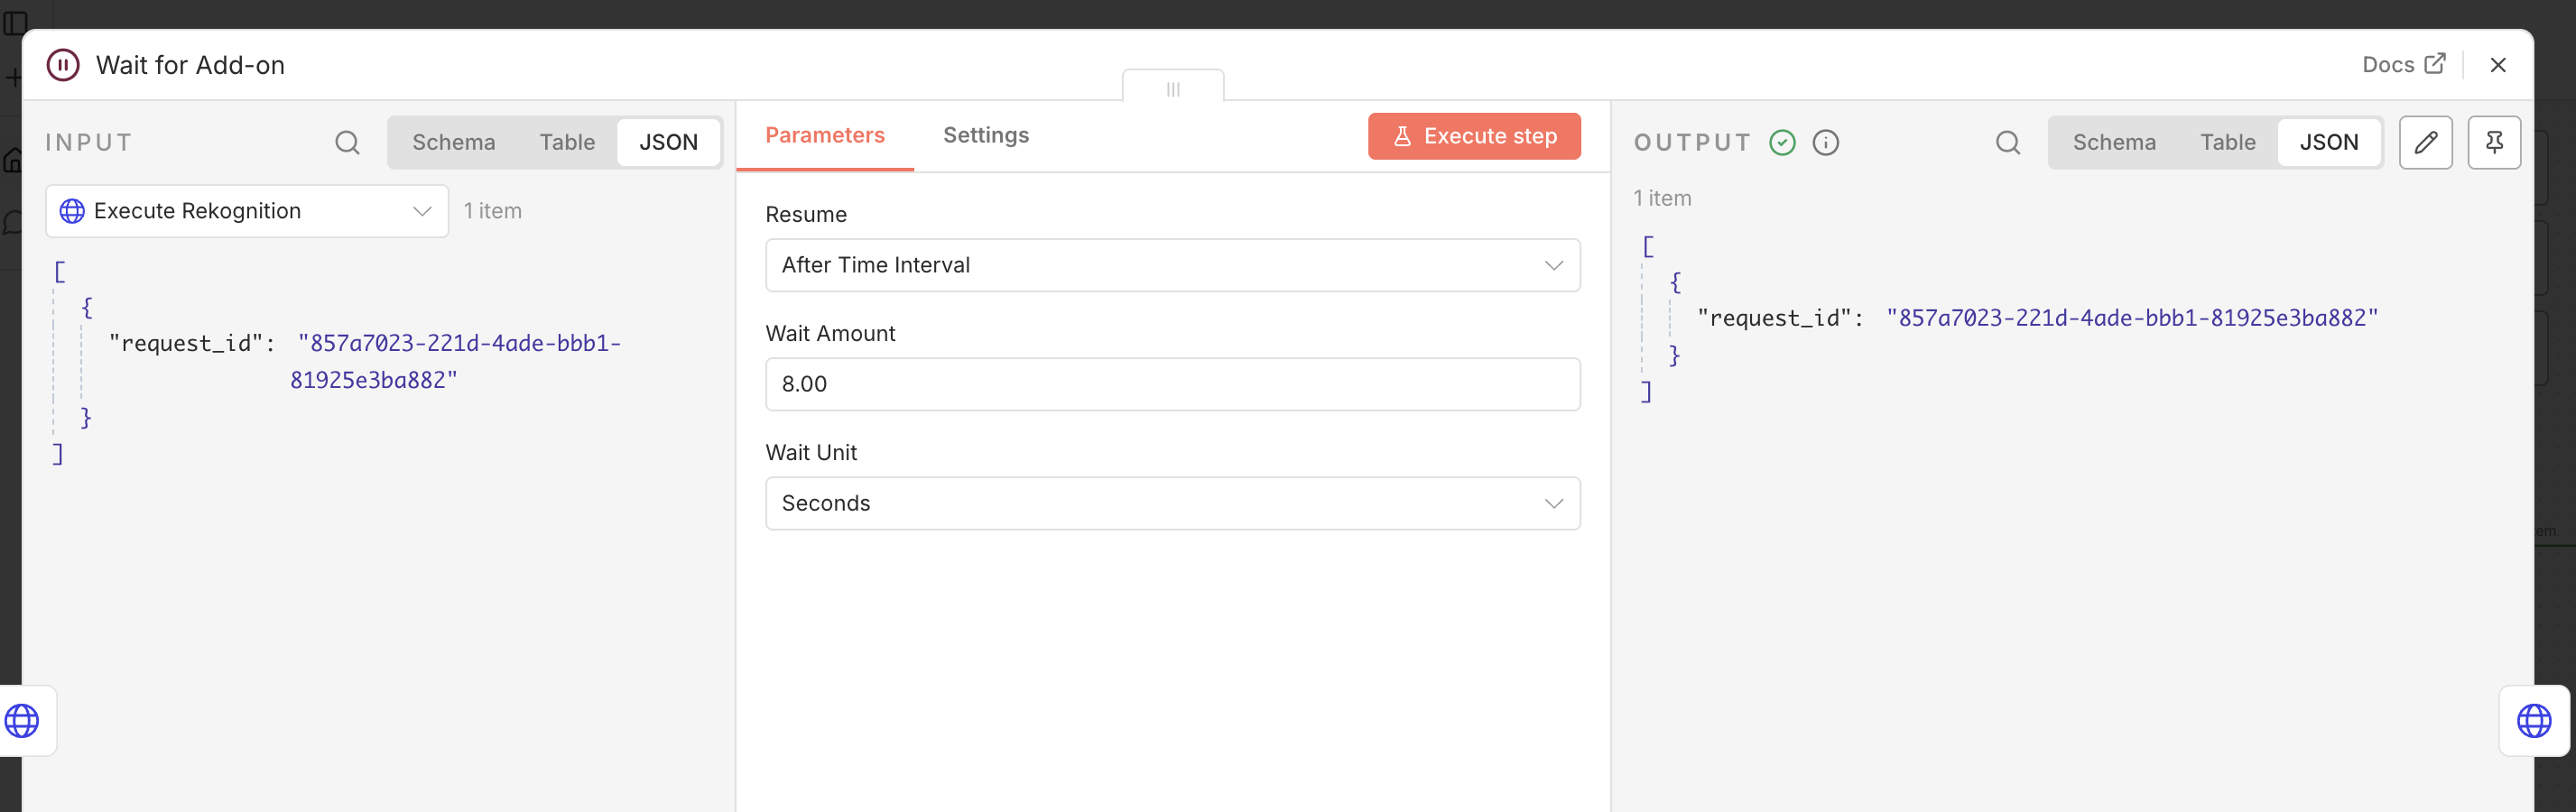
Step 3: Wait and poll for completion
Now that the add-on is running, give it a moment and then check on it.
Add a condition comparing {{ $json.status }} to done.
When status equals done (the true output), the labels are ready, so the workflow continues.
Otherwise, route the false output back to a short Wait & Retry node that loops to the status check.
Tip: If a file occasionally takes longer, this loop keeps polling instead of failing the moment a
result isn’t ready.
n8n If node branching on the done status
Step 4: Where do the recognition results live?
The add-on stores its results on the file itself, not in the poll response, which only reports
{"status": "done"}. The labels land in appdata.aws_rekognition_detect_labels.data.Labels, where
each entry has a Name and a Confidence score, so once the status reports done, you fetch the file
to read them.
Note: Two things to watch out for:
The appdata field is only returned when you ask for it with ?include=appdata;
a plain GET /files/<UUID>/ comes back with appdata: null.
The labels array is Labels with a capital L, because it mirrors the raw AWS Rekognition response.
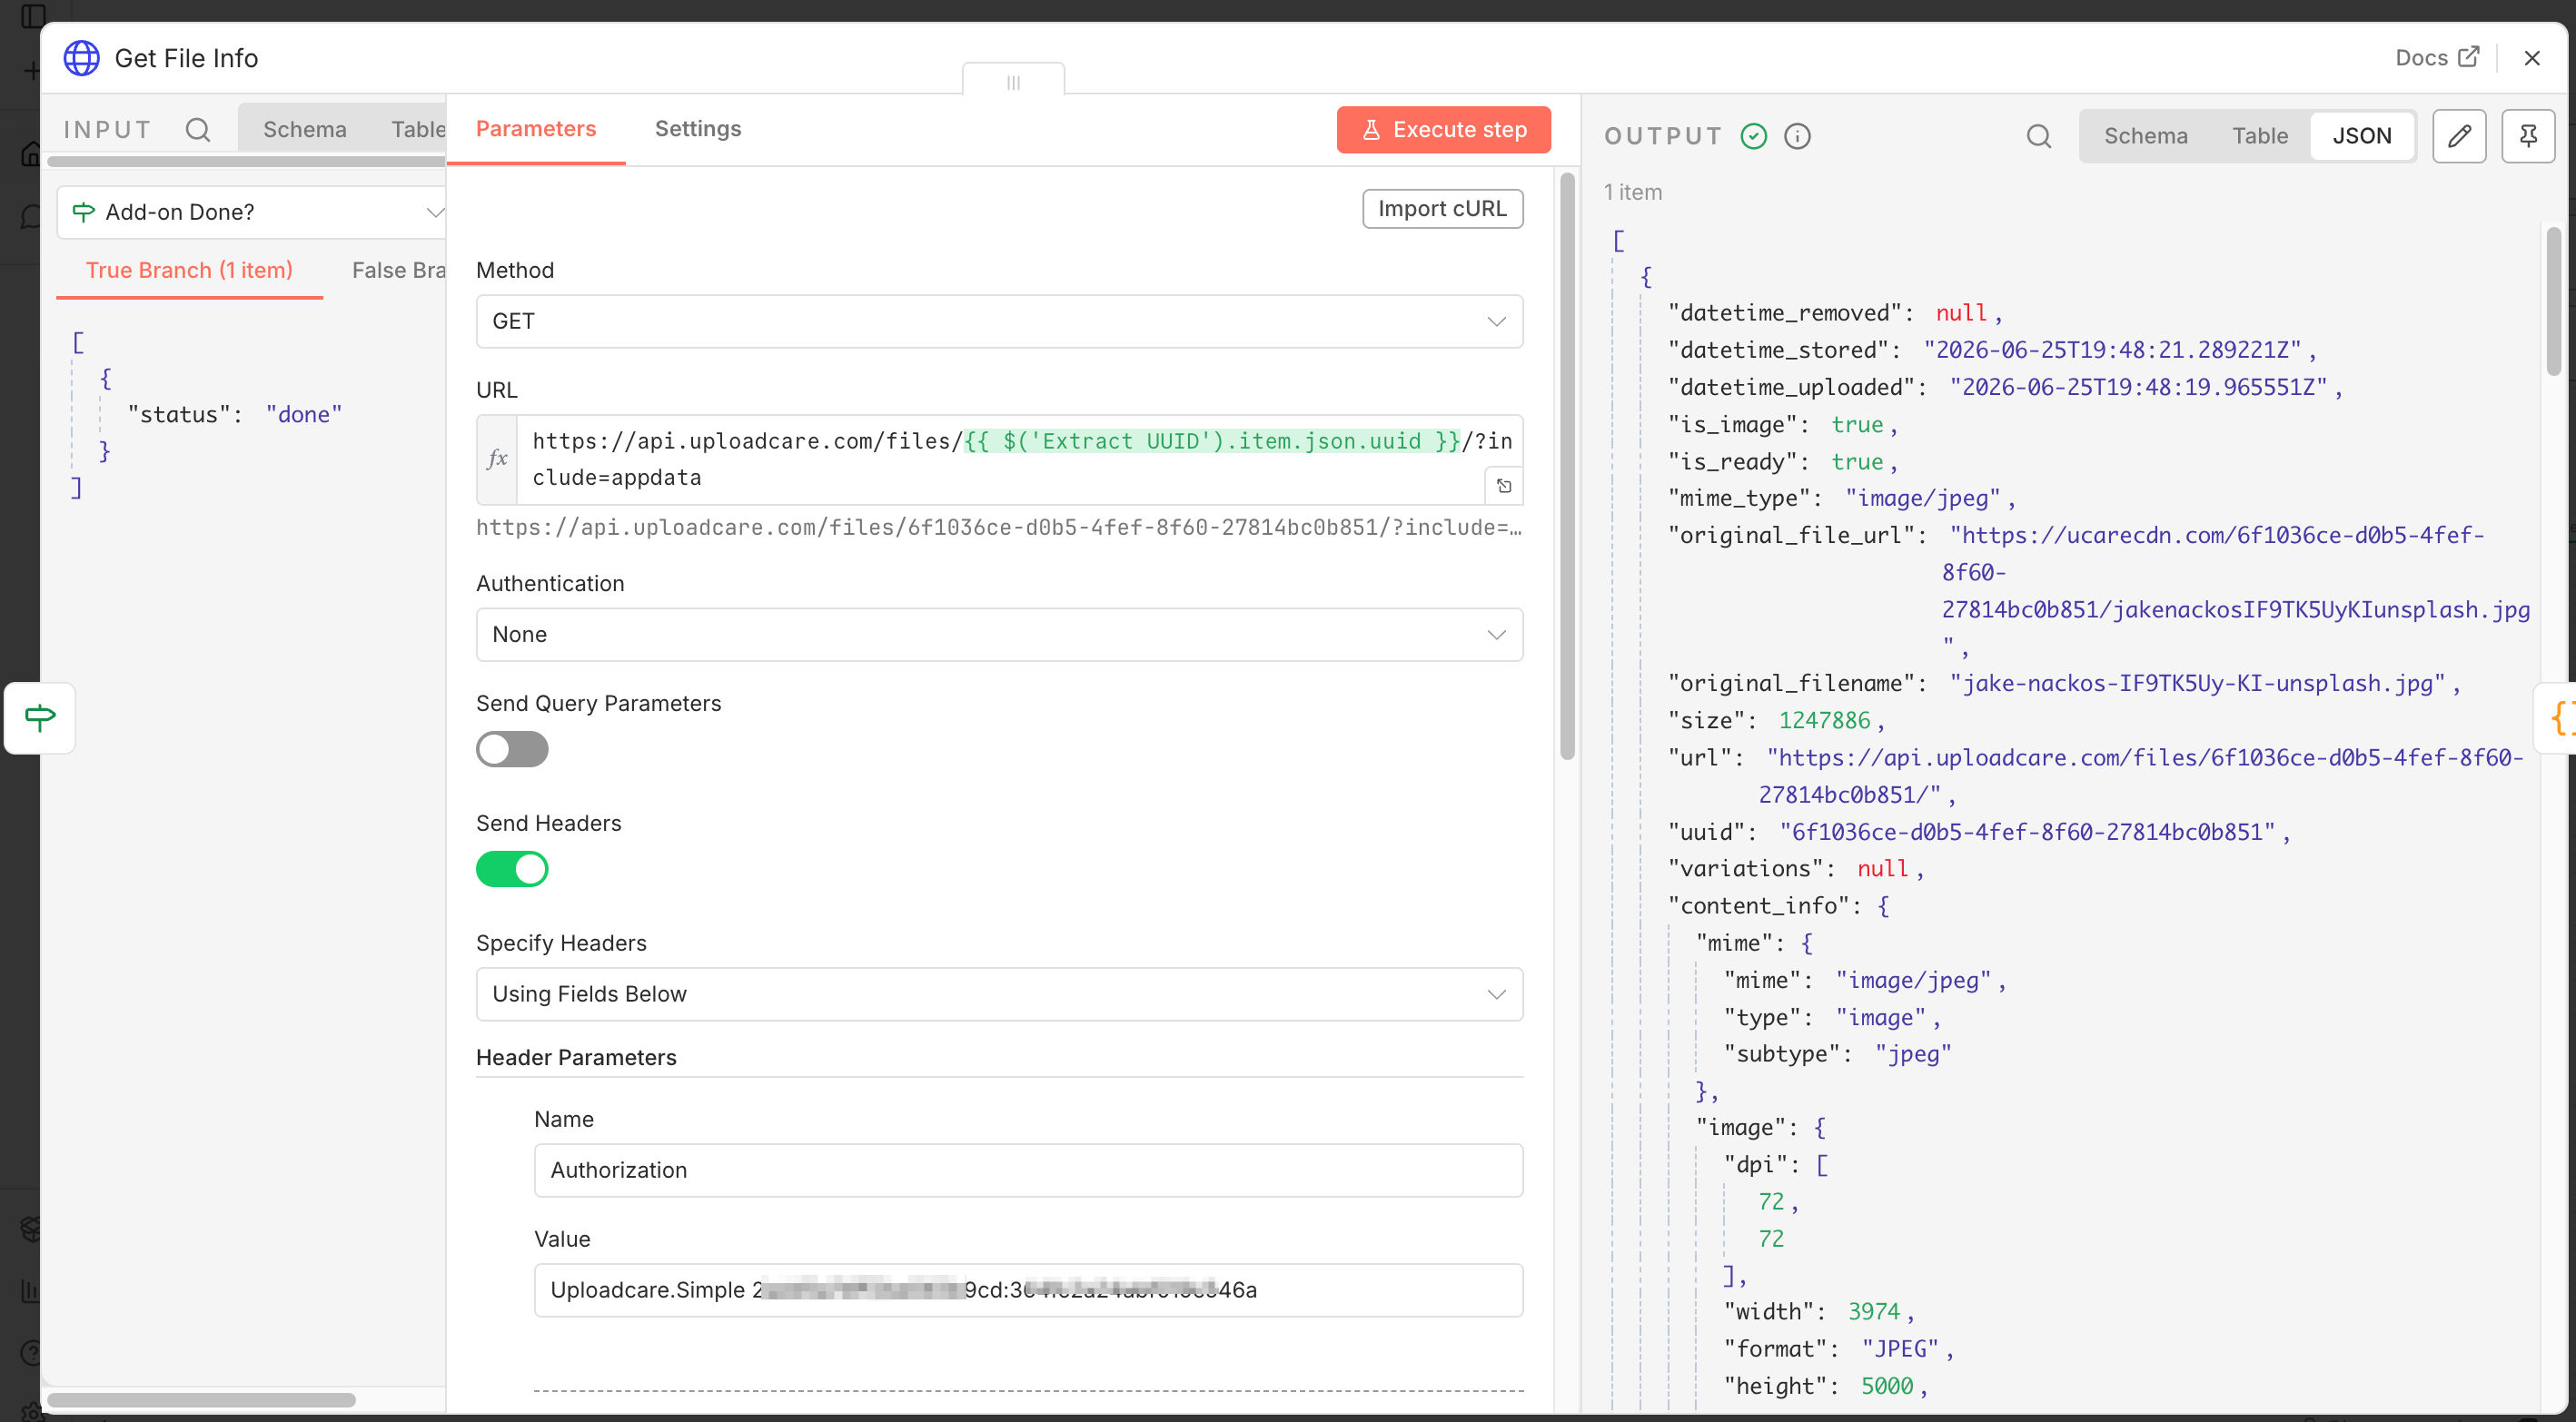
Fetch the file info
On the If node’s true output, add an HTTP Request node and rename it Get File Info.
Set the Method to GET.
Set the URL to the file endpoint, using the UUID captured back in Step 1,
with the ?include=appdata query parameter so the response carries the add-on results:
Toggle Send Headers on and add the same Authorization and Accept headers from Step 2.
Open Options → Response and set Response Format to JSON, just as in Step 2, so n8n parses
the body and appdata arrives as an object instead of a string under data.
This reads the same file the add-on analyzed and returns the full file object (File REST API reference). The ?include=appdata
parameter is what makes Uploadcare attach the appdata.aws_rekognition_detect_labels.data.Labels
array that the Object Recognition add-on wrote; without it, appdata comes back null.
n8n HTTP Request node fetching the Uploadcare file info with appdata
Step 5: Filter tags by confidence
A Code node turns the raw labels into a tidy tag list,
dropping anything below your threshold. Add a Code node after the file fetch, set its language to JavaScript,
and enter the following:
Sets a CONFIDENCE_THRESHOLD of 80 so only labels the model is reasonably sure about make the cut.
Reads the labels from appdata.aws_rekognition_detect_labels.data.Labels (capital L),
defaulting to an empty array if the add-on returned nothing.
Keeps each label’s Name and discards its score, then returns a single record with the uuid,
a ready-to-use cdnUrl, the filtered tags, and a tagCount.
Note:2ta6v1zvst.ucarecd.net is this project’s CDN domain.
Find yours in the Uploadcare Dashboard under Delivery → CDN Domain names,
and use it in place of the shared ucarecdn.com host in the URLs throughout this guide.
What the tags look like
Run a real photo through this and you can watch the threshold do its job. A car photo returns these
high-confidence labels, while a borderline Sports Car guess at 58% confidence gets filtered out:
That single dropped label is the difference between a clean tag set and a noisy one, which is exactly
what the CONFIDENCE_THRESHOLD controls.
Step 6: Store the tags
With a clean tag list ready, a Set node assembles the final record and a Data Table node
stores it in n8n’s built-in, lightweight datastore, no external database to run.
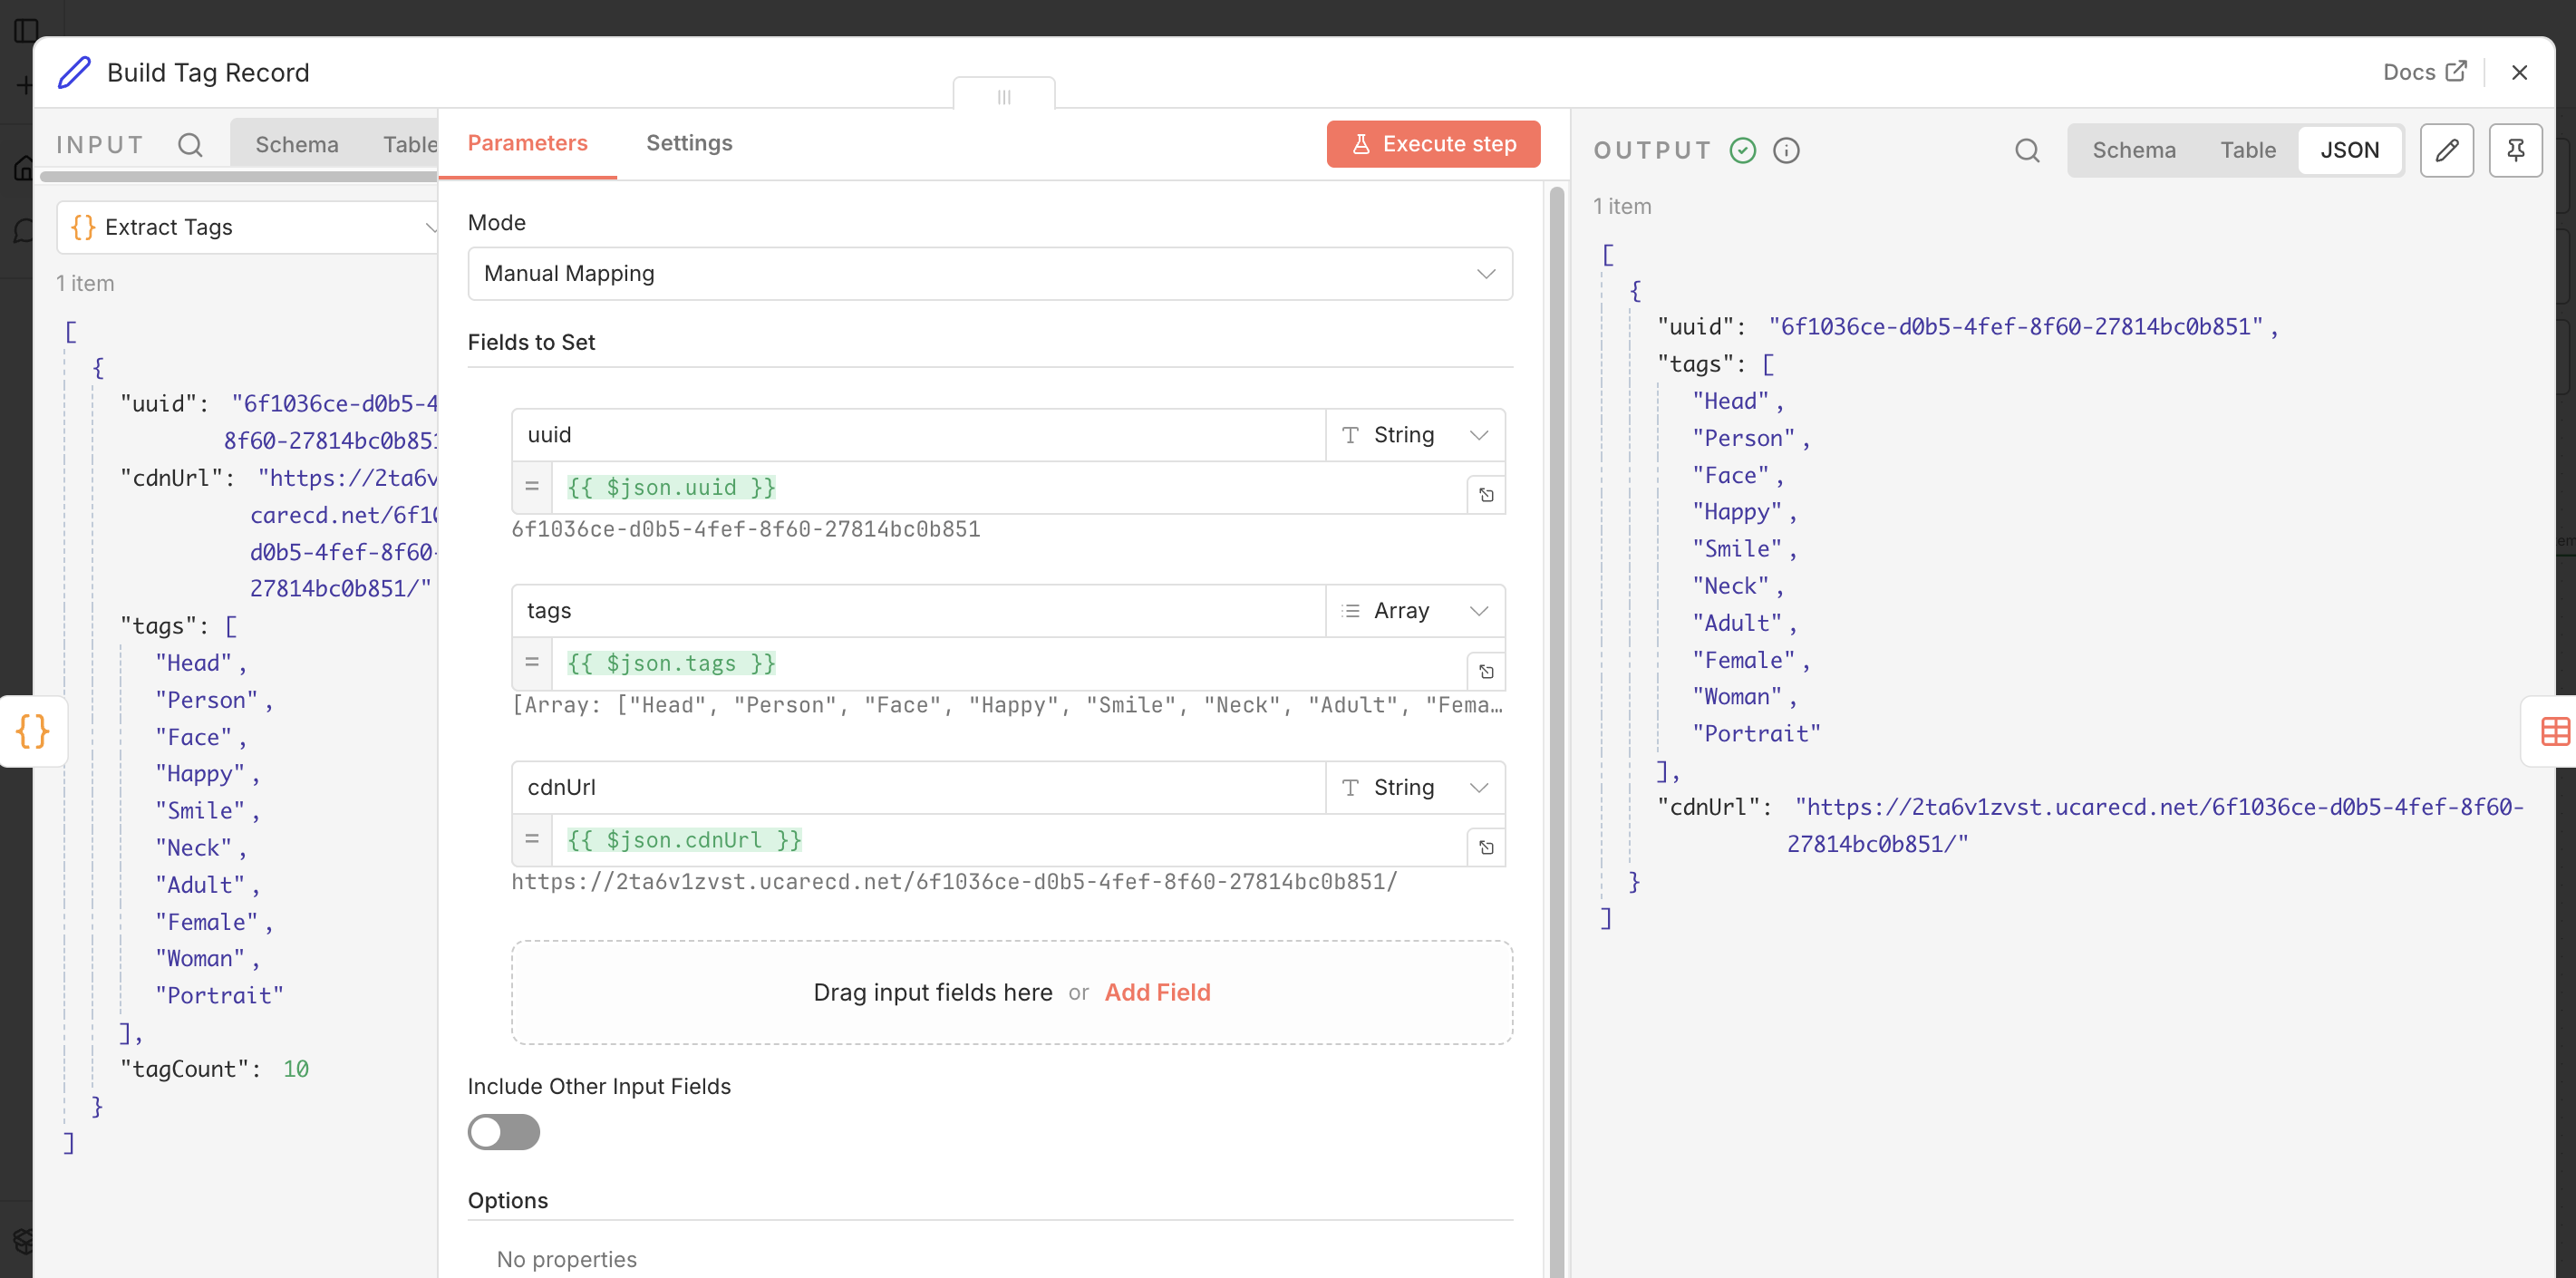
Assemble the record
Add a Set node after the Code node and rename it Build Tag Record.
Add fields for uuid, cdnUrl, and tags, mapping each from the Code node’s output.
n8n Set node assembling the uuid, cdnUrl, and tags record
Store the tags in a Data Table
n8n’s built-in Data Tables give you a local, lightweight store with no extra service to run, a good
fit for this workflow. First create the table:
From the n8n Overview, open the Data tables tab and select Create data table.
Name it image_tags, then add three string columns: uuid, cdnUrl, and tags.
Then write each tagged image into it:
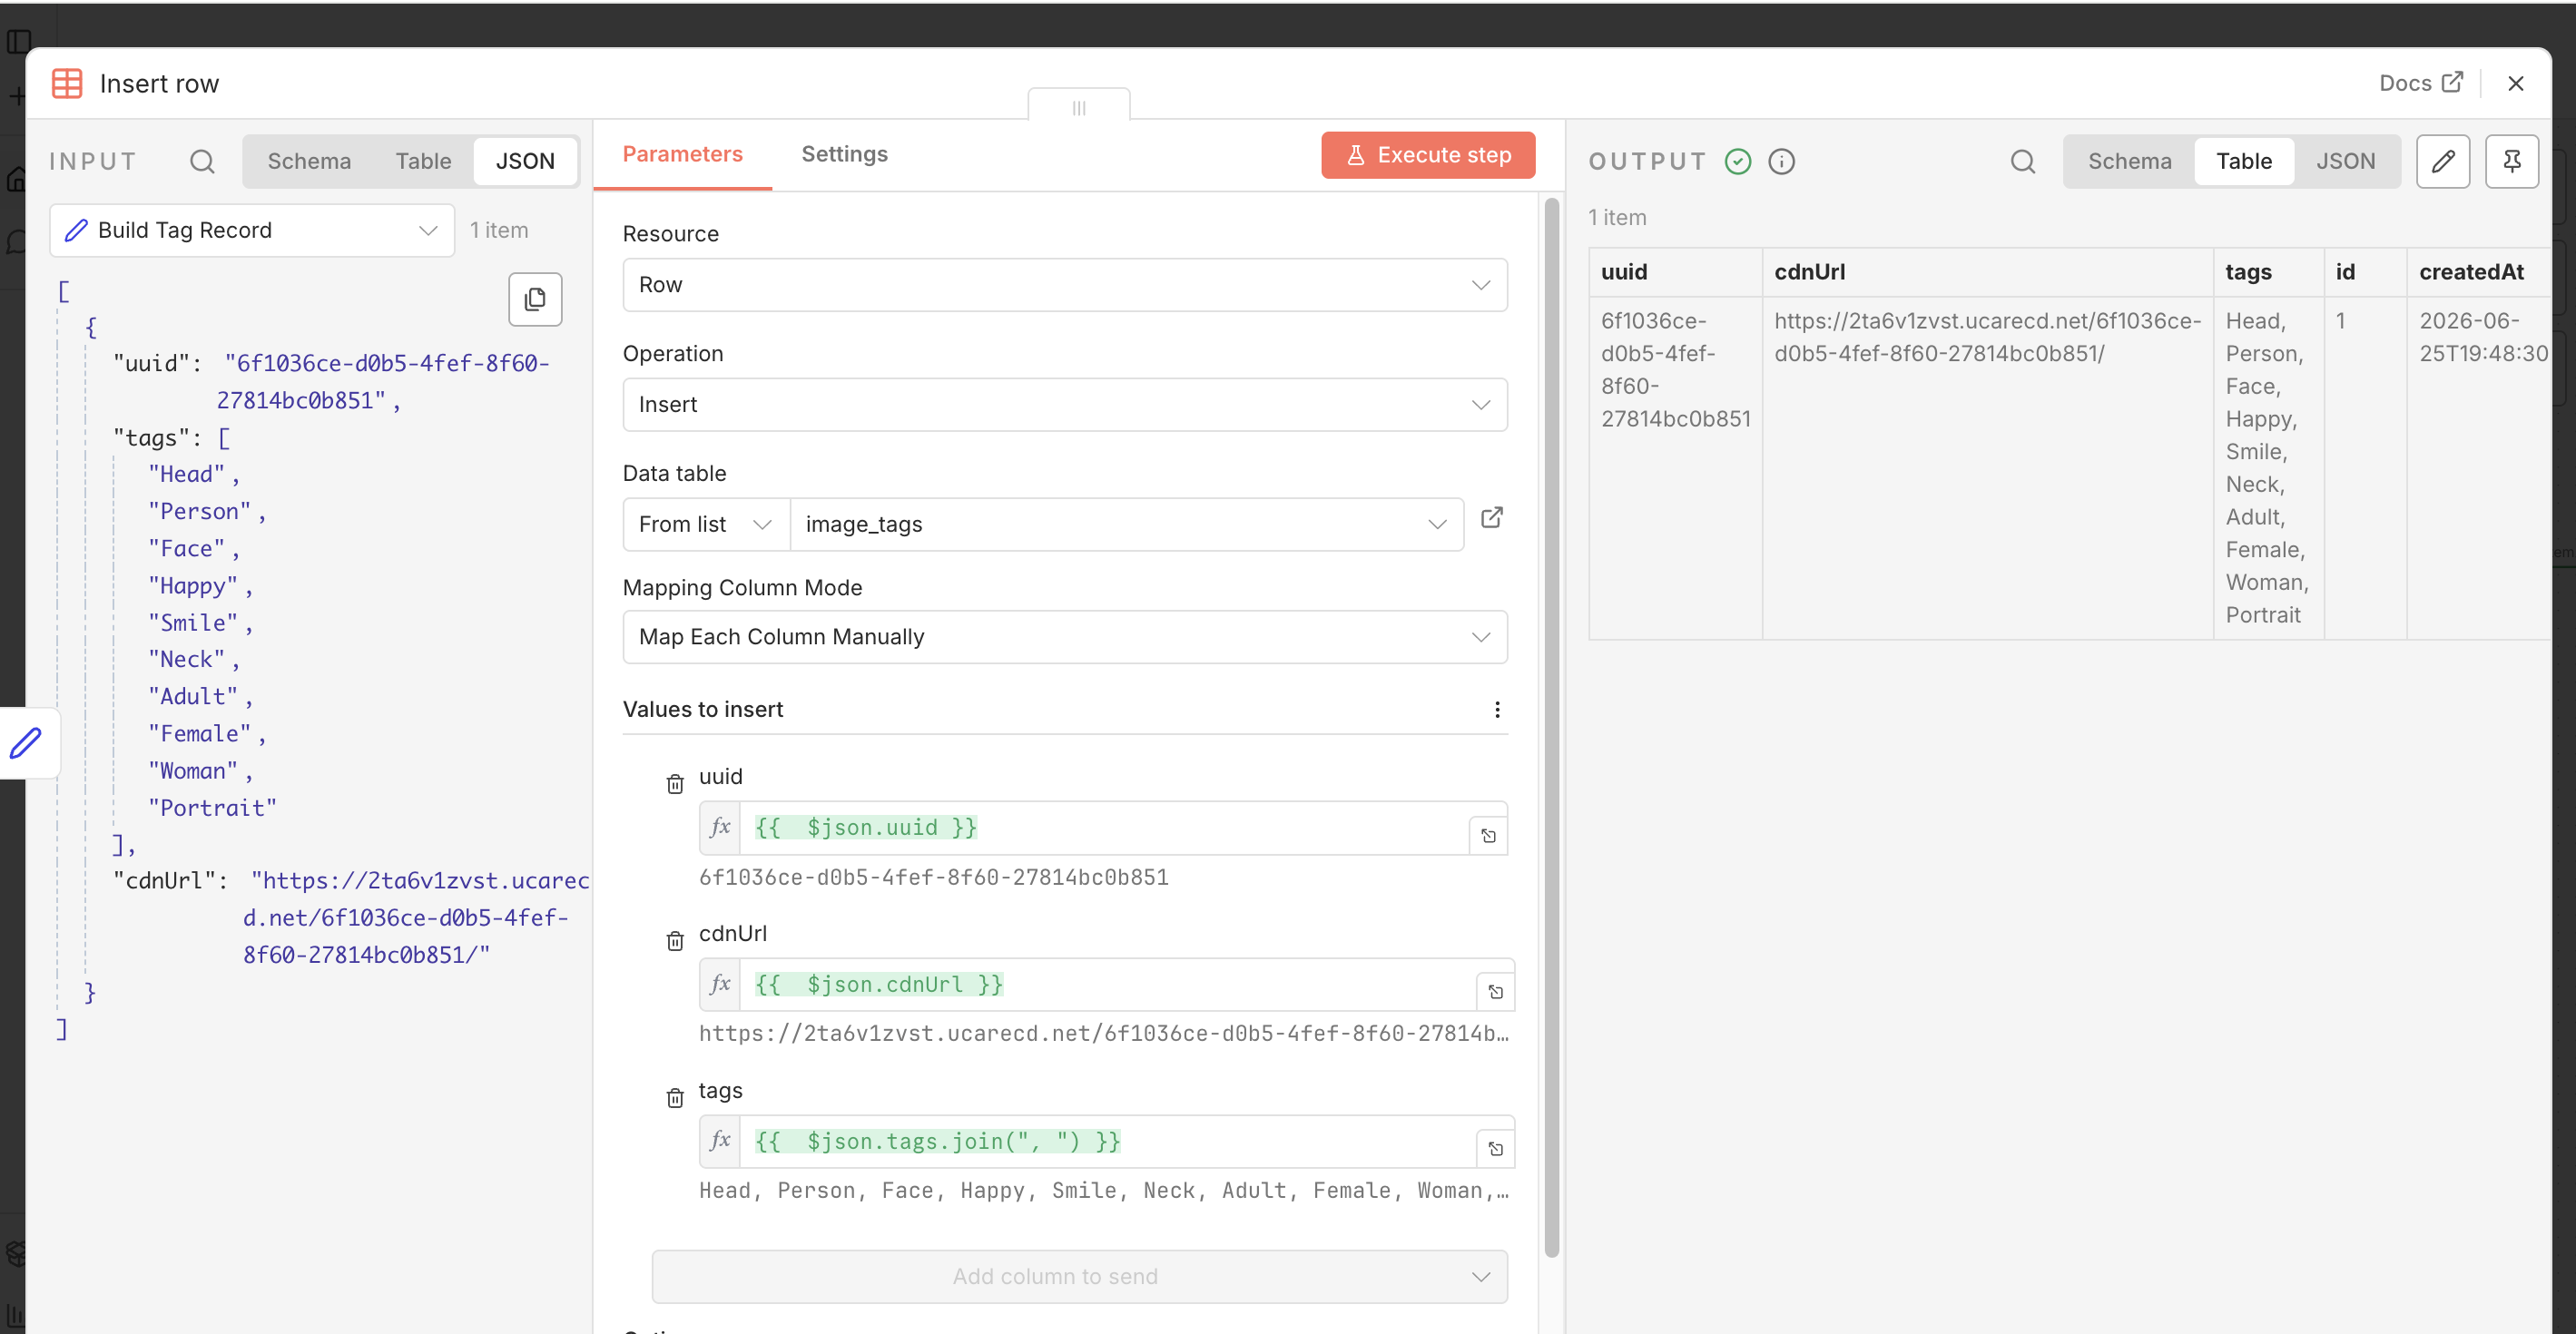
Add a Data Table node after the Set node and rename it Store Tags (Data Table).
Set the Operation to Insert row and choose your image_tags table.
With Map Each Column Manually, map each column to the record:
uuid → {{ $json.uuid }}
cdnUrl → {{ $json.cdnUrl }}
tags → {{ $json.tags.join(", ") }} — the column is text, so join the array into a string.
Each new upload now appends a row you can browse right in the n8n UI.
n8n Data Table node inserting the uuid, cdnUrl, and tags row
Note: Data Tables ship with recent n8n versions. On an older release, or if you want a store shared
across systems, swap this node for an HTTP Request (or the Postgres node) that writes the same
uuid, cdnUrl, and tags to your database, CMS, or API. From here you can power faceted search,
auto-foldering, or alerting whenever a specific label appears.
Conclusion
In this guide, you’ve learned how to turn a new upload into high-confidence tags automatically:
triggering the Object Recognition add-on, filtering its labels by confidence, and storing the result
for later use.
Feel free to import the workflow from the image-tagging folder of the repo
and adapt it to your own database, CMS, or API.
Some possible next steps:
Faceted search: Index the tags array so users can filter the media library by label.
Auto-foldering: Route files into collections based on their top label.
Label alerts: Notify a channel whenever a specific label, such as a brand or a person, appears.
Do I need to poll instead of relying on the webhook alone?
Yes. The file.uploaded webhook tells you a file exists, but the Object Recognition add-on runs
asynchronously and finishes a little later. The execute call returns a request_id, and polling the
status endpoint with that request_id confirms the labels are ready before you read them.
How do I tune which tags I keep?
Adjust the CONFIDENCE_THRESHOLD in the Code node, which compares against each label’s Confidence
score. For a clean, low-noise tag set, use a higher value such as 90 to keep only the most certain
labels; for broader coverage, use a lower value to capture more tags at the cost of some noise.
Where does the Object Recognition add-on store its results?
On the file’s appdata, not in the poll response. After the add-on completes,
GET /files/<UUID>/?include=appdata returns appdata.aws_rekognition_detect_labels.data.Labels
(capital L), where each entry has a Name and a Confidence value. Without the ?include=appdata
parameter, appdata comes back null.
Why are my tags empty even though the add-on ran?
Three things cause an empty tag list, and any one of them is enough:
Response Format isn’t set to JSON. Uploadcare replies with application/vnd.uploadcare-v0.7+json,
which n8n leaves as a raw string under a data key unless the HTTP Request node’s Response Format is JSON.
While it’s a string, appdata is unreachable.
?include=appdata is missing from the Get File Info URL, so the response has appdata: null.
The labels key is Labels, not labels (capital L, mirroring the AWS Rekognition response).
Fix all three and the same image returns its labels, for example Person, Man, and Portrait at
high confidence.
Ready to get started?
Join developers who use Uploadcare to build file handling quickly and reliably.
Trust Jamin Okpukoro is a Developer Advocate and Senior Technical Writer with a strong background in software engineering, community building, video creation, and public speaking. Over the past few years, he has consistently enhanced developer experiences across various tech products by creating impactful technical content and leading strategic initiatives. His work has helped increase product awareness, drive user engagement, boost sales, and position companies as thought leaders within their industries.