In this guide, you’ll build an n8n workflow that converts a DOCX file to PDF (or a PDF page to a PNG preview)
with Uploadcare, then emails the finished link.
By the end, you’ll have a hands-off pipeline you can point at any output format you need.
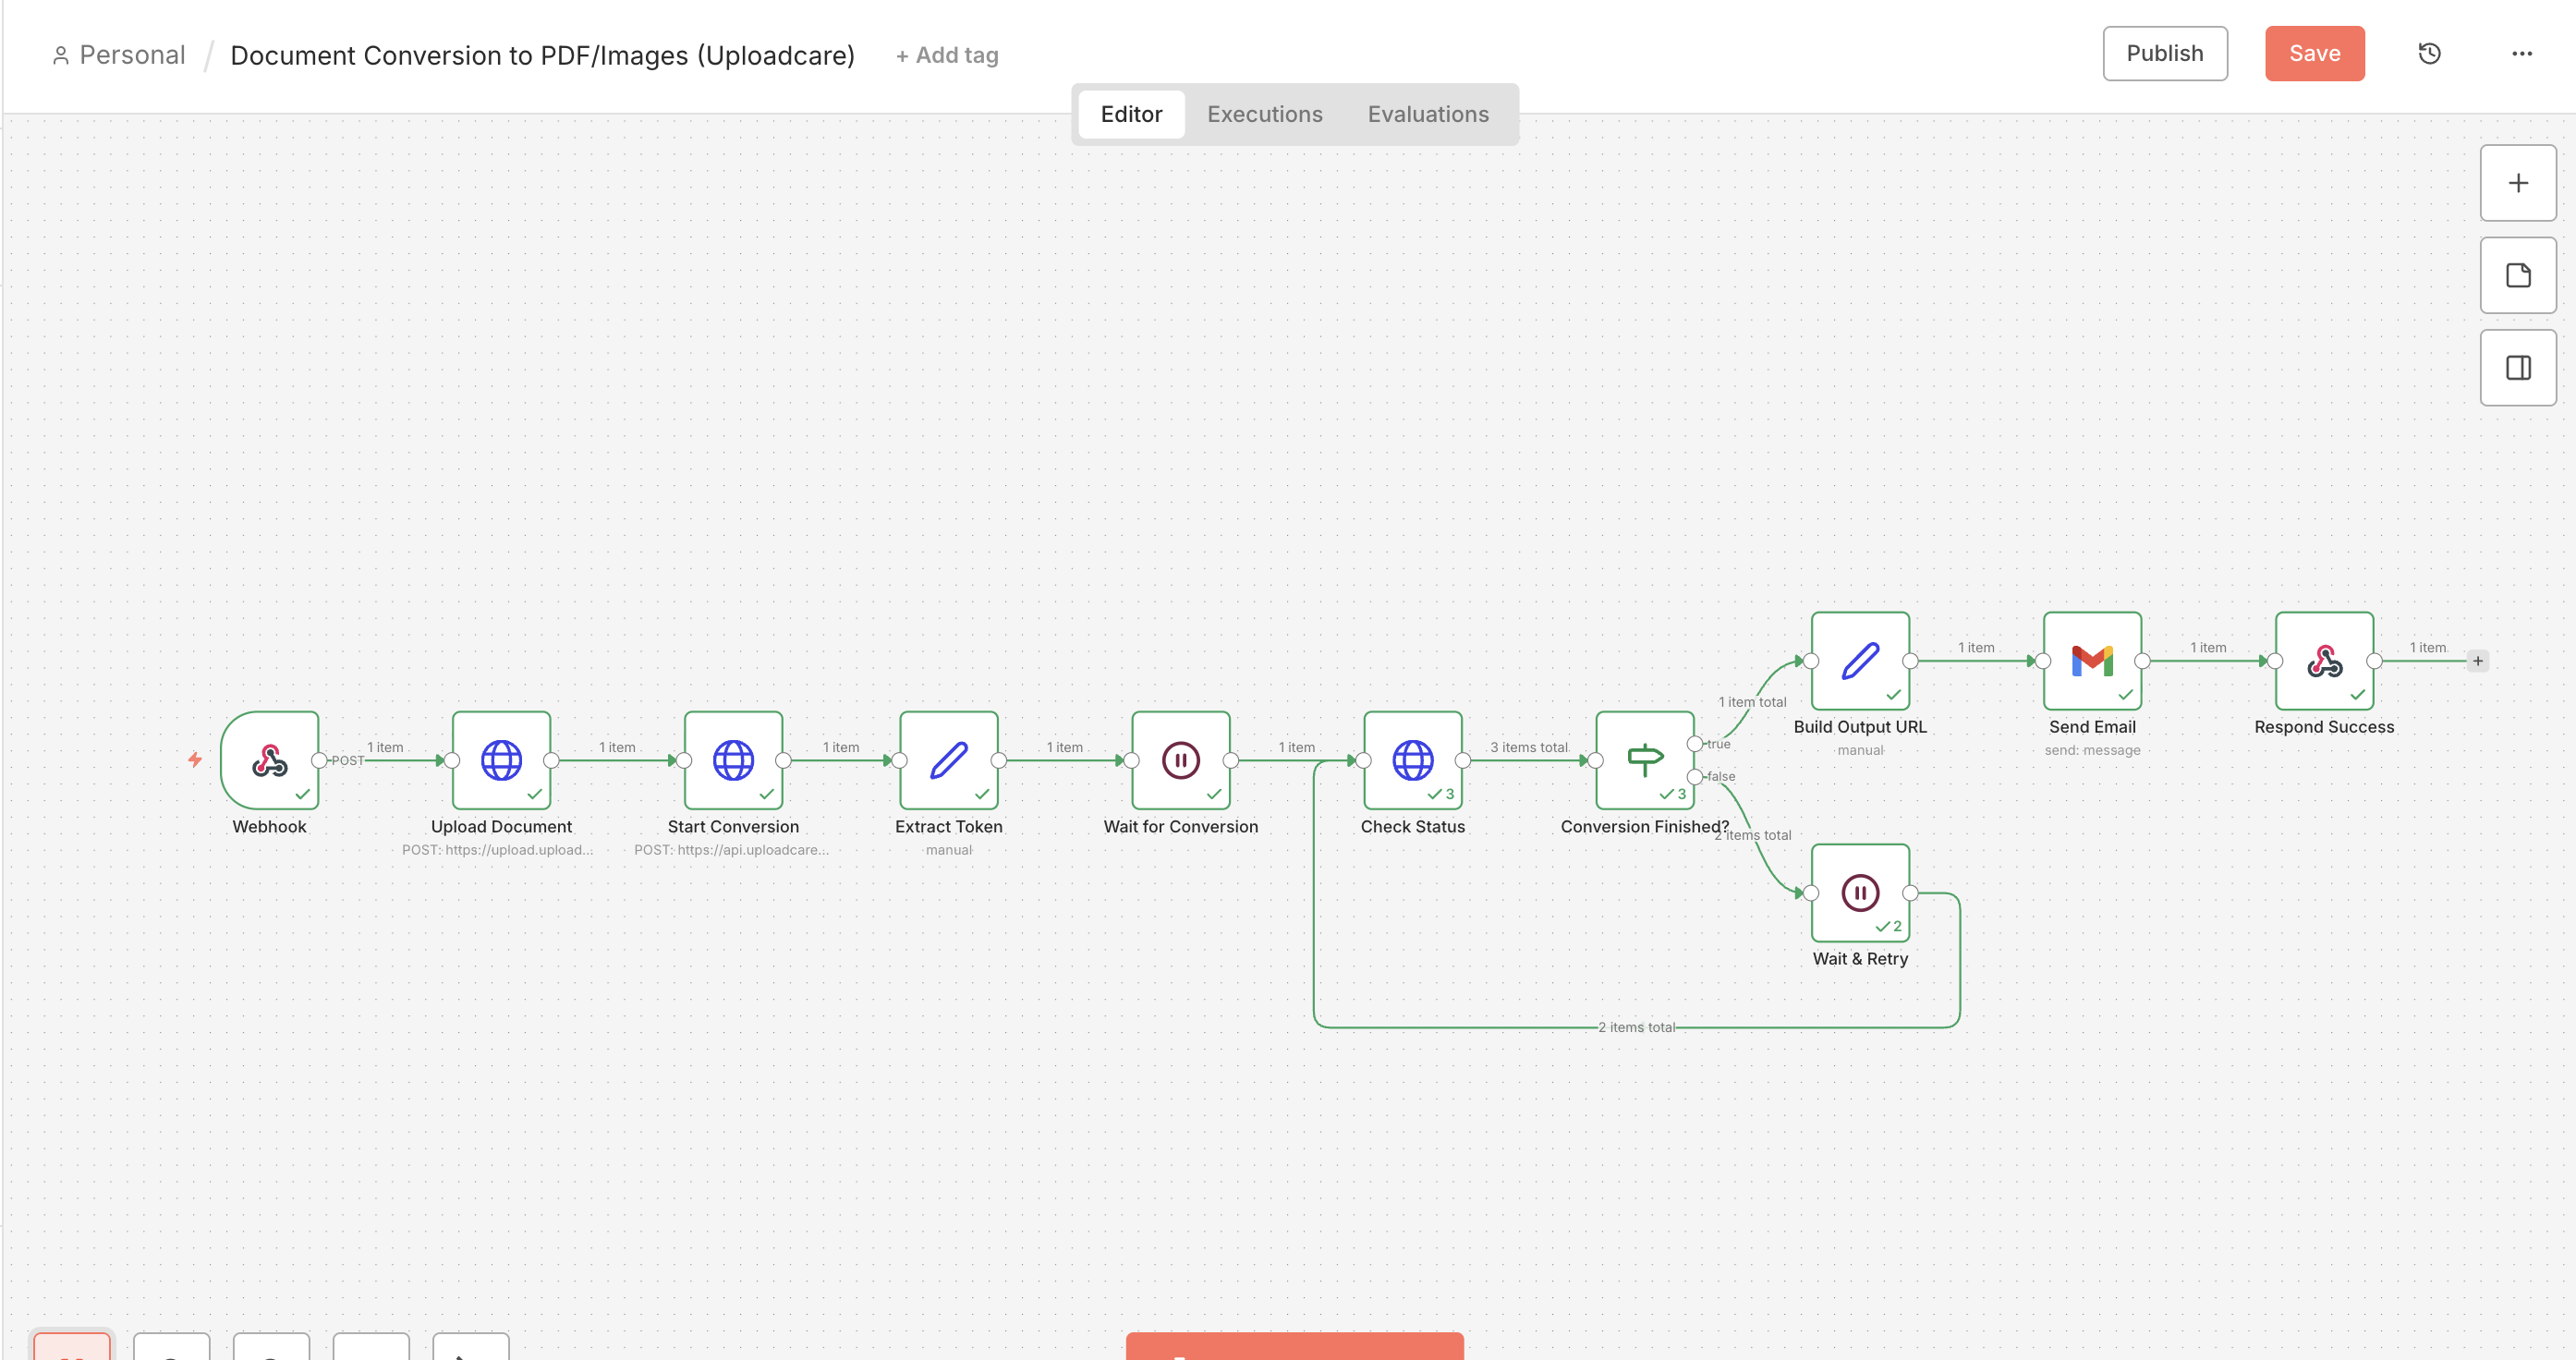
A Webhook node receives a document in a binary field named file.
An HTTP Request node uploads the file to the Uploadcare Upload API, which returns a UUID.
An HTTP Request node starts an async conversion with POST /convert/document/, which returns a token.
A Wait node pauses, then an HTTP Request node checks the conversion status by token.
An IF node loops back through the Wait node until the job reports finished.
A Set node builds the CDN URL of the converted file, then a Gmail node delivers it.
Step 1: Receive and upload the document
The Webhook node is your entry point, and an HTTP Request node uploads whatever document it receives to Uploadcare.
In your own project, you can trigger the workflow with a form, a Slack file upload,
or any other source that can send a POST request with a file. For this tutorial, you’ll test with Postman.
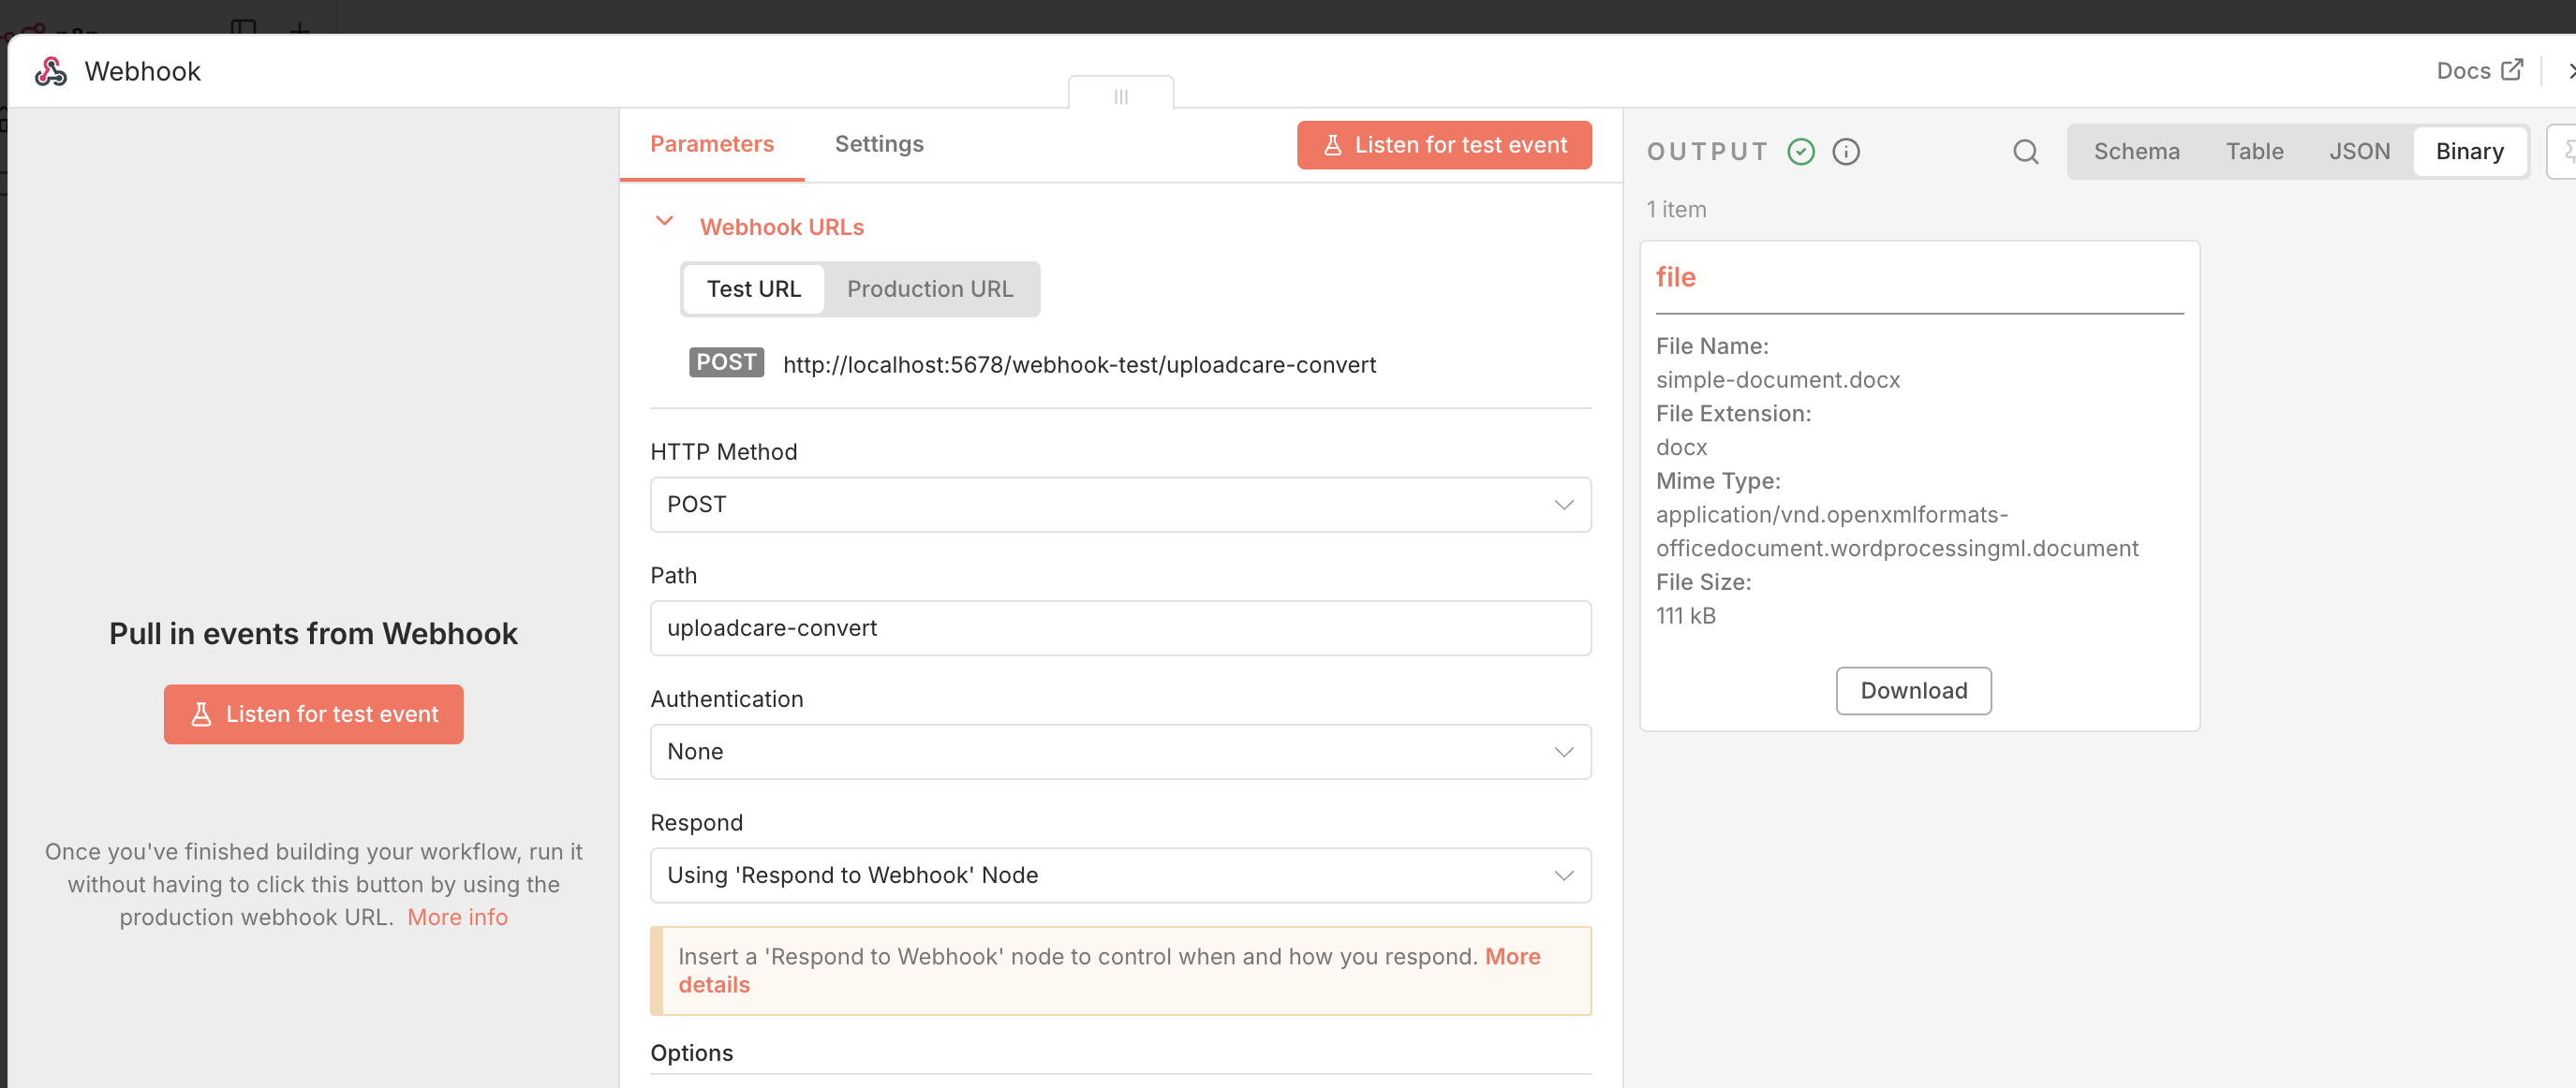
Add the Webhook node
Click the + button to add a node and search for Webhook.
Set the HTTP Method to POST.
Note the Production URL n8n generates, this is where you send the document.
Send this webhook a POST request with your document in a binary field named file.
n8n exposes that file as a binary property the next node can read.
n8n Webhook node set to POST with a binary file field
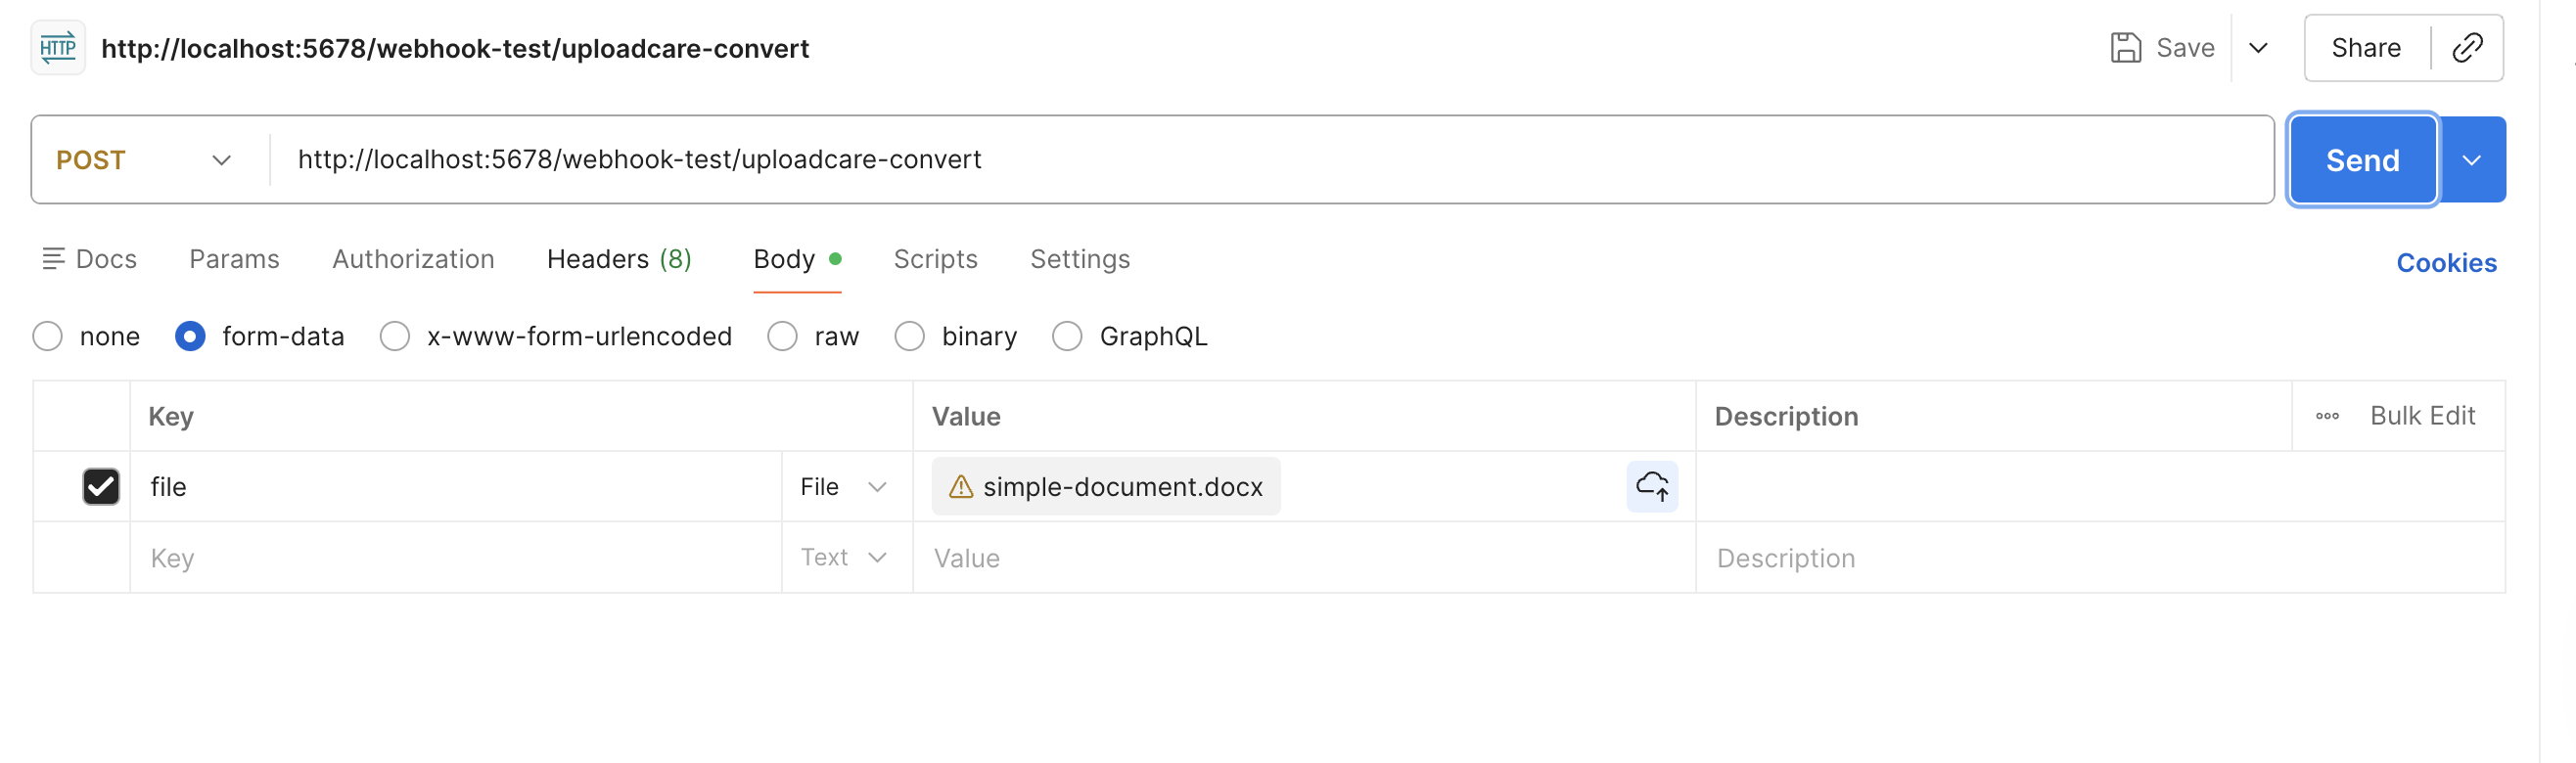
To test, you can use a tool like Postman to send a POST request with a file attached to the Webhook URL.
Postman configured to send a DOCX file in a binary field named file
Configure the upload HTTP Request node
Add an HTTP Request node after the Webhook node.
Set the Method to POST.
Set the URL to the Uploadcare direct upload endpoint: https://upload.uploadcare.com/base/.
Toggle Send Body to true and select Form-Data as the Body Content Type.
Add the upload body parameters
Under Body Parameters, add three parameters:
A Form Data field named UPLOADCARE_PUB_KEY with your public key as the value, which authenticates the upload against your project.
A Form Data field named UPLOADCARE_STORE with the value 1, so the file is stored permanently.
It needs to survive long enough to convert.
An n8n Binary File field named file, with the Input Data Field Name set to the binary property from the Webhook node (file).
n8n HTTP Request node configured for the Uploadcare upload
You should receive a response containing the UUID of the uploaded file:
{"file":"6ac598cf-2278-44b7-a5ad-345810b09017"}
That UUID is the handle you’ll convert next.
Step 2: Start the conversion
Now that the document is in Uploadcare, let’s start the conversion.
The Conversion API is part of the Uploadcare REST API, which runs the conversion asynchronously:
the POST returns a token instead of the finished file, and you poll for the result.
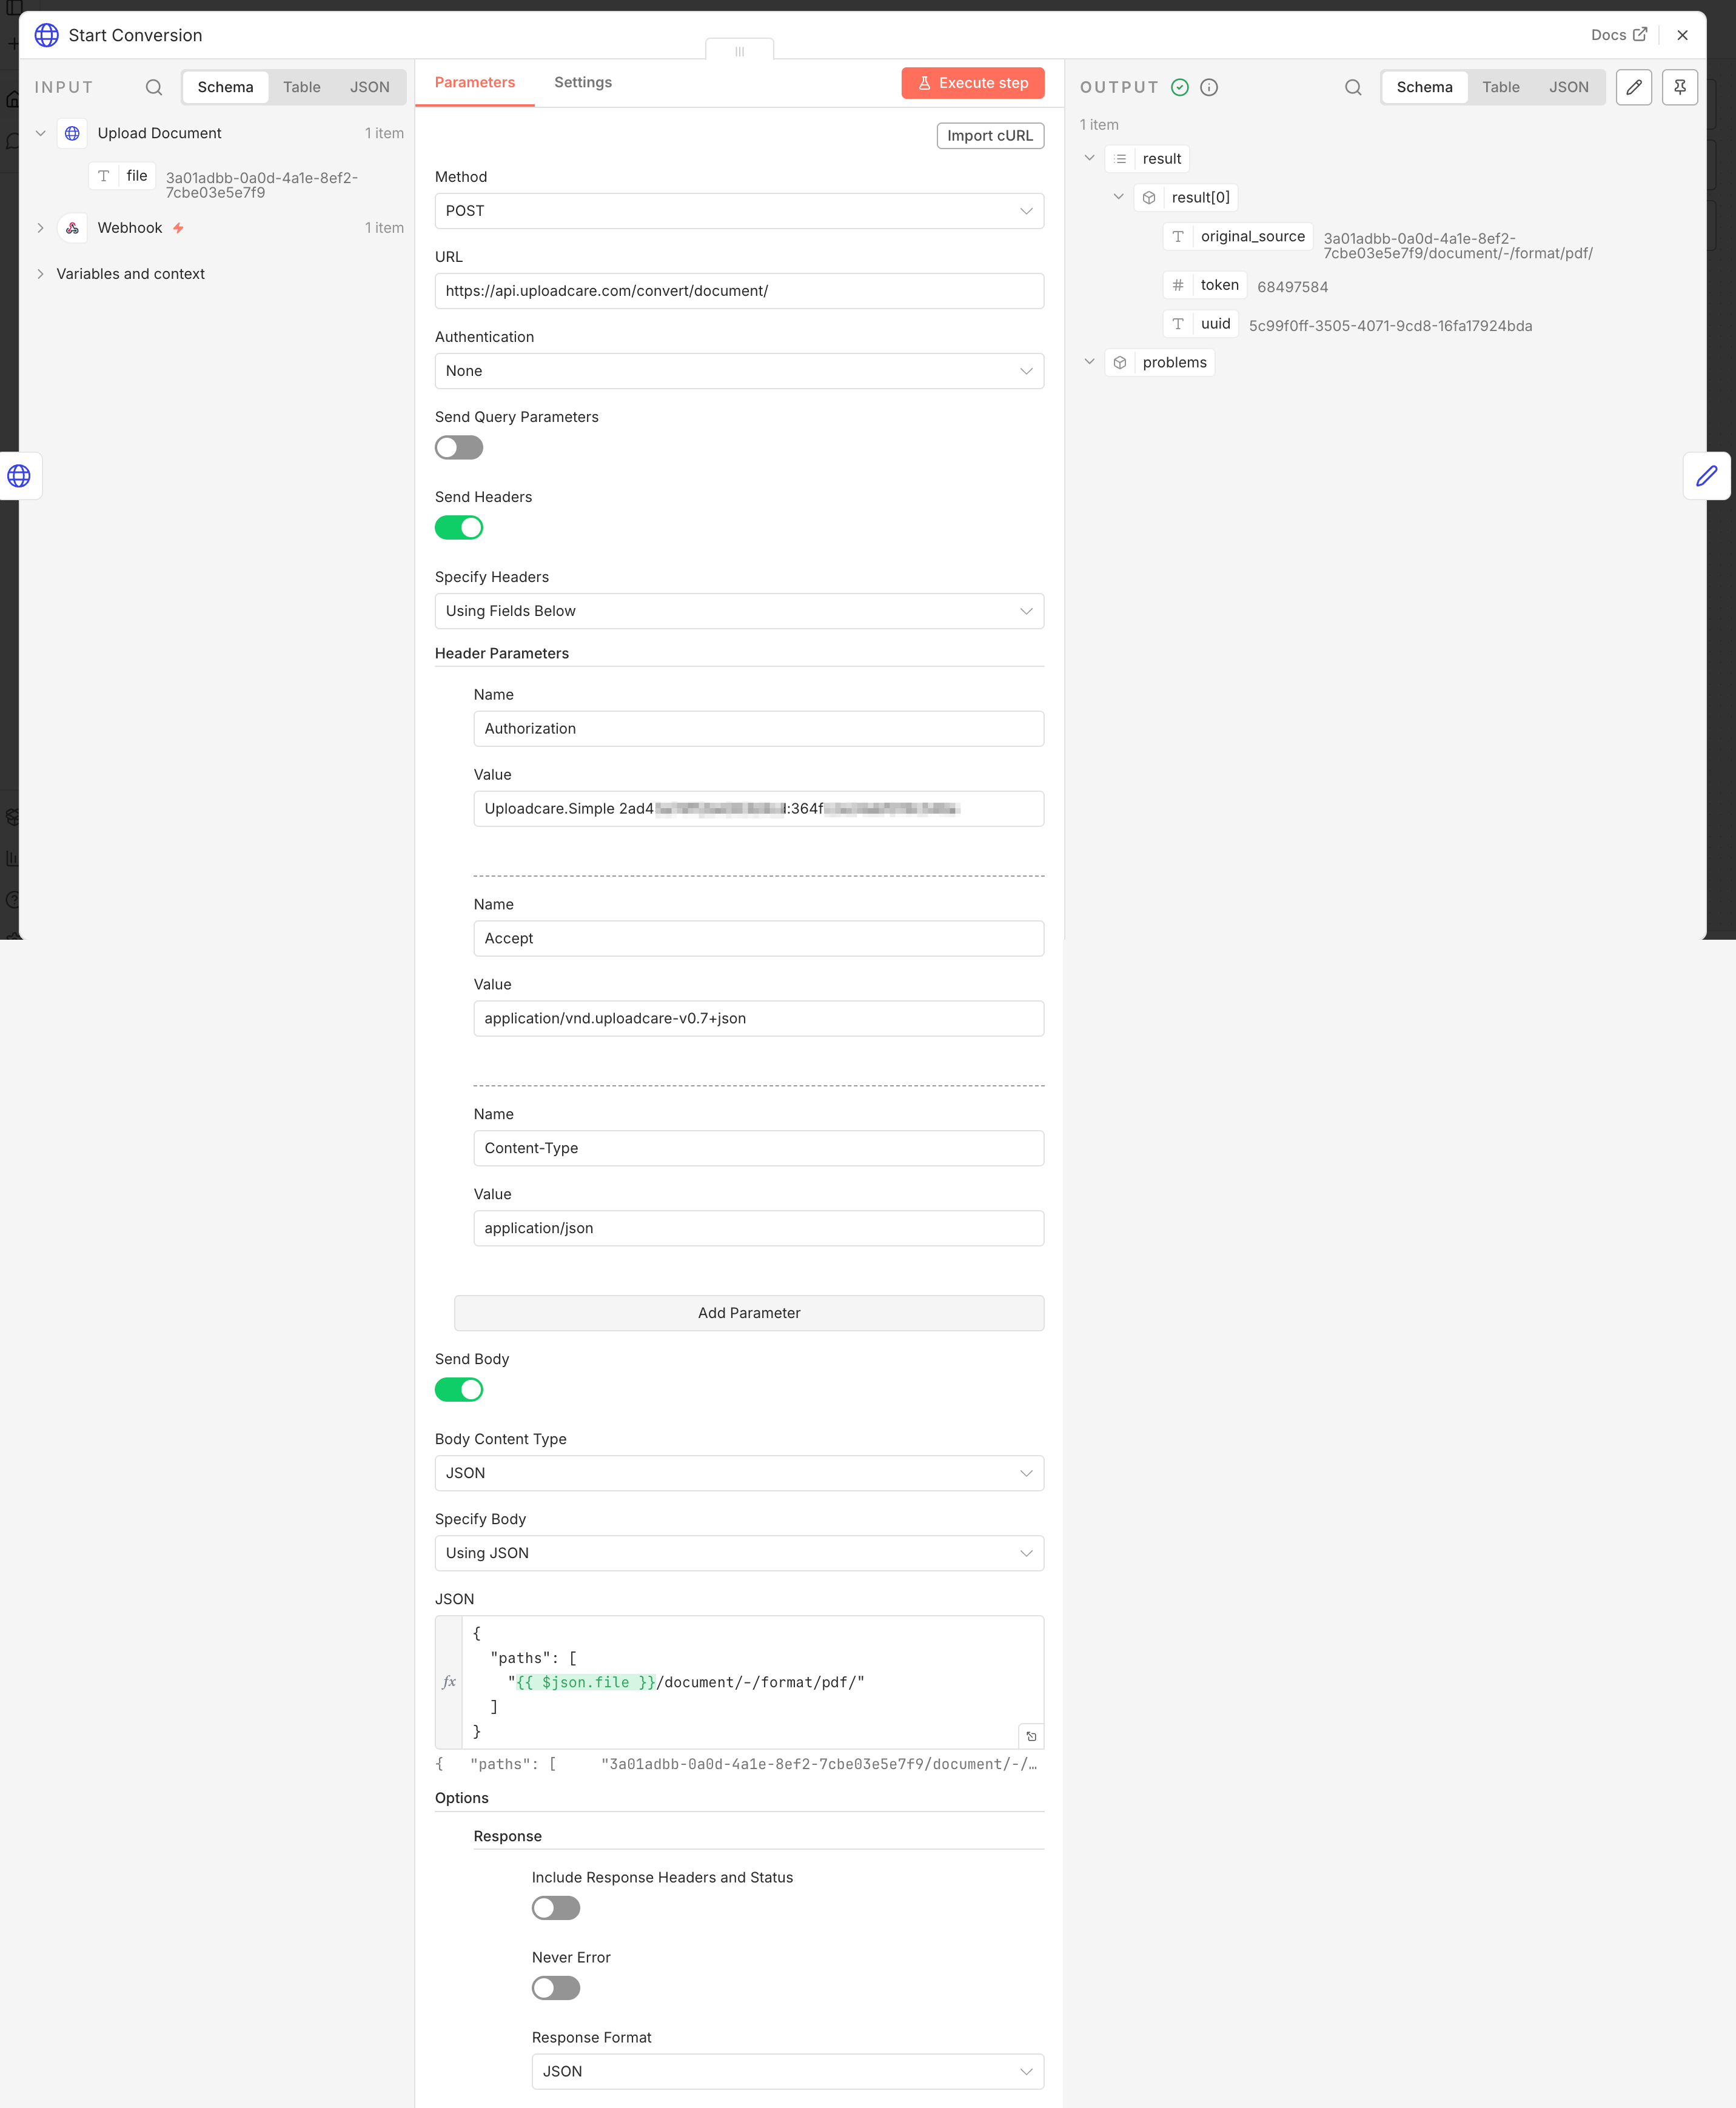
Configure the start-conversion HTTP Request node
Add an HTTP Request node after the upload node.
Set the Method to POST.
Set the URL to https://api.uploadcare.com/convert/document/.
Add the required headers
The REST API expects an authorization header on every call. Under Headers, add two:
An Authorization header with the value Uploadcare.Simple YOUR_PUBLIC_KEY:YOUR_SECRET_KEY.
An Accept header with the value application/vnd.uploadcare-v0.7+json, which pins the API version.
Build the request body
Toggle Send Body to true and select JSON as the Body Content Type and Specify the body content as Using JSON.
Paste the following into the JSON field. Each entry in paths is the source UUID plus a conversion operation,
and /document/-/format/pdf/ tells Uploadcare what to convert and into what:
Open Options → Response and set Response Format to JSON.
n8n HTTP Request node starting an async Uploadcare conversion
Note: The Conversion API responds with the content type application/vnd.uploadcare-v0.7+json.
n8n doesn’t auto-detect that vendor +json type as JSON,
so without Response Format set to JSON it hands you the body as a raw string under a data field,
and expressions like {{ $json.result[0].token }} come back empty.
Setting Response Format to JSON makes n8n parse the body so you can read its fields directly.
If you want a PNG preview of the first page instead of a PDF,
you can swap the path for {{ $json.file }}/document/-/format/png/-/page/1/
(see generating a PDF thumbnail for more on page previews).
The response includes a result array. Grab result[0].token with a Set node;
that’s what you’ll poll on next.
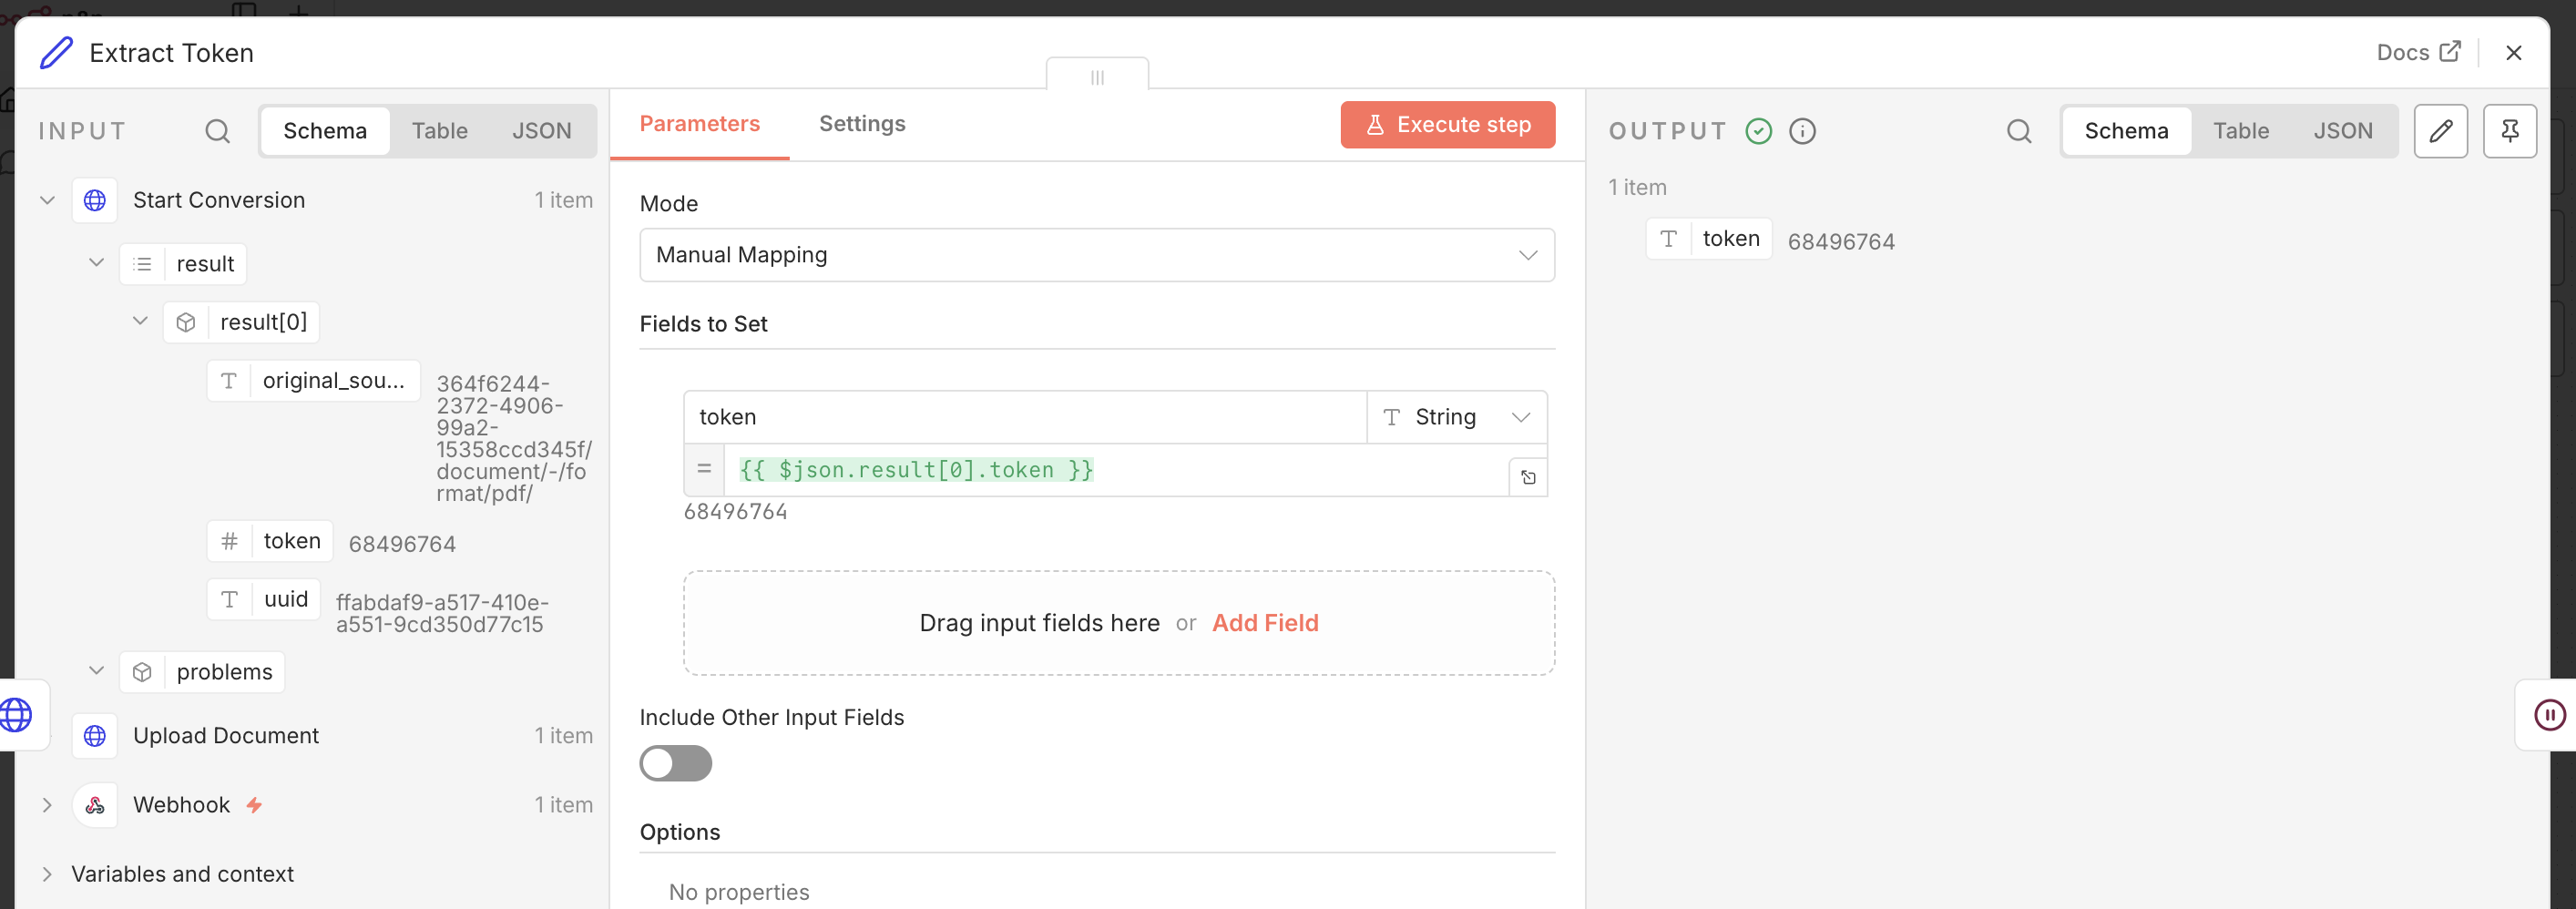
Extract the token with a Set node
Add a Set node after the conversion node by clicking the + button -> Data Transformation -> Set.
Add a field named token and set its value to the expression {{ $json.result[0].token }}.
n8n Set node extracting the conversion token
Note: Keep the Uploadcare.Simple authorization header server-side only, because it carries your secret key.
The upload in Step 1 uses the public key, but the Conversion API needs the secret key, so this call must never run in client code.
Step 3: Poll for the result
With the conversion running, you need to wait for it to finish. Because the conversion is asynchronous, the pattern is wait, then check.
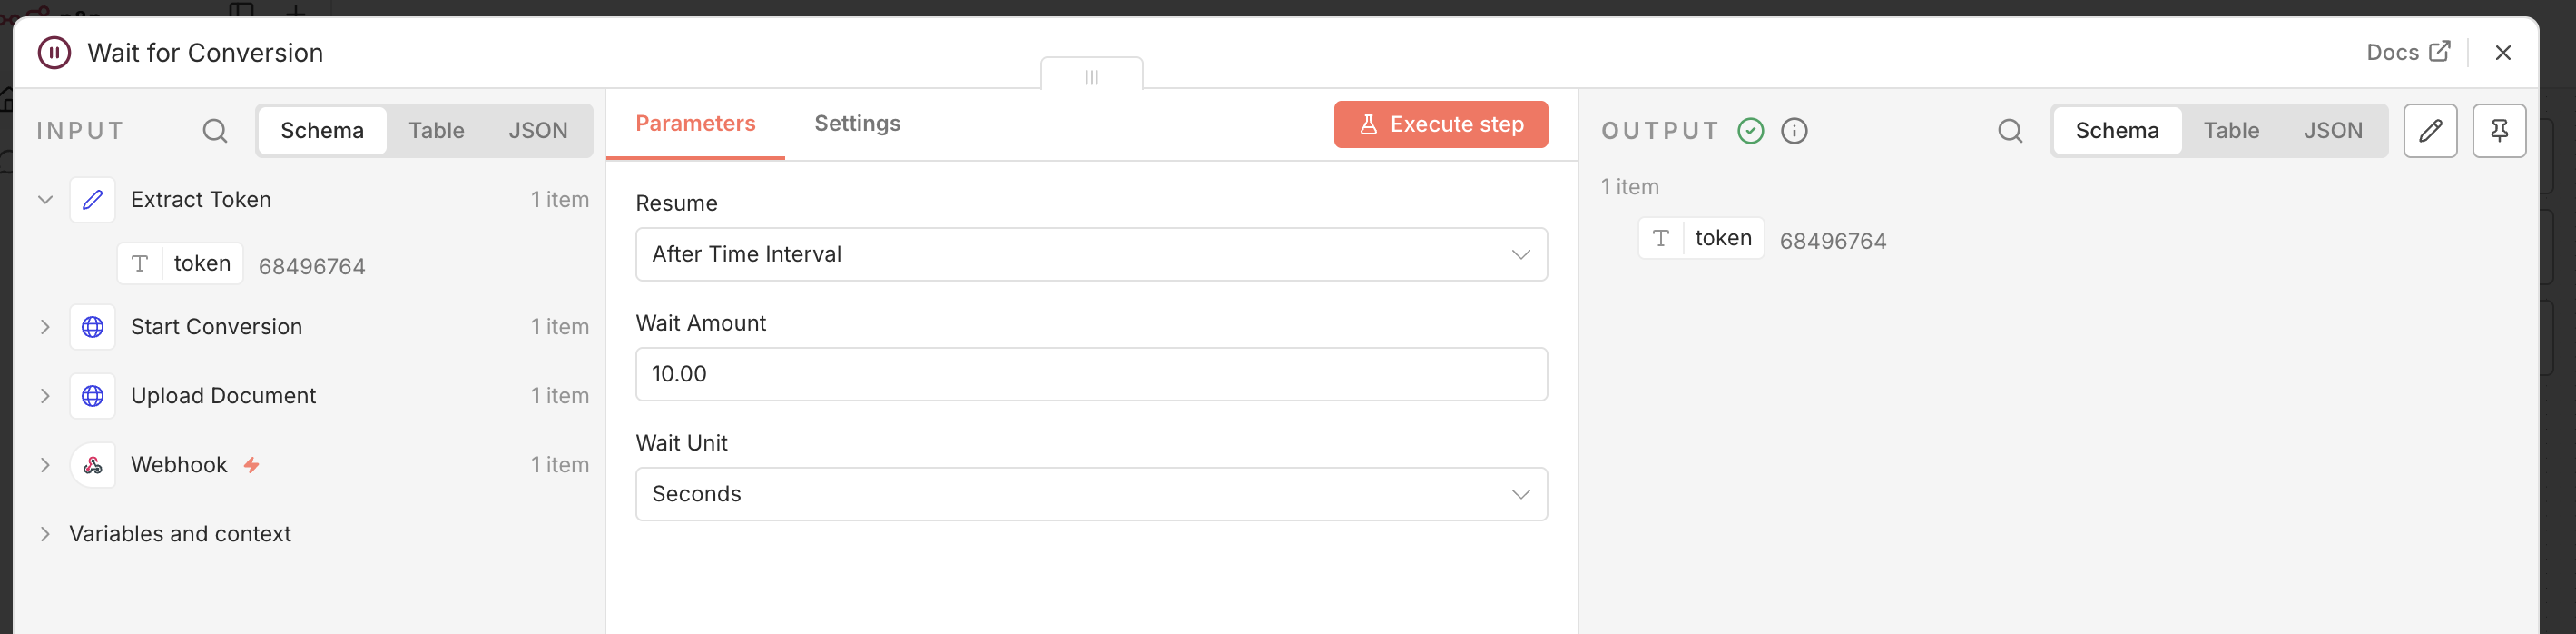
Add the Wait node
Add a Wait node after the Set node.
Set Resume to After Time Interval and the Wait Amount to 10 seconds.
If you expect large files, you can raise that above 10 seconds to cut down on status calls.
The Wait node is what makes the loop work: even large documents keep polling until they report finished, so nothing stalls.
n8n Wait node pausing before the status check
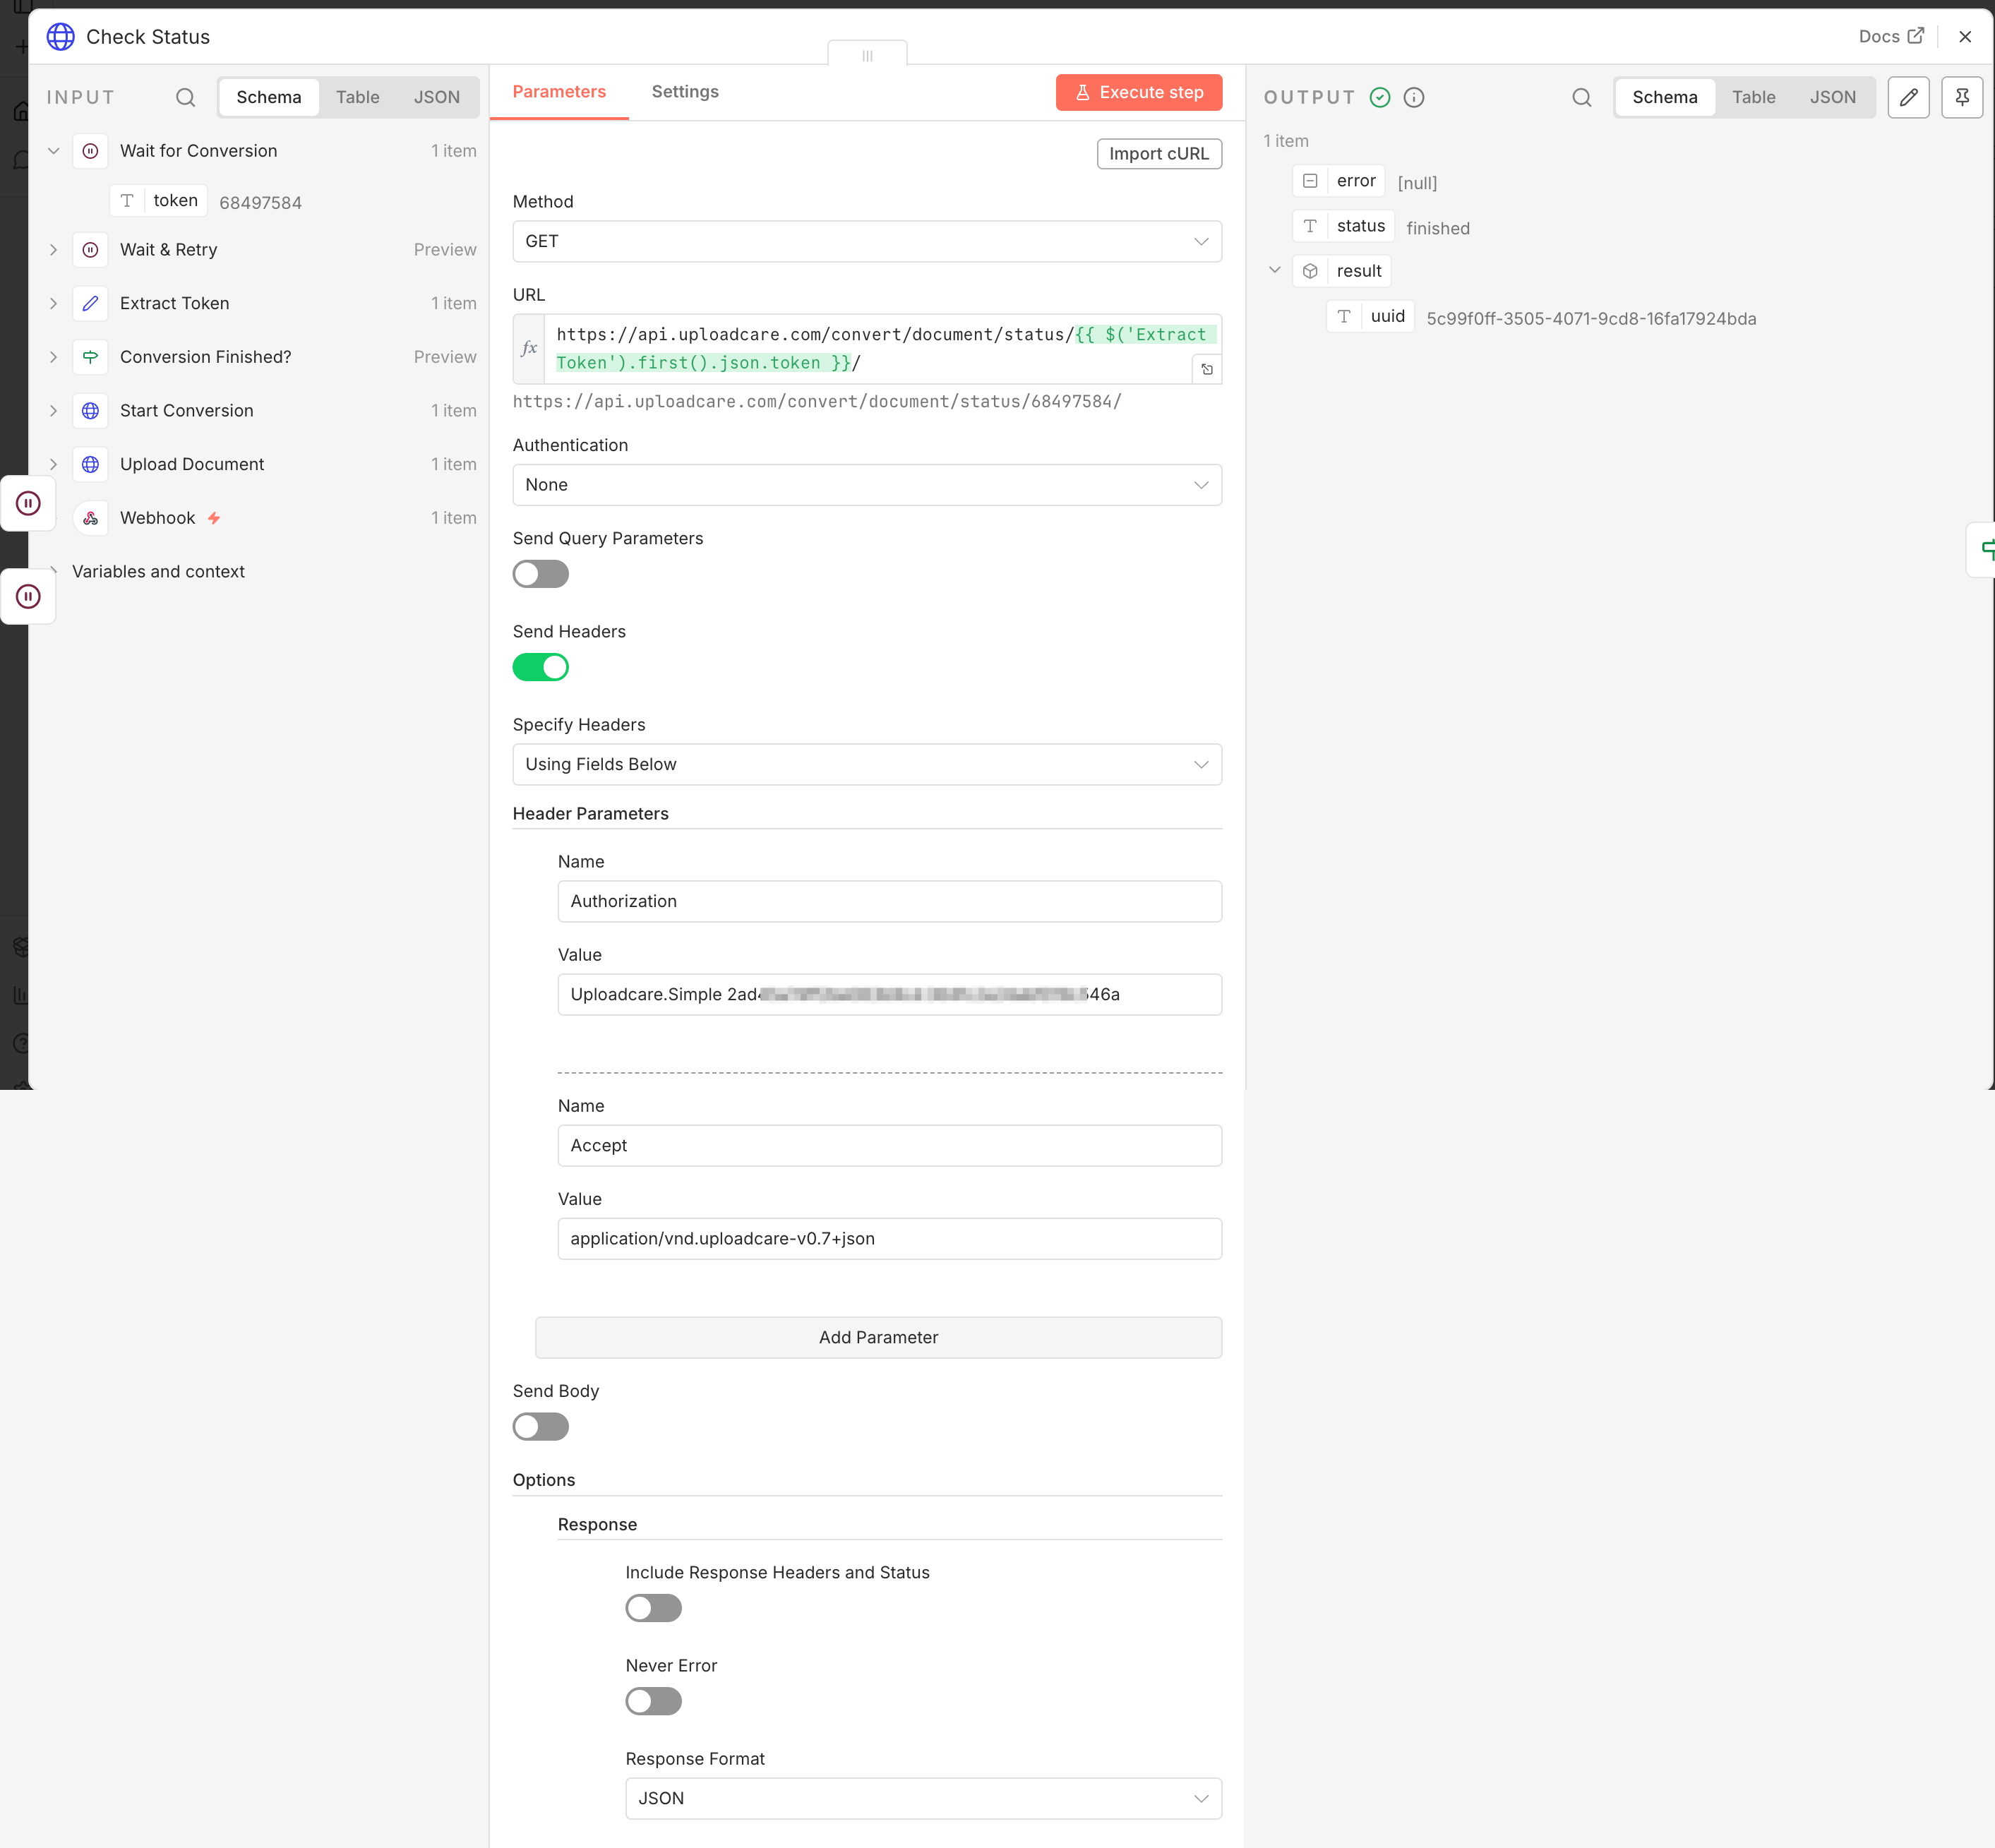
Configure the status-check HTTP Request node
Add an HTTP Request node after the Wait node.
Set the Method to GET.
Set the URL to the status endpoint with the token from Step 2:
Reference the token from the Extract Token node by name, not {{ $json.token }}.
When the job isn’t finished yet, the retry loop feeds the previous status response (which has no token) back into this node,
so {{ $json.token }} would be empty on the second pass and the URL would collapse to .../status//, returning a 404.
Pulling it from $('Extract Token') keeps the token stable across every retry.
Under Headers, add the same Authorization and Accept headers you set on the conversion node.
Open Options → Response and set Response Format to JSON, just as you did on the conversion node,
so the status fields parse instead of arriving as a string under data.
n8n HTTP Request node checking conversion status by token
Test the status with an IF node
The status response moves through pending and processing before reaching finished (or failed).
To test it, add an IF node after the status-check node that compares the status field to finished:
Add an IF node after the status-check node.
Set the Value 1 field to the expression {{ $json.status }}.
Connect the true output (index 0) onward to delivery, and connect the false output (index 1) back to the Wait node to check again.
n8n IF node comparing the conversion status to finished
That false branch is what makes the loop work: even large documents keep polling until they report finished, so nothing stalls.
Tip: if you expect large files, raise the Wait node above 10 seconds to cut down on status calls.
Step 4: Deliver the converted file
With the polling loop in place, all that’s left is delivery.
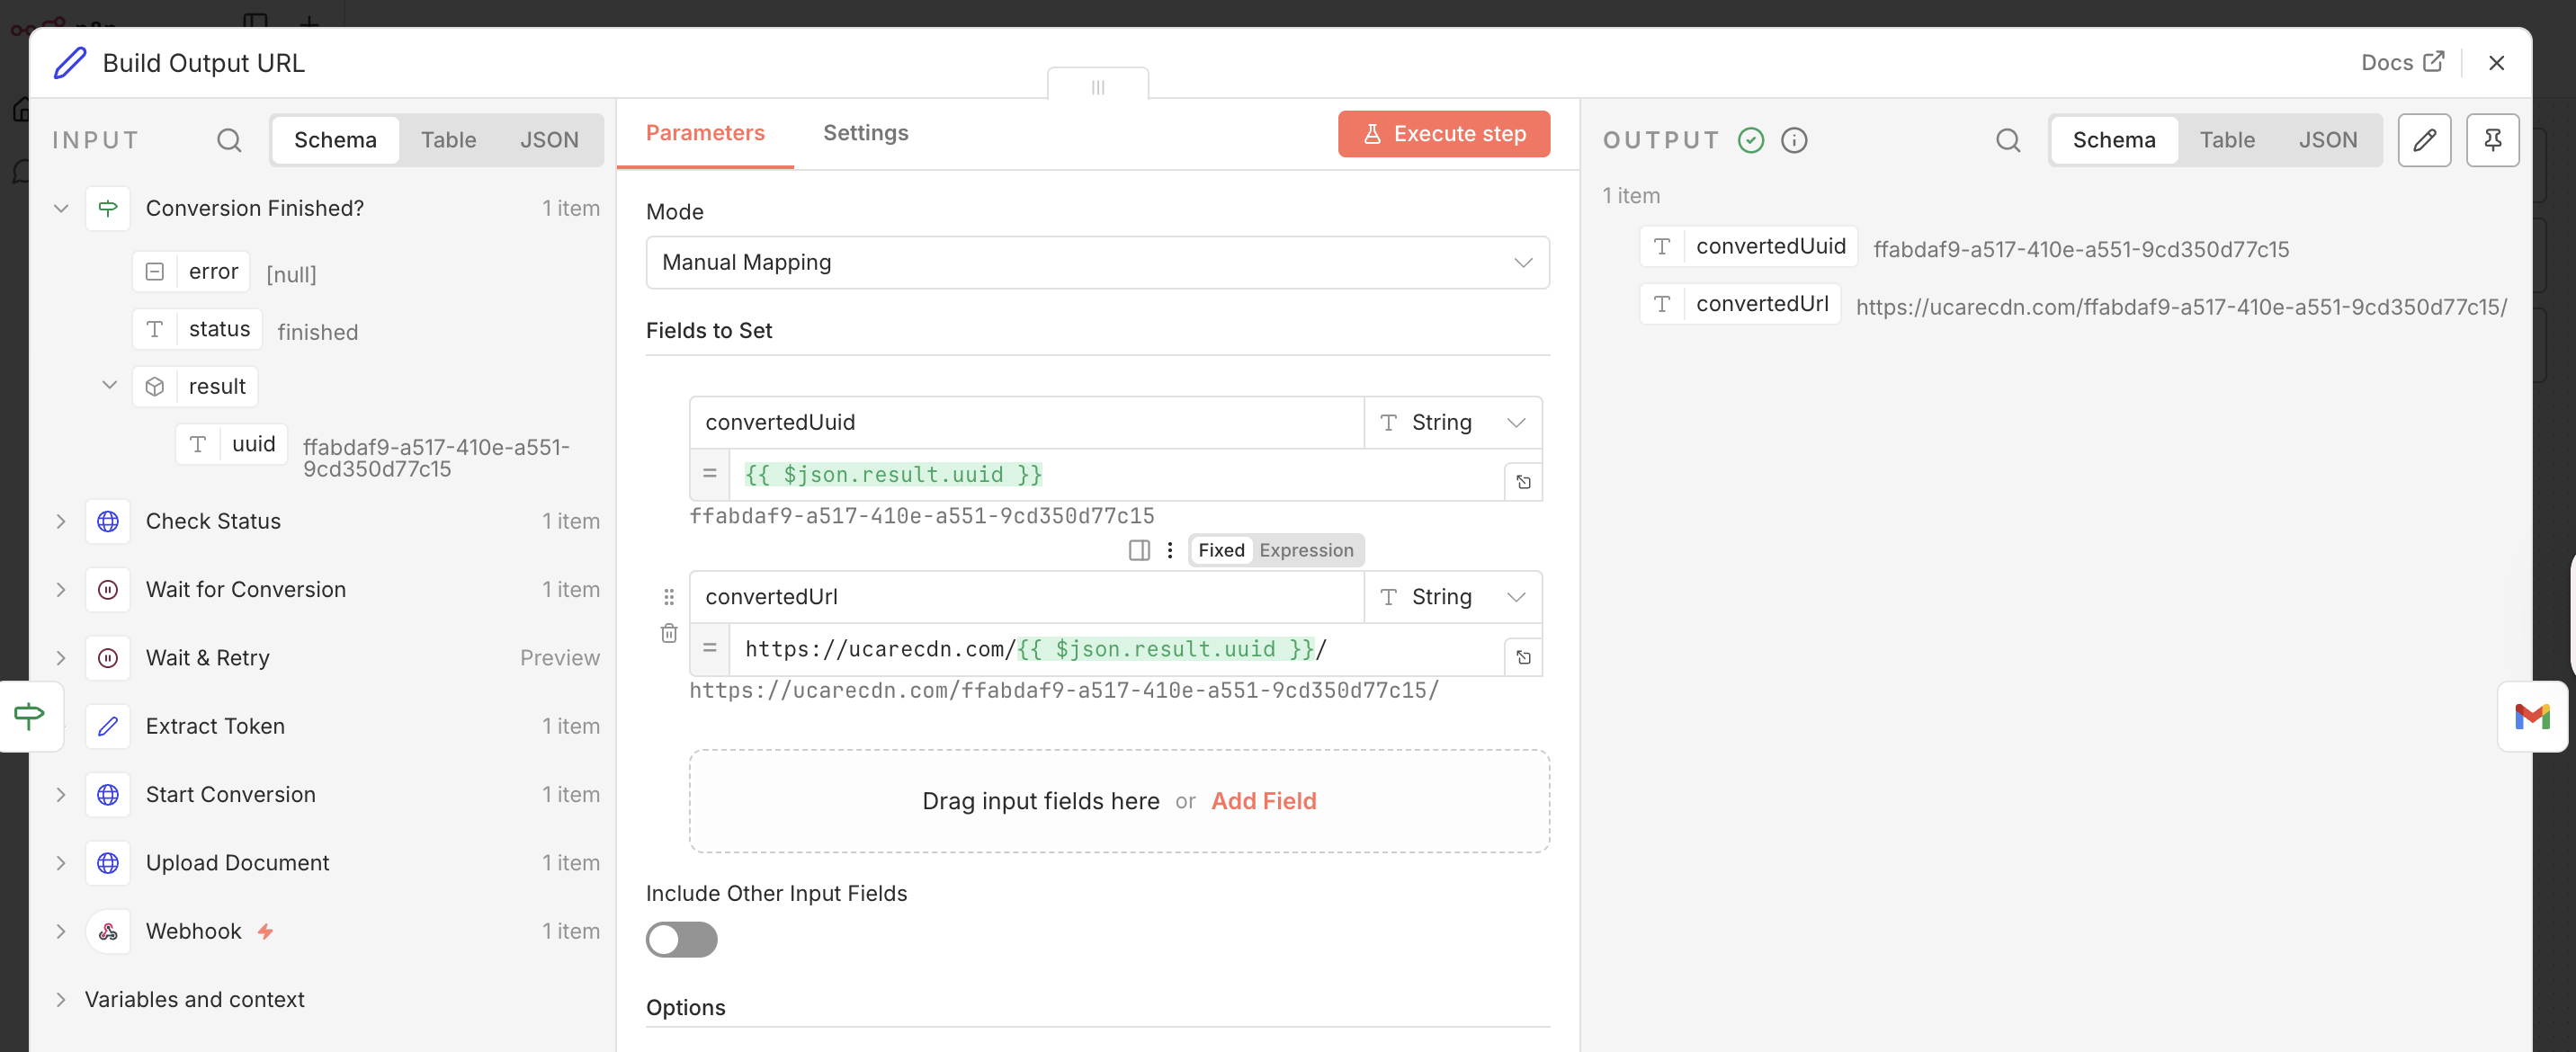
When the job finishes, the status response contains result.uuid, the UUID of the new converted file.
Build the output CDN URL with a Set node
Add a Set node on the IF node’s true branch.
Add a field named url and set its value to the expression that builds the CDN URL:
That URL points straight at the finished PDF (or PNG) on the Uploadcare CDN.
Note:2ta6v1zvst.ucarecd.net is this project’s CDN domain.
You can find yours in the Uploadcare Dashboard under Delivery → CDN Domain names,
and use it in place of the shared ucarecdn.com host in the URLs throughout this guide.
n8n Set node building the output CDN URL
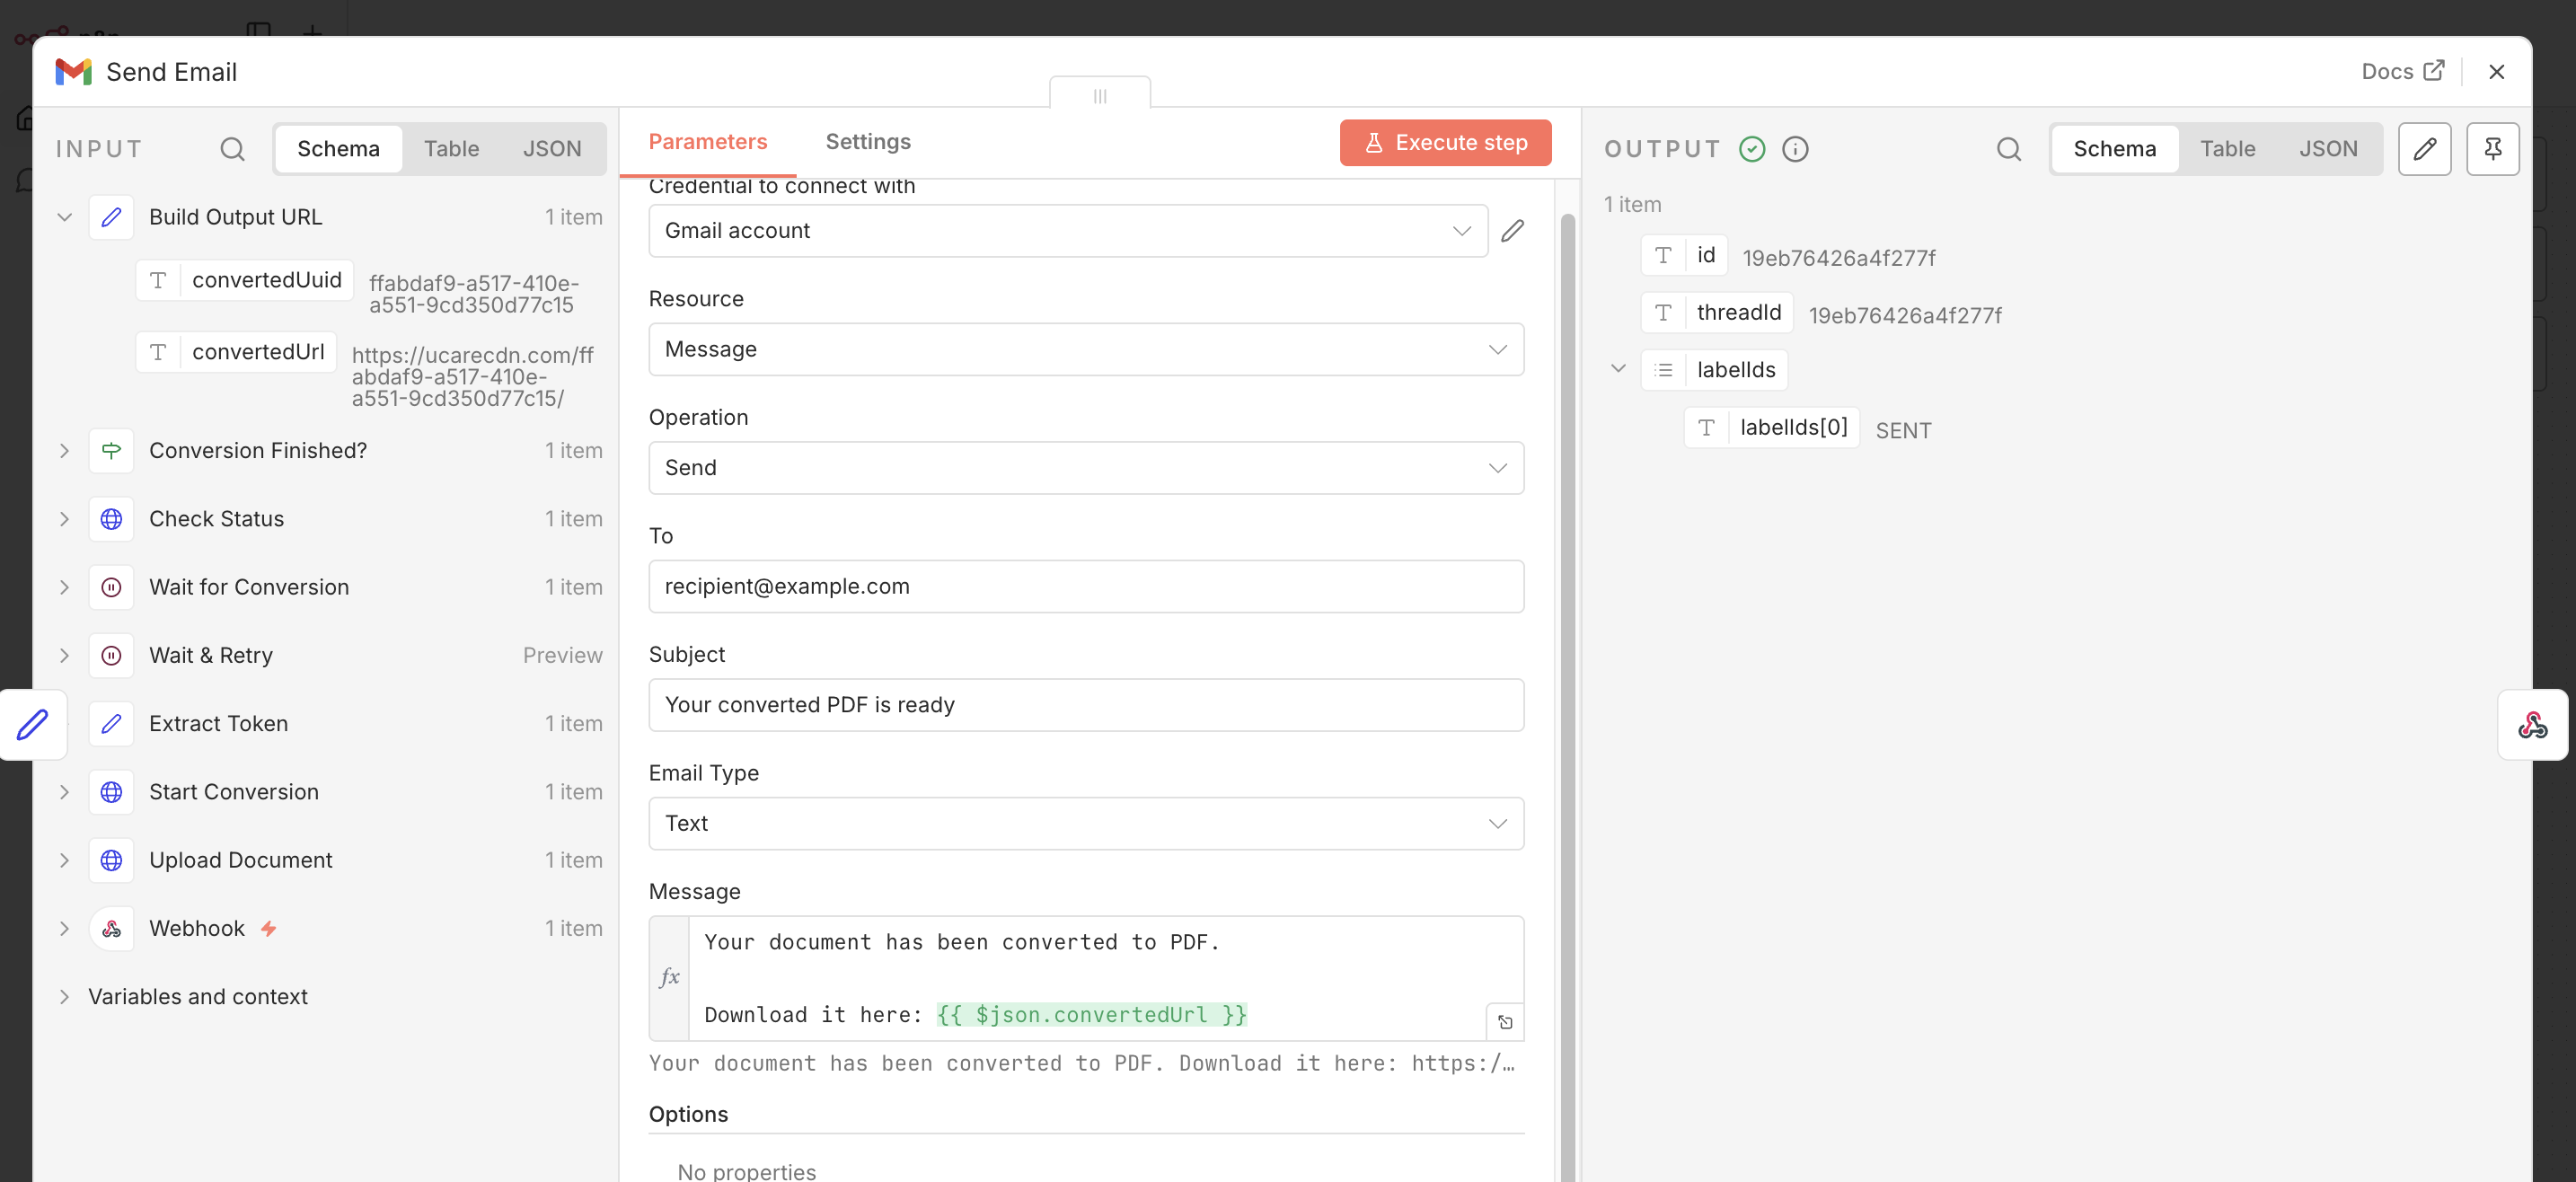
Email the link and respond
Add a Gmail node after the Set node, select your Gmail account credential,
leave Resource as Message and Operation as Send, and put the url field in the message body.
n8n Gmail Node
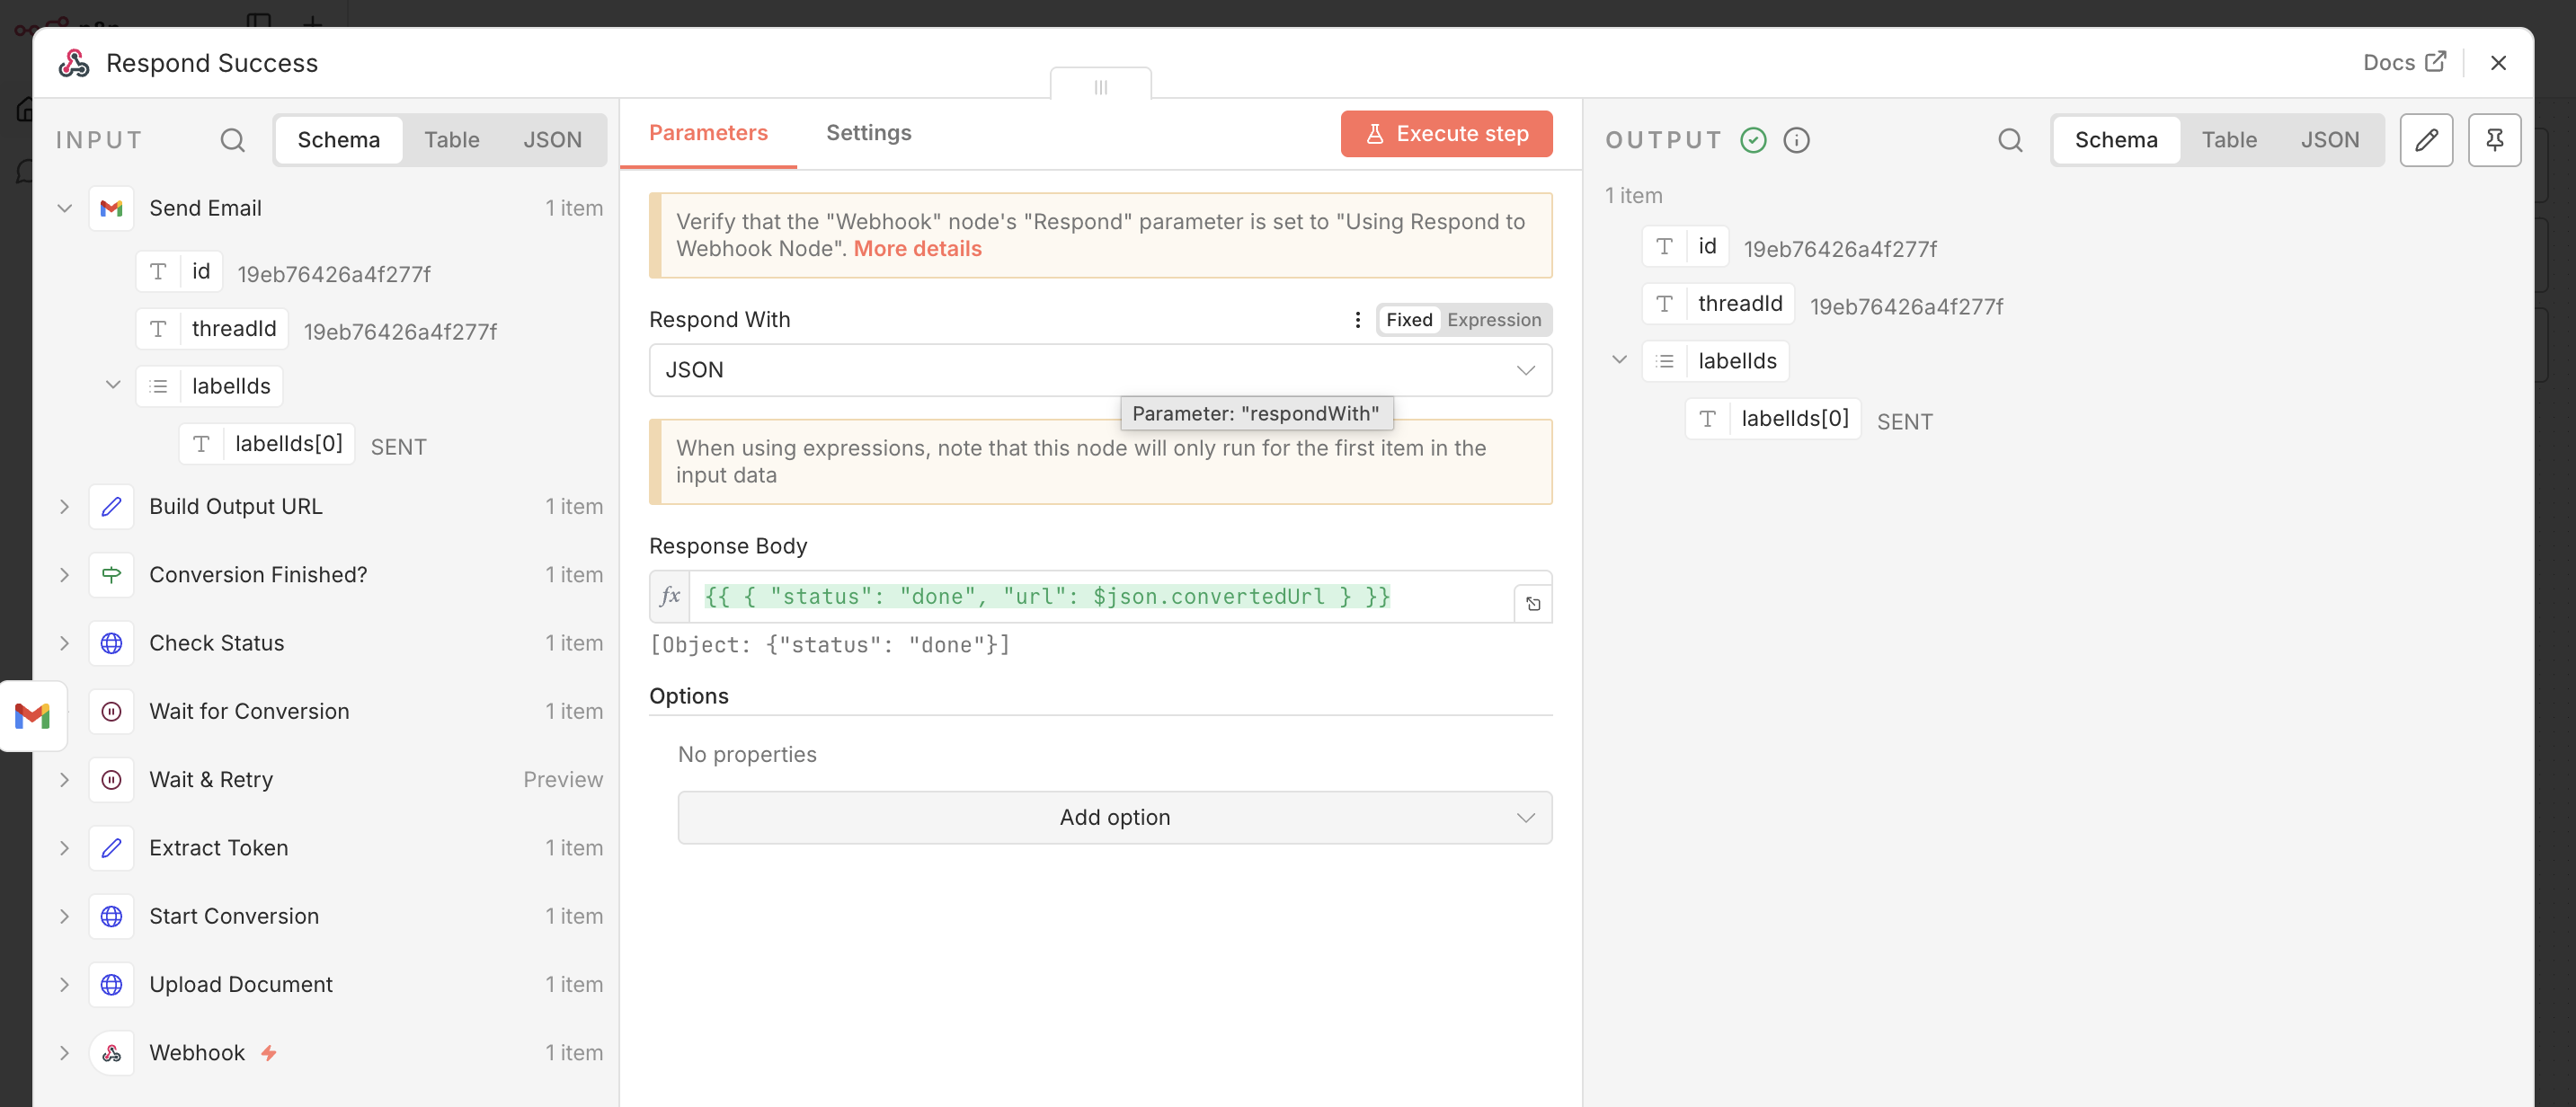
Also, add a Respond to Webhook node after the Gmail node
to send a response back to Postman (or whatever source triggered the workflow) with the converted file’s CDN URL:
n8n Respond to Webhook node sending the CDN URL back to the source
From here you can push the link to Slack, save it to a database, or attach it to a record, whatever fits your stack.
Conclusion
In this guide, you’ve learned how to upload a document over a Webhook node,
start an async PDF or PNG conversion with the Uploadcare Conversion API,
poll the status endpoint by token until the job reports finished,
and turn the result into a ready-to-share CDN link delivered by email.
The polling loop keeps the workflow self-contained, so it handles a one-page memo and a long report the same way.
You can try it out in your own project by importing the workflow.json from the document-conversion folder,
add your keys, and change the conversion path to match the output format you need. For more endpoints,
see the Uploadcare docs, and see the webhooks reference if you’d rather switch to event-driven delivery.
Which document formats can the Uploadcare Conversion API convert?
The Uploadcare Conversion API accepts common office and document formats as input,
such as DOC, DOCX, and ODT, and can output pdf, png, and jpg.
You set the output format in the conversion path, for example -/format/pdf/.
Do I need my Uploadcare secret key for this workflow?
Yes, for the conversion step. The upload in Step 1 authenticates with the public key,
but the Conversion API is part of the REST API and needs the Uploadcare.Simple authorization header built from your public and secret keys.
Keep that call server-side so the secret key never reaches client code.
How do I get an image preview of a single PDF page?
Use a path like <UUID>/document/-/format/png/-/page/1/.
The page operation selects the page number, and format/png (or jpg) renders it as an image rather than a document.
Why poll the status endpoint instead of waiting for a webhook?
For a self-contained workflow, poll: the conversion is asynchronous, so you wait, then check the token until the job reports finished.
For event-driven delivery, configure a webhook in the Uploadcare Dashboard
and trigger a separate Webhook node when the converted file is ready.
Ready to get started?
Join developers who use Uploadcare to build file handling quickly and reliably.
Trust Jamin Okpukoro is a Developer Advocate and Senior Technical Writer with a strong background in software engineering, community building, video creation, and public speaking. Over the past few years, he has consistently enhanced developer experiences across various tech products by creating impactful technical content and leading strategic initiatives. His work has helped increase product awareness, drive user engagement, boost sales, and position companies as thought leaders within their industries.