How to optimize images before uploading to WordPress
Last edited:
Did you know that WordPress can natively shrink assets in your Media Library? If you upload an image, it will automatically create 5+ resized versions and compress them. So, why bother doing extra homework and optimize images before uploading?
Even if it sounds like overkill, such a habit can improve your page load speed and save server space. Read on to find out the possible benefits for your project and learn to perform image optimization in the least exasperating way.
Why native WP compression is not a magic pill
There are three possible pitfalls you can face by relying on the standard WordPress functionality.
1. One pre-defined level of compression
To perform automatic resize and compression, WordPress uses the PHP-GD extension. GD Library is enabled by default and offers an 82% JPEG compression level. To change it, you’ll need to add a filter to your theme’s functions.php file.
At the end of the day, you’ll have the same compression level for all assets, which means that:
❌ Some images won’t look as sharp and crisp as you need
❌ Some images, conversely, won’t be sufficiently compressed
2. Not all of your assets will get compressed
WordPress with the standard GD Library enabled will only shrink JPEG files uploaded to the Media Library. And even when it comes to JPEG files, not all the resized versions get compressed: the original image remains untouched.
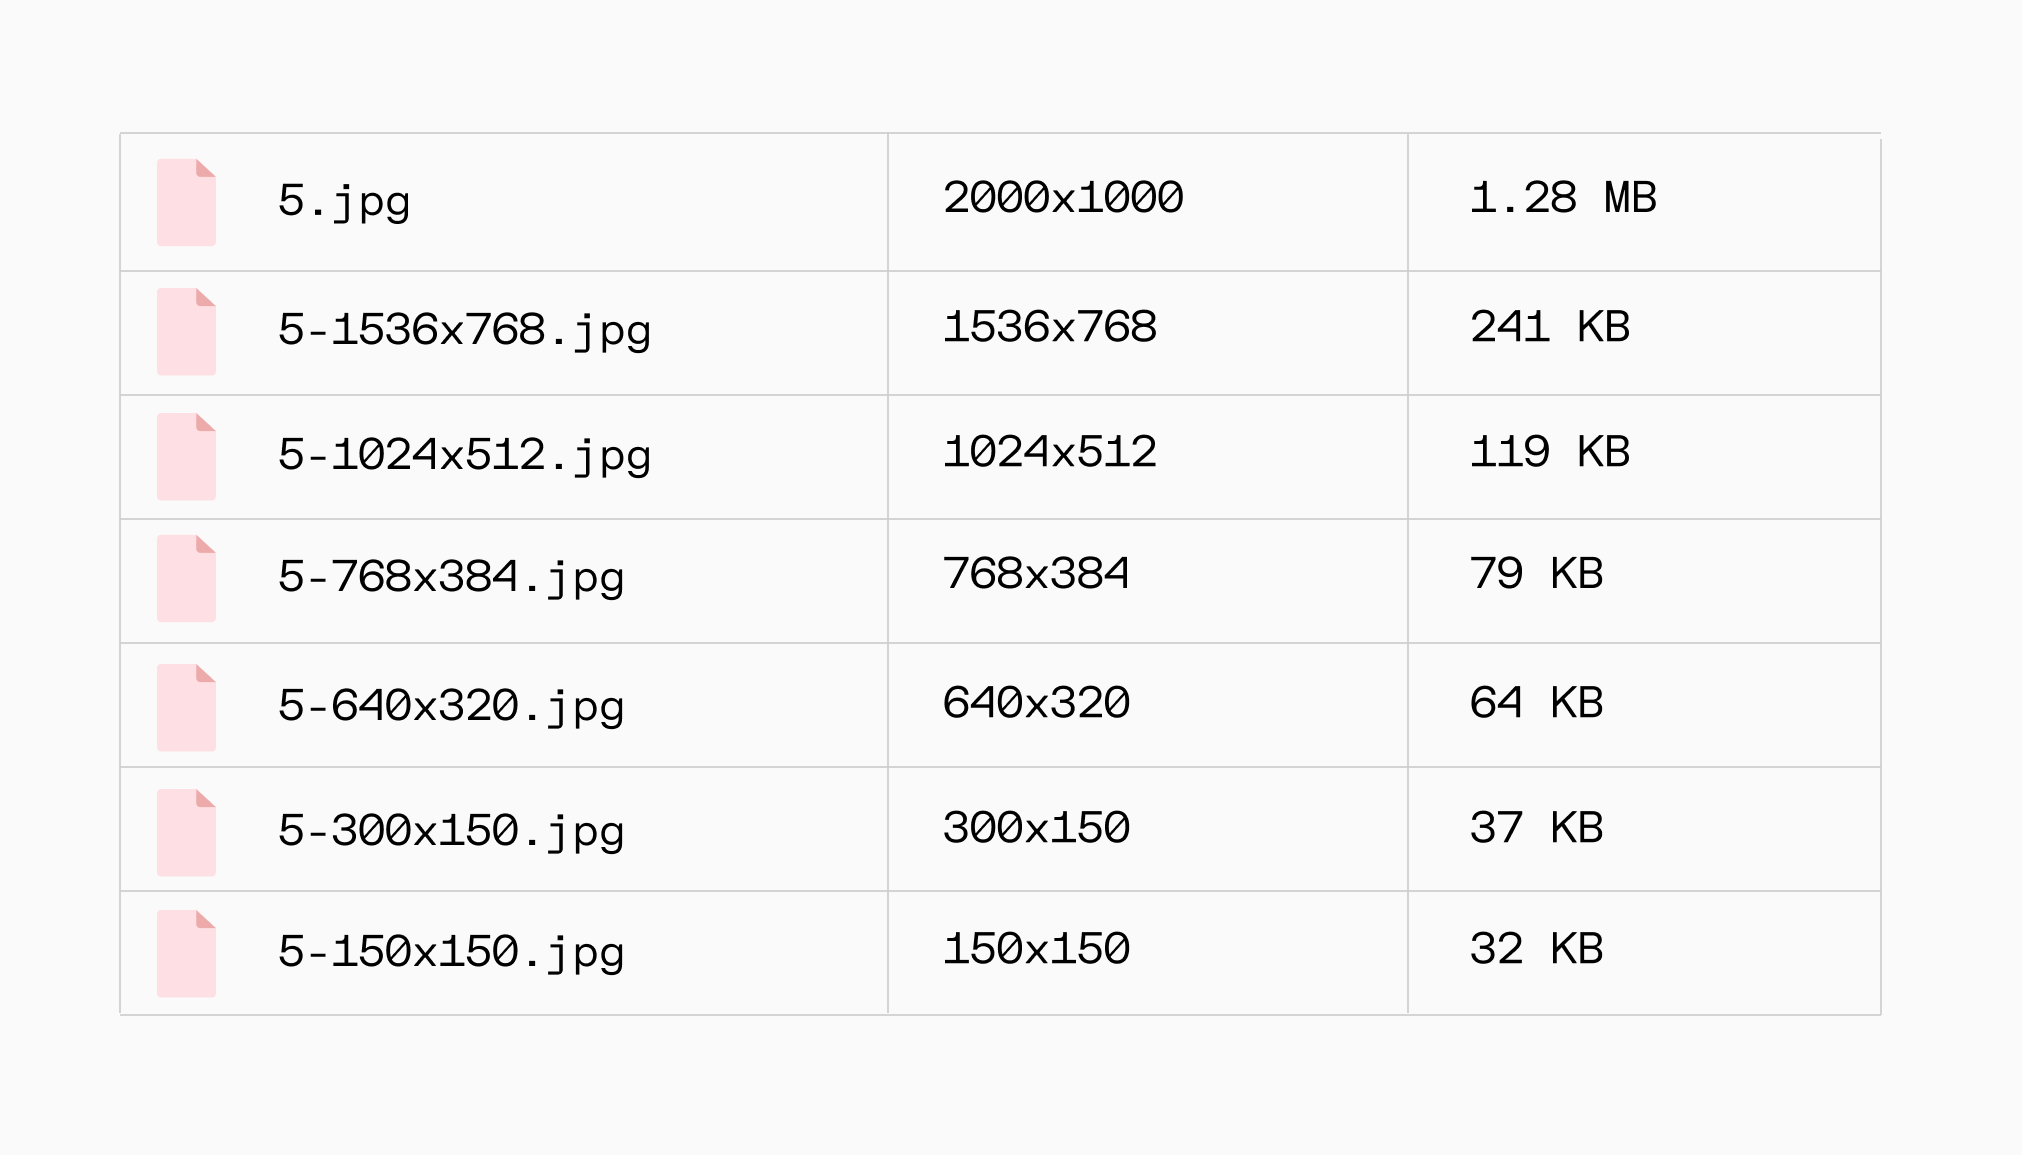 In this example, I uploaded a 1.28 MB, 2000x1000px image. WordPress created six resized copies to fit the theme and compressed them automatically. The original image remained full-sized.
Such a seemingly minor detail can become a thing because:
❌ You end up stuck with original images that hog your server space
❌ WP can possibly serve your original unoptimized image and affect website performance
❌ Other file types (PNG, WebP) won’t get compressed at all
3. You lose sight of optimization opportunities
Image optimization is not limited to compression. It refers to a whole range of methods that help reduce image file sizes and make a website lean and fast.
These methods can work both before and after uploading, ensuring the balance between perceived quality and load speed:
| 📥 Work before, upon, and after uploading | 📤 Work after uploading |
Reformatting Progressive JPEG and Interlaced PNG | Lazy loading and LQIP Responsiveness Using a CDN |
By delegating image optimization to WordPress, you lose the opportunity to:
❌ Benefit from next-gen formats like WebP
❌ Take advantage of different types and levels of compression
❌ Build on pre-upload optimization with post-upload techniques like lazy loading
Pre-Upload optimization methods: Overview
The limitations mentioned above are not that critical if you have a static website with minimal images all in JPEG format. For more complex projects with different file types, some extra optimization routines prior to uploading are recommended.
Choosing the right image format and reformatting
Before anything else, you can pick the proper format for your original images, depending on the type of visual content they communicate.
Most of the time, we would choose between JPEG and PNG. They are both raster formats but encode images differently, affecting image size, quality, and even functionality (e.g., transparency). JPEG uses lossy compression, resulting in smaller file sizes and inferior quality. PNG applies lossless compression; therefore, the file size can be bigger for photos and smaller for graphics. So, which one to choose?
Let’s see what Google has to say about this. Spoiler: There are many more image formats to consider.
A word of advice from Google web.dev experts:
💡 Choose vector formats (SVG) for images with simple geometric shapes like logos and icons. They are tiny in size but will look sharp on any screen, including retina.
💡 Use JPEG with different levels of compression for photos and screenshots. PNG is recommended only when fine detail is needed, e.g., for small static graphics on a transparent background.
💡 Consider using WebP as the main raster format. WebP images are 25-35% smaller than JPEG and PNG, resulting in significant performance wins. Its only drawback is that, being a next-gen format, it is not supported by legacy browser versions. That’s why it’s better to use alternative JPEG/PNG images as a fallback.
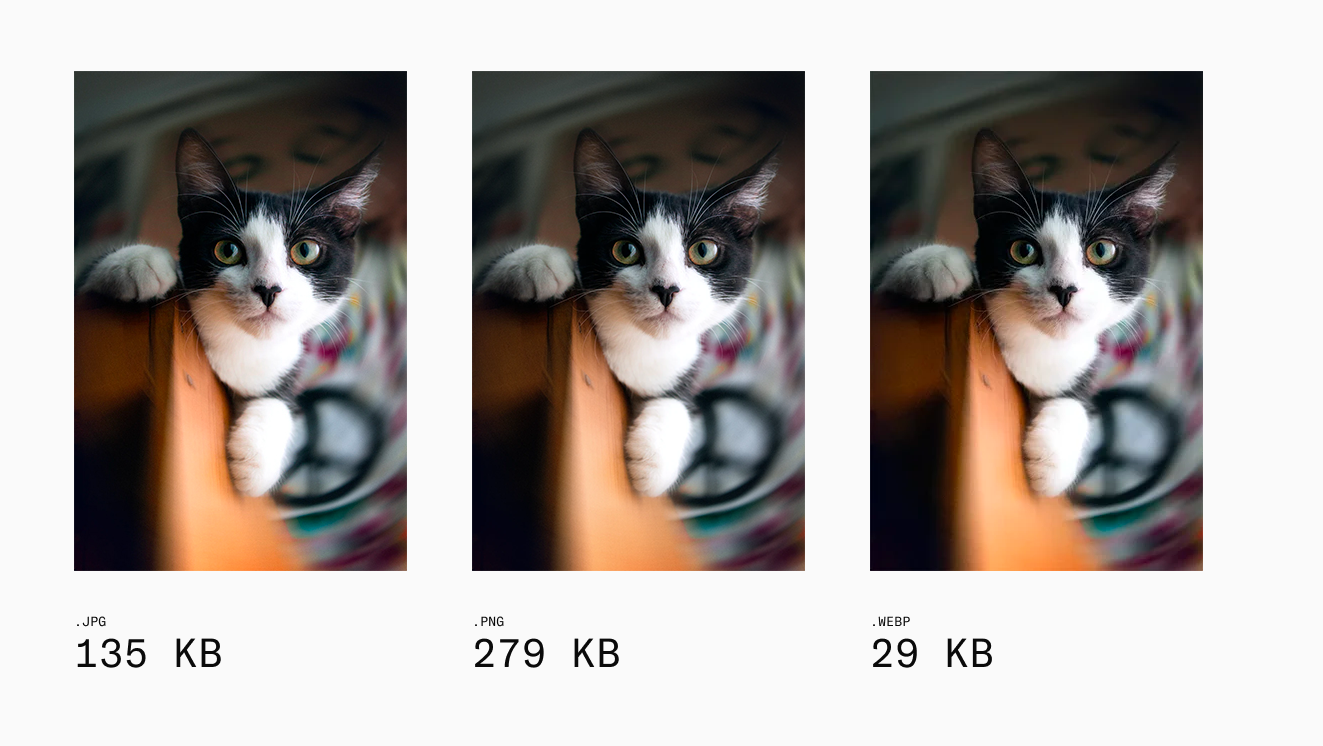 The same image in three different formats (PNG, JPEG, and WebP) with file sizes
Resizing and responsiveness
The second step after picking the right format is resizing: by decreasing the original image's dimensions in pixels, you can make it way smaller in size.
The main goal is to have a set of image versions for different screens so that the browser picks the smallest one that fits the container.
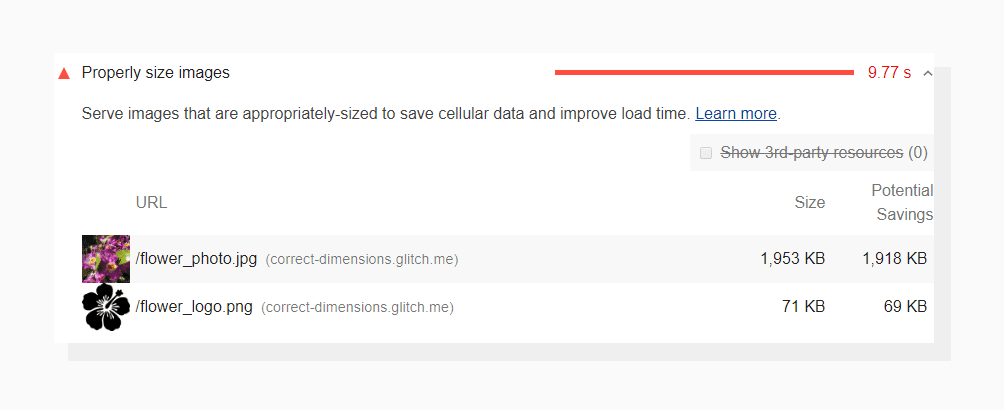 Lighthouse identifies images that are larger than the container and evaluates potential savings.
Luckily, WordPress has responsive image support and generates resizes to fit any screen. By uploading an image to your Media Library, you get a set of resizes, cropped and compressed, at widths of 150 px, 300 px, 768 px, 1024 px, 1536 px, and 2048 px.
What else can be done here?
💡 You can adjust the default resize dimensions or add new ones via the Settings Media Screen.
💡 You can resize the original image before uploading to fit one of the default sizes (the largest one). This way, WordPress won’t create a duplicate on your server.
👉 Read more about Responsive Images in WordPress
Compression
Let’s imagine that you now have a properly formatted and scaled original image. The question is whether to further compress it before uploading it to WordPress or not. And the answer is: it depends.
If it's a JPEG and you decide to rely on the native WordPress shrinking, the source image should be of good quality. Otherwise, you are at risk of having crooked resized versions with compression artifacts.
Suppose you turn the automatic JPEG compression off (yes, it is also possible) or choose to upload images in other formats. In that case, WordPress will compress neither the original image nor the resized copies. In this case, compressing your assets before uploading is recommended.
What else can be done here?
💡 If you decide to rely on default compression, at least consider enabling ImageMagick PHP as an alternative to PHP-GD, as it has different levels of compression and supports more file types.
💡 As recommended by Google, try different JPEG compression levels to find the best quality vs. size ratio for your assets.
Tools to optimize images before uploading
There are two common ways to optimize images before uploading which are available to any WordPress publisher: manual image tweaking (online or offline) and automated (using plugins). Let’s take a closer look at all of them and distill some pros and cons.
Manual tweaking with offline image editors
 Manual offline tweaking tools cannot manage the post-upload methods
Offline photo editing software has more or less the same features. Photoshop, GIMP, and Indesign enable you to:
- Convert an image to a better format
- Change quality levels (lossy or lossless compression will be applied, depending on the image format)
- Scale down and crop
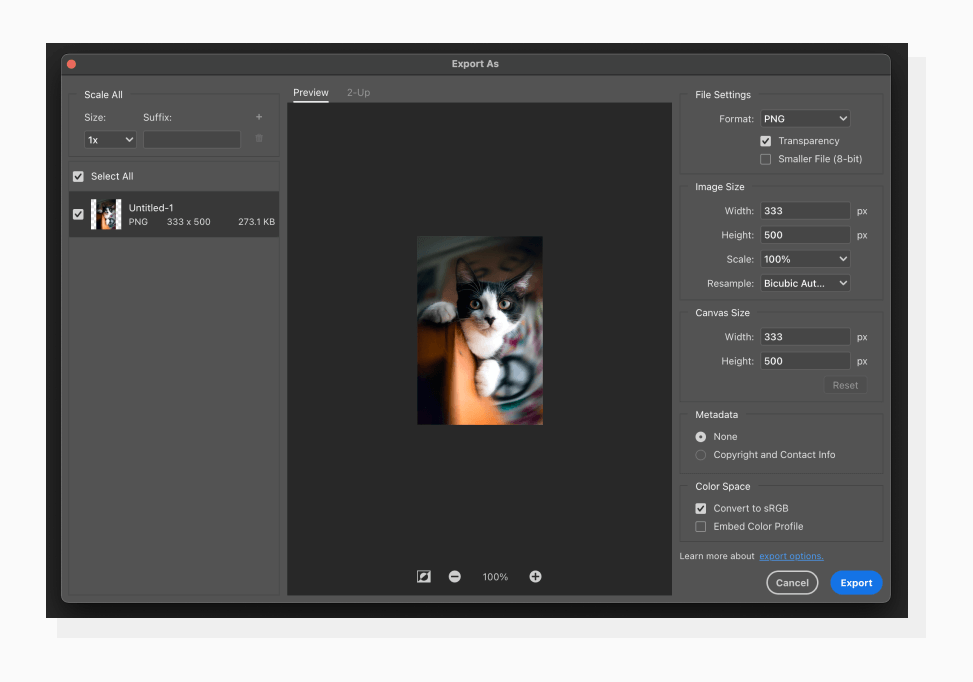 Exporting with Photoshop
Pros: You can apply all the pre-upload optimization methods and strip (or save) image metadata. You are in full control of all the settings.
Cons: Manual image tweaking is tiresome. Though there are options for bulk optimization like Image Processor in Photoshop or Sketch Image Compressor, you will spend lots of time resizing pictures instead of focusing on your core tasks. On top of that, you’ll pay not only with your efforts: most editors don’t have free versions.
Manual tweaking with online tools like TinyPNG or Compressor
 TinyPNG or Compressor tools usually manage only image compression
There are a number of online drag-and-drop services that help to compress one or several images in a batch. Usually, they don’t offer resizing or reformatting options at all, or on paid versions only.
Using them is faster than offline software, but the process is less manageable. For instance, you can’t choose a custom quality setting: Compressor will only offer preset compression levels, and TinyPNG/TinyJPG will pick the compression ratio itself.
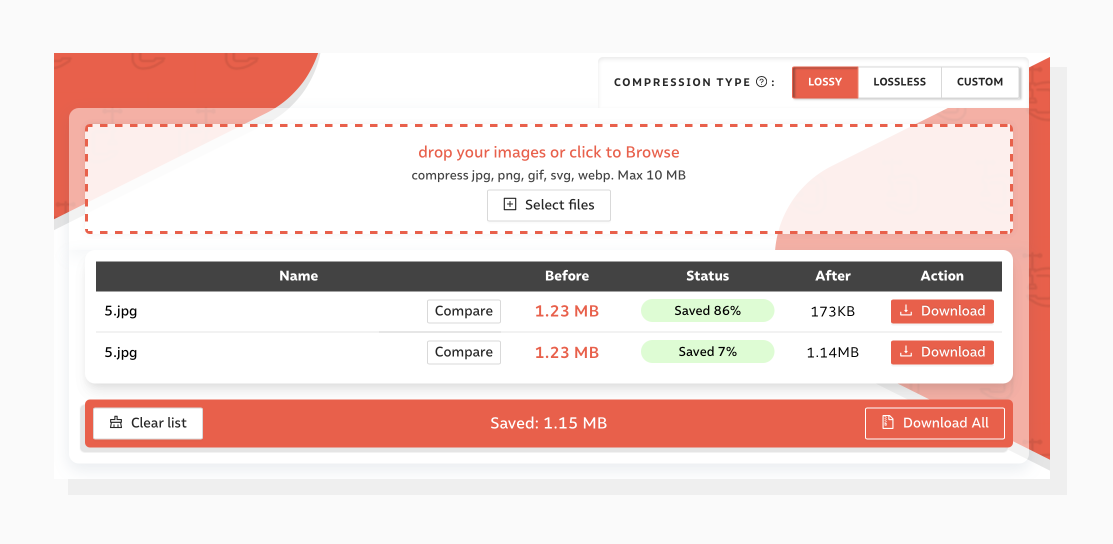 Lossy and lossless compression in Compressor. If you hit the "Compare" button, you’ll be able to evaluate the perceived quality before downloading the picture.
Pros: Such services are a good choice for a quick one-off compression and if you don’t need to perform any other manipulations. They also handle all the decision-making in terms of balancing file size and quality, so you can just drop in the files and grab what pops out.
Cons: Online tools perform optimization under the hood, but there are still many routine operations. On top of that, neither of the manual tweaking tools mentioned above will spare you from exporting and uploading assets to the server.
Automated optimization via WordPress plugins
 Benefits of Automated optimization via WordPress plugins
There are plenty of free and paid image optimization plugins to help you automate. Most of them use all the optimization methods, including post-upload delivery optimizations like lazy loading and CDN. They also shrink other website content, such as theme elements.
But it would be a lie to say that plugins help to optimize images literally before uploading. Usually, it happens sometime during the process, and the functionality is called image optimization upon uploading, meaning that all the images are processed off-site and arrive in the Media Library already compressed.
Here are some of the plugins that support such functionality. The most popular ones have already evolved into image handling infrastructures, but if you’re a person who doesn’t need all the bells and whistles, simple solutions are also available:
| Plugin | Converting to WebP | Resizing | Compression | Post-upload methods | Free |
| WP Smush | + | + | + | + | +, but most of the features are available on the PRO plan |
| ShortPixel | + | + | + | - | -, 100 free credits/mo |
| EWWW Image Optimizer | + | + | + | - | +, but most of the features are available on the PRO plan |
| Better Images | - | + | + | - | + |
| reSmush.it | - | - | + | - | +, with a 5MB file size limit |
| Imsanity | - | + | + | - | + |
Pros: Plugins can optimize images upon uploading, so you don’t have to worry about unoptimized duplicates in your Media Library. They also compress all the sizes and thumbnails automatically. Most of them offer quality adjustment options so you can choose the levels of compression suitable for your content.
Cons: Though using plugins seems to be a better option in terms of workload, adding extra code can actually impact web performance and slow down your website. And if there’s a plugin for each function, this impact can be huge.
Concerned with too much plugin code on your website?
Consider using only one plugin to handle all the image-related issues, e.g., Uploadcare File Uploader. Originally built as a file uploading solution, it now covers all the image and file handling stages, from uploading to delivery (so it's like many plugins in one!).
It provides a customizable uploading UI and offers such features as:
- Image resizing and shrinking upon upload
- Image editing (crop, enhance, rotate, etc.)
- Multiple upload sources (camera, Instagram, Google Drive, Dropbox, and more)
- Storing your assets in the cloud or downloading them to the Media Library
- Serving responsive lazy-loaded images with Adaptive Delivery
- Secure uploads and multi-upload mode
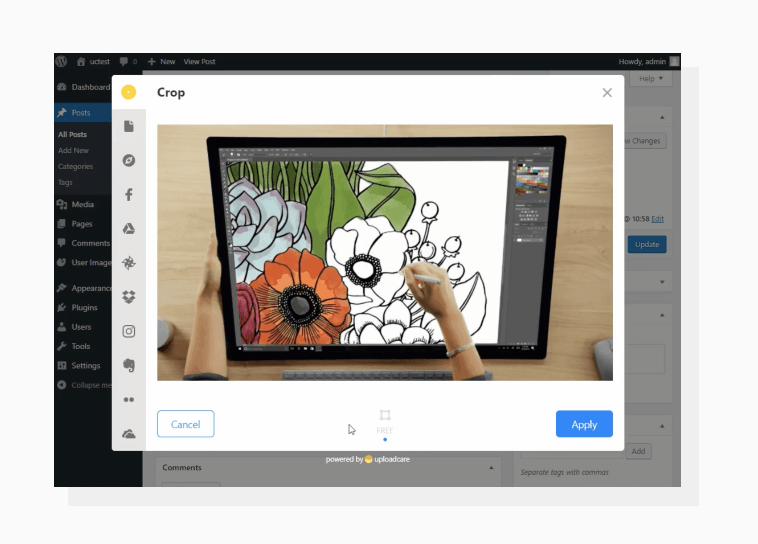 Uploadcare File Uploader allows you to upload, shrink, edit, and deliver responsive images.
👉 Check out how to install and set up the plugin
To automate it once and for all
If you don’t want to have any plugins on your WordPress website and don’t want to spend a second on image handling either, adopt the Uploadcare media processing pipeline.
Enabled with only one line of code, it provides an end-to-end file-handling solution that includes smart compression, conversion to WebP, responsiveness, and lazy loading. Just set it and forget it!