Using the Uploadcare CLI with AI coding agents (Cursor, Claude Code, GitHub Copilot, and Codex)
The Uploadcare CLI works well with AI coding agents for agentic file and media workflows: it’s a single binary an agent invokes as a subprocess, with a built-in command that describes its full surface so the agent knows exactly which commands, flags, and fields are available.
In this guide, you’ll learn how to connect it to four agents so they can upload files, convert media, and return CDN URLs on their own.
How the Uploadcare CLI works with AI agents
The Uploadcare CLI was built to run non-interactively by outputing structured JSON, returning deterministic exit codes, and exposing its full command surface on demand. It has four properties that make it ideal for AI integration.
Self-describing surface. The command uploadcare api-schema provides a comprehensive, machine-readable JSON schema of the entire CLI.
The schema includes all command paths, flags, arguments, and the JSON fields that each command can return, along with agent-specific usage guidance.
Your agent utilizes this schema to generate valid commands, eliminating the need to guess method names or scrape --help text.
Machine-readable output. All commands support --json for machine-readable output, allowing for structured output,
either for all fields or a selected subset. Additionally, the --jq option enables filtering with a jq expression inline.
This provides the agent with a clean data for reasoning, instead of a table that requires parsing.
Deterministic exit codes. The CLI uses specific exit codes to indicate the outcome of operations.
0for success,1for an API error,2for a usage error, and3for an authentication or configuration issue.
This allows an agent or a Continuous Integration (CI) job to make decisions based on the exit code without needing to check the accompanying message.
Safe by default for writes. Destructive commands include a --dry-run flag that allows users to preview the effects before making any changes.
So an agent can plan a delete or migration and show you the result before anything happens.
Since it is a single binary with no runtime dependencies, there is no SDK to import and no plugins to keep synchronized with the platform.
The agent interacts with uploadcare in the same way it would with git or curl.
Prerequisites
To follow along with this tutorial, you’ll need the following:
- A free Uploadcare account and your project’s public and secret API keys
- One of the supported agents: Cursor, Claude Code, GitHub Copilot, or OpenAI Codex
- A terminal on Linux, macOS, or Windows
- Basic familiarity with your agent’s terminal or command-approval settings
Install and authenticate the CLI
Every agent below invokes the same binary, so install it once. On Linux or macOS, run:
curl -fsSL https://raw.githubusercontent.com/uploadcare/uploadcare-cli/main/scripts/install.sh | shPre-built binaries for Windows and specific versions are on the GitHub Releases page. Confirm the install worked:
uploadcare --versionNext, authenticate by exporting your API keys, which you’ll find in your Uploadcare dashboard:
export UPLOADCARE_PUBLIC_KEY="your-public-key"
export UPLOADCARE_SECRET_KEY="your-secret-key"
If you’d rather not export the keys every session, the CLI also reads them from a config file at ~/.uploadcare/config.yaml. When keys are set in more than one place, the CLI picks them in this order:
- Command-line flags (highest priority)
- Environment variables
- The config file (lowest priority)
So a value passed as a flag wins over an environment variable, which in turn wins over the config file. This order is what lets an agent or CI system inject secrets at runtime: those keys take priority automatically, and your local config file stays untouched.
Note: Keep your secret key out of any file the agent commits. Export it in the shell the agent inherits, or store it in your agent’s secret manager, rather than writing it into an instruction file that lands in version control.
How agents discover commands with api-schema
Before wiring up any agent, run this yourself to see what the agent will see:
uploadcare api-schema | jq -r '.commands[].path'That prints every command path the CLI exposes: file upload, file list, convert video, and so on.
To inspect a single command’s returnable fields:
uploadcare api-schema | jq '.commands[] | select(.path == "file info") | .json_fields'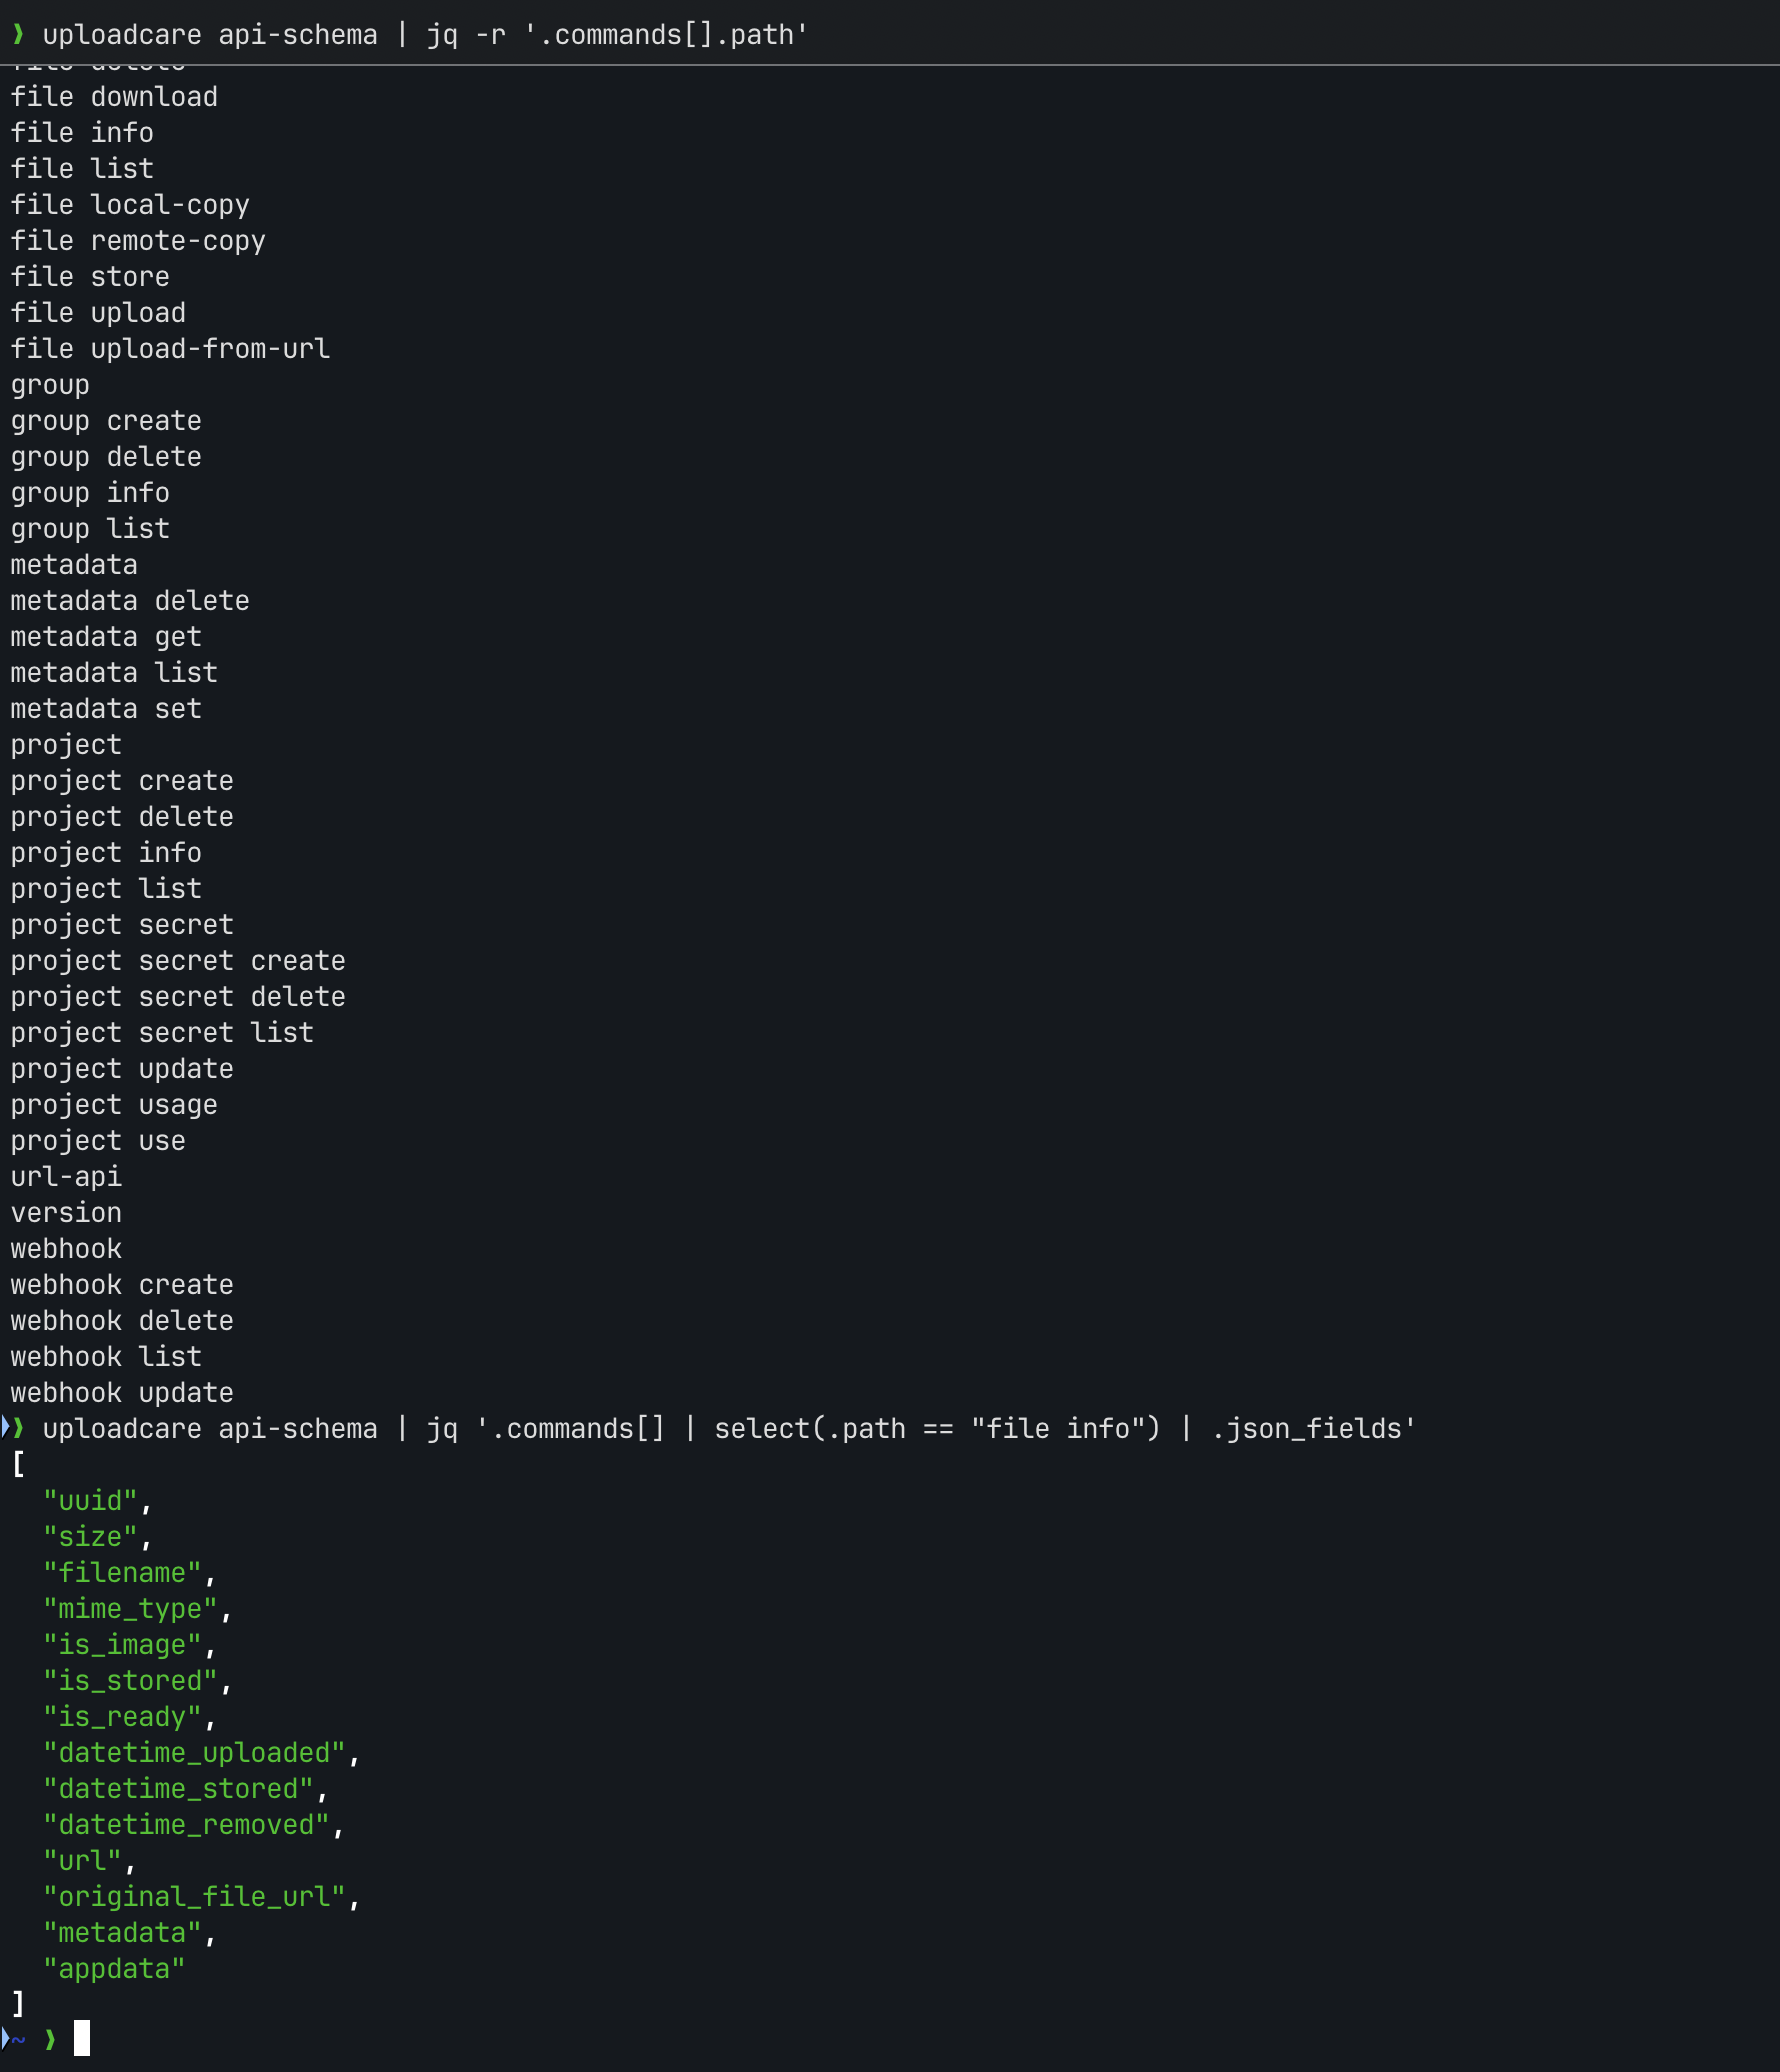 Terminal output of the uploadcare api-schema command listing available command paths as JSON
This is the mechanism every integration will rely on.
Instead of hardcoding command syntax into a prompt (which goes stale the moment the CLI changes),
you tell the agent to run uploadcare api-schema and read the result.
The schema is the single source of truth, so the agent stays correct across CLI updates.
Using the Uploadcare CLI with Cursor
Cursor’s Agent can run terminal commands, and it reads rule files from your project root. The setup is two parts: a rule that tells the agent when and how to use the CLI, and a terminal permission so it can actually run the binary.
First, create an AGENTS.md file in your project root. Cursor reads AGENTS.md (and .cursor/rules) as agent instructions:
# File uploads and media

This project uses the Uploadcare CLI for all file upload, conversion, and
media tasks. Do not write custom upload code or import an SDK.

- Discover available commands by running `uploadcare api-schema` and reading
  the JSON output (command paths, flags, and `json_fields`).
- Prefer `--json` output so you can parse results.
- Preview any destructive command (for example `file delete`) with `--dry-run`
  before running it for real.
- API keys are already set as `UPLOADCARE_PUBLIC_KEY` and
  `UPLOADCARE_SECRET_KEY` environment variables.
The rule above does the following:
- Scopes the tool: it tells the agent to reach for the CLI on any file or media task, instead of hand-rolling an upload.
- Points at
api-schema: the agent discovers commands itself rather than relying on syntax baked into the prompt. - Sets a safety rule: it requires
--dry-runon destructive operations, so the agent plans before it deletes.
Next, allow the agent to run the command.
Open Cursor’s Agent settings (Cmd/Ctrl + Shift + J → Agents → Auto-Run) and add uploadcare to the allowlist of commands
the agent can run without asking each time. Keep destructive shell commands out of the allowlist so writes still prompt you.
Tip: Start with Auto-Run set to “Ask Every Time” while you watch what the agent does.
Once you trust the flow, move read-only uploadcare commands to the allowlist and leave deletes on manual approval.
Now prompt the agent in natural language, such as “Upload hero.jpg to Uploadcare and give me the CDN URL”,
and it will run uploadcare api-schema, find file upload, and execute it.
Using the Uploadcare CLI with Claude Code
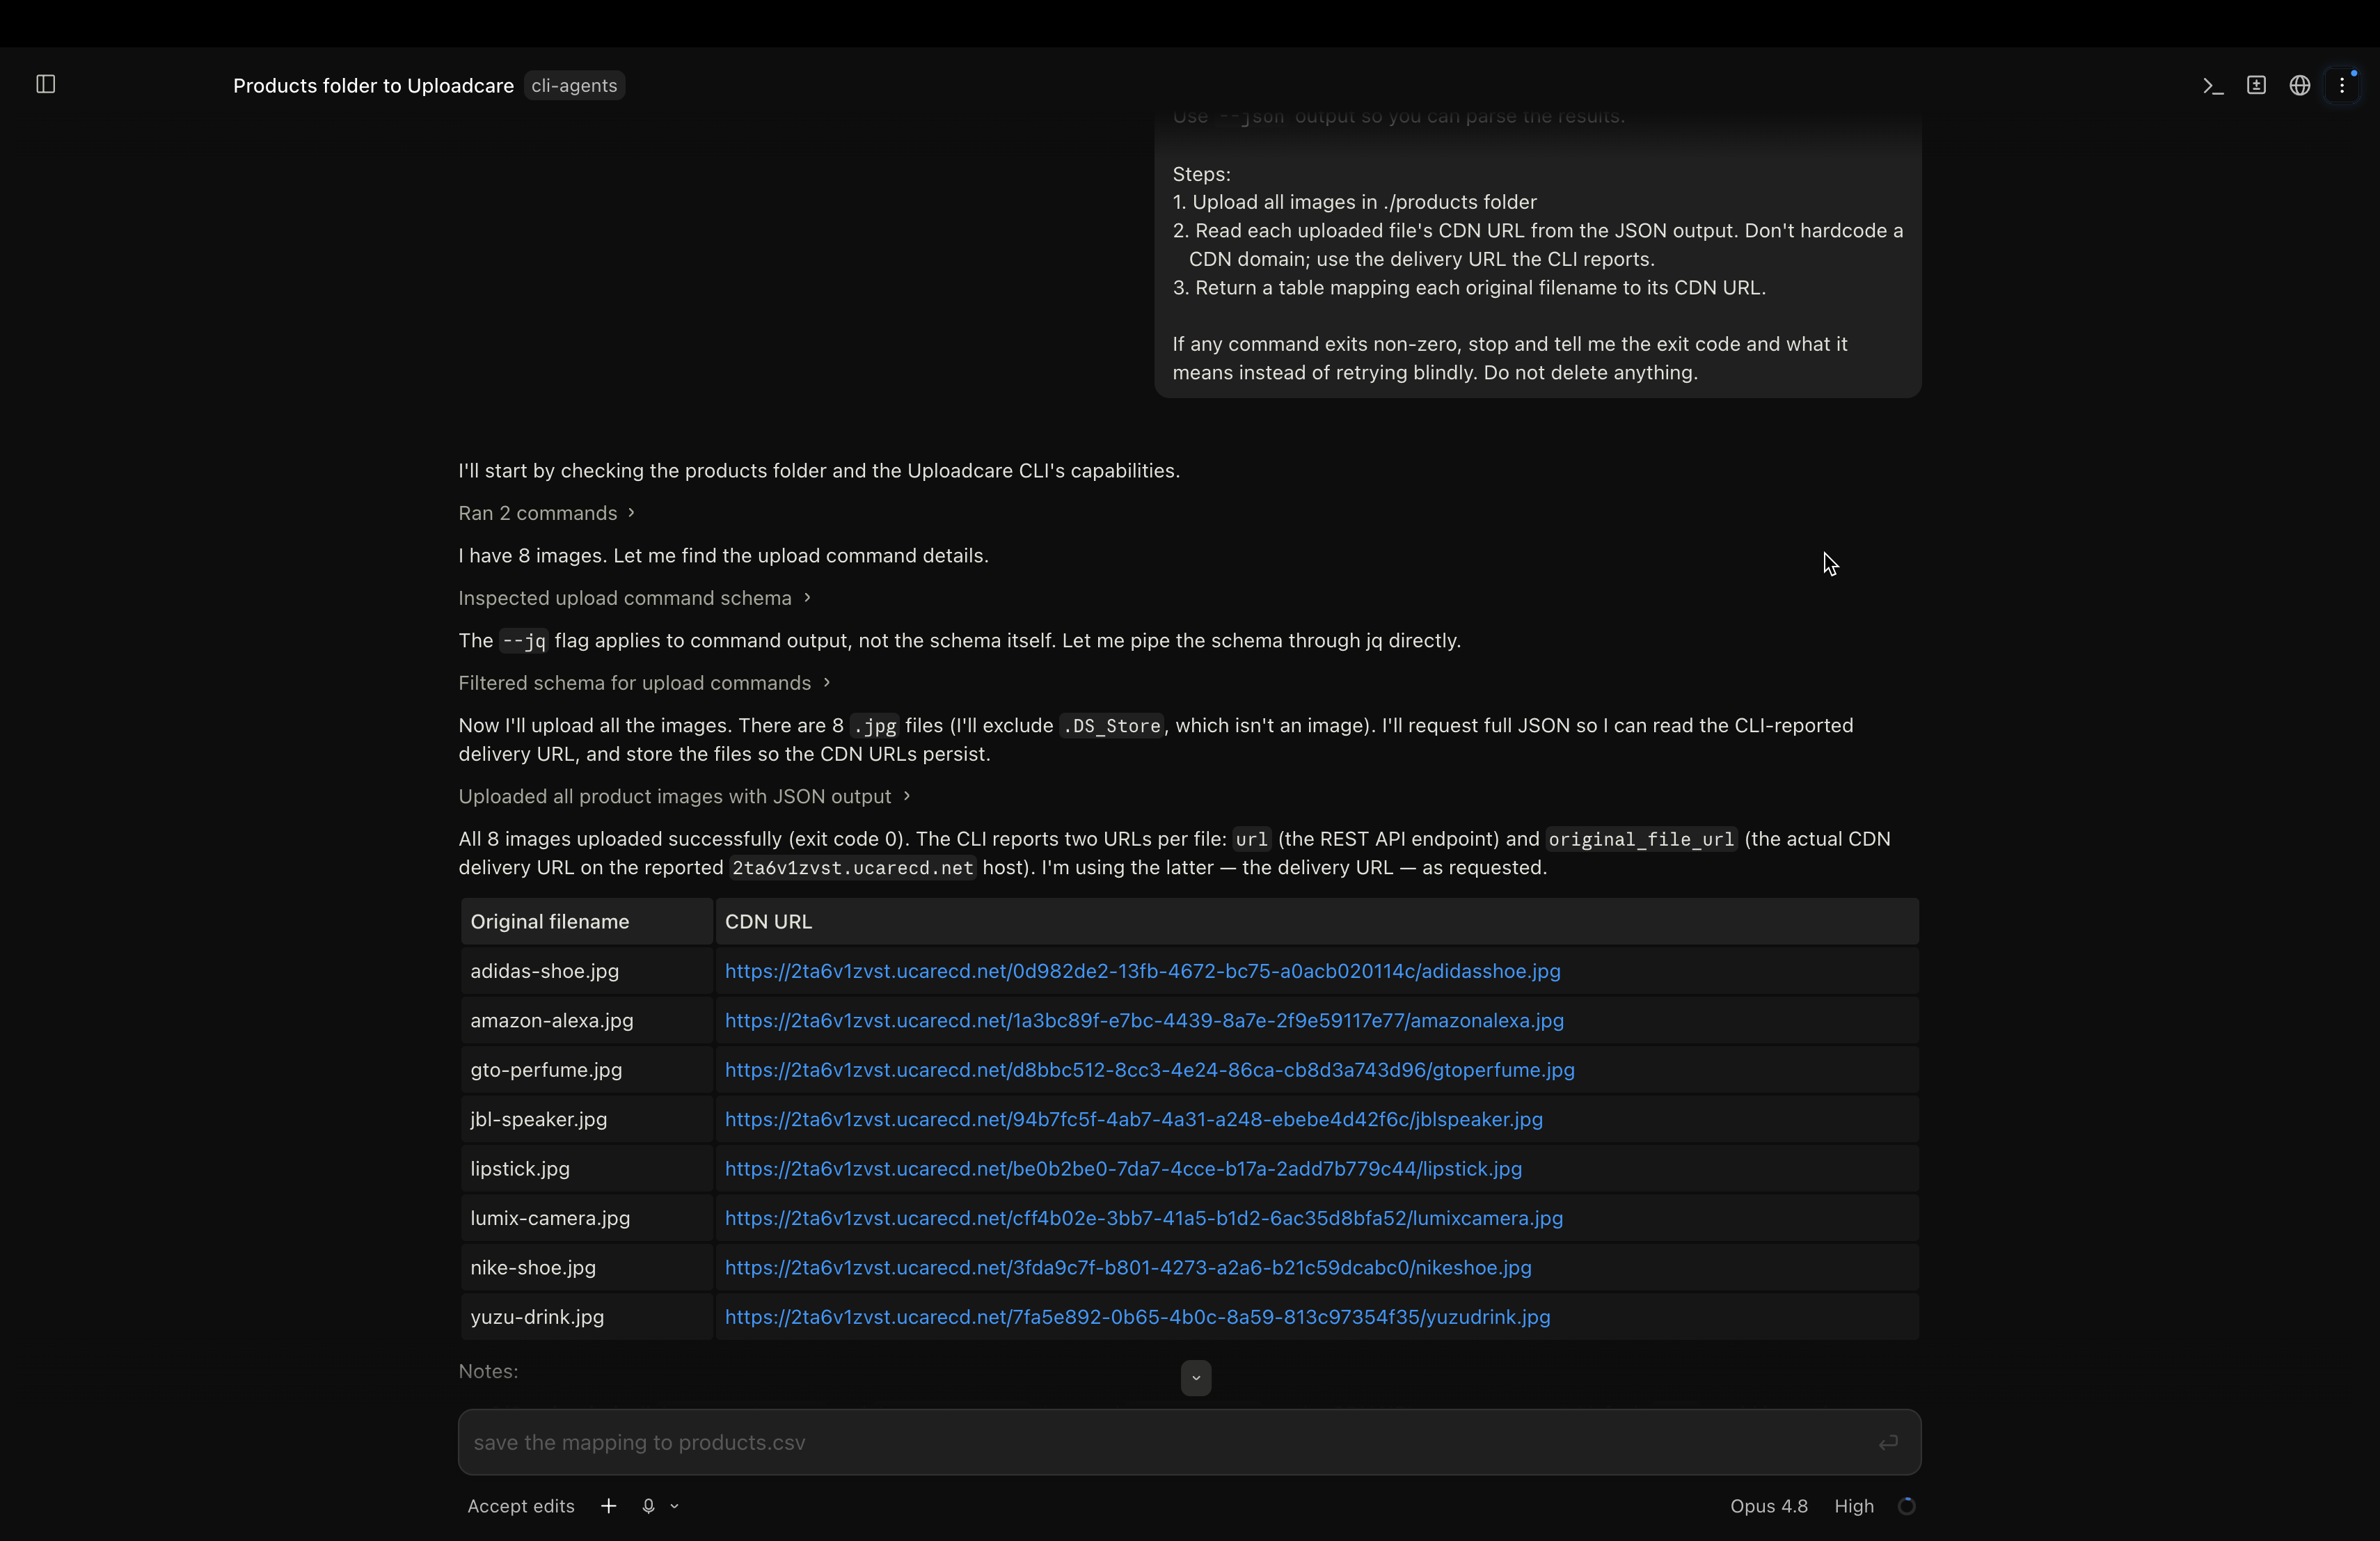 Claude Code running the Uploadcare CLI
Claude Code runs Bash commands directly and reads a CLAUDE.md file for project context, so the pattern mirrors Cursor’s. Add a CLAUDE.md (or reuse the same AGENTS.md, which Claude Code also reads) to your project root with the same instructions:
# File uploads and media

Use the Uploadcare CLI for all file upload, conversion, and media operations.
Run `uploadcare api-schema` to discover commands, flags, and JSON fields.
Use `--json` for structured output and `--dry-run` before any delete.
Then let Claude Code run the binary without prompting on every call by adding a permission rule to .claude/settings.json in your project:
{
  "permissions": {
    "allow": ["Bash(uploadcare:*)"]
  }
}
Here’s what that configuration does:
-
Bash(uploadcare:*)allows any command that starts withuploadcare(uploadcare file upload,uploadcare convert video, and the rest), using Claude Code’s prefix-matching permission syntax. -
Everything else stays gated: because the rule only matches the
uploadcareprefix, other shell commands still follow your default approval mode.
If you’d rather keep deletes behind a confirmation,
allow the read and write commands you trust and leave uploadcare file delete off the allowlist so it prompts.
With that in place, ask Claude Code to handle a file task and it discovers the command surface through api-schema,
then runs the right command as a Bash subprocess.
Using the Uploadcare CLI with GitHub Copilot
GitHub Copilot’s agent mode also runs terminal commands and supports custom instructions. Copilot reads AGENTS.md as well as .github/copilot-instructions.md, so you can reuse the instructions from the Cursor section or add a Copilot-specific file.
Create .github/copilot-instructions.md:
# File handling

For any file upload, conversion, or media task, use the Uploadcare CLI
(`uploadcare`). Run `uploadcare api-schema` to discover the available commands
and their JSON fields before composing a command. Always request `--json`
output, and preview destructive commands with `--dry-run`.
Copilot’s agent will run uploadcare in the integrated terminal.
On Copilot Business or Enterprise, terminal commands are governed by an allow/block policy,
so confirm that uploadcare isn’t caught by a broad blocklist rule (the defaults target commands like rm -rf, sudo, and curl | sh, not uploadcare).
If your organization uses a strict allowlist, add uploadcare to it.
Using the Uploadcare CLI with OpenAI Codex
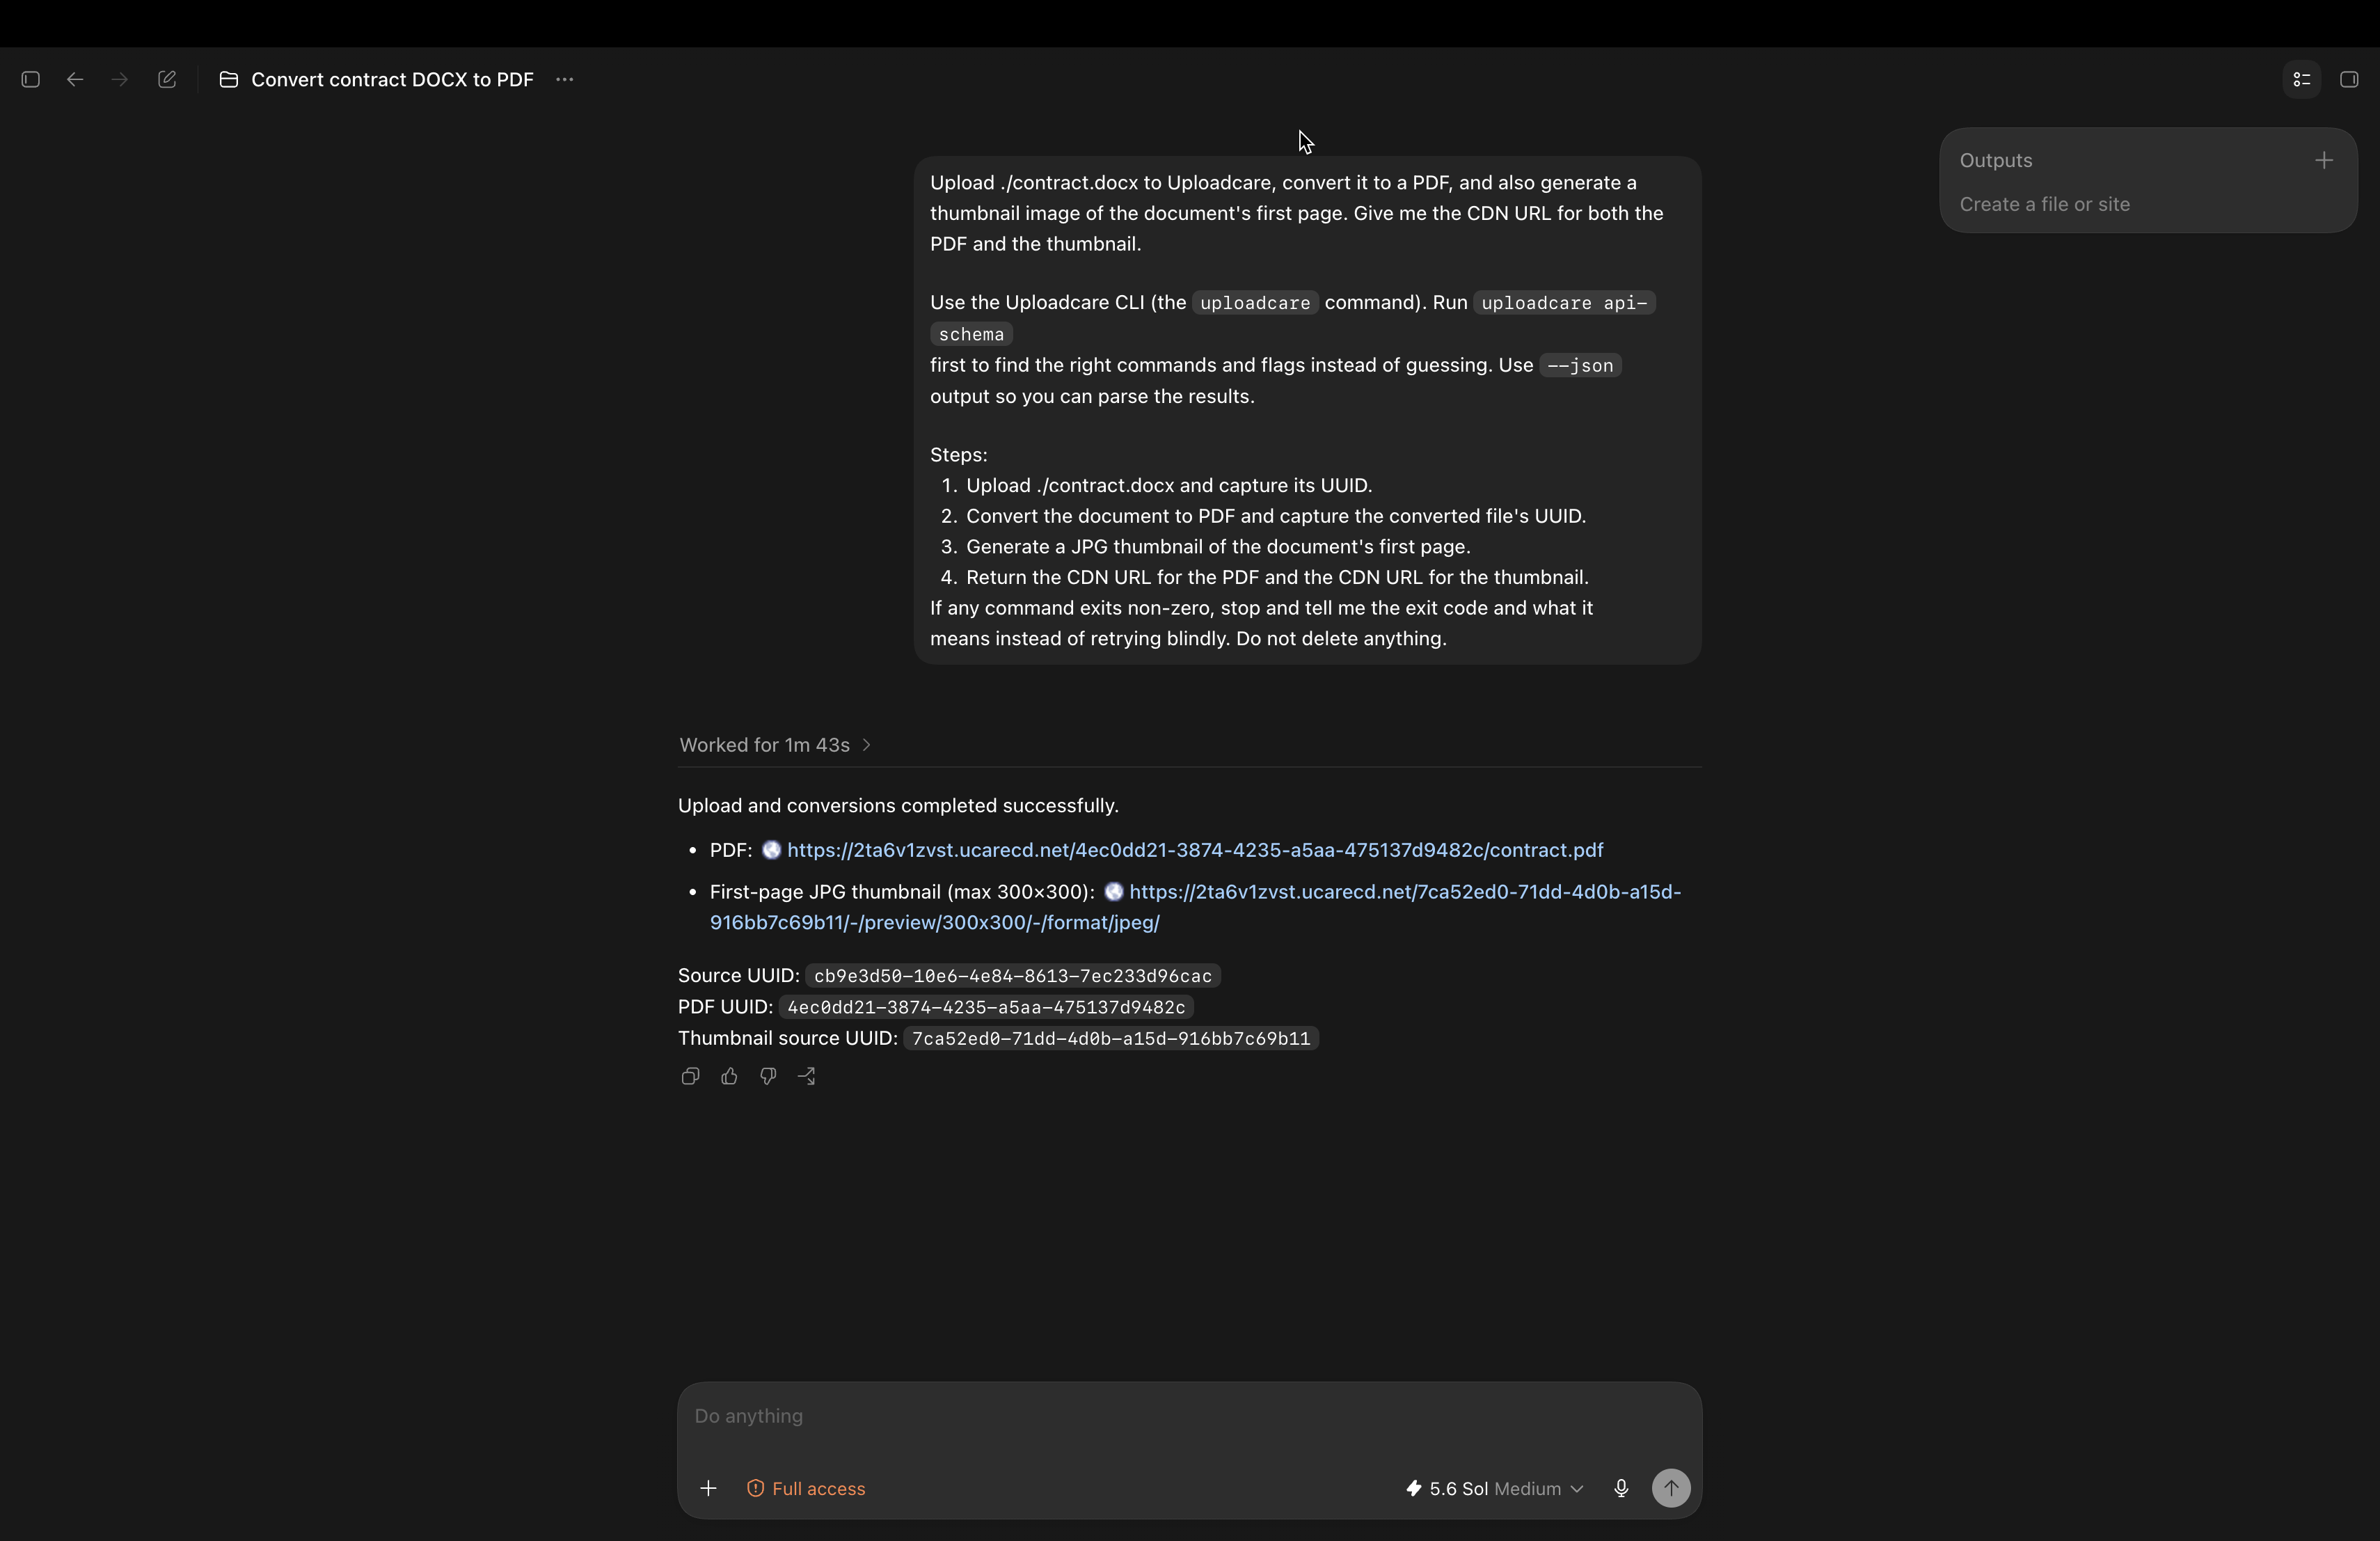 OpenAI Codex running the Uploadcare CLI
OpenAI’s Codex CLI reads an AGENTS.md file for project instructions, the same file Cursor and Copilot use, so you can reuse the instructions from the earlier sections without writing a new one.
Codex runs shell commands inside a sandbox whose autonomy you control with an approval policy. Set your defaults in ~/.codex/config.toml:
approval_policy = "on-request"
sandbox_mode = "workspace-write"

[sandbox_workspace_write]
network_access = true
Here’s what that configuration does:
-
approval_policy = "on-request"lets Codex run the commands it judges safe and pause for your approval on the rest, so reads flow while writes get a checkpoint. -
sandbox_mode = "workspace-write"confines file writes to your project directory while still letting theuploadcarebinary run. -
network_access = trueis the setting to watch: the CLI calls the Uploadcare API over the network, and Codex’s sandbox blocks network access by default. Leave it off anduploadcare file uploadfails with a connection error rather than an approval prompt.
With the sandbox allowed to reach the network, Codex discovers the command surface through api-schema and runs the workflow the same way the other agents do.
Note: The four agents share the same two-part pattern: an instruction file that points at api-schema,
and permission to run the uploadcare binary. Write the instructions once in AGENTS.md and all four can read it.
End-to-end examples: two prompts you can hand your agent
Once the instruction file and terminal permission from the sections above are in place, you don’t spell out the commands yourself.
You describe the goal, and the agent discovers the exact syntax through api-schema.
Here are two realistic tasks, each with the commands the agent runs and a prompt you can paste into any of the four agents.
Example 1: Upload a product image folder
Uploading a whole folder is one command, because the shell expands a glob and the CLI accepts every matched file:
uploadcare file upload ./products/*.jpg --json allThe --json all flag returns one JSON object per file as NDJSON (newline-delimited JSON), one per line,
so the agent reads back every result without parsing a table.
To get each file’s CDN URL, the agent reads the delivery-URL field the CLI reports, confirming the exact field name through api-schema,
rather than building a URL by hand. That keeps the URLs correct for your account, whose delivery domain the CLI already knows.
Here’s the prompt:
Upload every image in the ./products folder to Uploadcare, then give me
a list mapping each original filename to its CDN URL.

Use the Uploadcare CLI for the upload and use the `--json` output so you can parse the results.

Steps:
1. Upload all images in ./products folder
2. Read each uploaded file's CDN URL from the JSON output. Don't hardcode a
   CDN domain; use the delivery URL the CLI reports.
3. Return a table mapping each original filename to its CDN URL.

If any command exits non-zero, stop and tell me the exit code and what it
means instead of retrying blindly. Do not delete anything.
Example 2: Convert a document to PDF with a thumbnail
Document conversion runs as an asynchronous job: the agent submits the source file’s UUID and a target format, and Uploadcare produces a new file with its own UUID. The upload and conversion are two commands:
uploadcare file upload contract.docx --json uuid
uploadcare convert document <uuid> --target-format pdf
For the thumbnail, Uploadcare renders a single document page as an image.
On the delivery side, that’s the file’s CDN URL with the document-conversion operations appended (.../<uuid>/document/-/format/jpg/-/page/1/),
which returns page 1 as a JPG. The agent confirms the exact CLI flags for the target format and page selection through api-schema rather than assuming them.
Here’s the prompt:
Upload ./contract.docx to Uploadcare, convert it to a PDF, and also generate a
thumbnail image of the document's first page. Give me the CDN URL for both the
PDF and the thumbnail.

Use the Uploadcare CLI for the upload and use the `--json` output so you can parse the results.

Steps:
1. Upload ./contract.docx and capture its UUID.
2. Convert the document to PDF and capture the converted file's UUID.
3. Generate a JPG thumbnail of the document's first page.
4. Return the CDN URL for the PDF and the CDN URL for the thumbnail.

If any command exits non-zero, stop and tell me the exit code and what it
means instead of retrying blindly. Do not delete anything.
Both prompts are shaped the same way, and that shape is what the CLI’s design makes possible:
-
Points at
api-schemafirst: the agent verifies the command surface at runtime instead of relying on syntax you typed, so the prompt keeps working as the CLI changes. -
Requires
--json: the agent gets structured output it can parse and thread each UUID from one step to the next. -
Sets a failure rule: it tells the agent to stop on a non-zero exit code and report what it means, which the agent looks up in
api-schemarather than looping on a bad command. -
Draws a safety line: “Do not delete anything” keeps a broadly permissioned agent from taking a destructive step you didn’t ask for.
Swap in your own folder or document, and the same prompts drive any of the four agents.
Conclusion
In this guide, you’ve learned how to connect the Uploadcare CLI to AI agents:
installing the single binary, authenticating with your API keys,
and giving each agent an instruction file that points it at uploadcare api-schema plus a terminal permission to run the command.
You’ve also walked two end-to-end examples where an agent uploads a folder of product images and converts a document to PDF with a thumbnail,
returning CDN URLs without an SDK.
The through-line is that the CLI is self-describing: because the agent reads the command surface from api-schema at runtime,
your setup keeps working as the CLI grows. From here, a few directions to explore:
- Batch migrations: Have the agent combine
--page-all,--from-stdin, and--dry-runto preview and run bulk file operations safely. - CI/CD reuse: Drop the same commands into a GitHub Actions step, where the deterministic exit codes make failures easy to catch.
- Metadata-driven workflows: Use
uploadcare metadata setandgetso the agent can tag and later find files by environment or source.
To get started, Install the Uploadcare CLI, point your agent at it, and sign up for a free account to get your API keys. The full command reference is available in the CLI documentation.
Frequently asked questions
Which AI coding agents work with the Uploadcare CLI?
Any agent that can run shell commands. That includes Cursor, Claude Code, GitHub Copilot, and OpenAI Codex, plus any LLM-based tool that shells out to a subprocess. Because the CLI is a single binary with deterministic exit codes and JSON output, it behaves the same whether a human or an agent runs it.
How does the agent know which Uploadcare commands are available?
It runs uploadcare api-schema, which outputs the full CLI surface as JSON:
every command path, its flags and arguments, the JSON fields each command can return, and agent-specific usage guidance.
The agent reads that schema instead of guessing method names or parsing help text, so it composes valid commands on the first try.
Do I need a wrapper, plugin, or SDK to use the CLI with an agent?
No. The CLI is a standalone binary. You install it, export your API keys, and let the agent invoke it.
There’s no SDK to import and no plugin to maintain. The agent calls uploadcare the same way it would call git or curl.
What happens if the agent runs a destructive operation?
For destructive commands like file delete, add the --dry-run flag to preview the effect before anything changes.
Combined with your agent’s own command approval or auto-run allowlist,
you can require confirmation for writes and deletes while letting read-only commands run freely.
Can I use the same CLI commands in CI/CD?
Yes. The commands that work in an agent’s terminal work unchanged in a shell script or a GitHub Actions step.
The deterministic exit codes (0 success, 1 API error, 2 usage error, 3 auth error) let a pipeline branch on failure without parsing output,
so the same file workflow serves both your agent and your build.