Uploadcare vs Cloudinary: Review & comparison
Last edited:
The specialized term “image CDN” has been out there for quite a while now. Certain industry standards have developed over time, and lots of services are going head-to-head offering similar features. Or are they so similar?
In this article, I’m going to put Uploadcare and Cloudinary — two prominent players — to the test to find out which one you may want to go with. This post is not meant to contain lots of tables comparing all the possible features of both products with green ticks. Instead, we’ll use a real-life example, see what approaches Cloudinary and Uploadcare offer, and compare them.
Sample objective
There are several types of media that can be used on the internet. Both Uploadcare and Cloudinary actively promote their Image CDN and image optimization services, and for good reason: according to HTTP Archive, since 2018, the average total desktop page size has been 2062 kilobytes. Images take on average 973 kilobytes of that, which is 47% of total page weight.
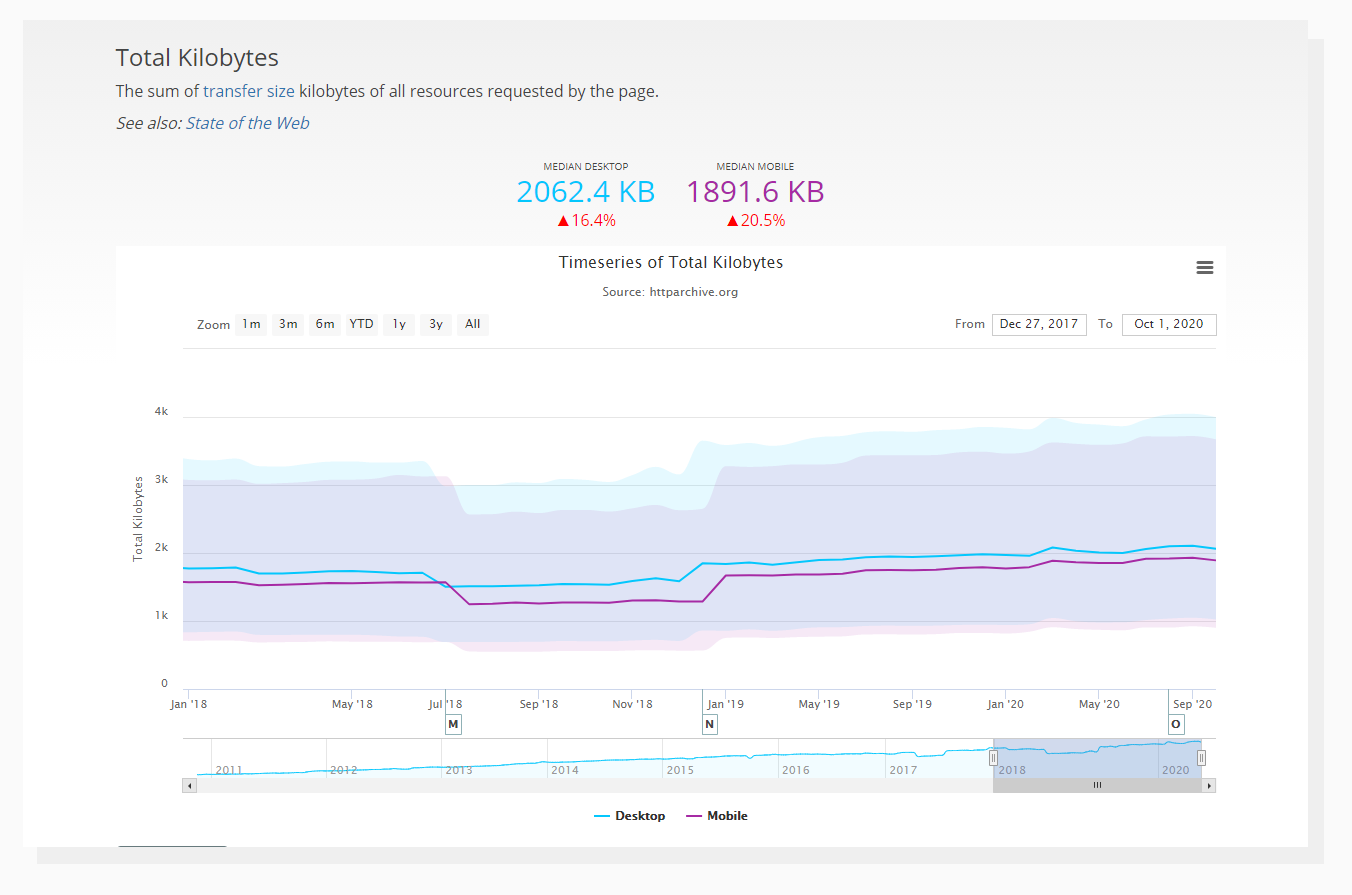 Average total page size, including all resources.
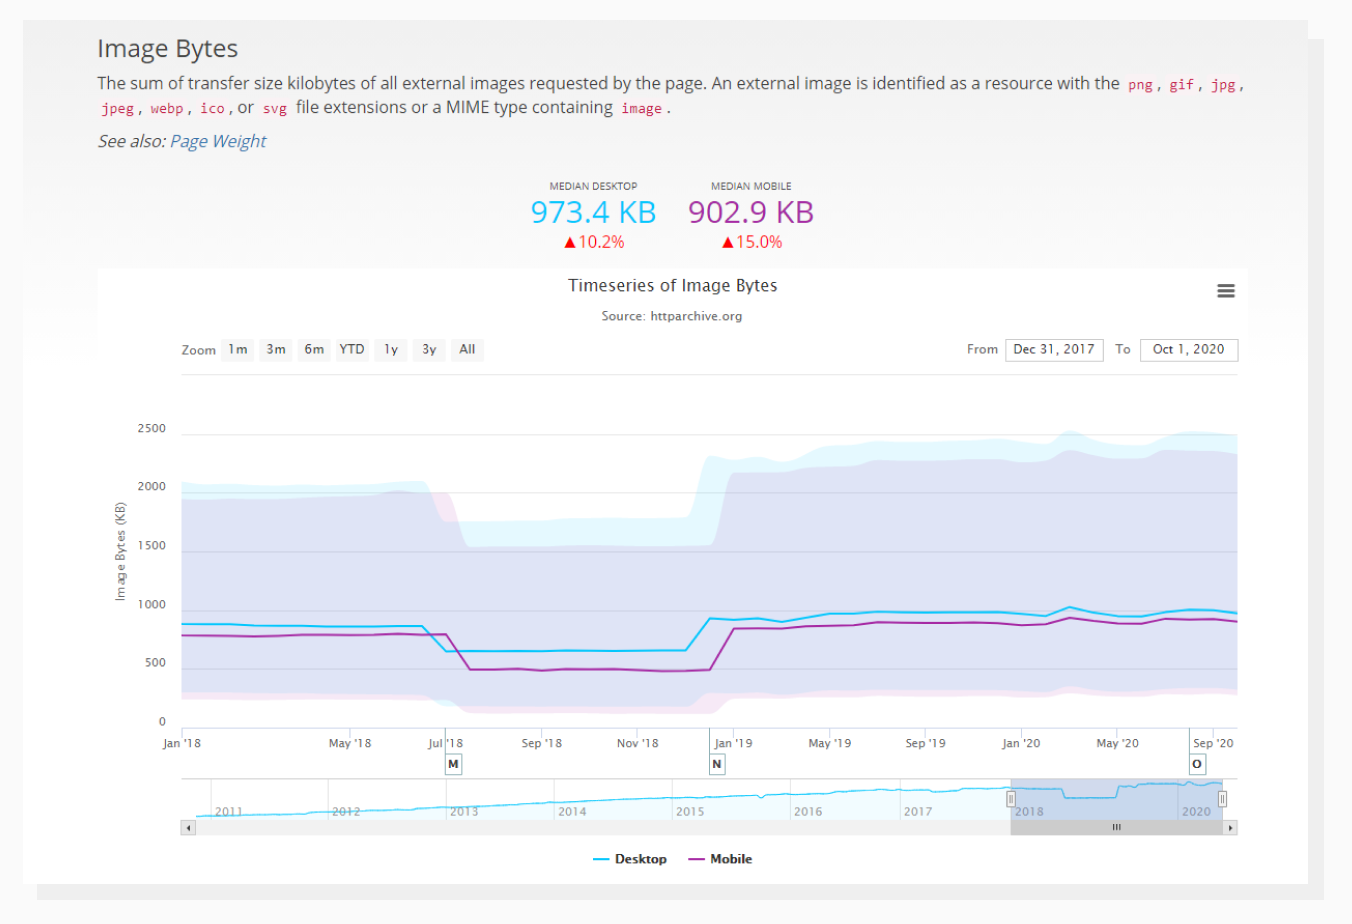 The average size of all images requested by a page.
With this in mind, let’s choose image hosting and optimization as the main priority for this comparison.
Preparing the test
Let’s think of real-life examples of websites that usually have many images of various sizes. From my experience, ecommerce-related websites usually contain photos of products on the main page (in a grid-like arrangement) and sometimes a “hero” image on the first screen that’s bigger than the rest.
For this analysis, I decided to use a free ecommerce HTML template by HTML Codex distributed with a Creative Commons license.
 Our test website.
The images that come with the template are already compressed pretty heavily both in terms of dimensions and file size, so I used a TinEye reverse image search to find the originals.
1. Uploading files
It all starts with getting your assets out there. Both services provide various methods of uploading files, but this time we’re going to use manual upload via GUI, which is perhaps the most straightforward way to get your local files to the cloud.
Cloudinary
Let’s see how Cloudinary welcomes us.
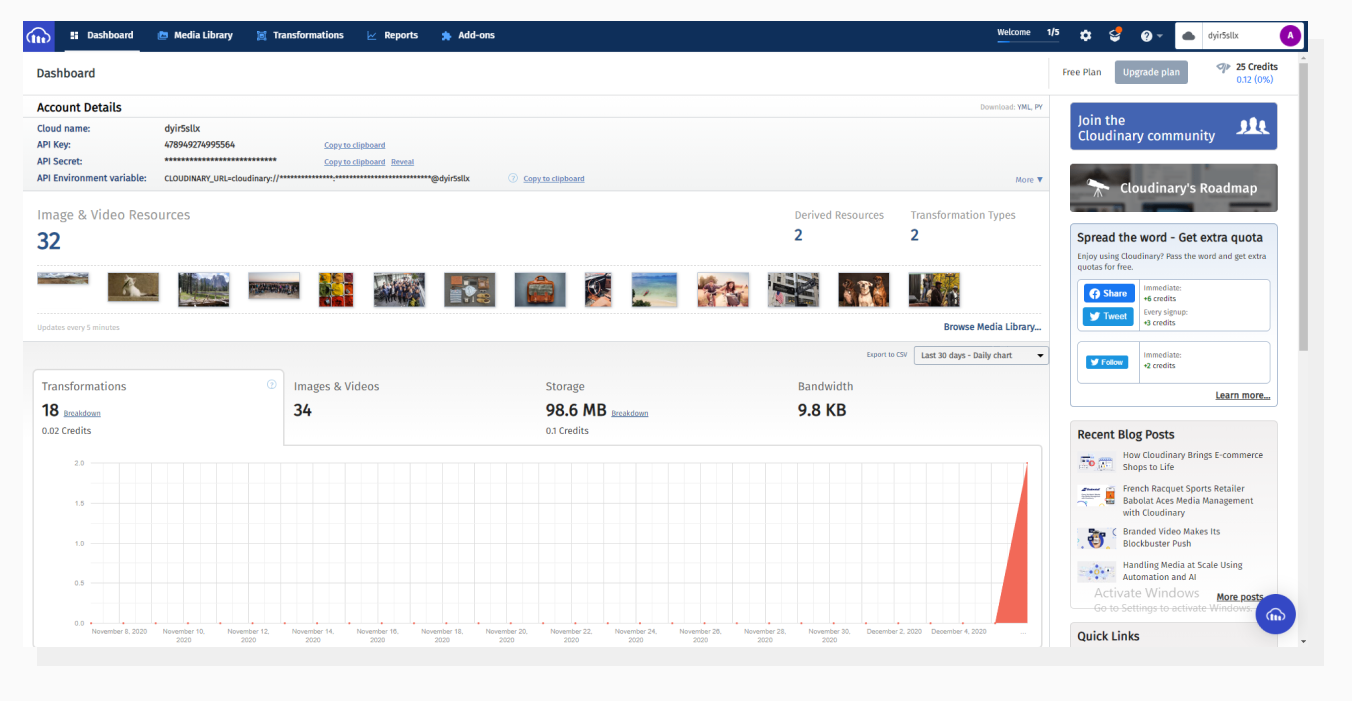 When you log into Cloudinary, you’re welcomed with this Dashboard.
Above is a screenshot of the Cloudinary Dashboard. Initially, there was no data, but once I navigated to the Media Library tab on the top, some statistics started being collected. It seems that generating thumbnails for sample images (which exist in Cloudinary by default) consumes some resources and may potentially affect billing. Not to worry now though, since we’re using free trial plans for this comparison.
To access the File Uploader interface, we need to navigate to the Media Library at the top and then click Upload. A window will pop up, inviting us to upload images.
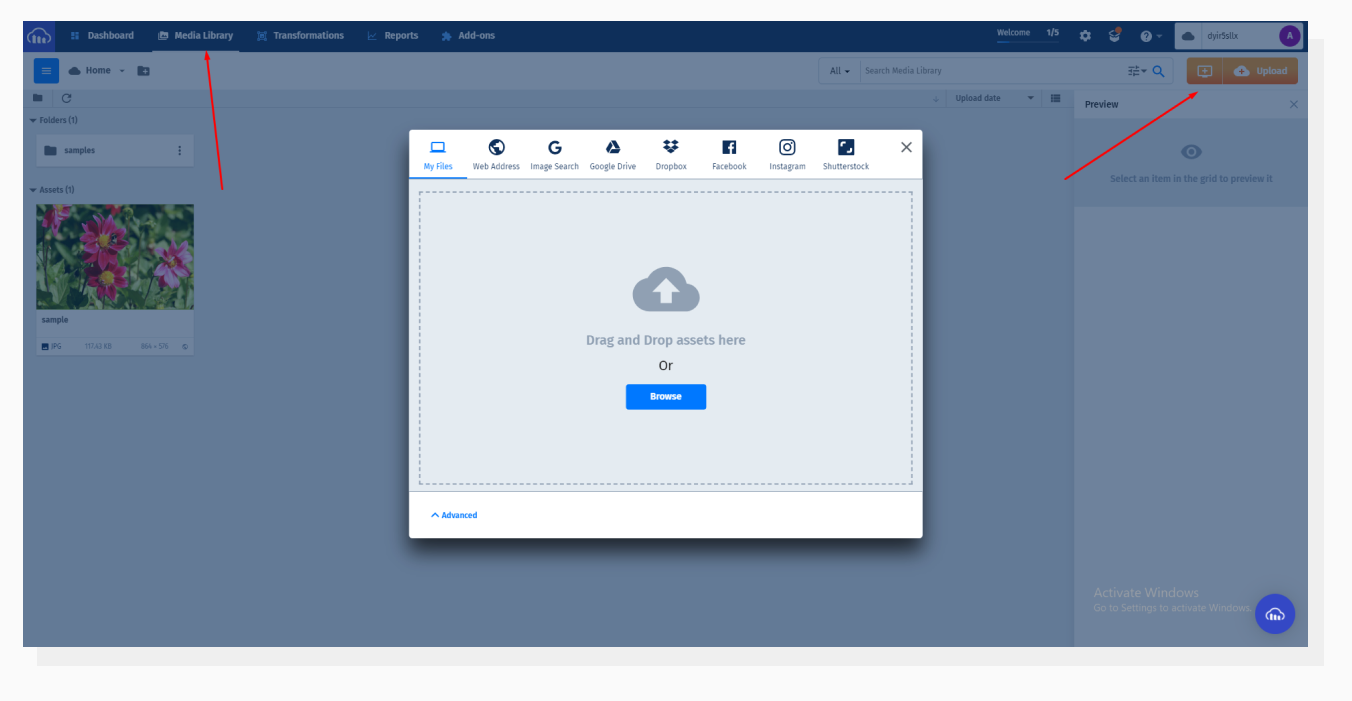 Cloudinary Dashboard. File Uploader.
In our case, we have files on the hard drive that are ready to be uploaded. Lots of websites are in this position, i.e. with files hosted somewhere in local or remote storage. But this is not always the case. Here’s how Cloudinary allows you to upload files:
- My Files — Upload files from your computer using the Browse button or by dragging items into the uploader.
- Web Address — Upload a file by providing a direct link to it, e.g. a public URL of an image that is placed on your hosting.
- Image Search — Search the Web for images without leaving the uploader. Also, there’s a selector where you can define usage rights: for example, “free to use, share or modify.”
- Google Drive — Connect your Google Drive account to take images from there.
- Dropbox — Same logic but for Dropbox.
- Facebook — Upload files from your Facebook account.
- Instagram — Same for Instagram.
- Shutterstock ��— Access and use your Shutterstock assets from this tab.
While all of this can be useful, we’re going to stick with My Files, as mentioned before.
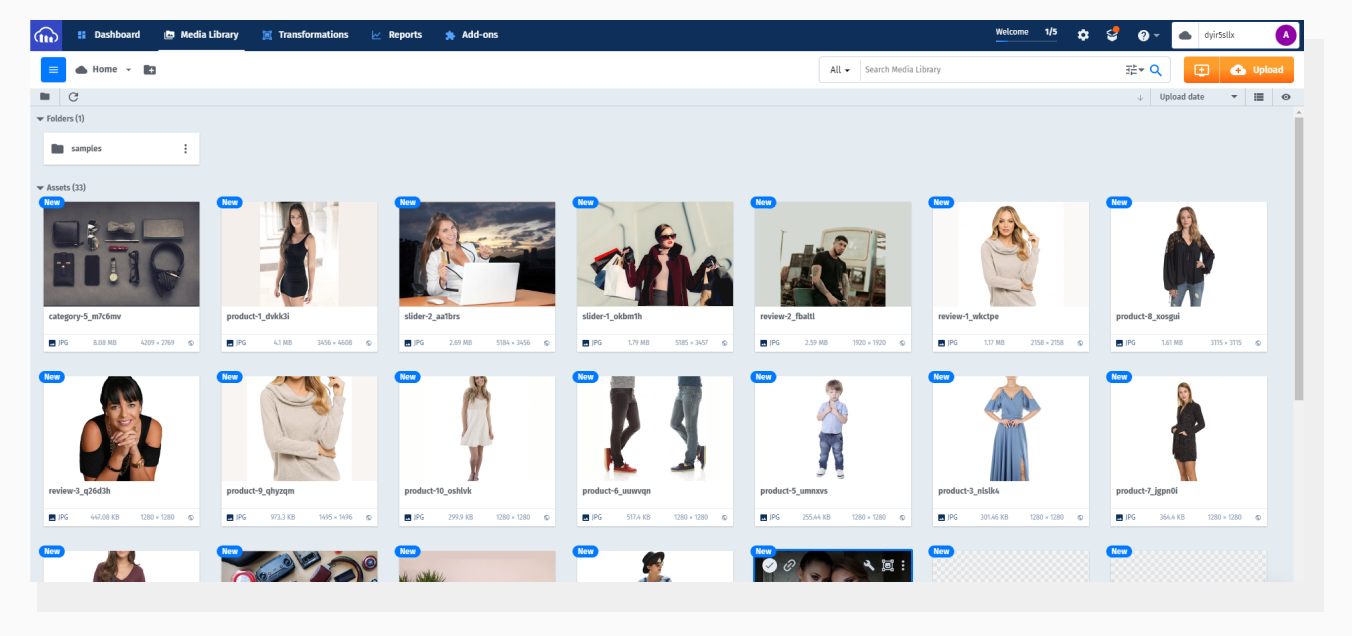 Uploaded images are placed in a grid in “File Manager”-ish style.
Our images have been uploaded, and what I notice right away is that they’ve been renamed: six-character random strings have been added to each file name. From a developer's perspective, I assume that this is done to eliminate file name collisions.
Uploadcare
This is how Uploadcare greets us.
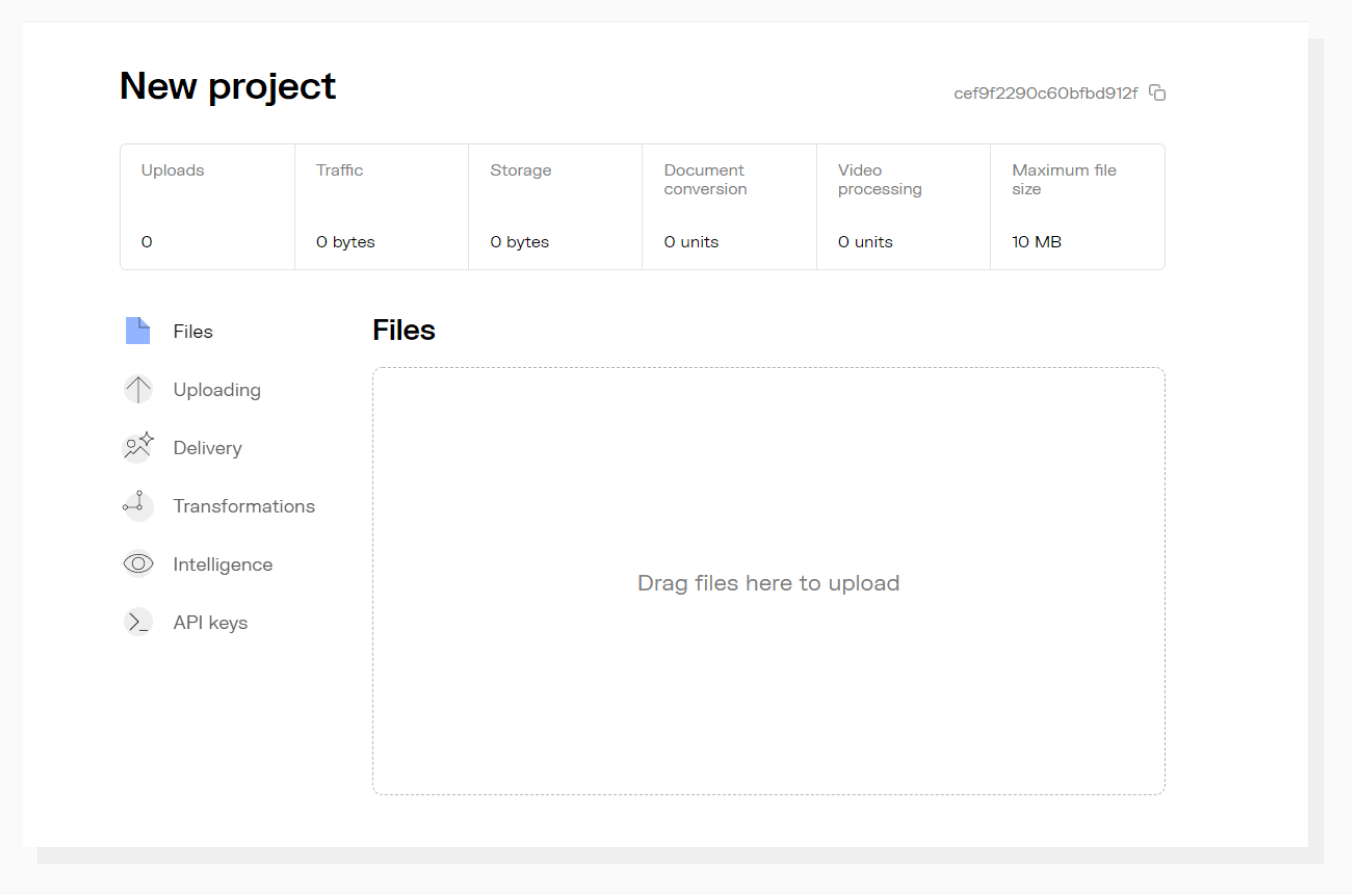 The Uploadcare Dashboard: the first thing you see when you log in.
This is how Uploadcare greets us. Contrary to Cloudinary. Uploadcare offers a lighter interface with core metrics prominently displayed. As a fan of “less is more,” I personally prefer this type of UX to the previous one.
We can upload files right away by dragging items to the Files section, but let’s click on it to see the whole range of options Uploadcare has to offer and compare them to Cloudinary.
 Uploadcare Dashboard. File Uploader.
Here are the options Uploadcare has to offer:
- Local Files — Browse or drag-and-drop files from your computer.
- Camera — Take photos and videos from your camera and push them directly to the Uploadcare Library without leaving the uploader widget.
- Direct Link — Put a direct link to a public file hosted somewhere.
- Facebook — connect your Facebook account and use photos from there.
- Google Drive — Upload files from Google Drive by connecting your account.
- Google Photos — Similar to the previous option, but this time it connects to Google Photos to let you choose media from there.
- Dropbox — Get files from your Dropbox.
- Instagram — Connect your Instagram and get media from there.
- Evernote — Get files from your Evernote account.
- Flickr — Get files from your Flickr account.
- OneDrive — Get files from Microsoft OneDrive.
Let’s use Local Files again.
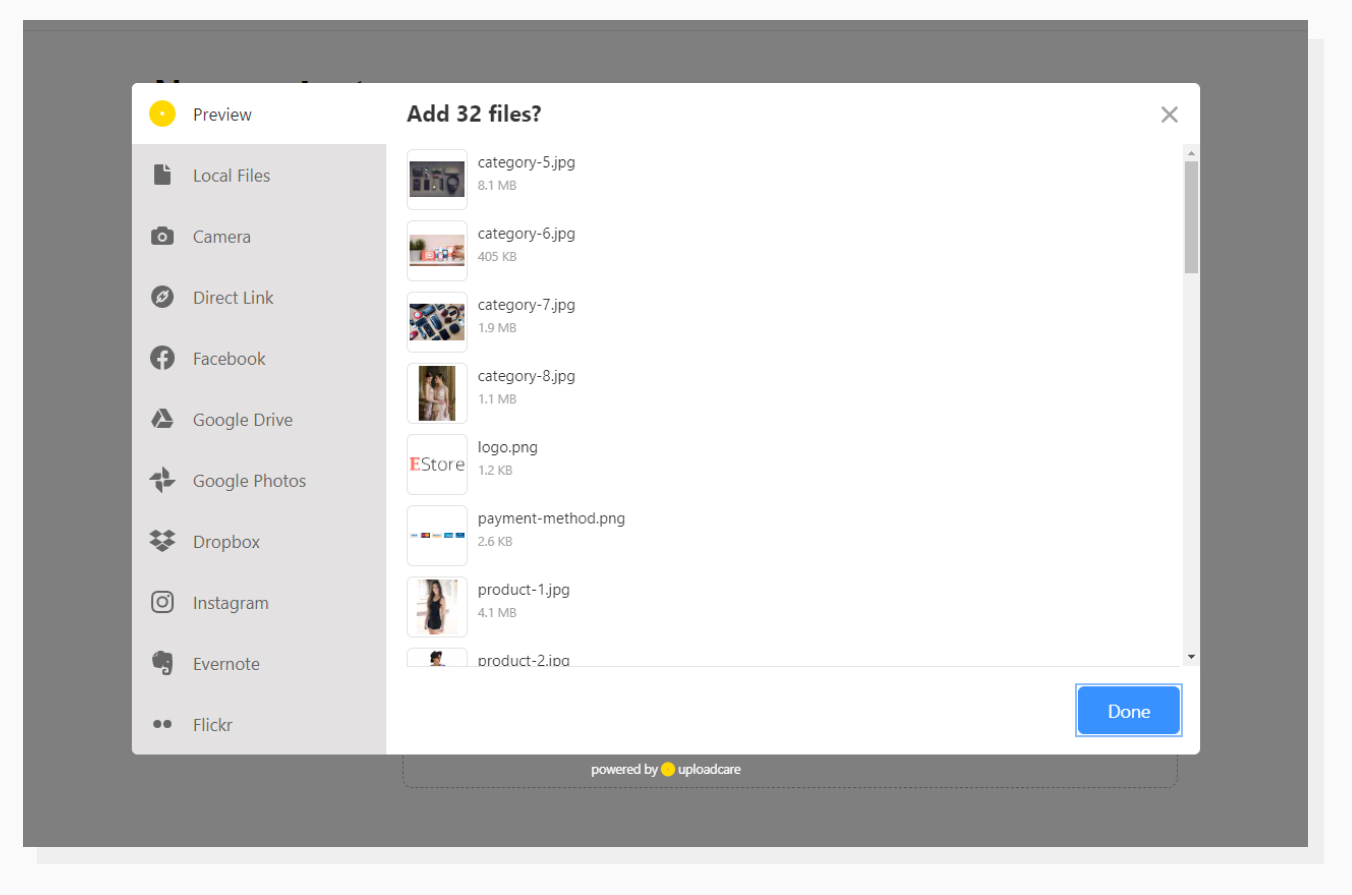 Uploadcare File Uploader lets you review the files.
Uploadcare File Uploader seems to be a bit more verbose than the Cloudinary one. When an upload is in progress, it shows progress bars for each item and asks you “Add X files?” when done. I did a little experiment here: if you haven’t clicked Done yet and go to the dashboard in a separate tab, you’ll see that the files are already there. It seems that this prompt window is just a visual way of interacting with the user; the files are uploaded anyway once dropped to the window.
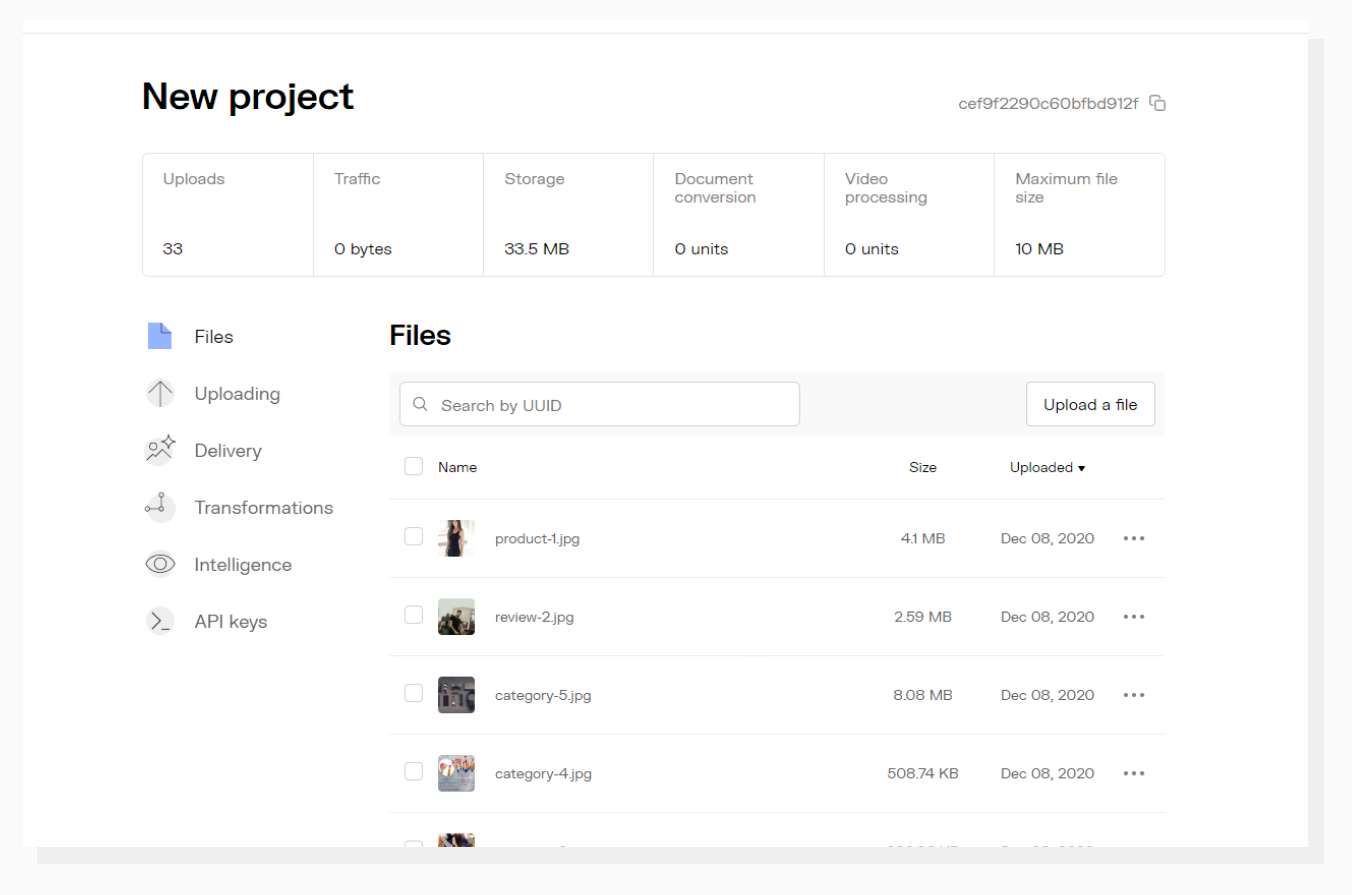 All uploaded files are placed in rows with core data displayed.
Uploading conclusion
Both providers offer various means of uploading files. The most important thing here is that all standard methods are implemented in both Uploadcare and Cloudinary. UX-wise, Uploadcare seems lighter and less overwhelming than Cloudinary.
2. Delivery
Now that our images are uploaded, the next step is to go to the ecommerce template and swap the existing image links with the ones provided by the service. I created two versions of the same test website: one for Cloudinary and another for Uploadcare. Down the road, we’ll need to monitor the performance of both services, so let’s come up with an initial benchmark to compare with:
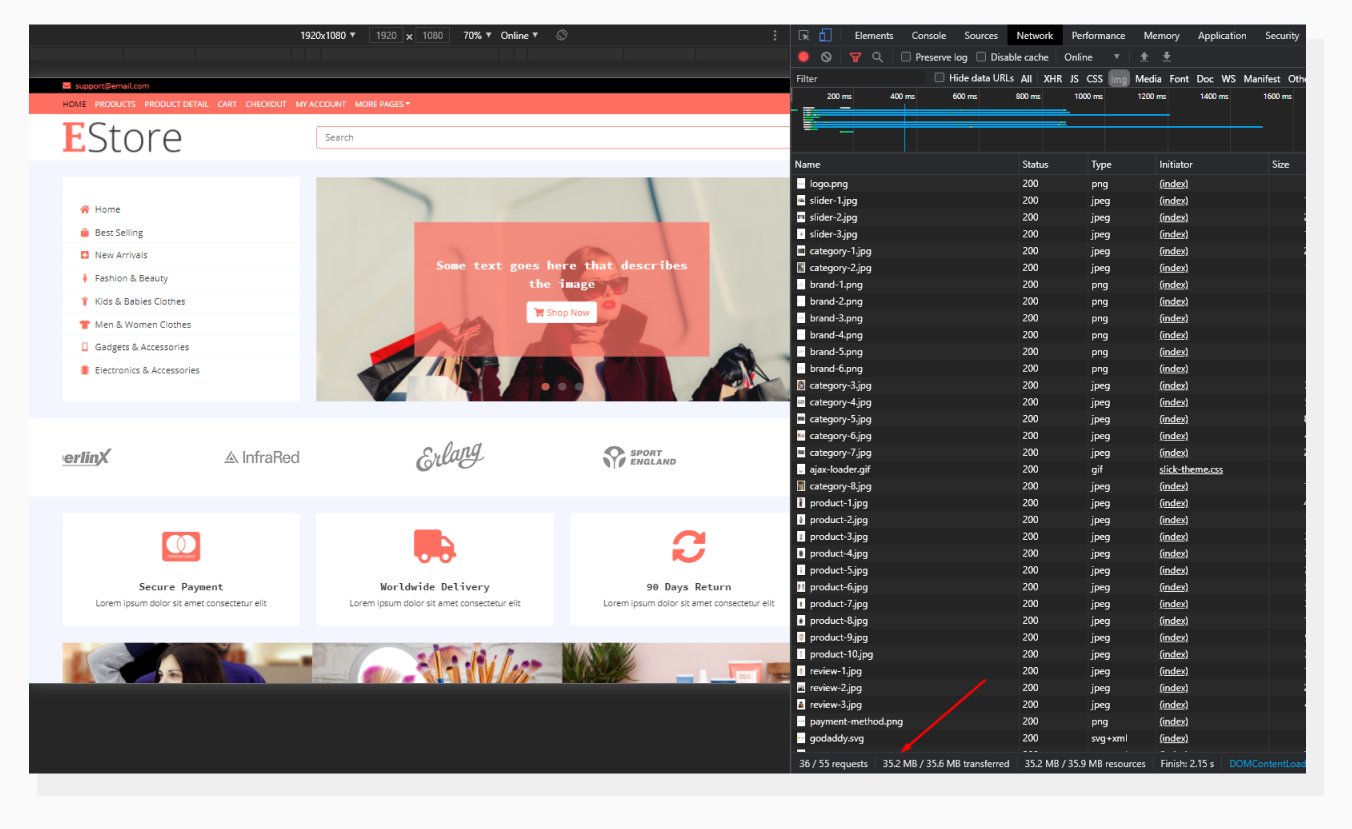 A list of all the images fetched by the page.
Above, you can see that our initial page version requests local images with a total size of 35.2 megabytes, which is quite a high number for a single page. In this part of the experiment, we’ll swap the original images with the ones we uploaded, and then see what options the services offer to reduce network load. Delivering optimized images is one of the core functions of image CDNs. If you don’t need such a feature, you could just use a regular file CDN.
Another thing to mention is that we will be using only JPG and PNG files as source images. SVG files in general — and the Slick Slider loader GIF in this template — are pretty small and will be hosted locally.
With this in mind, let’s scan through the available automated compression methods.
Cloudinary
According to Cloudinary’s documentation, it’s possible to configure the CDN to automatically decide which compression ratio to use when delivering an image.
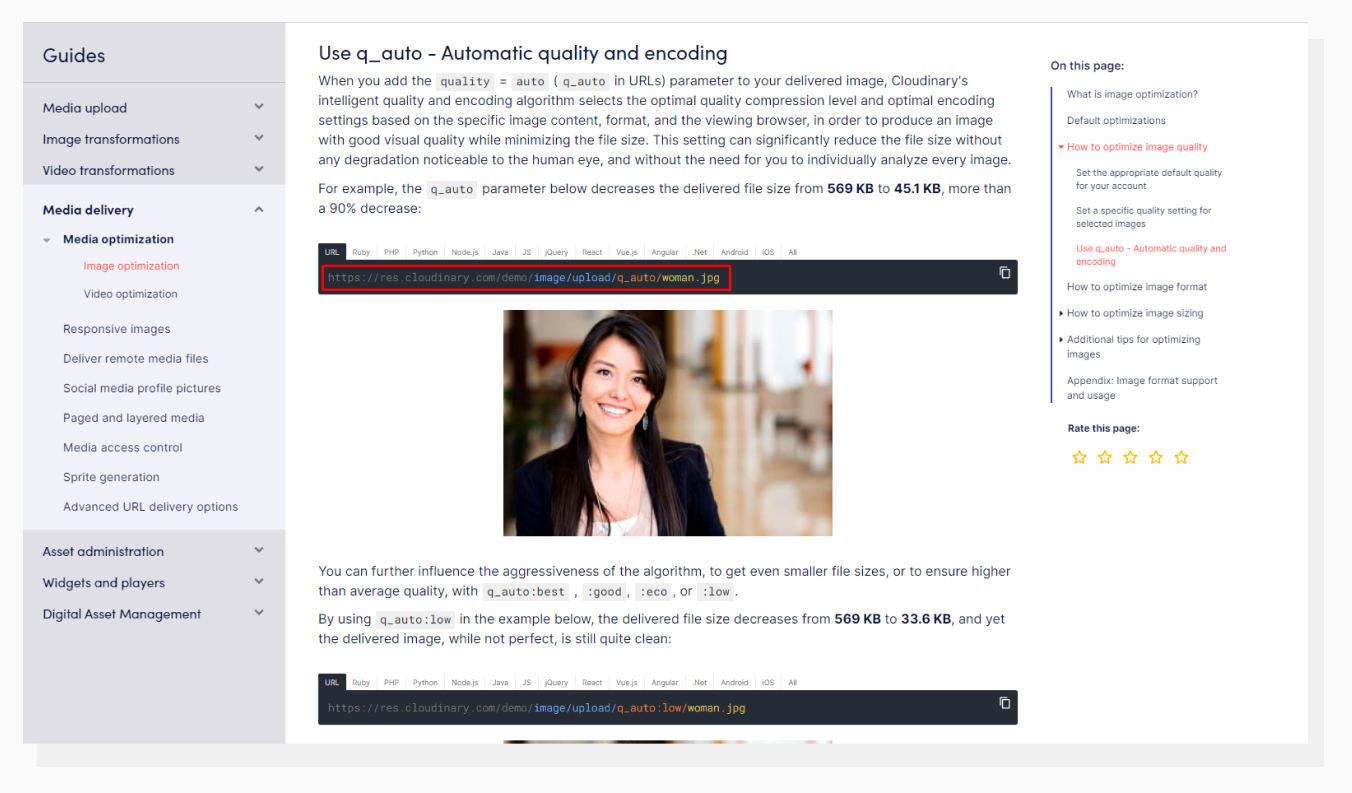 Use “q_auto” to tell the CDN to serve an automatically optimized image.
Cloudinary states that it uses its intelligent quality and encoding algorithm to select parameters based on image content, format, and viewing browser.
Let’s swap the local files with the remote ones using this URL pattern and then take a look at the Network tab again.
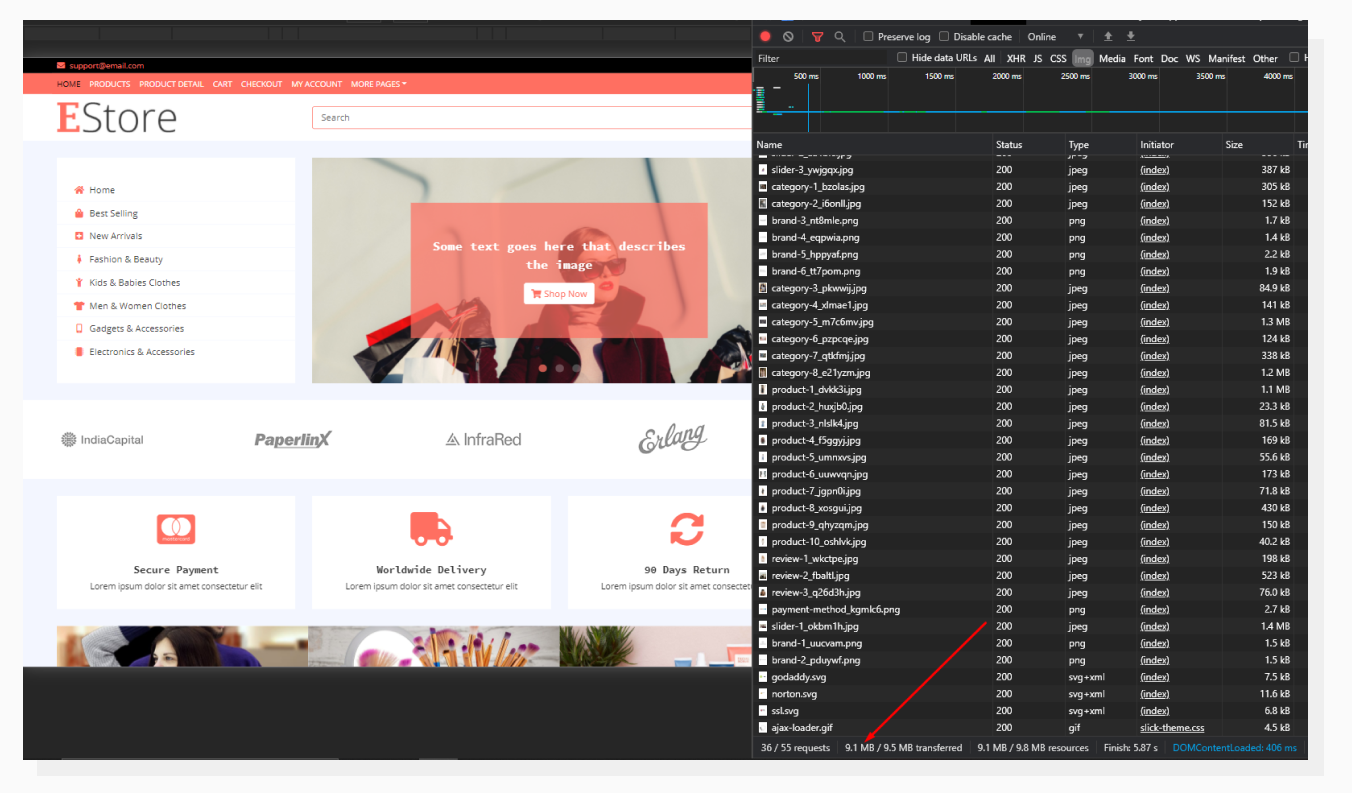 Images with same dimensions, compressed with “q_auto” parameter.
As expected, we see an improvement here. Now, instead of 35.2 MB of image data, the browser downloads only 9.1 MB of graphic resources. This is 74% less than the benchmark.
Uploadcare
Uploadcare has a similar “auto” feature called “smart” quality. It compresses images in a content-aware fashion (like Cloudinary does) but in addition to this, Uploadcare can convert your images to a more suitable format.
For example, if your image is in JPEG format, it can convert the image to WEBP, a new format developed by Google that has better compression settings. To do this, you would need to set “format” to “auto” and “quality” to “smart” in the URL.
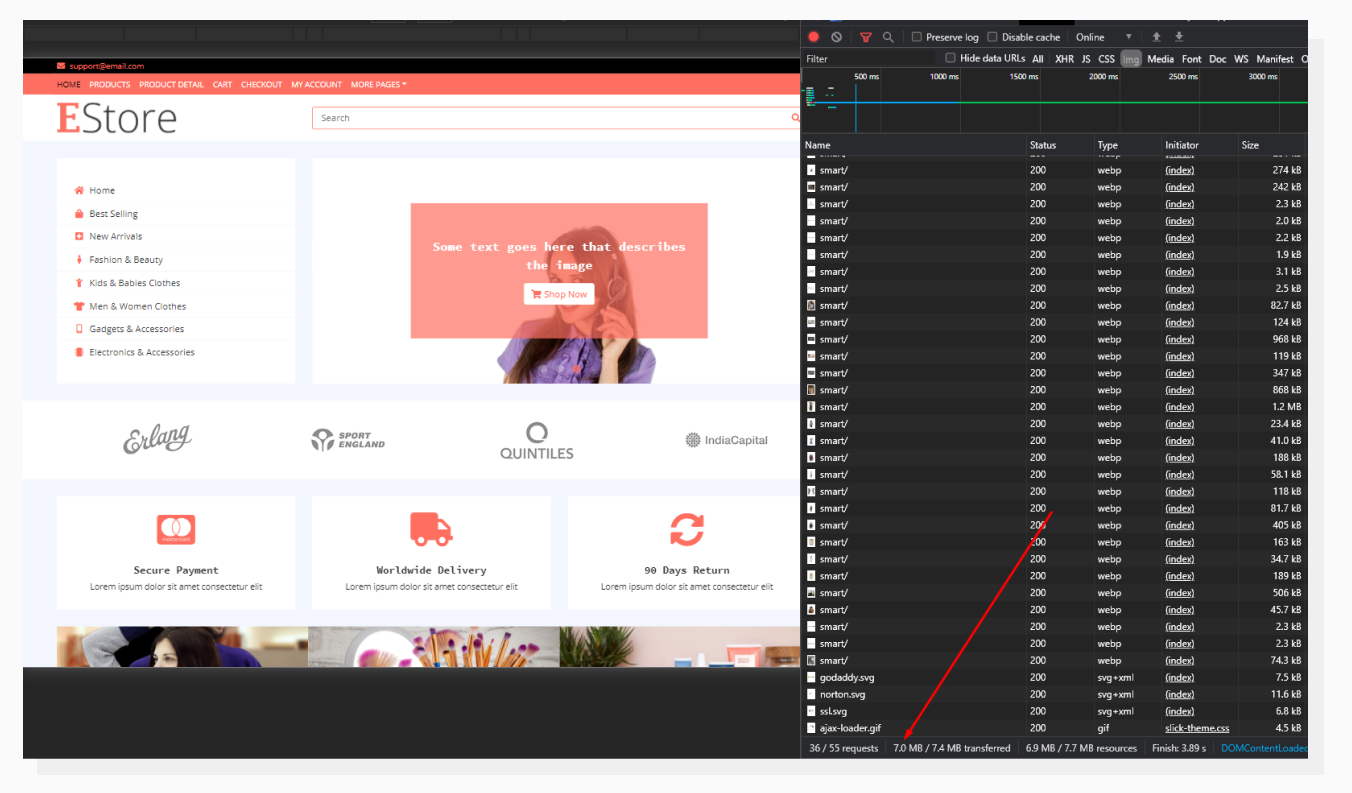 Images with same dimensions with “format” set to “auto” and “quality” to “smart”.
This time 7.0 MB is transferred over the network, which is an 80% improvement.
Delivery conclusion
While both services did a great job optimizing images, I think Uploadcare provided better results. It did compress images slightly more effectively in terms of file size (80% improvement vs 74%), but that’s not the only reason. Automatically converting images to suitable formats opens doors to bigger improvements for different image content. (I also checked Internet Explorer 11 during my standard browser check — developers know the struggle.)
3. Responsive images
So now we have our CDNs hosting images and providing optimized versions. What else can we expect?
There are several other things that modern CDNs can do with images (transformations, cropping, effects, overlays), but here’s what’s more crucial.
We need to make sure the images look great and load fast on every device, especially mobile devices. To test that functionality, I intentionally didn’t manually resize any of the images. On the contrary: I searched for high-resolution source images, since this is what usually happens when lots of images are being uploaded to a website without active moderation.
When talking about different screen sizes and device aspect ratios, the term “responsive images” is used.
This is a technique that lets a developer provide a set of URLs instead of just a single direct link to a file. Each of these URLs points to a different-sized version of the image. As a result, a mobile with a small screen wouldn’t need to load a 4K desktop image.
Obviously, creating a srcset (an attribute used to define a set of responsive images) manually for each image is not an option in our case. For example, below is a screenshot of Shopify generating 10 assets for each image:
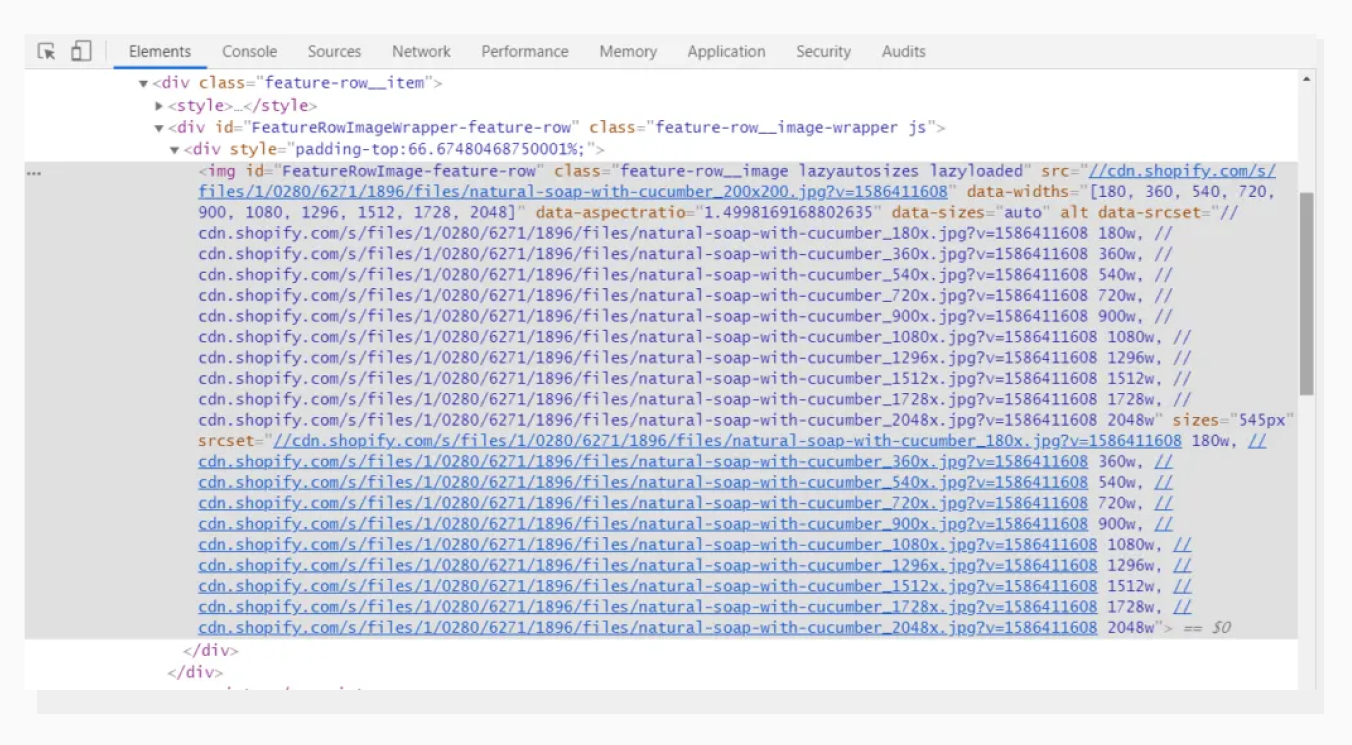 Long HTML code for every image at Shopify.
Do these image CDN providers offer automated solutions to this problem? Let’s check.
Cloudinary
There is a Javascript solution by Cloudinary. What you need to do is to upload a hi-res image to Cloudinary, and then the script will:
- Deliver an image scaled to the appropriate resolution;
- Monitor browser window resize and provide an updated image (100px interval by default)
- If the browser is scaled down, the image will simply be scaled down as well, instead of downloading a smaller image.
The complete tutorial is published on Cloudinary Docs, but here’s a basic description of the steps:
- Change all
srcattributes of images todata-src. - Add
cld-responsiveclass to all<img>tags. - Include the Cloudinary script in the page’s code.
- Put links to images hosted on Cloudinary with auto width and crop parameters.
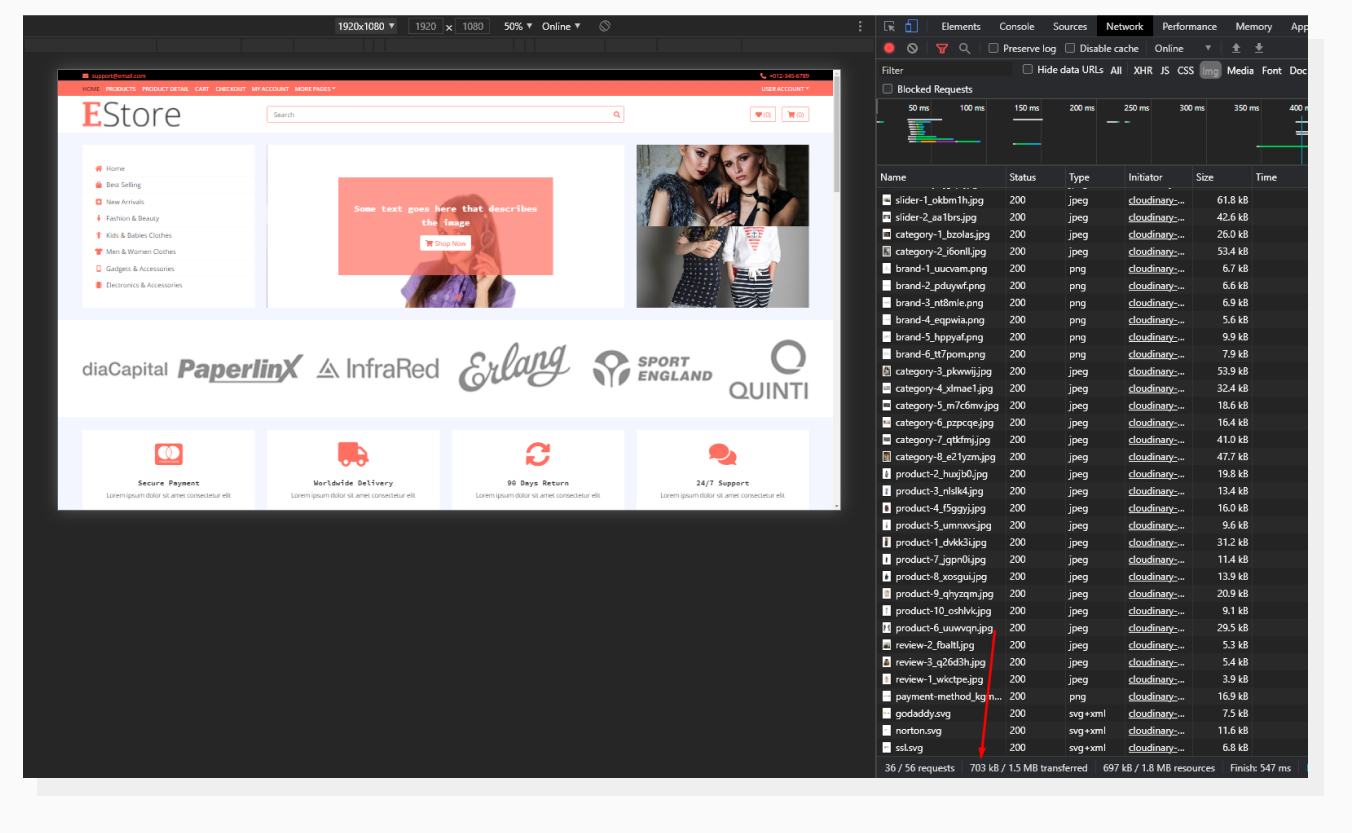 Cloudinary Responsive Images on FullHD screen, DPI: 1.
The file sizes have been reduced. In fact, the image dimensions have shrunk to become very close to the image container. For example, if the main slider width is 835px then a 900px image is loaded.
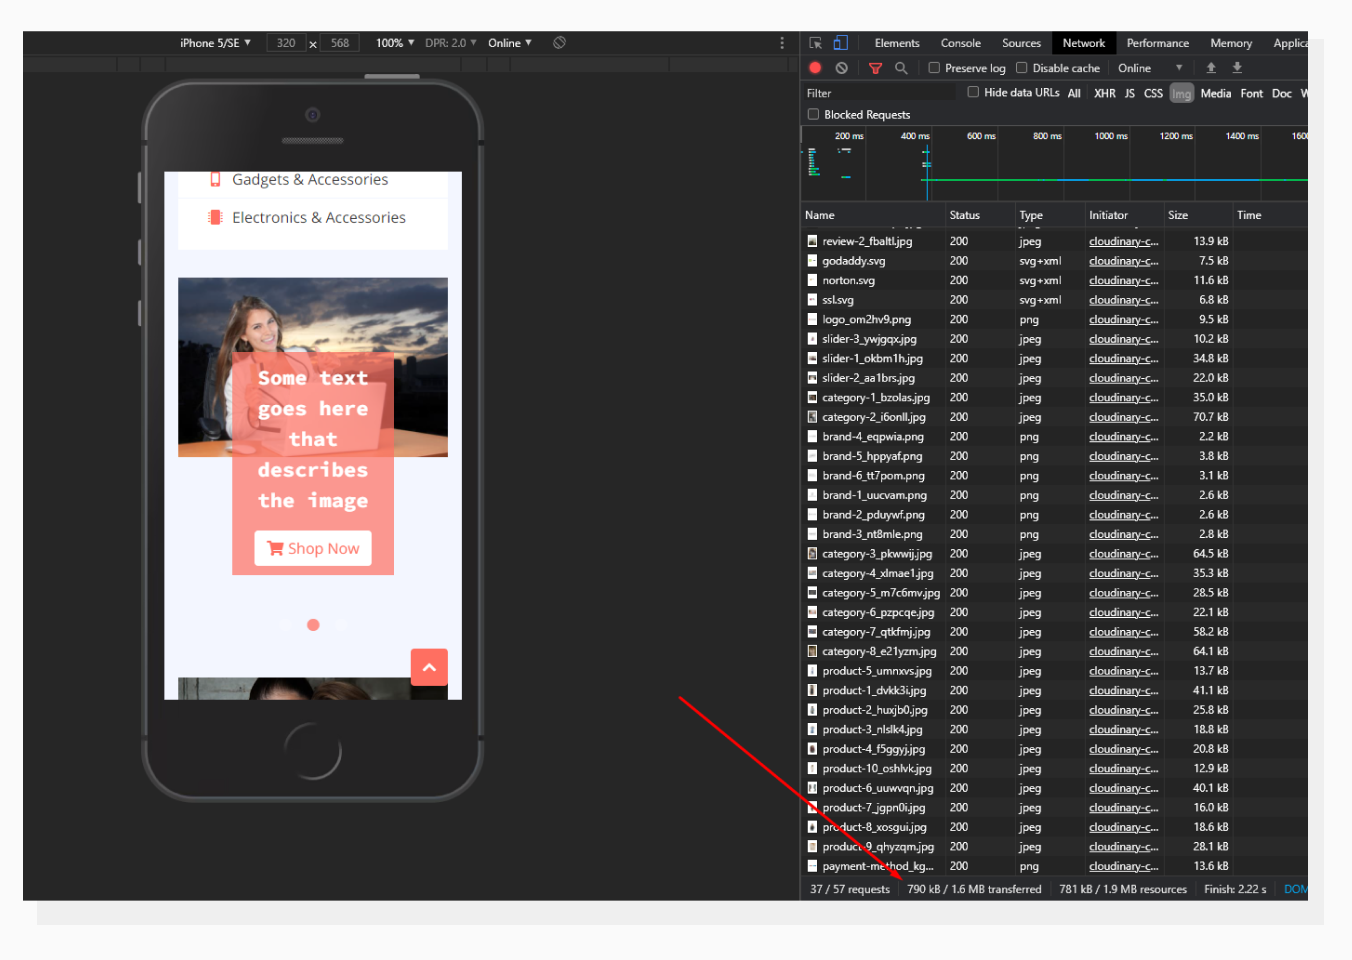 Cloudinary Responsive Images on a mobile screen, DPI: 2.
Mobile images have different sizes (usually smaller) and their sizes differ, and this is also reflected in the developer's console. This time the sizes don’t differ much despite the fact that this is a mobile device. Retina screens (like on the emulator above) have high pixel density and require bigger images to take full advantage of screen DPI.
Uploadcare
Uploadcare has their own method of delivering responsive images called Adaptive Delivery. At first glance, the method is pretty similar:
- Paste the Uploadcare script in the page’s code.
- Change
srctodata-blink-src. - Put links to images with the new attribute.
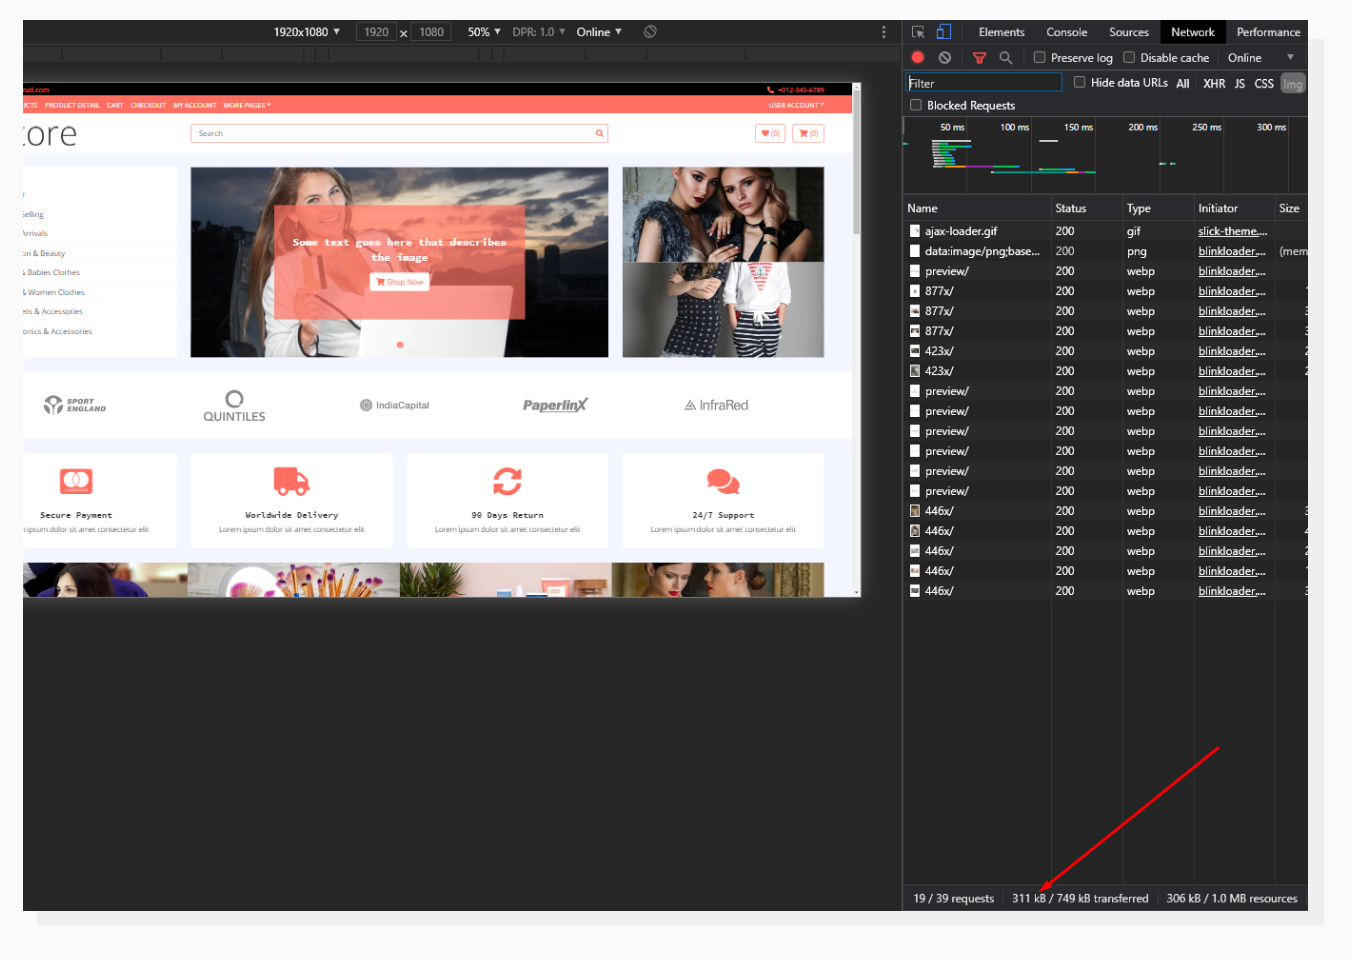 Adaptive Delivery on FullHD screen, DPI: 1.
Here, only 311 KB of images are transferred via the network. But why not more? Because in addition to image optimization, Adaptive Delivery defers loading off-screen images until they’re visible, making the page faster (lazy loading).
Cloudinary requests the closest image size rounded up to a bigger number. Uploadcare’s Adaptive Delivery requests the exact image width. For example, if the slider in the middle is 877 pixels wide (assuming that the DPI is 1), the requested image will have the exact same dimensions (i.e., width is 877 pixels).
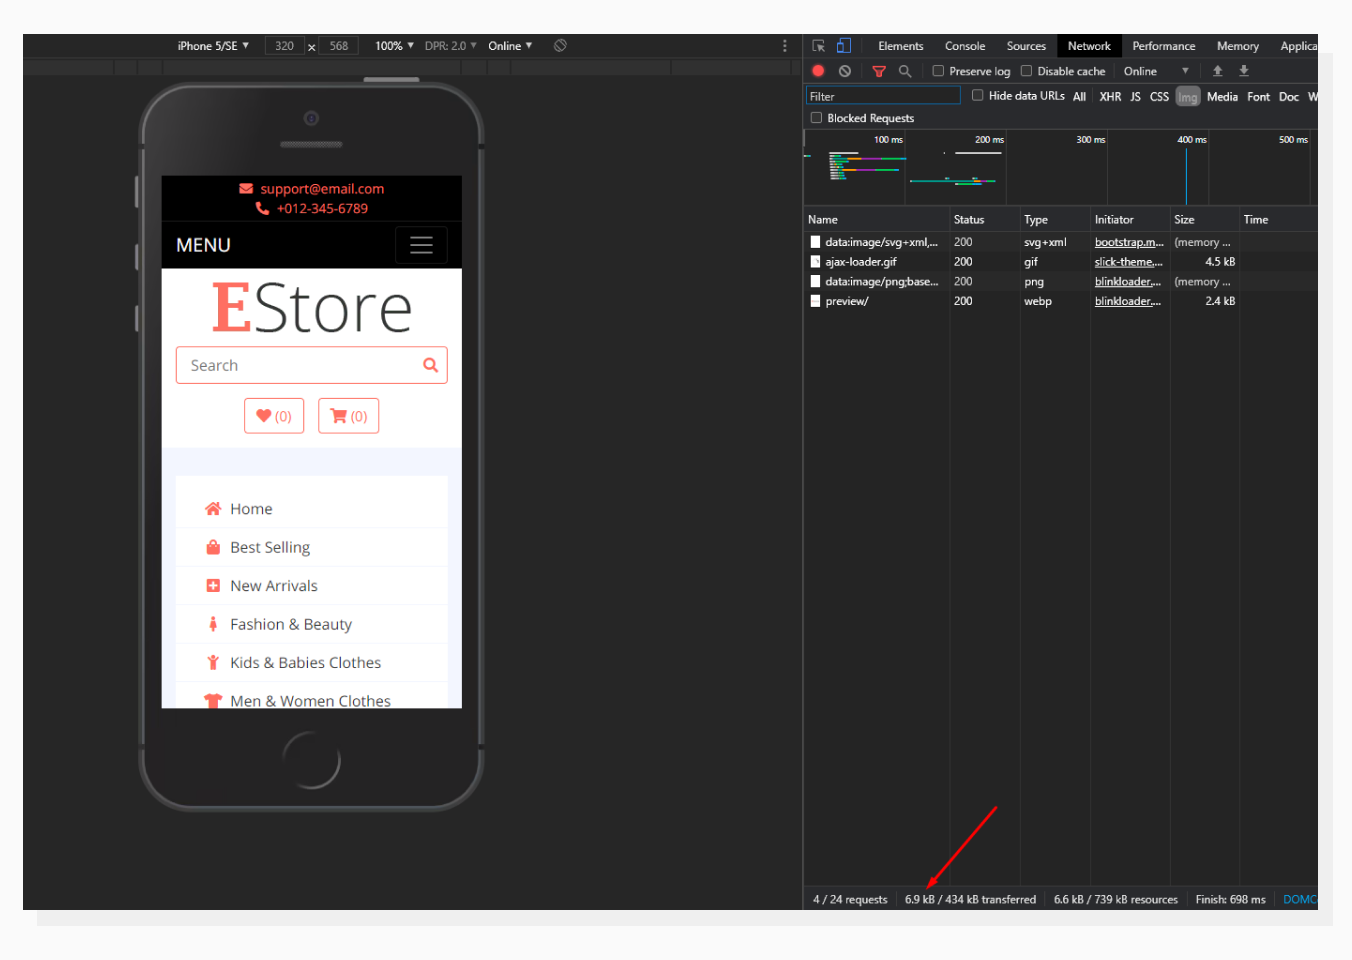 Adaptive Delivery on a mobile screen, DPI: 2.
Here, only a few images are loaded. When scrolled to, new images are loaded.
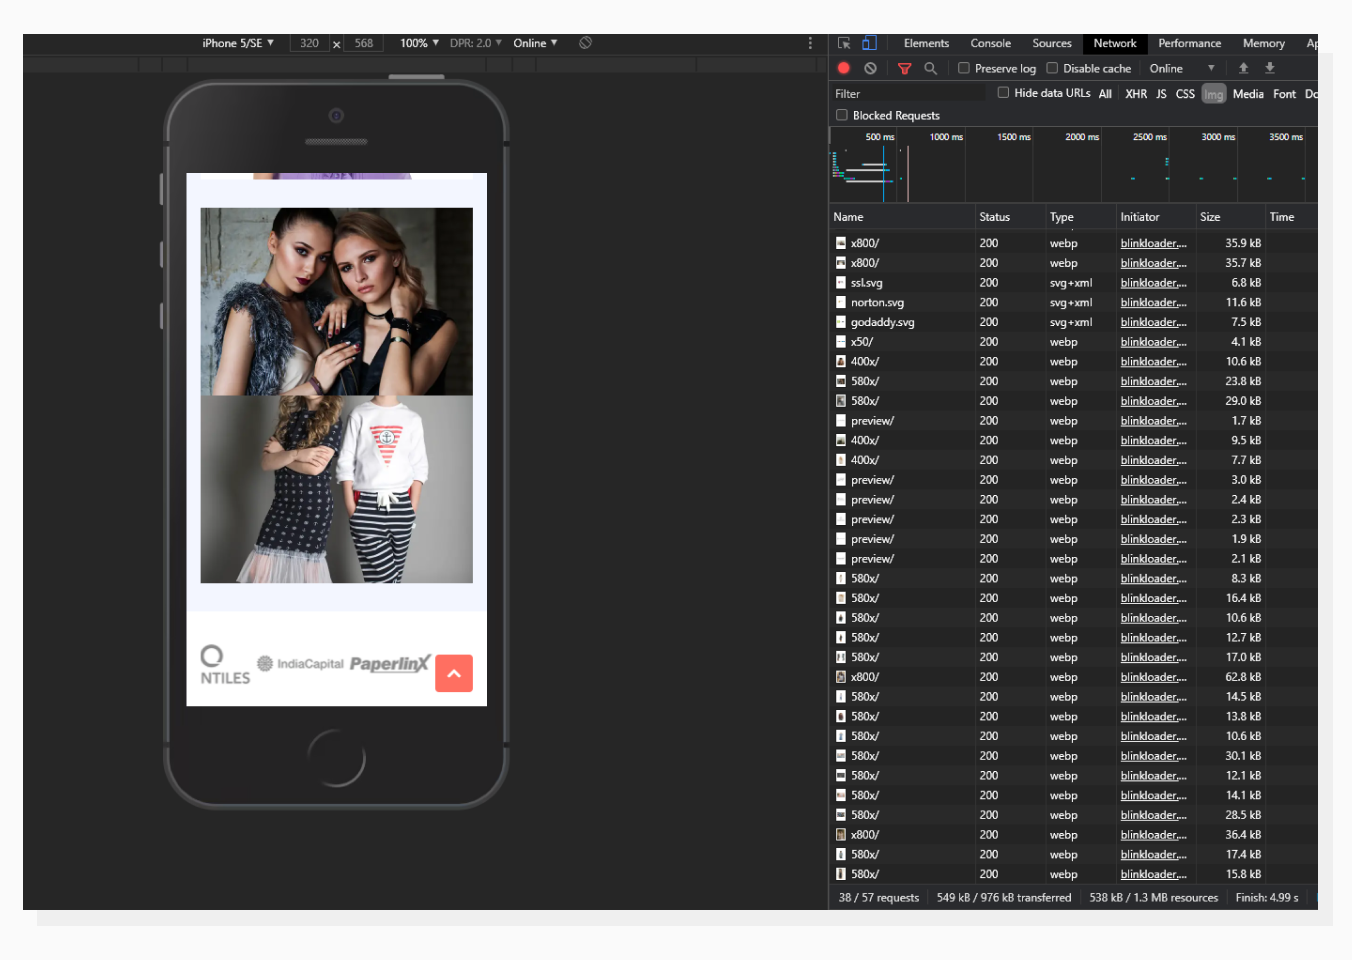 Adaptive Delivery continuously loads images on demand on a mobile screen, DPI: 2.
Above, you can see that as you scroll the page, images are loaded on demand. DPI is also taken into account to provide sharpness on high-density screens.
Adaptive Delivery: encore
Now, let’s look at the reason why Uploadcare Adaptive Delivery is way out in front in this comparison.
Let’s say you have the same store, but with images hosted elsewhere, on Imgur, for example.
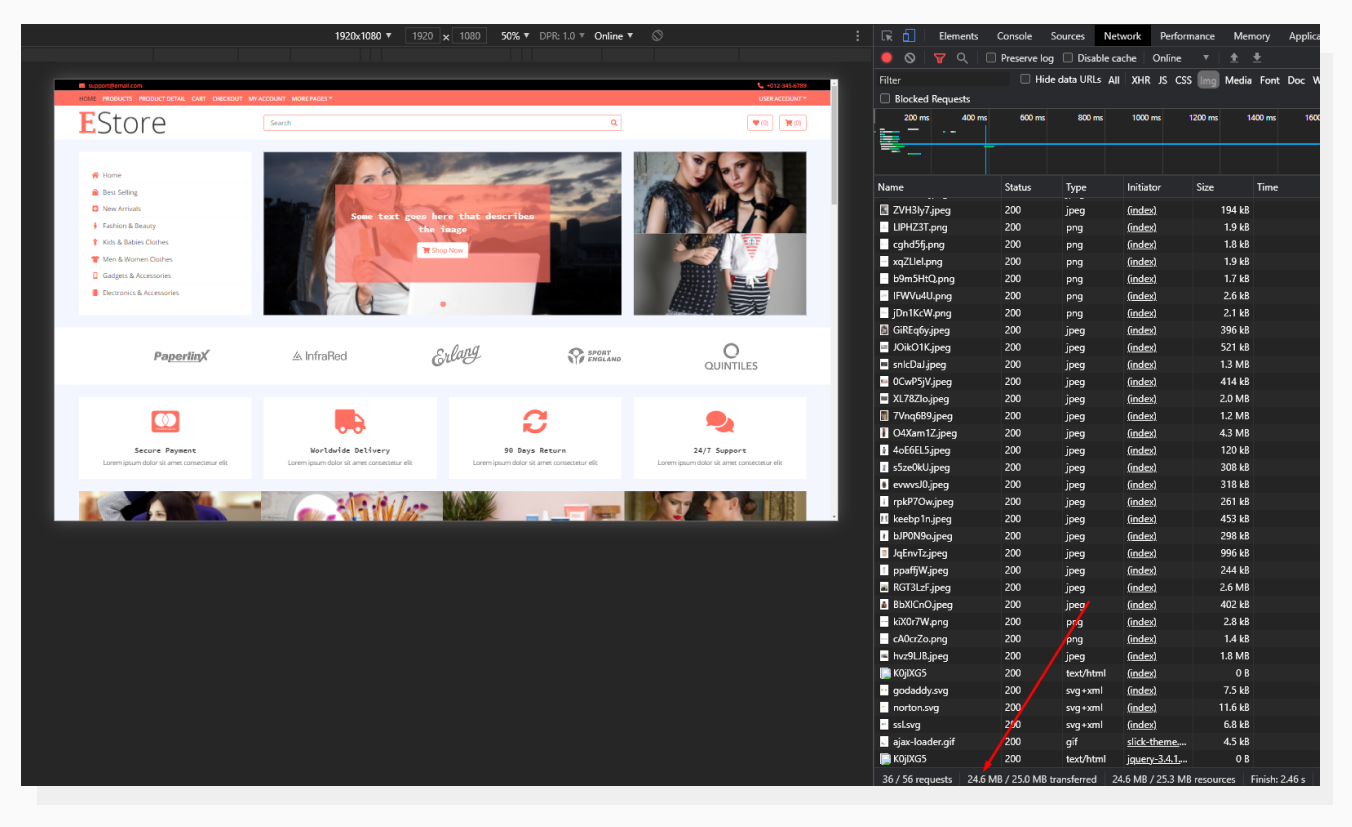 Same store, different image source. Unoptimized.
That 24.6MB of data is not the number we would strive for. What would it take to deliver optimized versions with Cloudinary? Here are the brief steps:
- Download all the images and upload them to Cloudinary or use the Direct Link uploader option, even if there are lots of images.
- Set up Cloudinary Responsive Images as we did before.
With Uploadcare, you don’t need to have source images uploaded to Uploadcare at all. Adaptive Delivery lets you use third-party images from third-party resources and they will be processed just fine, as if they had been uploaded to Uploadcare first!
This does all the heavy lifting we’ve been discussing in the article. Among all the reasons why I would prefer using Uploadcare, this feature plays the most important role.
Let’s apply Adaptive Delivery to the new setup and take a look at the Network tab again:
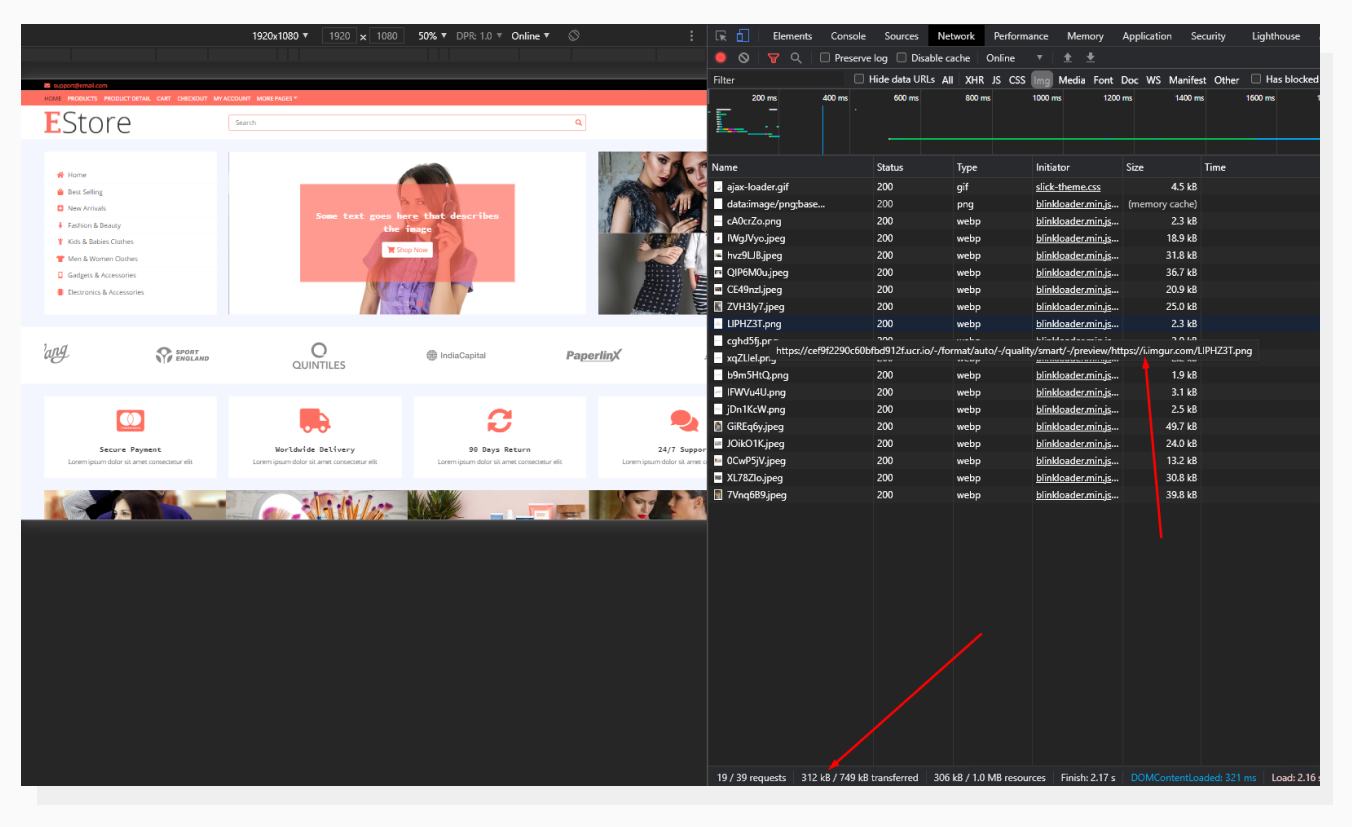 Uploadcare optimized third-party images just as if they were uploaded to the CDN.
In the screenshot above you can see that, technically speaking, Uploadcare seems to take an external URL as an argument to process the image and return an optimized version from its own CDN servers. After that, it acts just like we’ve previously seen:
- Images are lazy-loaded.
- Image sizes are calculated based on DPI and container element.
- Image format is selected based on the visitor’s browser capabilities.
Of course, you may want to block certain external resources from being processed by Adaptive Delivery — Uploadcare has an option to whitelist domain names in the Dashboard. This is also where you can find tweaks such as lazy loading, smart compression and others.
Recap
In this article, we covered the core features that image CDNs have to offer. As you can see, there’s more to them besides just basic image delivery and optimization. But before diving into the minor functions, it’s important to decide which solution suits you the most at the most basic level.
That’s why I encourage you to Try Uploadcare and its Adaptive Delivery feature in your project. All the features above are available in the free plan, so feel free to sign up and experiment.