Lossless image compression. Quality over page speed?
Last edited:
Nowadays, it would be a challenge to find someone involved with website/web-app/web-product development who doesn’t know how important it is to have a fast-loading and well-performing website. While loading speed depends on various factors, there’s a reason why we want to exclusively address image compression in this article.
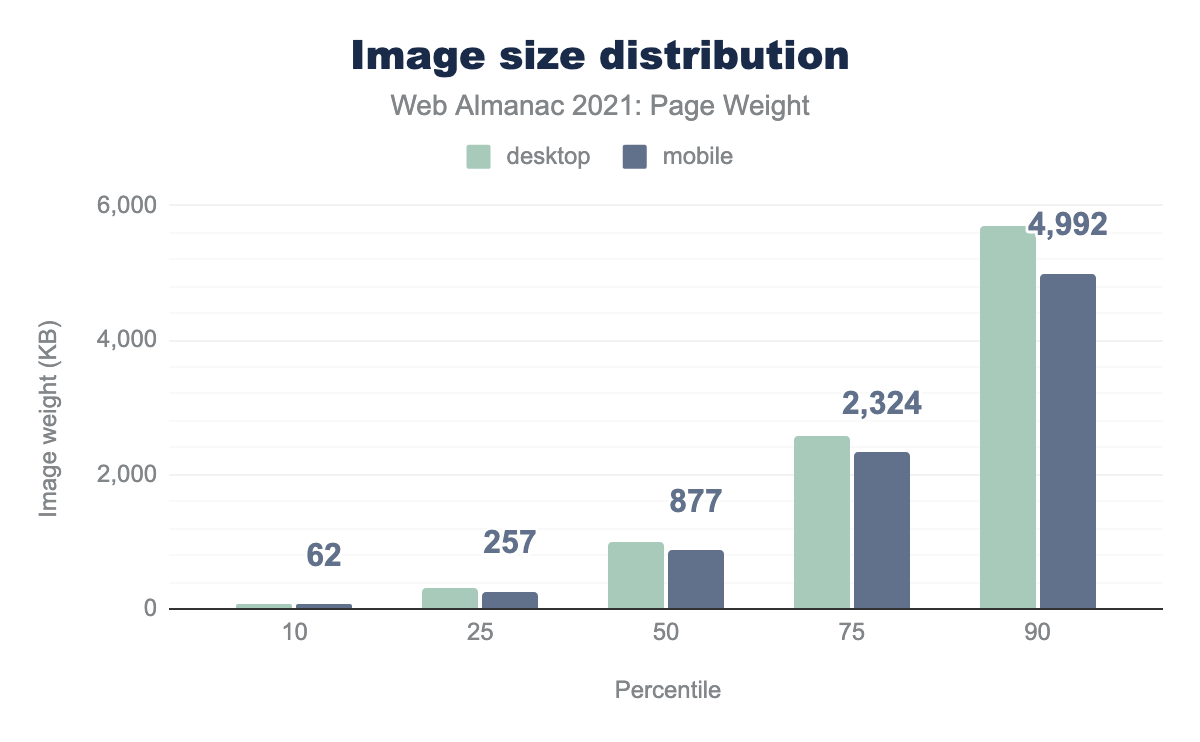
According to data taken from HTTP Archive as of December 1, 2021, the average or, to be more precise, the median amount of total data requested by a webpage is 2205 kilobytes, where 982 kilobytes are responsible for transferring images for that specific page (desktop). However, below you can see that a large amount of websites consume even more bandwidth due to images.
 “Image Bytes” taken from HTTP Archive.
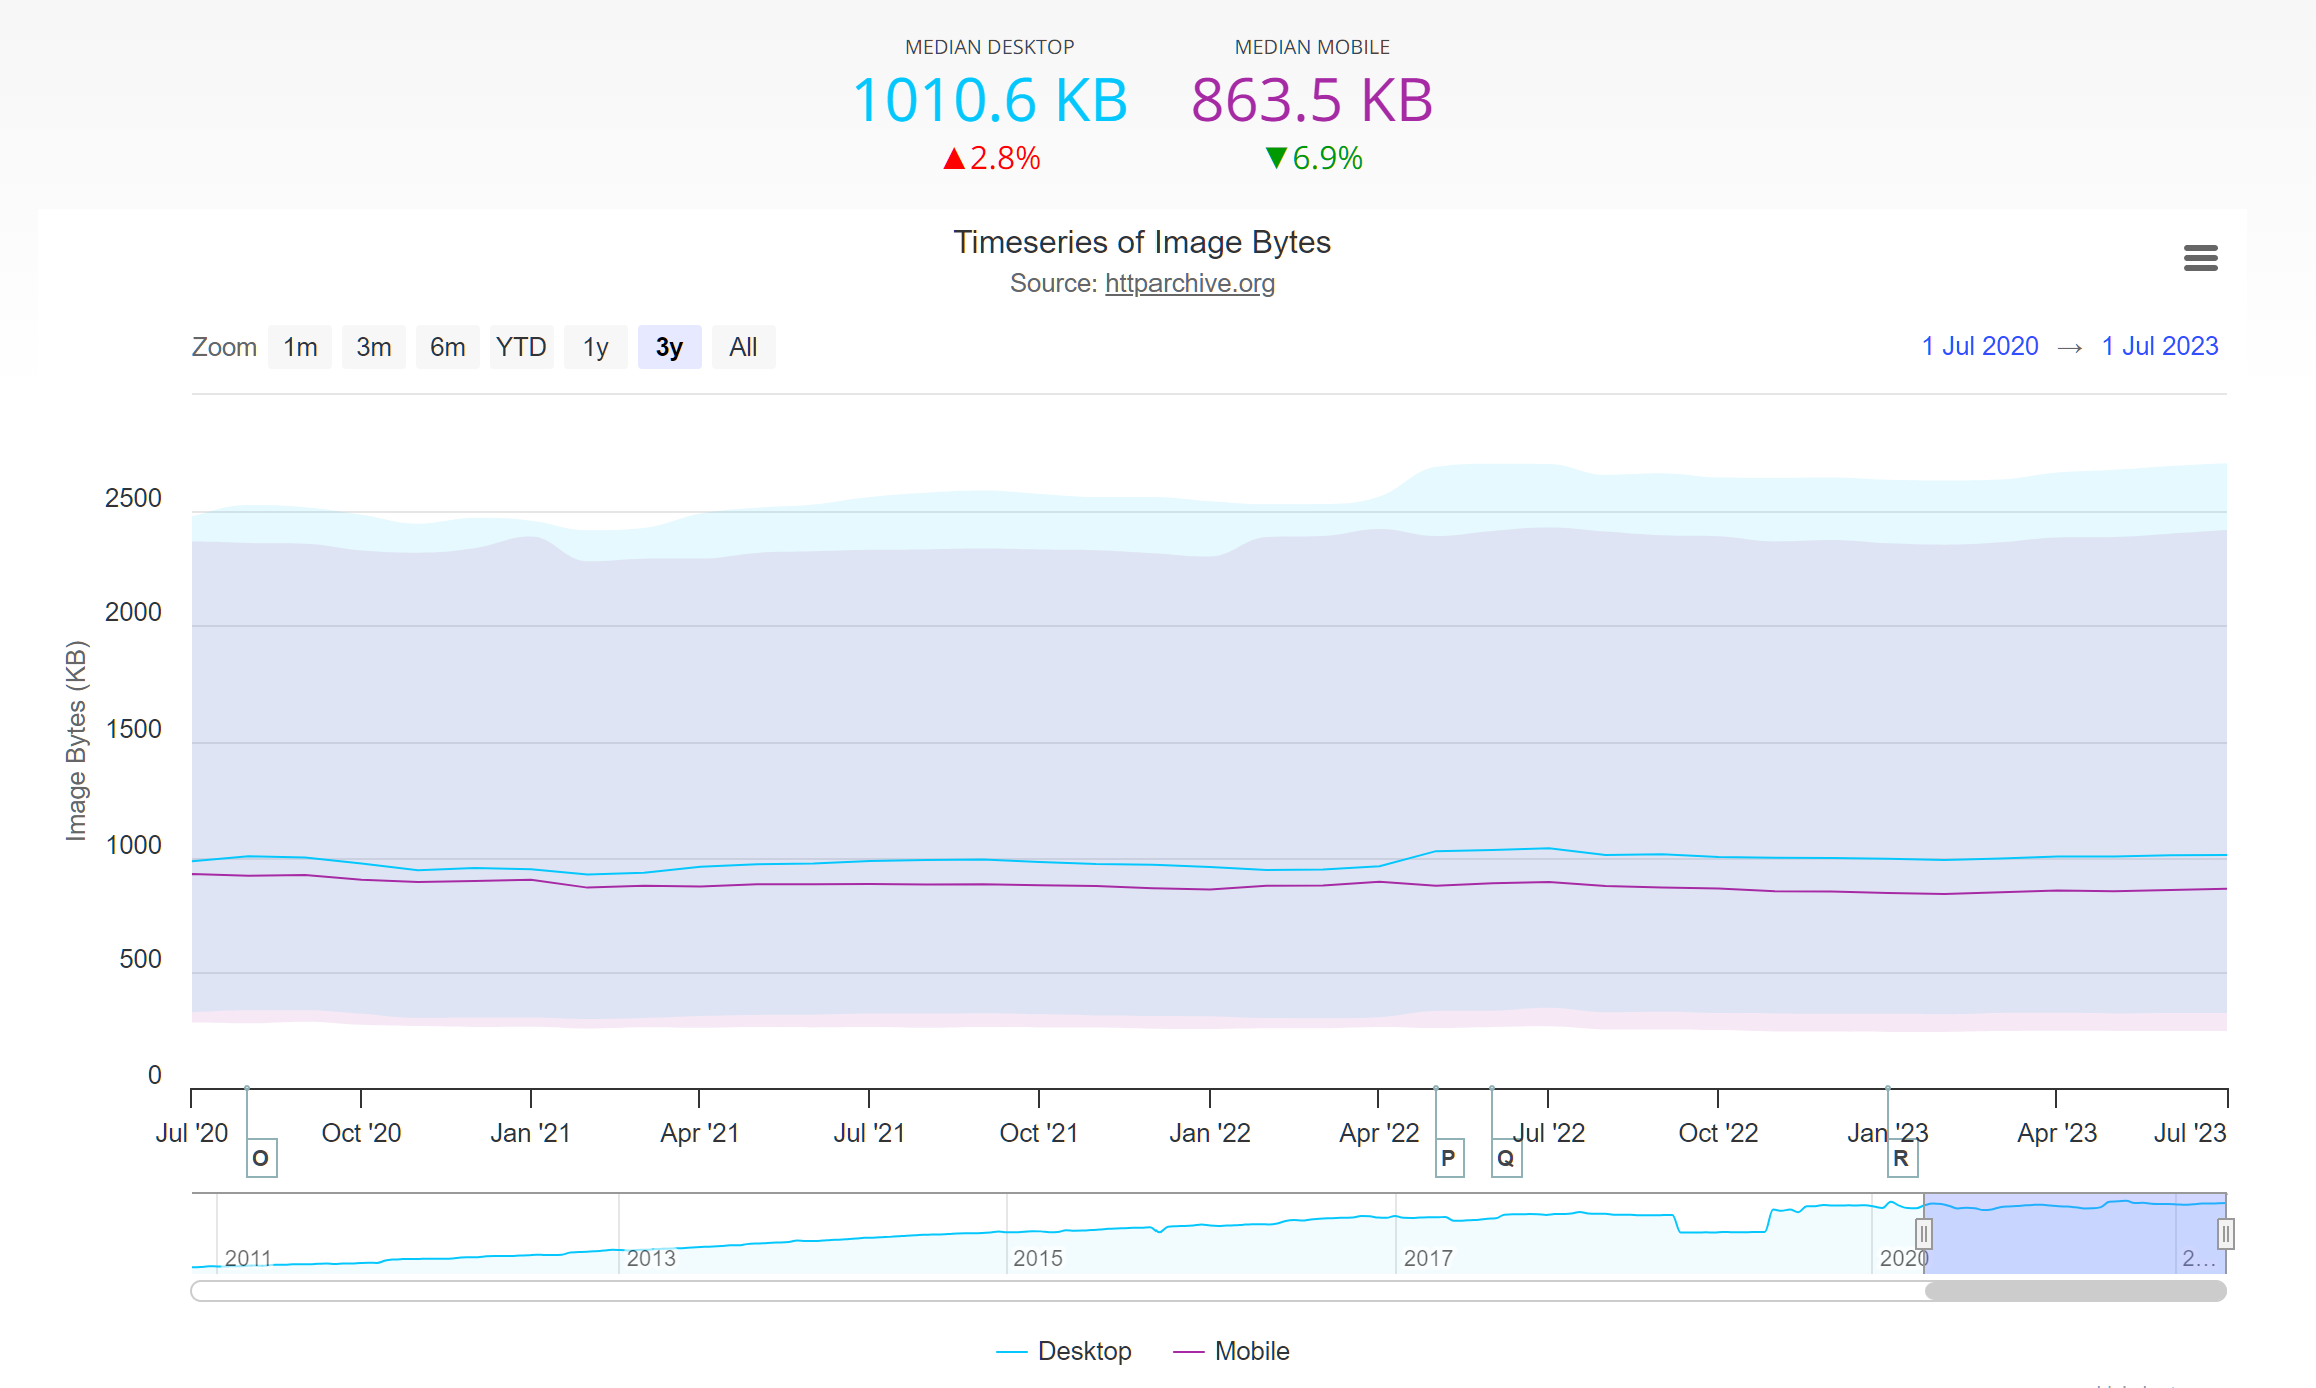 “Image Bytes” taken from HTTP Archive. The sum of transfer size kilobytes of all external images requested by the page. An external image is identified as a resource with the png, gif, jpg, jpeg, webp, ico, or svg file extensions or a MIME type containing image.
That doesn’t mean that all websites are almost 50% images in terms of network data payload. The data includes both poorly and perfectly optimized websites, as well as those rare ones that don't have images at all. Still, there’s one important fact that can be gleaned from the data: image size matters, and that’s where image compression comes into play.
In this article, we’re going to talk about two types of image compression and how to properly compress images. To better understand what type of compression prevents us from losing data, let’s first talk about compression methods.
Lossy image compression: a quick overview
Lossy compression refers to a method of compressing digital data, where a portion of the source file's data is intentionally discarded. You may have encountered instances on the web where images appear distorted, characterized by bulky, oversized, and faded pixels. This distortion is the outcome of robust lossy compression techniques applied to the images.
For a visual comparison, observe the representation on the left, showcasing the outcome of aggressive lossy compression, and juxtapose it with the minimally compressed image on the right. The differences are evident, with the former displaying more pronounced artifacts due to the heavy data loss.
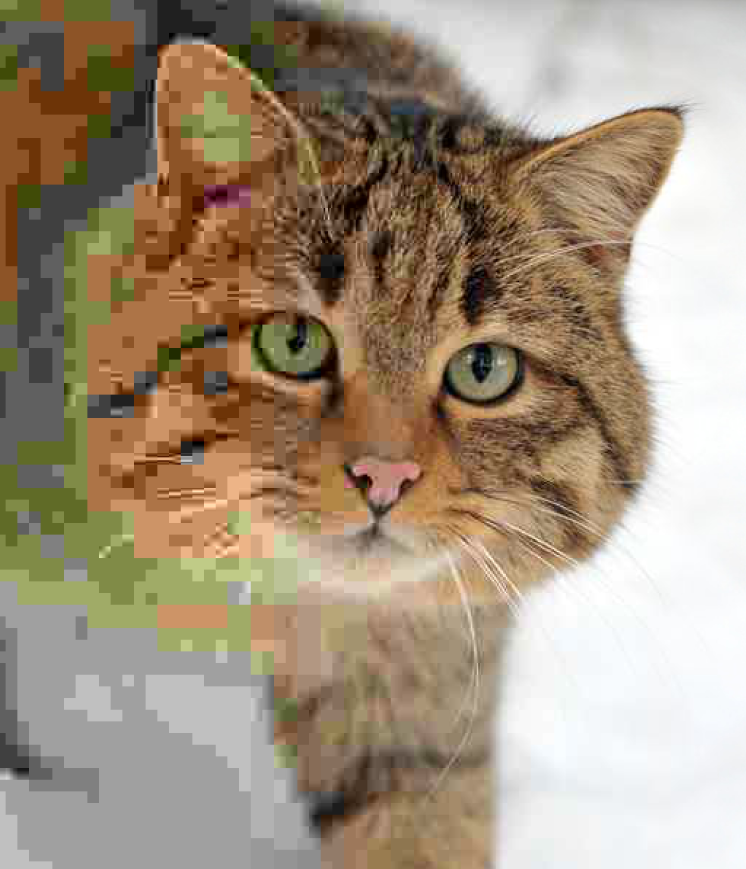 On the left, you can see the result of very strong lossy compression. The right side is much less compressed.
Prioritizing file size with lossy compression
The main advantage of lossy data compression is file size. The more compressed the image is, the less data needs to be transferred over the network.
However, a crucial consideration arises: What if a website features intricate visuals, such as a meticulously designed logo, that demand preservation without compromise? In scenarios where maintaining visual integrity takes precedence over marginal gains in load times, the trade-off between compression-induced visual distortion and milliseconds saved becomes less appealing. But all is not lost.
Despite all these complexities, there's a silver lining. Our exploration of image compression doesn't conclude with lossy techniques alone. In upcoming sections, we'll delve into the world of lossless image compression, which offers an alternative path for maintaining image fidelity without sacrificing quality.
Lossless image compression
This type of compression refers to a set of image compression algorithms that do not affect image quality, while still providing more optimal results in terms of file size. When applied to the whole world of media (not only images), it means that the initial data could be perfectly restored from the compressed version.
Formats
There are several lossless formats out there. Here are two of them that are widely used on the web:
-
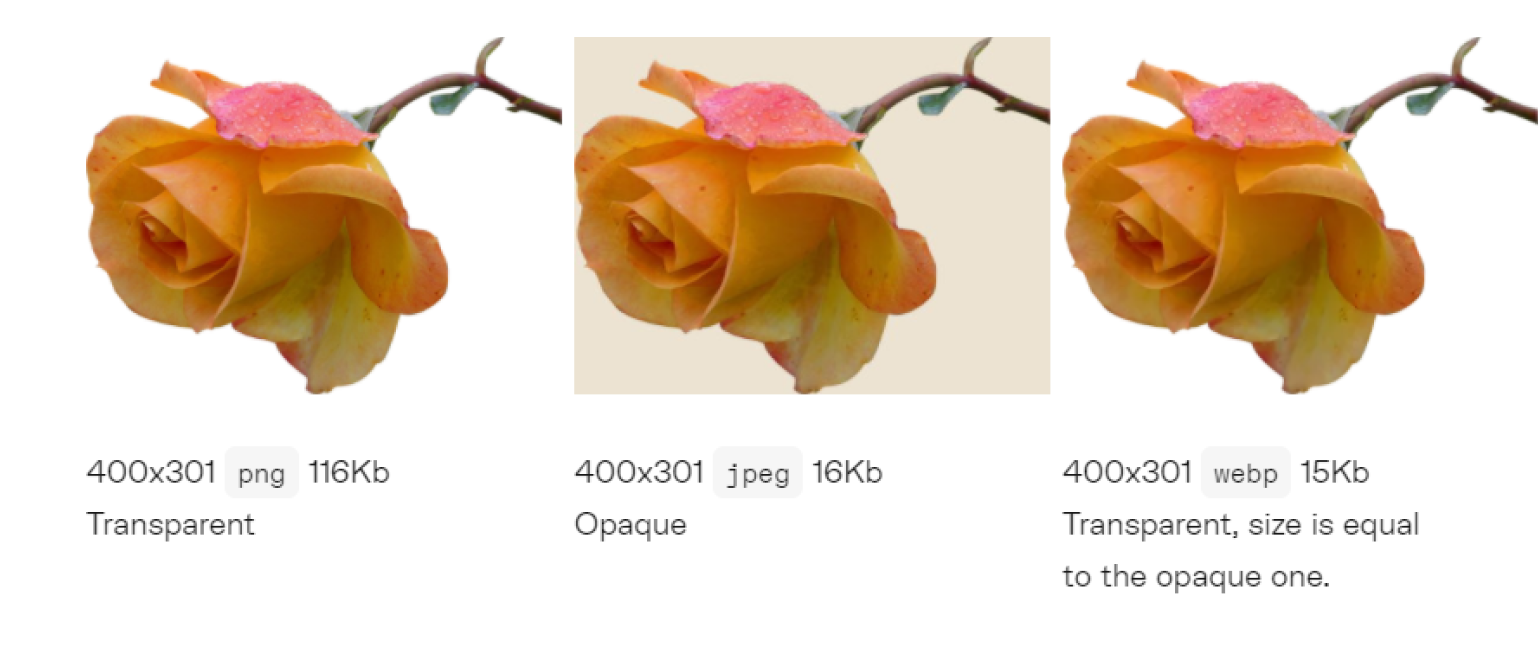
PNG. Since its invention in the late 90s, this format has been widely used in a number of applications, including web browsers. Unlike lossy JPEG, it supports transparency.
-
WEBP. A relatively new player in the game. Developed by Google, it’s positioned as a good replacement for PNGs. It supports lossy and lossless compression types and works with alpha channel data. It is already supported by all the major browsers as of August 2023. Older browsers may have problems displaying it.
-
AVIF. It distinguishes itself by its ability to seamlessly balance superior compression efficiency with exceptional image quality. This format presents a promising evolution in image compression technology, offering a compelling alternative for scenarios that demand both preservation of intricate details and a reduction in file sizes. AVIF is supported by a lesser amount of browsers than WEBP.
What is best compressed using lossless compression?
Lossless compression is particularly effective for images dominated by text and visuals featuring transparent backgrounds. Formats such as RAW, BMP, GIF, and PNG reap significant advantages from this compression technique.
Lossy vs lossless Compression
In short, the primary differences between them are:
Lossy Compression
With this type of compression, one can get higher compression by eliminating image data but this can lead to even more degraded quality over time. It removes non-essential data and is suited for web images and social media, but not for high-fidelity images. This may cause artifacts like blurriness and pixelation, worsened through recompression.
Lossless Compression
Keeps visual quality with lower compression ratios, while also preserving data. Uses advanced algorithms to retain all data, ideal for precision-demanding tasks. Compatibility spans various image types without introducing artifacts. It also allows repeated compression and decompression without quality loss.
In summary, the choice between lossy and lossless compression varies from use case to use case. Lossy compression sacrifices some visual fidelity for smaller file sizes, while lossless compression prioritizes maintaining image quality at the cost of larger file sizes.
Examples of the lossy image compression
As we mentioned earlier, lossless compression is typically used in situations where it’s crucial to maintain the highest image quality possible. For example, website images with big dynamic/color ranges or transparency. Sharp color transitions are sensitive to compression, which is why it’s important to preserve as much data as possible to provide that sharpness on your website.
 Here's an example of a logo with sharp color changes compressed with the medium JPEG setting in Photoshop. Size: 29.6KB.
 This is a PNG version of the same image. Much better quality. Size: 18.47KB.
A note on terminology
Lossless does not mean uncompressed. For example, a BMP (uncompressed bitmap image format) with dimensions of 64×64 (a total of 4,096 pixels) will always contain the same amount of data, even if there’s only one color.
In contrast, simply put, lossless formats like PNG look for patterns. In other words, why encode the same color for each pixel when the same value can just be duplicated via a compression algorithm?
How to do lossless image compression
There are available online tools offering lossless compression like compressor.io where you can upload an image and download it compressed without losing any data.
Remember that while lossless compression techniques preserve the original data, the degree of compression achieved might vary based on the type of file you're compressing and the algorithm that is in the backend of each tool. In short, some files might experience greater size reduction than others.
Automated solution
The above solutions can be useful for individual image compression, but what if you already have a large set of images? The solution would be an image compressor with the option to batch-optimize, transform and upload images to your website. While that may sound pretty straightforward, a few problems may occur:
- Changing the format/compression level would require you to manually change it and then upload it.
- Not all images are made equal. Some types of compression and parameters that do a good job with graphics may not work well with photos.
To help you avoid the headache, here at Uploadcare, we implemented an automatic image compression feature. Let’s see the example:
 A screenshot taken from the Uploadcare Transformations documentation representing different compression results.
Automated image parameters detection
With Uploadcare, there’s no need to upload new images for every occasion. It works with image files that have already been uploaded to your Uploadcare account and returns new versions without altering the source files. The example above is a demonstration of how the “auto” conversion mode works. With this enabled, the system will automatically detect the image parameters and the visitor’s device capabilities to deliver the most optimal file.
“Lossless-ish lossy compression”
Another important feature to mention is the “smart” quality mode. For a big portion of visual assets, having 100% pure lossless compression is not a strict requirement.
“Smart” mode is a content-aware setting. When converting to lossy JPEG or WEBP, the mode automatically adjusts the format and compression settings to preserve visual quality while minimizing the file size.
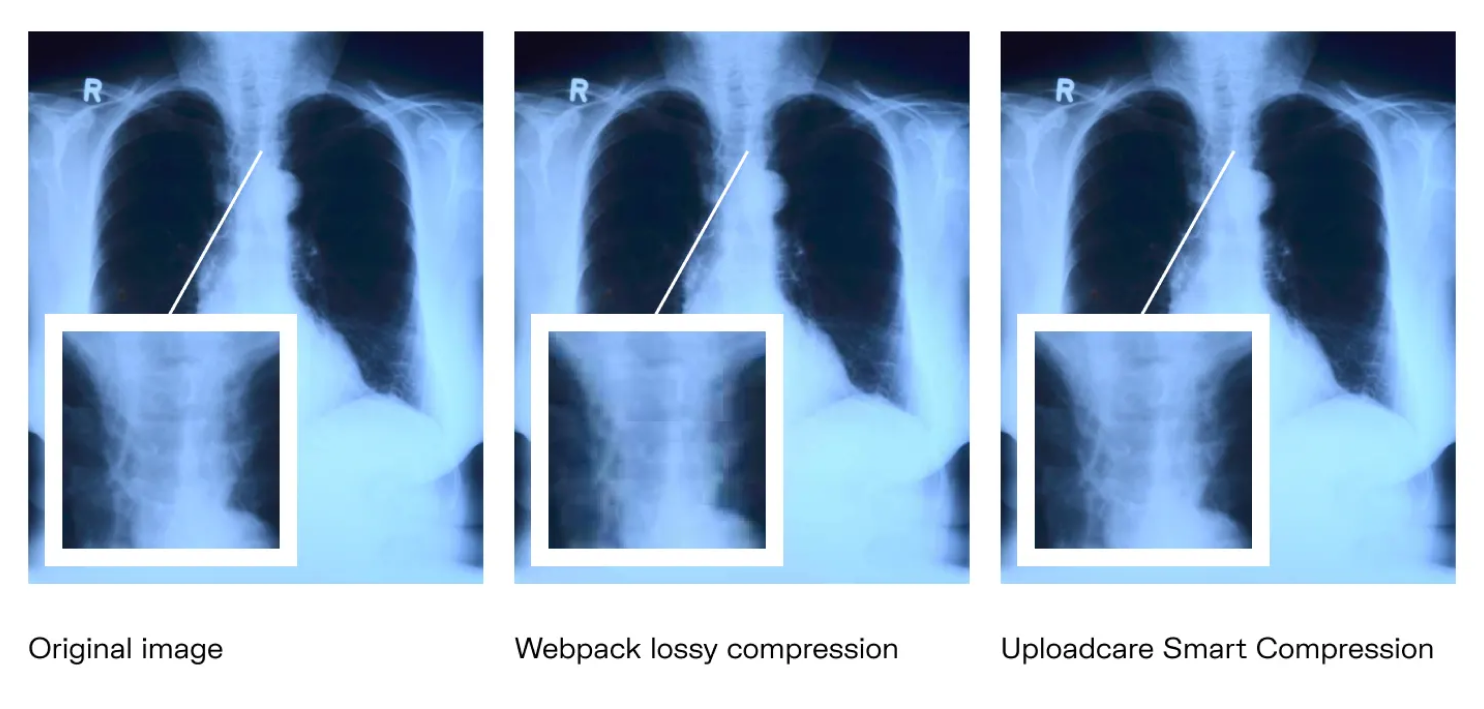 The results produced by Uploadcare Smart Compression compared to regular compression.
Bottom line
Lossless compression has its own niche and use cases, and the same is true for lossy compression. Using optimal compression settings, image size, and format is the key to good image loading speeds. Since Uploadcare Image Compression was made specifically for that purpose, why not see how it works in practice? Sign up for a free account to test it yourself, or explore our documentation to get more technical information.