How to upload files in Laravel with Uploadcare
File uploads seem straightforward until you start juggling storage configuration, MIME type validation, and efficient file delivery. Laravel gives you solid built-in tools to get started, and pairing it with Uploadcare takes care of the rest: CDN delivery, automatic image optimization, and secure storage, without adding complexity to your app.
In this tutorial, you’ll learn how to handle file uploads in Laravel using its built-in capabilities, then step it up by integrating the Uploadcare PHP SDK for more advanced file handling. Working with vanilla PHP instead of a framework? Our PHP file upload guide has you covered.
Prerequisites
To follow along with this tutorial, you’ll need the following:
- A free Uploadcare account
- PHP and Composer installed on your machine
- Familiarity with PHP
Uploading files in Laravel
Let’s start by setting up a Laravel project and creating a controller to handle file uploads.
Laravel uses the MVC architecture. In this tutorial, you’ll focus on the Controller (to handle the upload logic) and the View (to display the form and feedback), since you won’t be interacting with a database.
Setting up a Laravel project
To create a new Laravel project, run the following command in your terminal to install Laravel via Composer:
composer global require laravel/installerThis will install the Laravel installer globally on your system. Once the installation is complete, create a new Laravel project by running:
laravel new uc-laravelWhen prompted, select the starter kit of your choice. For simplicity, this tutorial uses “None” to create a basic Laravel project without any additional features.
Which starter kit would you like to install?
  › ● None
Also, select the following options as needed:
Which testing framework do you prefer?
  Pest


Do you want to install Laravel Boost to improve AI assisted coding?
  No

Which database will your application use?
  SQLite

Would you like to run npm install and npm run build?
  ● Yes / ○ No
After the installation is complete, navigate into the project directory:
cd uc-laravelThen, start the development server:
composer run devYou should see the default Laravel welcome page at http://localhost:8000 in your browser,
which confirms your project is running successfully.
Create a Laravel controller for file uploads
To create a new controller, run the following command in your terminal:
php artisan make:controller FileUploadControllerThis command creates a new file named FileUploadController.php in the app/Http/Controllers directory.
Update the FileUploadController.php file with the following code:
<?php

namespace App\Http\Controllers;

use Illuminate\Http\Request;
use Exception;

class FileUploadController extends Controller
{
  public function upload(Request $request)
  {
    $request->validate([
      'file' => 'required|file|image|mimes:jpeg,png,gif,webp|max:2048',
    ], [
      'file.required' => 'Please select a file to upload.',
      'file.file' => 'The uploaded file must be a valid file.',
      'file.image' => 'The uploaded file must be an image.',
      'file.mimes' => 'The image must be in one of these formats: JPEG, PNG, GIF, or WebP.',
      'file.max' => 'The image must not be larger than 2MB.',
    ]);

    try {
      $path = $request->file('file')->store('uploads', 'public');

      if (!$path) {
        return back()
          ->withErrors(['file' => 'The file could not be stored. Check that your storage disk is configured correctly and that the destination directory is writable.'])
          ->withInput();
      }

      return back()
        ->with('success', 'File uploaded successfully!')
        ->with('path', $path);
    } catch (Exception $e) {
      return back()
        ->withErrors(['file' => 'Upload failed: ' . $e->getMessage()])
        ->withInput();
    }
  }
}
The code above:
- Extends the base
Controllerclass provided by Laravel, inheriting its utility methods. - Validates the incoming request to ensure the user has uploaded a file and that it does not exceed 2 MB in size.
- Checks that the uploaded file is an image and is in one of the allowed formats (JPEG, PNG, GIF, or WebP).
- Checks if the file is valid and returns an error message to the user. If the validation passes, it proceeds to store the uploaded file.
- Stores the uploaded file in the
uploadsdirectory within thepublicdisk (which is typically thestorage/app/publicdirectory). - Uses the
back()helper to redirect the user back to the previous page with a success message and the path to the uploaded file.
Next, you need to define a route that points to this controller method.
Define a route for file uploads
Open the routes/web.php file and add the following routes:
<?php

use Illuminate\Support\Facades\Route;
use App\Http\Controllers\FileUploadController;

Route::get('/', fn() => view('upload'))->name('file.form');

Route::post('/', [FileUploadController::class, 'upload'])->name('file.upload');
The code above defines two routes:
- A
GETroute for the root URL (/) that returns a view namedupload, which will contain the file upload form. - A
POSTroute for the root URL (/) that points to theuploadmethod of theFileUploadController, which handles the file upload logic when the user submits the form. You can reference this route asfile.uploadin the form’s action attribute.
Now that you have defined the routes, you can create the view for the file upload form.
Create a view for the file upload form
In the resources/views directory, create a new file named upload.blade.php and add the following code:
<!DOCTYPE html>
<html lang="en">
<head>
  <meta charset="UTF-8">
  <meta name="viewport" content="width=device-width, initial-scale=1.0">
  <title>Upload File</title>
  <style>
    body {
      max-width: 600px;
      margin: 50px auto;
      padding: 20px;
    }

    form {
      margin: 20px 0;
    }

    input[type="file"] {
      padding: 10px;
      margin: 10px 0;
    }

    button {
      padding: 10px 20px;
      background-color: #007bff;
      color: white;
      border: none;
      cursor: pointer;
      border-radius: 5px;
    }

    button:hover {
      background-color: #0056b3;
    }

    .error {
      color: #f00;
      margin: 10px 0;
    }

    .success {
      color: #080;
      margin: 10px 0;
    }

    a {
      color: #007bff;
      text-decoration: none;
    }
  </style>
</head>
<body>
  <h1>Upload File</h1>

  <form action="{{ route('file.upload') }}" method="POST" enctype="multipart/form-data">
    @csrf
    <div>
      <label for="file">Select file to upload:</label><br>
      <input type="file" name="file" id="file" required>
    </div>
    <button type="submit">Upload</button>
  </form>
</body>
</html>
This HTML form lets users select and upload a file. A few things worth noting:
- It uses the
POSTmethod to submit to the route namedfile.upload. - File uploads require the
enctype="multipart/form-data"attribute. Without it, the file data won’t reach the server correctly. - It includes a CSRF token for security, which Laravel requires on all forms to prevent cross-site request forgery attacks.
Handling errors and success messages
Right now, the form can upload files but doesn’t display any feedback.
To handle errors and success messages, update upload.blade.php to display them.
Inside the form, add the following code to display validation error messages for the file input:
<form>
  <!-- previous form code... -->
  @if ($errors->has('file'))
    <div class="error">{{ $errors->first('file') }}</div>
  @endif
</form>
This checks if there are any validation errors for the file input and displays the first error message if one exists.
Add the following code after the form to display success messages:
@if (session('success'))
  <div class="success">{{ session('success') }}</div>
  <img src="{{ asset('storage/' . session('path')) }}" alt="Uploaded File" width="500">
@endif
This checks if there is a success message in the session and displays it, along with a preview of the uploaded file.
To make uploaded files accessible via the browser, create a symbolic link from public/storage to storage/app/public:
php artisan storage:linkTo test the file upload functionality, start the development server if it’s not already running:
composer run devThen, navigate to http://localhost:8000 in your browser. You should see the file upload form.
Try uploading a file, you should see a success message along with a preview of the uploaded file.
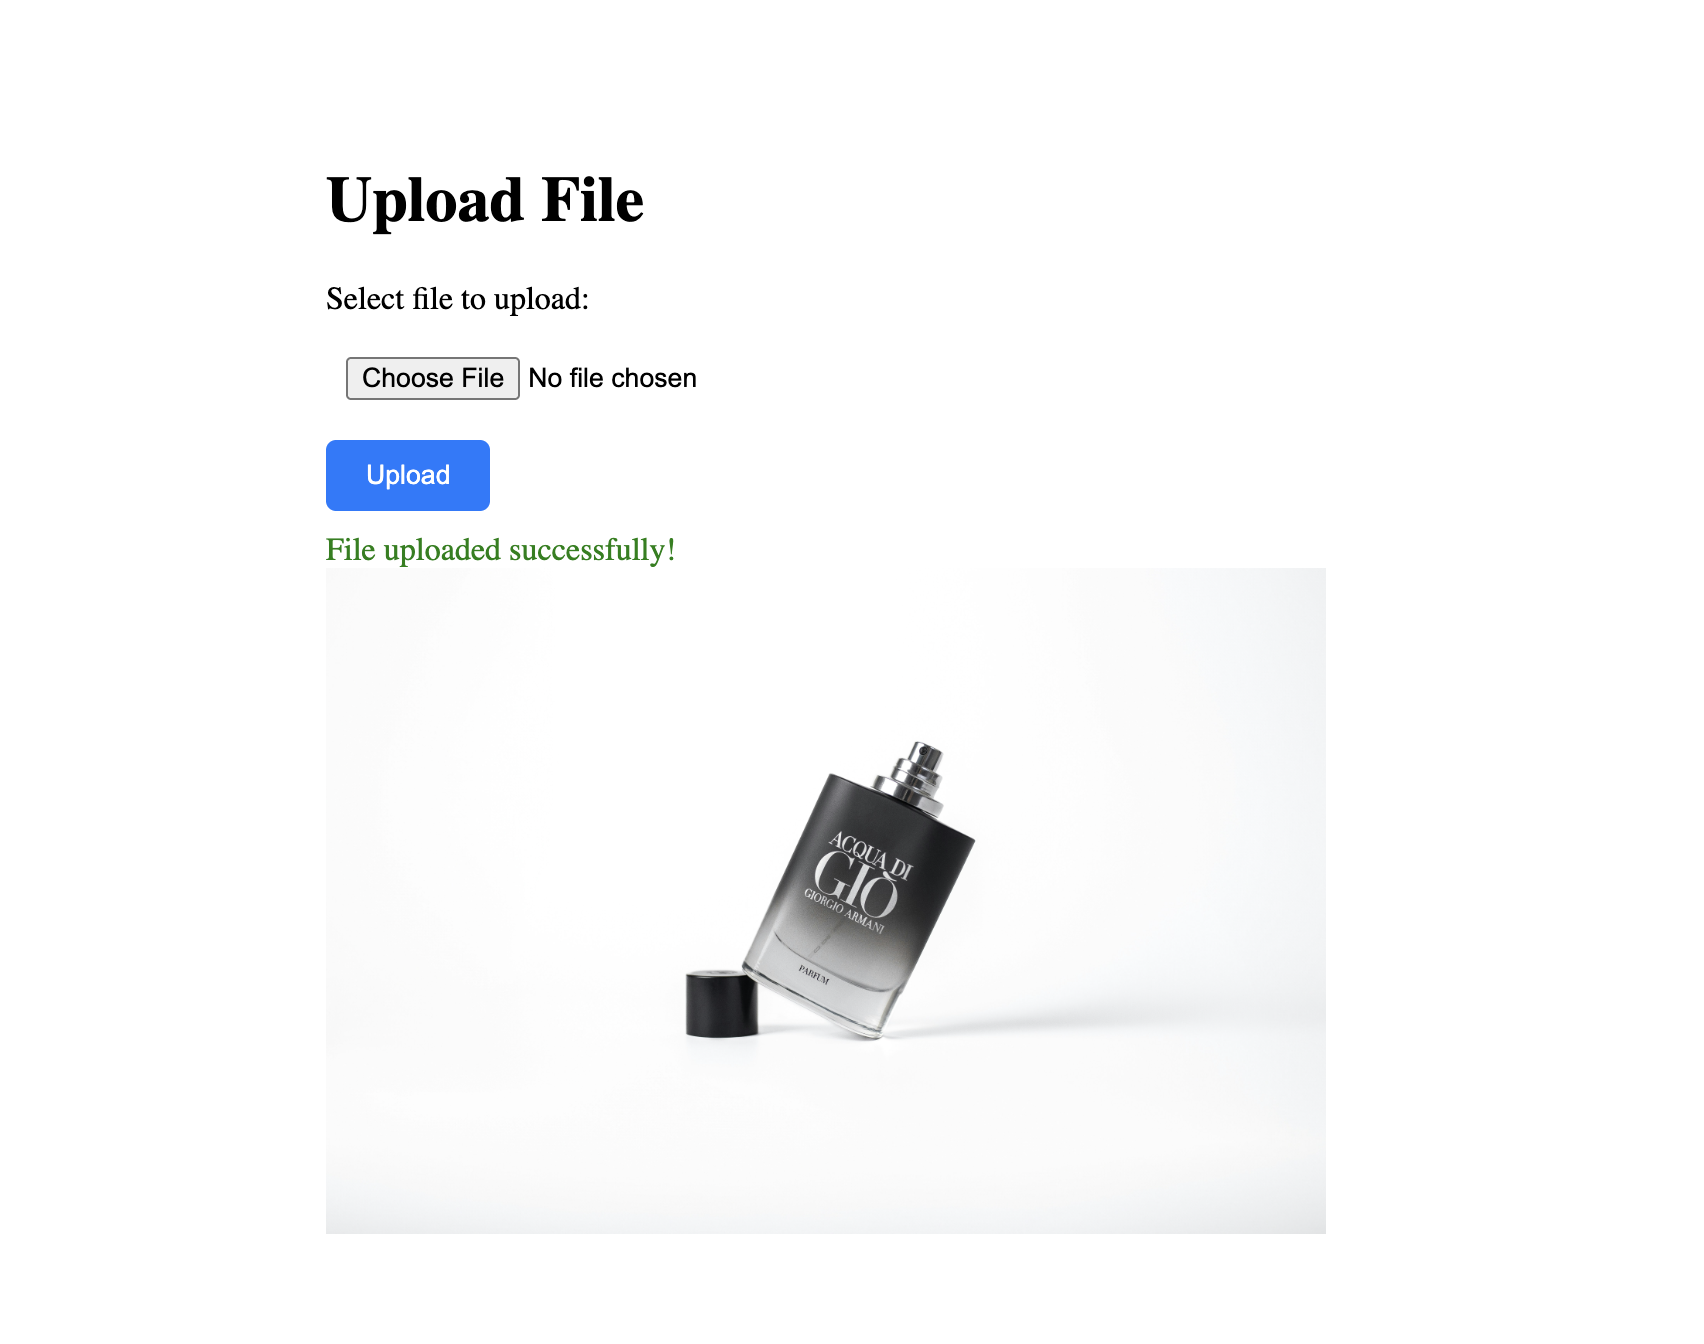 Laravel File Upload Form
You now have a working file upload system in Laravel. Let’s bring in Uploadcare for more advanced handling.
Uploading files using Uploadcare in Laravel
Laravel’s built-in storage gets the job done for simple use cases. But if you’re handling files at scale, or just don’t want to manage storage infrastructure yourself, Uploadcare takes a lot of that off your plate.
It integrates with Laravel through the Uploadcare PHP SDK, so you can upload files directly to Uploadcare without dealing with storage and processing on your own server. If you’d prefer to handle uploads directly from the browser, Uploadcare also offers a ready-made File Uploader widget.
Why bring Uploadcare into the picture?
-
Secure storage: Uploadcare stores your files using encryption and secure access controls, so you’re not taking on the burden of securing user uploads yourself.
-
Automatic image optimization: Uploadcare automatically optimizes images for web delivery, giving you smaller file sizes without quality loss and faster load times without any extra work on your end.
-
Easy integration: The Uploadcare PHP SDK slots neatly into a Laravel app and handles the upload pipeline for you.
-
CDN delivery: A global CDN serves your files, so your users get fast delivery regardless of where they are.
Install and configure the Uploadcare PHP SDK
Install the Uploadcare PHP SDK using Composer:
composer require uploadcare/uploadcare-phpNext, add your Uploadcare API keys to your .env file:
UPLOADCARE_PUBLIC_KEY=your_public_key
UPLOADCARE_SECRET_KEY=your_secret_key
Your API keys are in your Uploadcare dashboard. Head to the “API keys” section, you’ll find both your Public key and Secret key there.
 Uploadcare API keys
Replace the placeholders in your .env file with the actual keys from your dashboard.
Also, create a new configuration file for Uploadcare in config/uploadcare.php with the following content:
<?php

return [
  'public_key' => env('UPLOADCARE_PUBLIC_KEY'),
  'secret_key' => env('UPLOADCARE_SECRET_KEY'),
];
This way, you can easily access the API keys from your Laravel configuration using the config helper:
Create a controller for Uploadcare in Laravel
Create a new controller to handle uploads to Uploadcare:
php artisan make:controller UploadcareControllerOpen the UploadcareController.php file and add the following code:
<?php

namespace App\Http\Controllers;

use Illuminate\Http\Request;
use Uploadcare\Configuration;
use Uploadcare\Api;
use Uploadcare\Exception\AuthenticationException;
use Uploadcare\Exception\HttpException;
use Exception;

class UploadcareController extends Controller
{
  /**
   * Show the upload form
   */
  public function showForm()
  {
    return view('uploadcare');
  }

  /**
   * Handle file upload to Uploadcare
   */
  public function uploadFile(Request $request)
  {
    $request->validate([
      'file' => 'required|file|max:2048', // 2MB max
    ]);

    try {
      $publicKey = config('uploadcare.public_key');
      $secretKey = config('uploadcare.secret_key');

      if (!$publicKey || !$secretKey) {
        return back()
          ->withErrors(['file' => 'Uploadcare API keys are not configured. Please set UPLOADCARE_PUBLIC_KEY and UPLOADCARE_SECRET_KEY in your .env file.'])
          ->withInput();
      }

      // Create Uploadcare API instance
      $config = Configuration::create($publicKey, $secretKey);
      $api = new Api($config);

      // Get the uploaded file
      $file = $request->file('file');

      // Upload to Uploadcare
      $uploadedFile = $api->uploader()->fromPath(
        $file->getRealPath(),
        $file->getMimeType()
      );

      $fileUuid = $uploadedFile->getUuid();
      $fileUrl = 'https://ucarecdn.com/' . $fileUuid . '/';

      return back()
        ->with('success', 'File uploaded successfully to Uploadcare!')
        ->with('file_uuid', $fileUuid)
        ->with('file_url', $fileUrl)
        ->with('file_name', $file->getClientOriginalName())
        ->with('file_mime', $file->getMimeType());
    } catch (AuthenticationException $e) {
      return back()
        ->withErrors(['file' => 'Authentication failed: your Uploadcare API keys may be invalid or missing. Check UPLOADCARE_PUBLIC_KEY and UPLOADCARE_SECRET_KEY in your .env file. (' . $e->getMessage() . ')'])
        ->withInput();
    } catch (HttpException $e) {
      return back()
        ->withErrors(['file' => 'Upload request failed: ' . $e->getMessage() . ' (HTTP ' . $e->getCode() . ')'])
        ->withInput();
    } catch (Exception $e) {
      return back()
        ->withErrors(['file' => 'Upload failed (' . class_basename($e) . '): ' . $e->getMessage()])
        ->withInput();
    }
  }
}
In this controller:
- The
showFormmethod returns theuploadcareview, which contains the file upload form. - The
uploadFilemethod validates the incoming request (max 2 MB), creates an Uploadcare API instance using the keys from your.envfile, and uploads the file to Uploadcare. On success, it passes back the file UUID, CDN URL, original filename, and MIME type to display in the view.
On failure, it catches specific exception types, AuthenticationException for bad API keys,
HttpException for failed HTTP requests (with the status code),
and a general Exception fallback that includes the exception class name and message so you know exactly what went wrong.
Define routes for Uploadcare file uploads
Add the Uploadcare routes to your routes/web.php file:
<?php

use Illuminate\Support\Facades\Route;
use App\Http\Controllers\FileUploadController;
use App\Http\Controllers\UploadcareController;

Route::get('/', fn() => view('upload'))->name('file.form');

Route::post('/', [FileUploadController::class, 'upload'])->name('file.upload');

// Uploadcare Routes
Route::group(['prefix' => 'uploadcare', 'as' => 'uploadcare.'], function () {
  Route::get('/', [UploadcareController::class, 'showForm'])->name('form');
  Route::post('/', [UploadcareController::class, 'uploadFile'])->name('uploadFile');
});
These routes group under the uploadcare prefix:
- A
GETroute at/uploadcarethat displays the upload form. - A
POSTroute at/uploadcarethat handles the upload logic when the user submits the form.
Create a view for Uploadcare file uploads
In the resources/views directory, create a new file named uploadcare.blade.php and add the following code:
<!DOCTYPE html>
<html lang="en">
<head>
  <meta charset="UTF-8">
  <meta name="viewport" content="width=device-width, initial-scale=1.0">
  <title>Uploadcare File Upload</title>
  <style>
    body {
      max-width: 600px;
      margin: 50px auto;
      padding: 20px;
    }

    form {
      margin: 20px 0;
    }

    input[type="file"] {
      padding: 10px;
      margin: 10px 0;
    }

    button {
      padding: 10px 20px;
      background-color: #007bff;
      color: white;
      border: none;
      cursor: pointer;
      border-radius: 5px;
    }

    button:hover {
      background-color: #0056b3;
    }

    .error {
      color: #FF0000;
      margin-top: 10px;
      padding: 10px;
      border-radius: 5px;
    }

    .success {
      color: #008000;
      margin-top: 10px;
      padding: 10px;
      border-radius: 5px;
    }

    .file-info {
      margin-top: 20px;
      padding: 15px;
      background-color: #f0f0f0;
      border-radius: 5px;
    }

    .file-info p {
      margin: 10px 0;
    }

    .file-info strong {
      display: inline-block;
      width: 120px;
    }

    a {
      color: #007bff;
      text-decoration: none;
    }

    a:hover {
      text-decoration: underline;
    }

    img {
      max-width: 100%;
      margin-top: 20px;
      border-radius: 5px;
    }
  </style>
</head>
<body>
  <h1>Upload to Uploadcare</h1>

  <form action="{{ route('uploadcare.uploadFile') }}" method="POST" enctype="multipart/form-data">
    @csrf
    <div>
      <label for="file">Select file to upload:</label><br>
      <input type="file" name="file" id="file" required>
    </div>
    <button type="submit">Upload</button>

    @if ($errors->any())
      <div class="error">
        @foreach ($errors->all() as $error)
          <p>{{ $error }}</p>
        @endforeach
      </div>
    @endif
  </form>

  @if (session('success'))
    <div class="success">{{ session('success') }}</div>

    <div class="file-info">
      <h3>File Details</h3>
      <p><strong>File Name:</strong> {{ session('file_name') }}</p>
      <p><strong>File UUID:</strong> {{ session('file_uuid') }}</p>
      <p><strong>File URL:</strong> <a href="{{ session('file_url') }}" target="_blank">{{ session('file_url') }}</a></p>
    </div>

    @if (strpos(session('file_mime'), 'image') !== false)
      <img src="{{ session('file_url') }}" alt="Uploaded image">
    @endif
  @endif
</body>
</html>
This view:
- Displays a file upload form that submits to the
uploadcare.uploadFileroute. - Shows validation error messages if any errors occur during the upload.
- On success, displays the file’s name, UUID, and CDN URL, along with an image preview if the uploaded file is an image.
To test it, start the development server:
composer run devThen navigate to http://localhost:8000/uploadcare.
Try uploading a file, you should see a success message with the file details and a link to view it on Uploadcare’s CDN.
 Uploadcare File Upload Form
Automatic image optimization and transformations with Uploadcare
Beyond secure storage, Uploadcare gives you a powerful image transformation API. When you upload an image, it’s automatically optimized for web delivery, smaller file sizes without sacrificing quality. On top of that, you can apply transformations on the fly using URL parameters, no extra processing needed on your server.
Say you want to crop profile pictures to a square and resize them to 200×200 pixels. Just append the transformation parameters to the Uploadcare file URL:
https://ucarecdn.com/your-file-uuid/-/crop/200x200/-/resize/200x200/Some common transformations you can apply include:
-
Resize:
-/resize/widthxheight/— resizes the image while maintaining the aspect ratio. -
Crop:
-/crop/widthxheight/— crops the image to the specified dimensions. -
Format conversion:
-/format/webp/— converts the image to a different format (e.g.,jpg,png,webp). -
Quality adjustment:
-/quality/80/— adjusts the image quality (80 means 80%). -
Filters:
-/filter/grayscale/— applies a visual filter to the image.
For the full list of available transformations, check out the Uploadcare URL API documentation.
Best practices for file uploads in Laravel apps
-
Validate file uploads: Always validate incoming uploads, file types, sizes, and any other constraints your app needs. Laravel’s validation rules make this straightforward and they’re your first line of defense against malicious files.
-
Use storage disks: Rather than storing files directly in the public directory, use Laravel’s storage disks. This makes it easy to swap storage backends (local, S3, Uploadcare) without touching your application logic.
-
Handle errors gracefully: Use try-catch blocks and return meaningful error messages. A user who hits an upload error should know what went wrong and how to fix it.
-
Optimize images: For image-heavy apps, offloading optimization to a service like Uploadcare removes that burden from your server and improves load times automatically.
-
Secure file access: If you’re storing files on your own server, make sure access controls are in place. Use Laravel’s authentication and authorization features to restrict access where needed.
-
Use a CDN for file delivery: Serving files through a CDN significantly improves delivery speed and reliability. Uploadcare does this out of the box.
Conclusion
You’ve now got two approaches for handling file uploads in Laravel: using the framework’s built-in storage for simple cases, and integrating Uploadcare for anything that benefits from CDN delivery, automatic optimization, and scalable storage.
Give it a try in your own project. If you run into anything or want to share what you’ve built, drop a note or join the conversation in the Uploadcare community.
FAQ
Does Uploadcare replace Laravel’s built-in file storage?
No, Uploadcare doesn’t replace Laravel’s built-in file storage, it’s an alternative for when you need more than local storage can offer. You can mix and match: use Laravel’s storage for some files and Uploadcare for others, depending on your app’s needs.
Is Uploadcare secure enough for handling user uploads in Laravel apps?
Yes, Uploadcare builds security in from the start. It uses encryption and access controls to help protect your users’ files. For the full picture, see the Uploadcare security documentation.
Should files be uploaded directly from Laravel or straight to Uploadcare?
It depends on your use case. Sending files directly to Uploadcare (without routing them through your server) reduces server load and simplifies the pipeline. If you need to process files before storing them, like running a virus scan or transforming content, upload to your server first, then forward to Uploadcare.