File uploader validation guide
Last edited:
File validators let you apply specific restrictions during file uploads to ensure quality and consistency. These validations can occur before, during, or after the upload process.
In this article, you’ll explore the validators that come with the Uploadcare File Uploader and build a few custom validators for uploading files for an e-commerce store that sells furniture.
Using these validators, you can ensure that all product images meet the required dimensions, file size, and consistency standards for the store.
Requirements for the e-commerce images
Before implementing the validators, here are the requirements your product images need to meet:
-
Maximum file size: Limit the maximum file size to 2 MB to keep load times fast and improve user experience.
-
Uniform dimensions: Ensure all images are 1080×1080 pixels, giving them a 1:1 aspect ratio and allowing clear, high-quality zooming.
-
Collection limit: Each collection of images for a single product must include 3 images (a front, back, and side view) to provide a comprehensive view of the product.
-
Image background color: All images must have a white background, which creates a clean, professional look on product pages.
Project setup
Let’s set up the File Uploader in a project to implement the validators. You can add the file uploader to your HTML page using the following code snippet.
First, import the File Uploader components:
<script type="module">
  import * as UC from 'https://cdn.jsdelivr.net/npm/@uploadcare/file-uploader@v1/web/file-uploader.min.js';
  UC.defineComponents(UC);
</script>
Next, import the File Uploader CSS:
<link rel="stylesheet" href="https://cdn.jsdelivr.net/npm/@uploadcare/file-uploader@v1/web/uc-file-uploader-regular.min.css">Finally, add the File Uploader components to your HTML page:
<uc-config
  ctx-name="my-uploader"
  pubkey="YOUR_PUBLIC_KEY"
></uc-config>

<uc-file-uploader-regular
  ctx-name="my-uploader"
></uc-file-uploader-regular>
Replace YOUR_PUBLIC_KEY with your Uploadcare public key.
This key authenticates your requests when uploading files using the File Uploader.
Types of validators
The File Uploader provides two types of validators to ensure uploaded files meet your criteria: Built-in validators and Custom validators. Each type serves a specific purpose and enforces different validation rules based on your project requirements.
1. Built-in validators
The File Uploader includes predefined validators that cover the most common validation checks out of the box. Some of the built-in validators include:
-
max-local-file-size-bytes: Limits file size to a specified maximum. This helps optimize load times, particularly on e-commerce platforms. -
img-only: Restricts uploads to images only. This ensures only images reach the e-commerce platform.
For the e-commerce project, use the built-in validators to enforce a file size limit of 2 MB and allow only images.
Update the <uc-config> component with the max-local-file-size-bytes and img-only attributes:
<uc-config
  ctx-name="my-uploader"
  pubkey="YOUR_PUBLIC_KEY"
  max-local-file-size-bytes="2000000"
  img-only
></uc-config>
With this configuration, the File Uploader only accepts image files and caps the size at 2 MB. This ensures all product images meet the required quality standards for the e-commerce platform.
If an uploaded file doesn’t meet the specified requirements, the File Uploader displays an error message to the user, stating that the file is too big.
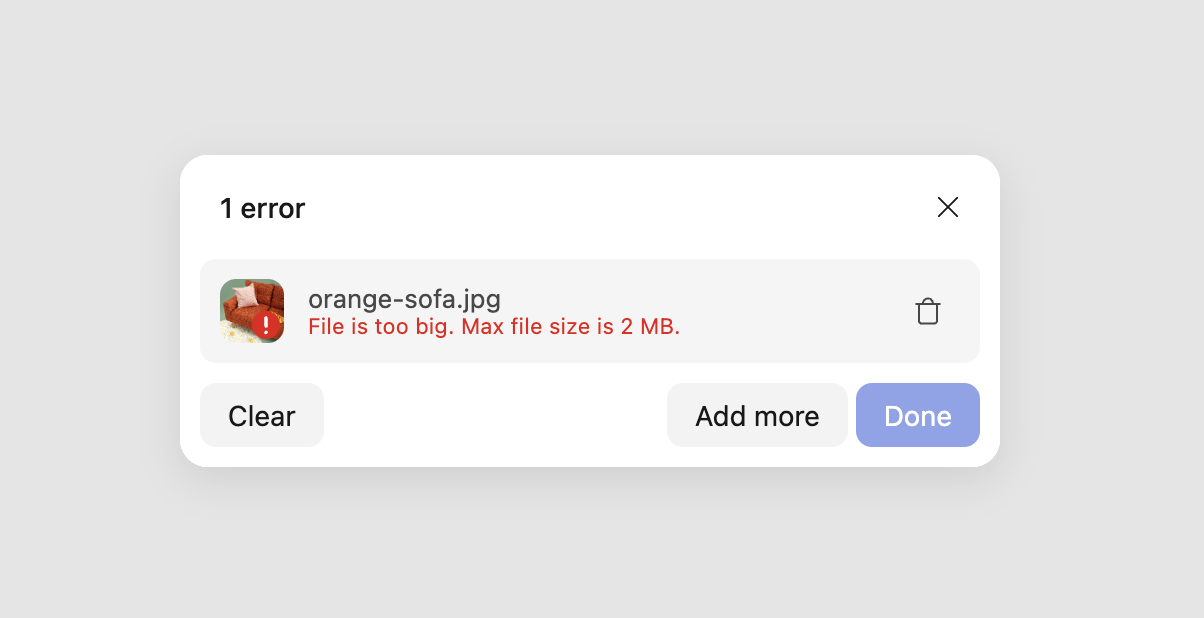 File Uploader validation error message
2. Custom validators
Custom validators let you define validation rules based on your specific needs, such as checking dimensions, file types, or other custom parameters.
Custom validators are pure functions that return an error message if validation fails.
There are two types of custom validators:
- File validator: Validates individual files.
- Collection validator: Validates a collection of files.
File validators
File validators validate individual files.
A file validator function accepts the following parameters: entry, api, and a { signal } object.
File validators can be synchronous (for instant checks) or asynchronous (for intensive checks like API calls or image analysis).
You define each validator as a function with the following type:
type SyncValidator = (
  file: OutputFileEntry,
  api: UploaderPublicApi
) => OutputErrorFile | undefined;
Or as an object with a runOn property to specify when the validator should run:
type ValidatorDescriptor = {
  runOn: 'add' | 'upload' | 'change';
  validator: SyncValidator | AsyncValidator;
};
The runOn property determines when the validator executes:
- add: Runs before upload when the file is added (use for filename or basic checks)
- upload: Runs after successful upload to Uploadcare (use for image dimensions, metadata)
- change: Runs on add, upload, or when editing with the Image Editor
If not specified, validators default to runOn: 'change'.
Synchronous file validators
Sync validators work best for simple, instant checks that use file properties already available (like filename patterns or file type validation).
For the e-commerce project, create a sync validator to ensure filenames follow a naming convention:
const productFilenameValidator = {
  runOn: 'add',
  validator: (entry, api) => {
    if (!entry.fileName?.includes('product')) {
      return {
        message: `Filenames must contain 'product'`,
        payload: {
          received: entry.fileName,
        },
      };
    }
  },
};

const config = document.querySelector('uc-config');
config.fileValidators = [productFilenameValidator];
This validator runs when the file is added (runOn: 'add') and checks the filename before any upload occurs.
If validation fails, it returns an error object with a user-friendly message.
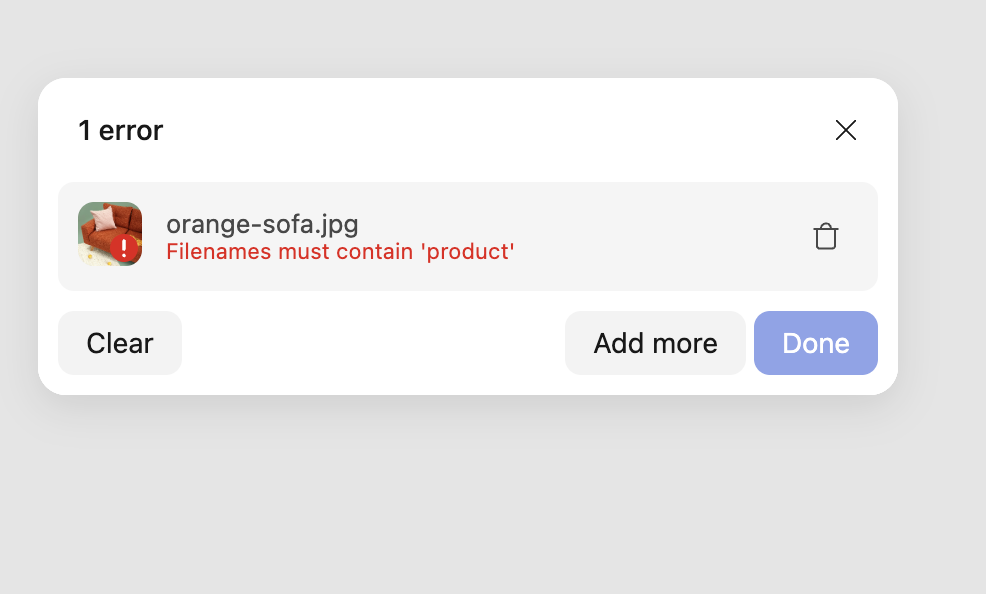 Invalid filename error message
Asynchronous file validators
Async validators are ideal for intensive checks that require API calls, library processing, or server-side validation.
They receive an AbortSignal to handle cancellation and timeouts.
Example 1: Validate image dimensions
To ensure all product images are exactly 1080×1080 pixels, use an async validator that runs after upload:
const imageDimensions = {
  runOn: 'upload',
  validator: async (entry, api, { signal }) => {
    const { imageInfo } = entry.fileInfo || {};

    if (!imageInfo) {
      return;
    }

    if (imageInfo.width !== 1080 || imageInfo.height !== 1080) {
      return {
        message: 'Image width and height must be 1080px',
        payload: {
          expected: '1080x1080',
          actual: `${imageInfo.width}x${imageInfo.height}`,
        },
      };
    }
  },
};

const config = document.querySelector('uc-config');
config.fileValidators = [imageDimensions];
Dimensions validation error message
This validator runs after upload (runOn: 'upload') because fileInfo with image dimensions is only available
after the file successfully uploads to Uploadcare.
Example 2: Verify the image contains furniture
For a furniture e-commerce store, you want to reject uploads that don’t actually show furniture. Uploadcare’s Object Recognition add-on uses AWS Rekognition to analyze image content and return confidence-scored labels, making it a good fit for this kind of content check.
Since the Object Recognition API requires your secret key, you need to route the check through your own backend. The validator calls your backend after upload; your backend handles the Uploadcare API calls and returns a simple yes/no result.
Note: Object recognition is available on paid Uploadcare plans. Check the pricing page for details.
Start with the frontend validator. It runs after upload (runOn: 'upload') to access the file’s UUID, which the Object Recognition API needs:
const furnitureValidator = {
  runOn: 'upload',
  validator: async (entry, api, { signal }) => {
    if (!entry.fileInfo?.imageInfo) {
      return;
    }

    try {
      const response = await fetch(
        `/api/check-furniture?uuid=${encodeURIComponent(entry.uuid)}`,
        { signal }
      );

      if (!response.ok) {
        // If the check fails, let the upload through rather than blocking the user
        return;
      }

      const { isFurniture, detectedLabels } = await response.json();

      if (!isFurniture) {
        return {
          message: 'Only furniture product images are accepted. Please upload an image of the furniture item.',
          payload: {
            detectedLabels,
          },
        };
      }
    } catch (error) {
      if (error.name !== 'AbortError') {
        console.error('Furniture check failed:', error);
      }
    }
  },
};

const config = document.querySelector('uc-config');
config.fileValidators = [furnitureValidator];
On the backend, your /api/check-furniture endpoint starts the recognition job, polls until it completes,
then checks the returned labels against a list of furniture-related categories:
// Node.js / Express backend example
const FURNITURE_LABELS = [
  'Furniture', 'Chair', 'Table', 'Desk', 'Bed',
  'Couch', 'Sofa', 'Cabinet', 'Shelf', 'Bookcase',
];

app.get('/api/check-furniture', async (req, res) => {
  const { uuid } = req.query;

  const headers = {
    Accept: 'application/vnd.uploadcare-v0.7+json',
    'Content-Type': 'application/json',
    Authorization: `Uploadcare.Simple ${process.env.UPLOADCARE_PUBLIC_KEY}:${process.env.UPLOADCARE_SECRET_KEY}`,
  };

  // 1. Start the object recognition job
  const executeResponse = await fetch(
    'https://api.uploadcare.com/addons/aws_rekognition_detect_labels/execute/',
    {
      method: 'POST',
      headers,
      body: JSON.stringify({ target: uuid }),
    }
  );
  const { request_id } = await executeResponse.json();

  // 2. Poll until the job completes (with a safety cap to avoid infinite loops)
  const MAX_STATUS_CHECKS = 30;
  let status = "in_progress";
  let attempts = 0;
  let jobError = null;

  while (status === "in_progress" && attempts < MAX_STATUS_CHECKS) {
    attempts += 1;
    await new Promise((resolve) => setTimeout(resolve, 1000));

    const statusResponse = await fetch(
      `https://api.uploadcare.com/addons/aws_rekognition_detect_labels/execute/status/?request_id=${request_id}`,
      { headers }
    );

    if (!statusResponse.ok) {
      jobError = `Status check failed with HTTP ${statusResponse.status}`;
      break;
    }

    const statusBody = await statusResponse.json();
    status = statusBody.status;

    // Treat explicit error/failed statuses as terminal
    if (status === "error" || status === "failed" || statusBody.error) {
      jobError =
        statusBody.error ||
        `Object recognition job finished with status "${status}"`;
      break;
    }
  }

  if (status === "in_progress") {
    // Timed out waiting for the job to complete
    return res
      .status(504)
      .json({ error: "Timed out waiting for object recognition to finish." });
  }

  if (jobError) {
    return res.status(502).json({ error: jobError });
  }
  // 3. Fetch the file info with appdata to read the labels
  const fileResponse = await fetch(
    `https://api.uploadcare.com/files/${uuid}/?include=appdata`,
    { headers }
  );
  const fileData = await fileResponse.json();

  const labels =
    fileData.appdata?.aws_rekognition_detect_labels?.data?.Labels ?? [];
  const detectedLabels = labels.map((label) => label.Name);
  const isFurniture = FURNITURE_LABELS.some((label) =>
    detectedLabels.includes(label)
  );

  res.json({ isFurniture, detectedLabels });
});
When a shopper uploads an image that doesn’t contain furniture,
the validator displays the error message in the File Uploader and includes the detected labels in the payload for debugging.
Collection validators
Collection validators validate a set of files.
A collection validator function takes two parameters: collection and api.
The collection parameter contains information about all the files, including their names, sizes, and types.
The api parameter provides access to the File Uploader API, which you can use to perform additional actions or checks.
For this example, we’ll create a collection validator that checks file names to ensure an uploaded product image collection contains a front, back, and side image of the product. File names should include the word describing the view:
const hasAllViewAngles = (collection, api) => {
  const hasFrontView = collection.allEntries
    .some(entry => entry.isImage && entry.name.includes('front'));
  const hasSideView = collection.allEntries
    .some(entry => entry.isImage && entry.name.includes('side'));
  const hasBackView = collection.allEntries
    .some(entry => entry.isImage && entry.name.includes('back'));

  if (!hasFrontView || !hasSideView || !hasBackView) {
    return {
      message: 'Each product listing must include front, side, and back view images.',
    };
  }
};
The hasAllViewAngles validator checks whether the uploaded collection contains a front, back, and side image of the product.
If any image is missing, it returns an error message.
To apply the collection validator to the File Uploader, use the following code:
const config = document.querySelector('uc-config');
config.collectionValidators = [hasAllViewAngles];
With the collection validator in place, the File Uploader checks for the required images in each product listing and displays an error message if any are missing.
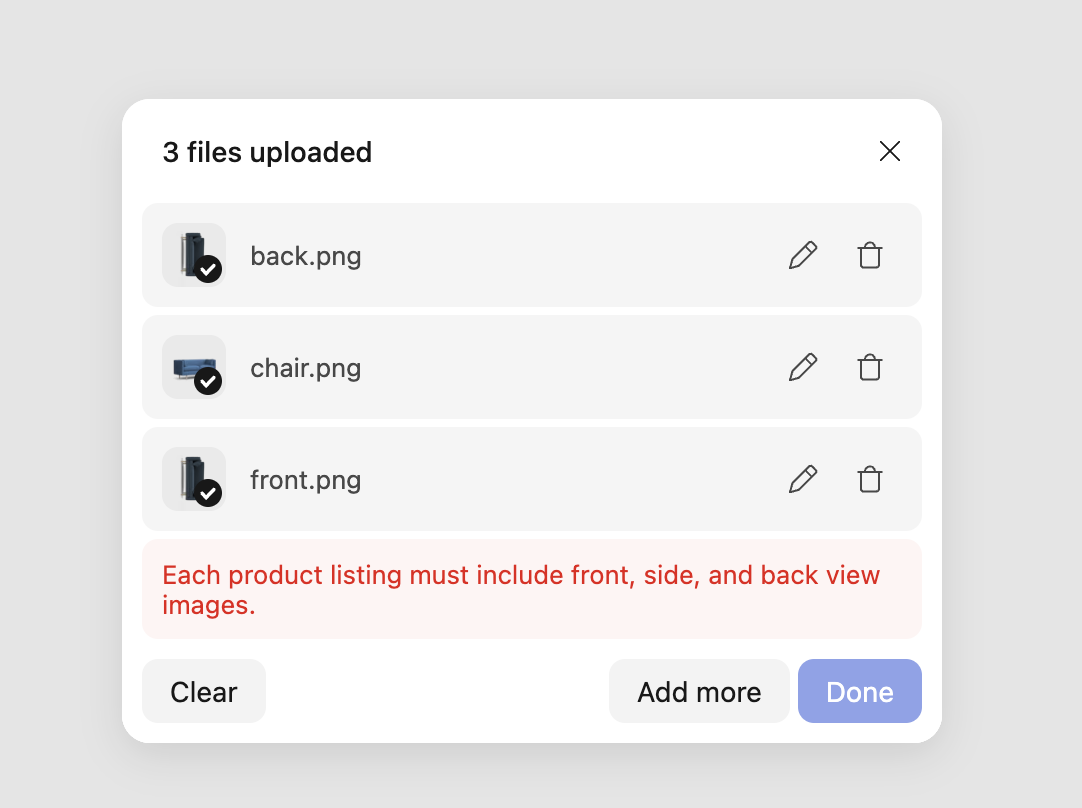 Collection validation error message
Displaying custom error messages
When you create a custom validator, it returns a custom message to display to users when validation fails.
The validator function returns an object with a message property set to the custom error message.
The File Uploader shows this message to the user when the validation condition isn’t met.
For example, the imageDimensions validator returns an error message if the image dimensions don’t match the required 1080×1080 pixels:
{
  message: 'Image width and height must be 1080px',
}
Localization of custom error messages
The File Uploader API lets you localize custom error messages
if you already use localization in the File Uploader, via the api parameter in the validator function.
The api parameter provides access to the l10n function, which translates error messages into different languages.
For example, to localize the error message for the imageDimensions validator,
use the l10n function to translate the message into different languages.
Start by importing a localization file for the File Uploader just after importing the File Uploader components:
import es from 'https://cdn.jsdelivr.net/npm/@uploadcare/file-uploader@v1/locales/file-uploader/es.js';Then, before calling UC.defineComponents(UC), add the following code to define the localization for the File Uploader:
UC.defineLocale('es', {
  ...es,
  custom: {
    'image-dimensions-error': 'Las dimensiones de la imagen deben ser de 1080px',
  },
});
Next, update the uc-config component to use the es locale:
<uc-config
  locale-name="es"
  ctx-name="my-uploader"
  pubkey="YOUR_PUBLIC_KEY"
></uc-config>
With the localization defined, use the l10n function in the validator to translate the error message into the specified language.
For example, update the imageDimensions validator like this:
const imageDimensions = (entry, api) => {
  if (entry.fileInfo &&
     (entry.fileInfo.imageInfo.width !== 1080
     || entry.fileInfo.imageInfo.height !== 1080)) {
    return {
      message: api.l10n('image-dimensions-error'),
    };
  }
}
With this update, the error message for the imageDimensions validator displays in Spanish
when the image dimensions don’t match the required 1080×1080 pixels.
When a file fails validation, users see the error message in the File Uploader UI. You can also access errors programmatically for logging or analytics:
const ctx = document.querySelector('uc-upload-ctx-provider');
ctx.addEventListener('change', e => {
  const collectionState = e.detail;

  collectionState.allEntries.forEach(entry => {
    if (entry.errors.length > 0) {
      entry.errors.forEach(error => {
        console.log('Error:', error.message);
        console.log('Details:', error.payload);
      });
    }
  });
});
Each validation error includes:
- message: User-facing error text
- payload: Optional object with additional details (actual vs. expected values) for your app’s logic
Summary
Whether you’re checking image dimensions, enforcing file types, or validating entire collections, the Uploadcare File Uploader’s validator system gives you full control over what gets uploaded and what doesn’t. Combine built-in validators for quick wins with custom validators for anything your project needs, and you’ve got a flexible, consistent upload experience without the heavy lifting.
Give it a try in your own project. If you run into anything or want to share what you’ve built, drop a note or join the conversation in the Uploadcare community.