How to upload files to WordPress with Uploadcare: a step-by-step guide
Last edited:
So, you want to upload files to your WordPress site, including images and other media. Surely, there’s the option of using WordPress’s native media upload interface, but what if you’ve got a lot of media? In this case, a more reliable and easy-to-use solution would be in order. Uploadcare Plugin is here to help you.
Uploadcare is a solution that can handle all your images, documents, and assets. It delivers optimized images to end users with the highest possible speed via its own Content Delivery Network (CDN), and serves images in a suitable format for any device by dynamically adapting to the specific device from which a user accesses the content. One of the components of its fully stocked toolkit is an easy-to-use uploader that can be integrated into your website.
When integrated with WordPress, Uploadcare drastically improves its uploading feature and allows you to use cloud storage, as well as a CDN. The integration process takes about 5 minutes to complete. This article will guide you through the process step by step.
WordPress plus Uploadcare
WordPress is a great tool to store and manage content for websites, blogs, and apps: it’s an open-source platform, used by an estimated 75 million websites worldwide which make 39% of the web. The content management system (CMS) is free to use on your own hosting. Alternatively, you can get both the CMS and a hosting plan at WordPress.com.
When you create a new post or page and upload an image to a WordPress site, it’s added to the Media Library automatically. The default library placement is a hosting service that hosts the WordPress engine as well. If your hosting isn’t optimized for images (e.g., has file size limits or doesn’t have a CDN), it can slow down the page loading speed. In turn, that affects your page ranking negatively.
Don’t be scared; the regular hosting works for most blogs and websites along with their media content. However, if you upload media to WordPress on a daily basis, and store and handle lots of images and assets, an all-around image uploading/delivery solution would improve your content management workflow and increase page loading speed for end users around the world.
WordPress users can get hold of Uploadcare as well, thanks to the smooth integration of the uploader and the WordPress CMS.
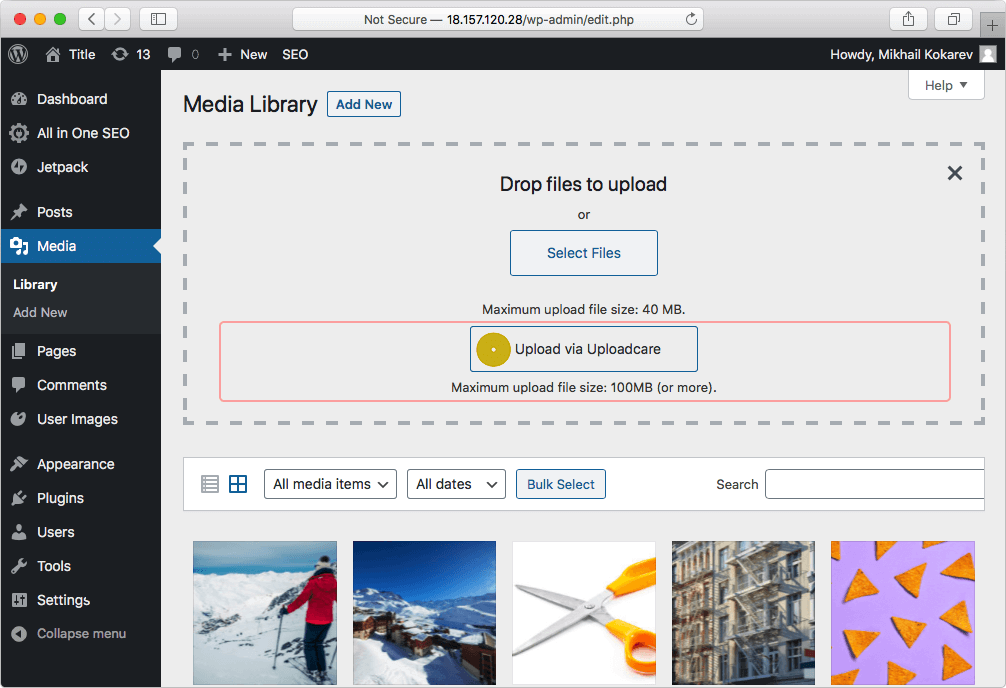
After you create your Uploadcare account and integrate the Uploadcare plugin with your WordPress, you’ll have this option to upload images:
 Integrating Uploadcare plugin with WordPress
Benefits
With Uploadcare, you’ll be able to:
- Upload larger media files than you would normally upload with the standard WordPress media uploader (max 40 MB).
- Edit images as you upload them (crop, resize, apply filter, etc.). The standard uploader doesn’t have these features.
- Deliver images to your website users via Uploadcare CDN with more than 280K nodes around the world, ensuring the fastest loading speed possible.
- Take advantage of adaptive delivery (an advanced feature available for business accounts) and serve images in a suitable format, size, and compression depending on the viewing device, internet connection speed, and other factors.
You can turn off the plugin at any time, and this uploading feature will no longer be shown.
Uploading media to WordPress with Uploadcare
This article will explain step by step how to install and configure the Uploadcare plugin for hassle-free image uploading to WordPress. Get through the nuts and bolts in just 7 minutes.
Step 1. Creating an Uploadcare account
Since you’re here, you probably already have a WordPress account. If not, either sign up for one at WordPress.com, or download the WordPress client from WordPress.org. If in doubt, check out the WordPress Codex guide to the installation process.
For Uploadcare, simply create an account by signing up on the website. Once you’re done, navigate to your dashboard: here, you can create a new project or have a look at the Public and Secret API Keys for an existing one.
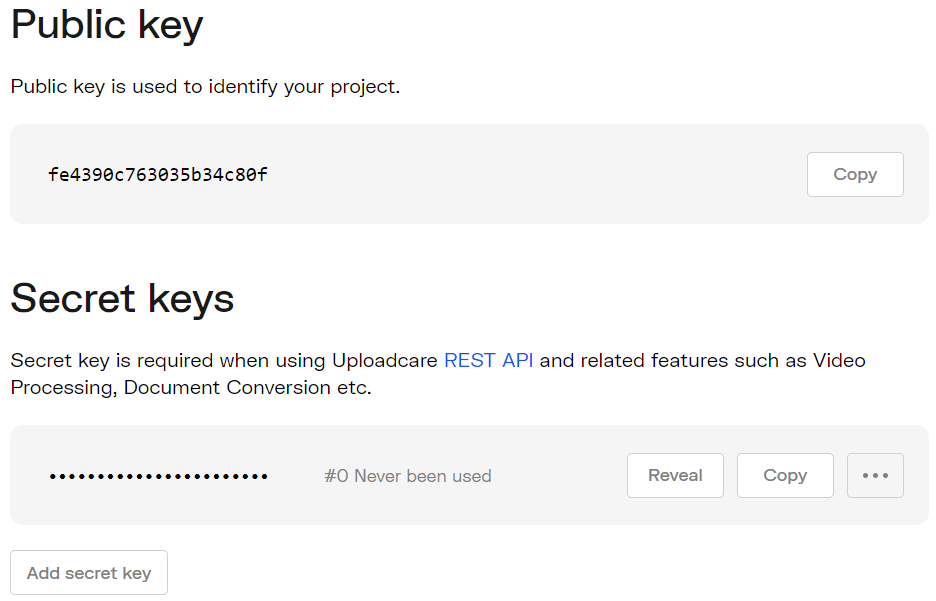 Uploadcare API Keys Screen
Step 2. Installing and configuring WordPress upload plugin
Navigate to yoursite.com/wp-admin to log in to your WordPress admin page. If you then go to the built-in WordPress plugin directory, you will find Uploadcare’s plugin. Install it.
Navigate to WordPress plugin directory, find and install Uploadcare’s plugin
Finally, you will also need to copy the Public and Secret API Keys from your Uploadcare account. These keys will help Uploadcare identify API calls from within other systems, such as WordPress.
Copy them from the API Keys section of your Uploadcare account. In your WordPress admin panel, navigate to Settings and paste the API Keys in the respective fields as follows:
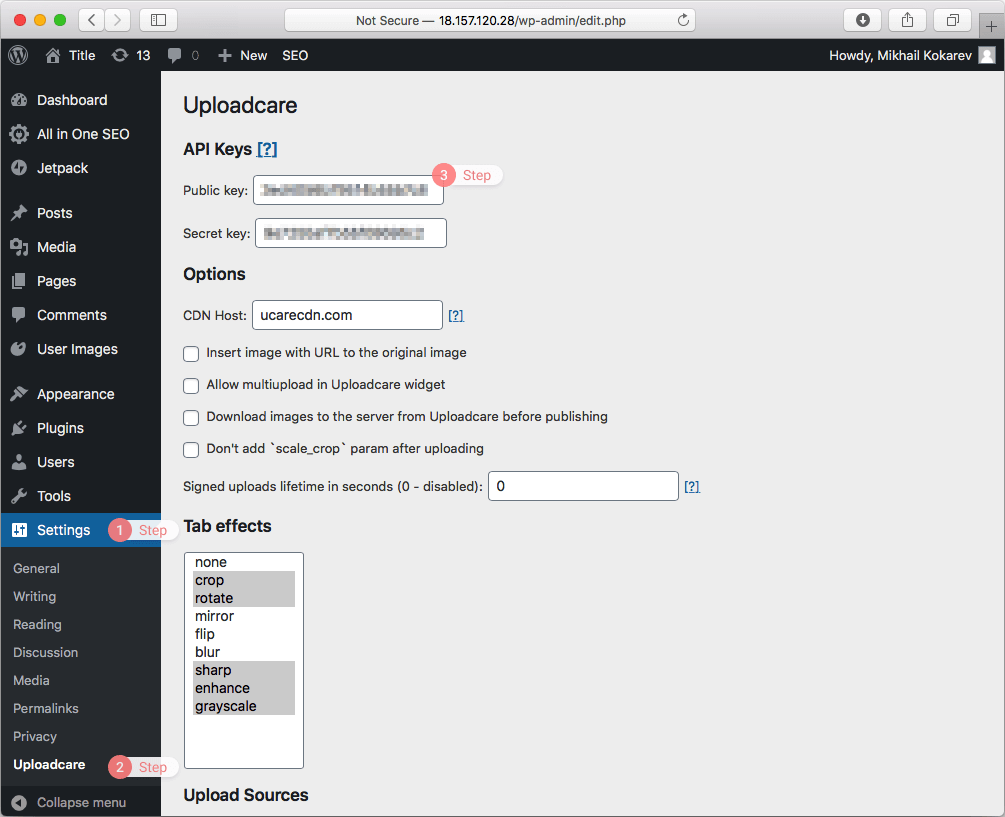 Setting Public and Secret API Keys
Optimizing the settings
Now that you’ve installed File Uploader, it’s time to configure it. First, there are settings for In-Browser Image Editing (Effects Tab). File Uploader uses tabbed navigation, and the Effects Tab is a custom pane for the uploader. By using the Effects Tab, your users will be able to edit images directly in their browser, regardless of whether they’re using a desktop or a mobile device. The process is simple and looks like this:
Editing images directly in Wordpress with the Effect pane
Uploadcare supports a range of additional options that you can optimize in accordance with your tasks and priorities. Simply go to the Settings and make your choices:
- Uploader allows users to crop, edit, enhance, blur, sharpen, and filter images right in the upload widget. You can decide which effects to add and which ones to cross out.
- Uploadcare supports 30 languages and adapts automatically depending on your location preferences. Just pick one of the 30 locales for each instance of the widget, and Uploader will instantly adapt to your users’ languages.
- Your clients are free to choose files of any possible format and size; they even have the ability to upload HTML files to WordPress. Output formats for transformed images: PNG, JPG, and WebP.
- Uploadcare File Uploader supports multiple file sources, including all major social media and cloud platforms like Dropbox, Facebook, and Instagram, as well as uploads via camera, direct links, and more. You can also customize these settings by deciding which ones to add.
You can also:
- Insert an image with a URL to the original image
- Allow multi-upload in the Uploadcare widget
- Download images to a server from Uploadcare before publishing
- Use Signed Uploads to control who can upload files and when
- Use a custom CDN CNAME
Don’t forget to click Save to apply and save your settings.
Step 3. Uploading images and media to WordPress
The Uploadcare plugin is now ready and can begin accepting file uploads. There are two basic ways of adding media to the plugin: you can either add them to the WordPress Media Library, or add them directly to the Post Editor.
Upload files to WordPress via media library
For the Media Library option, use the drag & drop menu provided by the WordPress interface. The process will look like as follows:
- First, navigate to your Media Library and click on the Add New button next to the Media Library title itself;
- You will see a drag & drop screen. Click on the Upload with Uploadcare button with the yellowish circle in it, which will then take you to the drag & drop screen for images.
- Choose images to be uploaded from your local drive, a camera, any social network, or a direct URL.
- That’s it: your images are now added to your Media Library, and you can use them later when working with WordPress.
Drag & drop images to upload them to the WordPress Media Library
Upload files to WordPress via Post Editor
Alternatively, you can use the Post Editor. To add media content using the Post Editor, simply follow the instructions shown below:
- Go the Posts pane and click on the Add New button, or choose an existing post and click Edit.
- WordPress will take you to the Edit Post screen. Here, click on the Add Media button with the yellowish circle on it (Uploadcare’s symbol).
- You will then see a drag & drop screen, where you can similarly add images either from your local drive, a device, a direct URL, or from social media or other cloud storages.
- Uploadcare will then allow you to edit the image directly in your browser window: you can crop, rotate, and apply some other transformations before actually uploading the image. When you’re done, click on the Add Image button;
That’s it! The image will be added directly into the body of your post, with all changes applied to it. To publish it, simply click on the Update button and see the image appear in your post in all its glory.
Adding images to the Post Editor
Conclusion
That’s it; it’s as simple as that. Take your WordPress site to the next level with advanced media uploading capabilities, cloud storage, in-browser image editing, and CDN-based content delivery. Utilize the Uploadcare WordPress Upload plugin to upload files, media and images to your WordPress site — effortlessly.
Learn more about Uploadcare concepts in our docs and check the WordPress Codex for any topics related to WordPress. Moreover, if you use a Wordpress-based platform, WooCommerce, our article on WooCommerce File Uploads explains how to integrate the Uploadcare plugin easily.
You can also check out this WPArena article on accelerating WordPress media with Uploadcare when building a photoblog. If you have any questions, feel free to post them in our community area or in the comments below.