How to upload files in React Native
Last edited:
In this tutorial, you will learn how to upload files in mobile applications for both iOS and Android platforms using React Native. We will integrate the Uploadcare File Uploader for a quick and ready-to-use solution. We will also use the Uploadcare Upload API Client package to manage file uploads with more configuration options and backend-only application support.
Prerequisites
Before you begin, you need:
- A free Uploadcare account
- A configured environment for developing with Android emulators or iOS simulators
- Basic knowledge of React and React Native
Retrieve the Uploadcare API key
Open your Uploadcare project dashboard and navigate to the API keys tab. Copy the Public API key, as you’ll need it for the following steps in this tutorial.
 Uploadcare public key
Create a new React Native project
Setting up the development environment varies based on your development OS and target OS. Follow the official React Native documentation to install and build a basic React Native application tailored to your specific setup.
Once your development environment is set up, create a new React Native project named UploadcareReactNative by running the following command in your terminal:
npx @react-native-community/cli@latest init UploadcareReactNativeNext, navigate to the project directory and run the Metro development server:
cd UploadcareReactNative
npm start
Keep the Metro Bundler running in its terminal.
To run the application, open another terminal window, navigate to your React Native project folder,
and use npm run android or npm run ios depending on your target platform.
If everything is set up correctly, your new app will run. If you encounter any issues during these steps, refer to the official React Native guide.
Upload files with WebView
First, install WebView from your application folder:
npm install react-native-webviewIf you develop for iOS, also install dependencies managed by CocoaPods:
cd ios
pod install
If you develop for Android or work with Windows, please refer to the WebView installation guide.
In the src/widgets directory, create a FileUploader.tsx file with the code snippet:
export const HTML = `
<!DOCTYPE html>
<html lang="en">
  <head>
    <meta http-equiv="content-type" content="text/html; charset=utf-8">
    <meta name="viewport" content="width=480, user-scalable=no">

    <link
      rel="stylesheet"
      href="https://cdn.jsdelivr.net/npm/@uploadcare/file-uploader@v1/web/uc-file-uploader-regular.min.css"
    />
  </head>

  <body>
    <uc-config
      ctx-name="my-uploader"
      pubkey="YOUR_PUBLIC_KEY"
    >
    </uc-config>
    <uc-file-uploader-regular ctx-name="my-uploader"></uc-file-uploader-regular>
  </body>

  <script type="module">
    import * as UC from 'https://cdn.jsdelivr.net/npm/@uploadcare/file-uploader@v1/web/file-uploader.min.js';
    UC.defineComponents(UC);
  </script>
</html>
`;
The code above:
- Imports the latest version of Uploadcare File Uploader and registers it.
- Imports the CSS styles for the File Uploader.
- Configures the file uploader using the
uc-configblock. Don’t forget to replaceYOUR_PUBLIC_KEYwith the public key from your Uploadcare project. - Renders the uploader with the
uc-file-uploader-regularblock.
Next, update your App.tsx file to create an UploadScreen component that embeds a WebView displaying the HTML content created in the previous step:
import React from 'react';
import { View } from 'react-native';
import WebView from 'react-native-webview';
import { SafeAreaProvider } from 'react-native-safe-area-context';

import { HTML } from './src/widgets/FileUploader';

function UploadScreen() {
  return (
    <View>
      <WebView source={{ html: HTML }} />
    </View>
  );
}

function App(): React.JSX.Element {
  return (
    <SafeAreaProvider>
	    <UploadScreen />
    </SafeAreaProvider>
  );
}

export default App;
Clicking on the “Upload files” button will open the file uploader modal, where you can select files to upload.
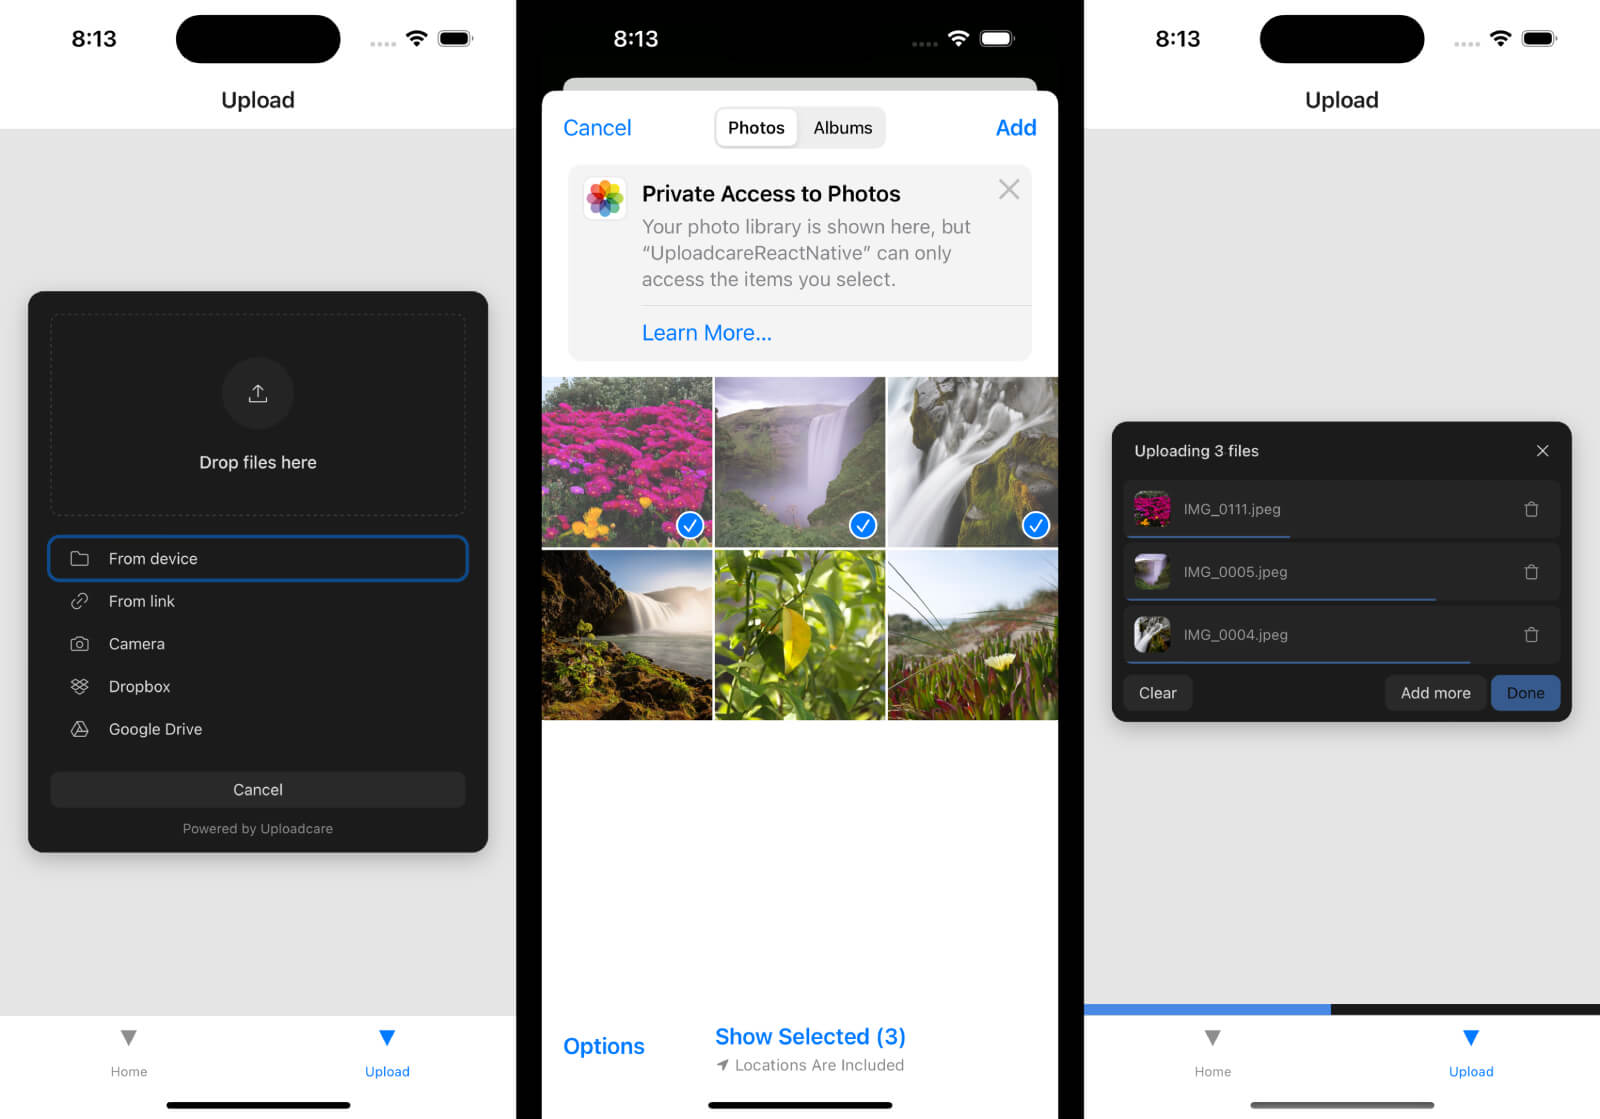 Image picker interface
Embed an existing web application
In the previous step, we embedded HTML into a WebView. It is typically used to create a small, self-contained part of your app that can render web content. It’s ideal for file uploaders or tiny widgets requiring minimal external dependencies. However, when you already have a fully functional web application with file-uploading functionality, you might want to embed an existing web application into a WebView.
To do that, update your App.tsx file with the content:
import React, { useRef } from 'react';
import { SafeAreaView, Button } from 'react-native';
import { WebView } from 'react-native-webview';

function App(): React.JSX.Element {
  const webViewRef = useRef();

  const handleGoBack = () => {
    webViewRef.current.goBack();
  };

  return (
    <SafeAreaView>
      <Button title="Go Back" onPress={handleGoBack} />
      <WebView
        ref={webViewRef}
        originWhiteList={['*']}
        source={{ uri: 'https://app.uploadcare.com/dashboard/' }}
      />
    </SafeAreaView>
  );
}

export default App;
The code above:
- Adds a “Go back” button to control the history state of the WebView.
- Adds the existing web application with file uploading functionality using its URL.
Upload files with Uploadcare Upload API Client
While the Uploadcare File Uploader provides quick integration, developing a custom solution is preferable for more complicated use cases. For example:
- When you need a highly customized uploader that fits specific design and functional requirements.
- When you require advanced features such as multipart uploading, custom processing workflows, or integration with other services.
- When you should scale and anticipate uploading large files or handling a high volume of uploads.
- When you want to manage file uploads on your backend server, allowing for additional processing, security checks, or storage options.
First, install Uploadcare Upload API Client:
npm install @uploadcare/upload-clientInstall the react-native-url-polyfill package to ensure compatibility and proper handling of URL-related functionalities:
npm install react-native-url-polyfillNext, install the react-native-image-picker package to select images and videos from the user’s device:
npm install react-native-image-pickerIf you develop for iOS, also install dependencies managed by CocoaPods:
cd ios
pod install
For troubleshooting refer to the react-native-image-picker README.
Navigate to App.ts and initialize a new instance of the Uploadcare client with the Public Key from your Uploadcare project retrieved in the previous step:
const client = new UploadClient({ publicKey: 'YOUR_PUBLIC_KEY' });Define the uploadFiles function with the following content:
const uploadFiles = async (assets: Asset[]) => {
  for (const asset of assets) {
    if (!asset) {
      continue;
    }

    try {
      const blob = await fetch(asset.uri, { method: 'GET' }).then(res => res.blob());

      await client.uploadFile(blob, {
        fileName: asset.fileName,
        contentType: asset.type,
      });
    } catch (error) {
      console.log({ error });
    }
  }
};
The function above:
- Receives all the chosen assets.
- Fetches the file using the URI and converts the response to a blob for each asset.
- Uses the
uploadFilemethod to upload the blob with additional parameters.
Create the getAssets function to open the device’s image library, allowing users to select media files:
const getAssets = async () =>
  await launchImageLibrary(
    { mediaType: 'mixed', selectionLimit: 0 },
    () => {},
  );
Define the handleUploadFile function to sequentially call the previously defined getAssets and uploadFiles functions:
const handleUploadFile = async () => {
  const { assets = [] } = await getAssets();
  await uploadFiles(assets);
};
Render the button that calls the handleUploadFile function and initiates the file upload process:
return (
  <SafeAreaView>
    <View>
      <Button title="Upload a file" onPress={handleUploadFile} />
    </View>
  </SafeAreaView>
);
Congratulations! You’ve successfully integrated file uploading functionality into your React Native application using the Uploadcare Upload API Client.
Conclusion
In this tutorial, you’ve built a React Native application to upload files using the Uploadcare File Uploader and the Uploadcare Upload API Client package. You’ve learned three different approaches to handling uploads on mobile according to your needs.
Uploadcare offers even more advanced features, such as image transformation, smart resizing and cropping. Learn more about these capabilities to optimize your application performance and easily handle image transformations.
To learn more about Uploadcare File Uploader for web applications, check out this step-by-step tutorial that explains how to upload files in React.