How to upload files in Webflow using Uploadcare File Uploader
Webflow is a no-code tool that enables you to design and build responsive websites visually. In this tutorial, you’ll learn how to integrate Uploadcare File Uploader into your Webflow websites with custom code.
Prerequisites
To follow along with this tutorial, you will need:
- A paid Webflow account — Webflow only allows the use of custom code on paid plans.
- A free Uploadcare account
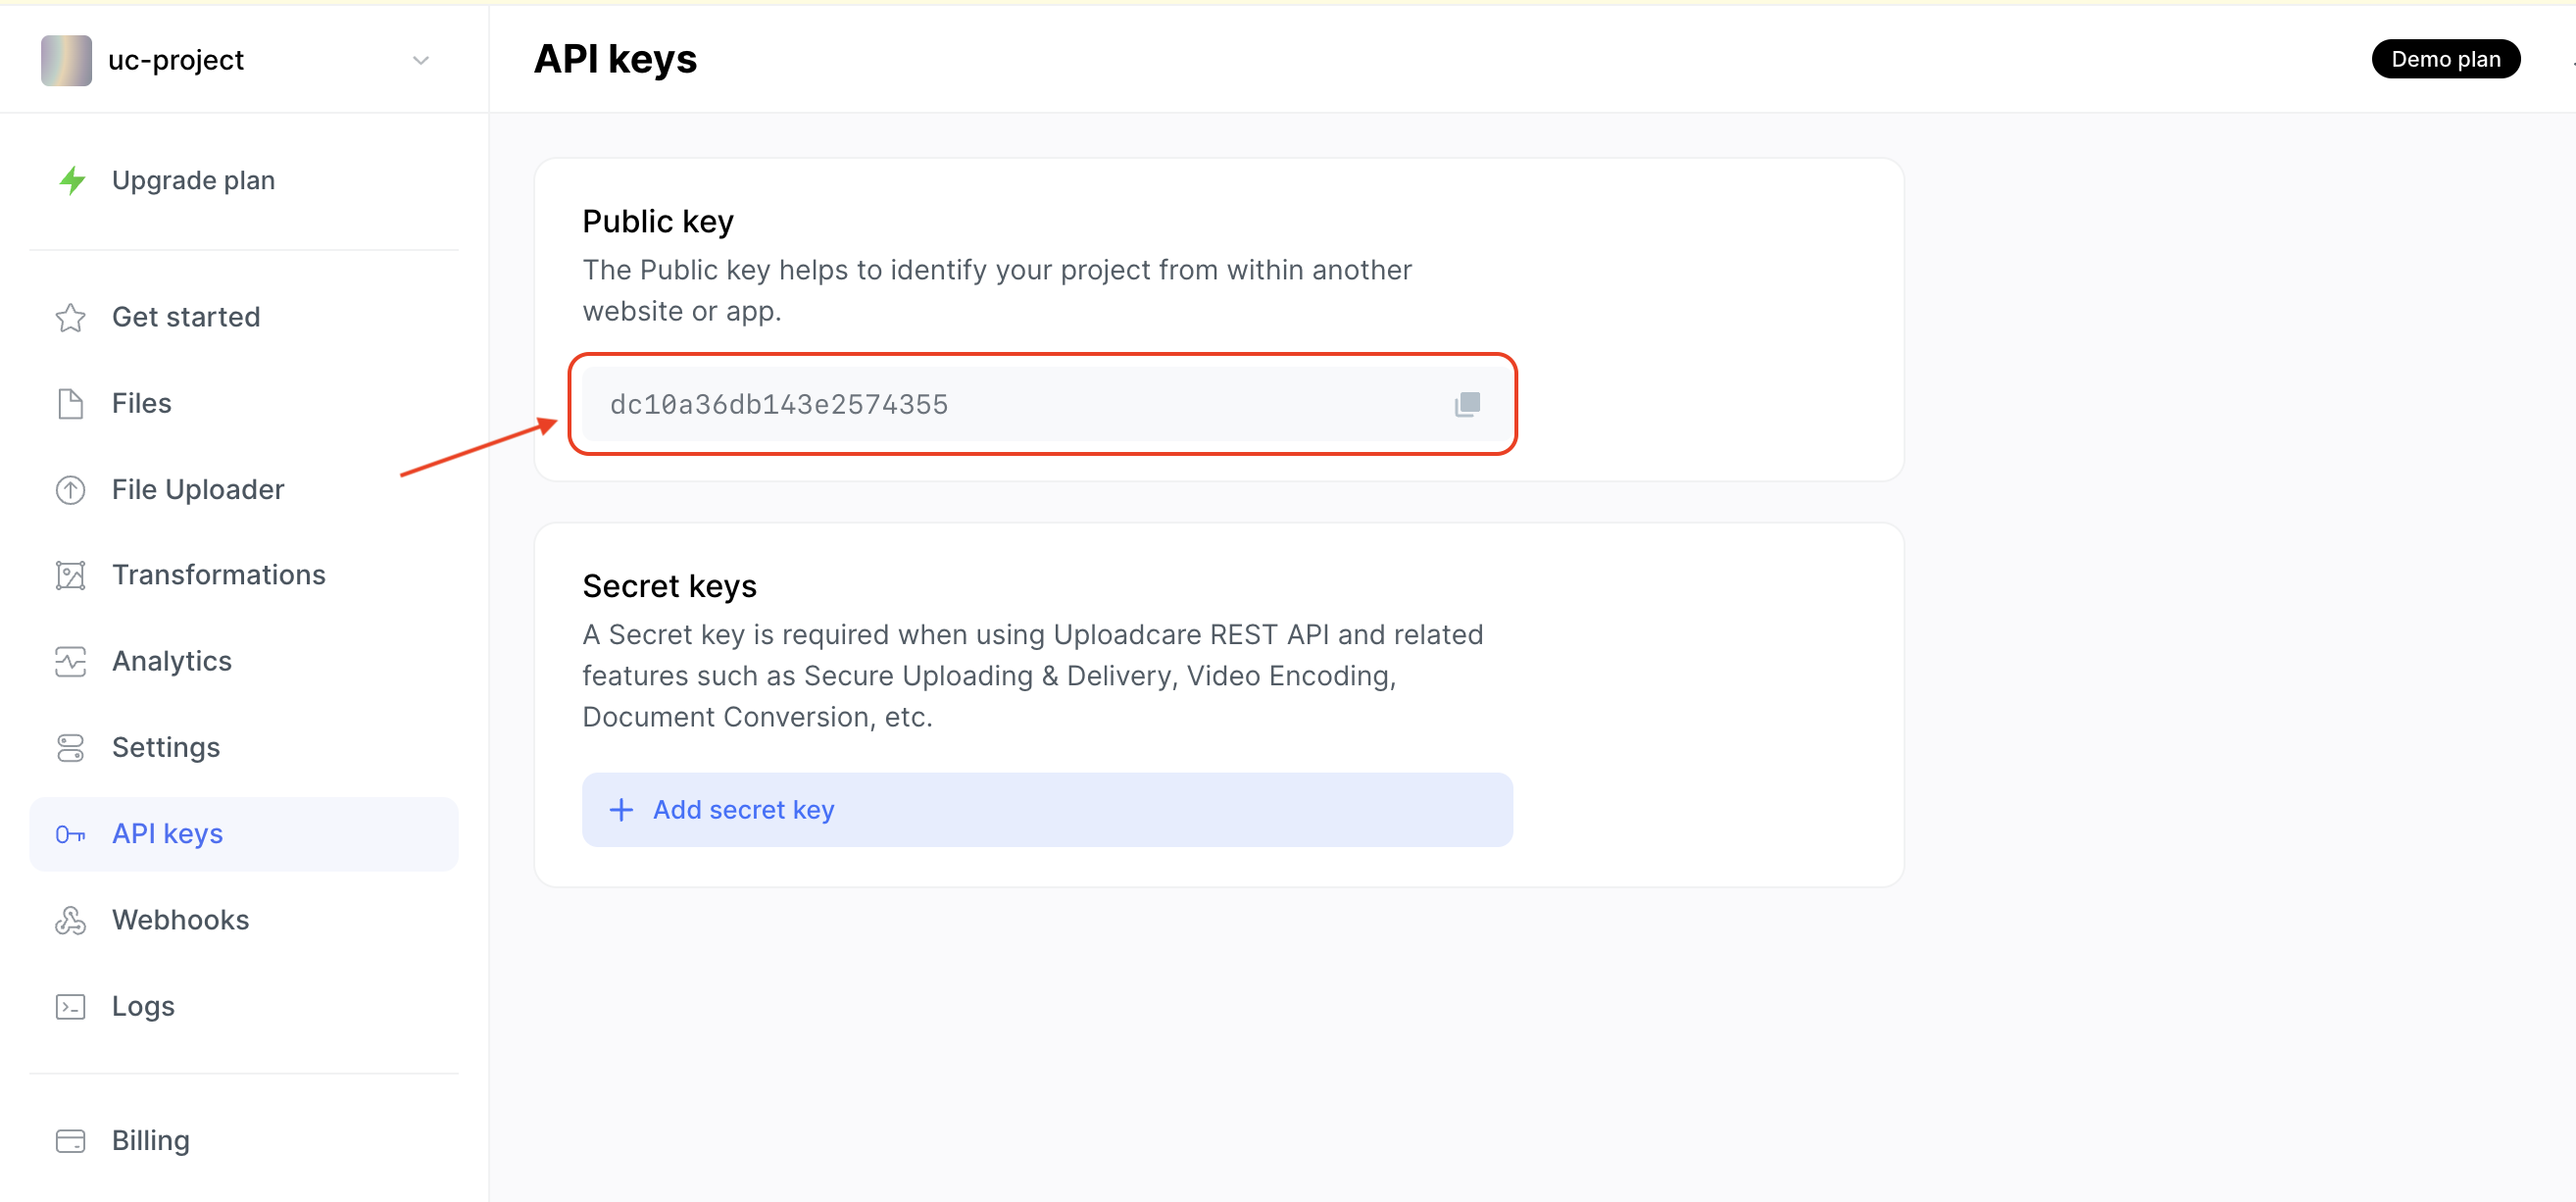
Obtain a Public API key
Head over to your Uploadcare dashboard and copy your Public API key. The Public key of a project is located in your Uploadcare Project Dashboard -> API keys.
 Uploadcare Public API key in the Uploadcare dashboard
You will use the Public key in the next steps of this tutorial.
Add the File Uploader script to your Webflow project
Go to your Webflow Dashboard -> Project -> Site Settings -> Custom Code. In the Custom Code tab, paste the following script:
<link
  rel="stylesheet"
  href="https://cdn.jsdelivr.net/npm/@uploadcare/blocks@0.41.0/web/lr-file-uploader-regular.min.css"
>

<script type="module">
  import * as LR from "https://cdn.jsdelivr.net/npm/@uploadcare/blocks@0.41.0/web/lr-file-uploader-regular.min.js";
  LR.registerBlocks(LR);
</script>
The code above:
- Imports CSS styles for the File Uploader.
- Imports the File Uploader script and registers the File Uploader blocks.
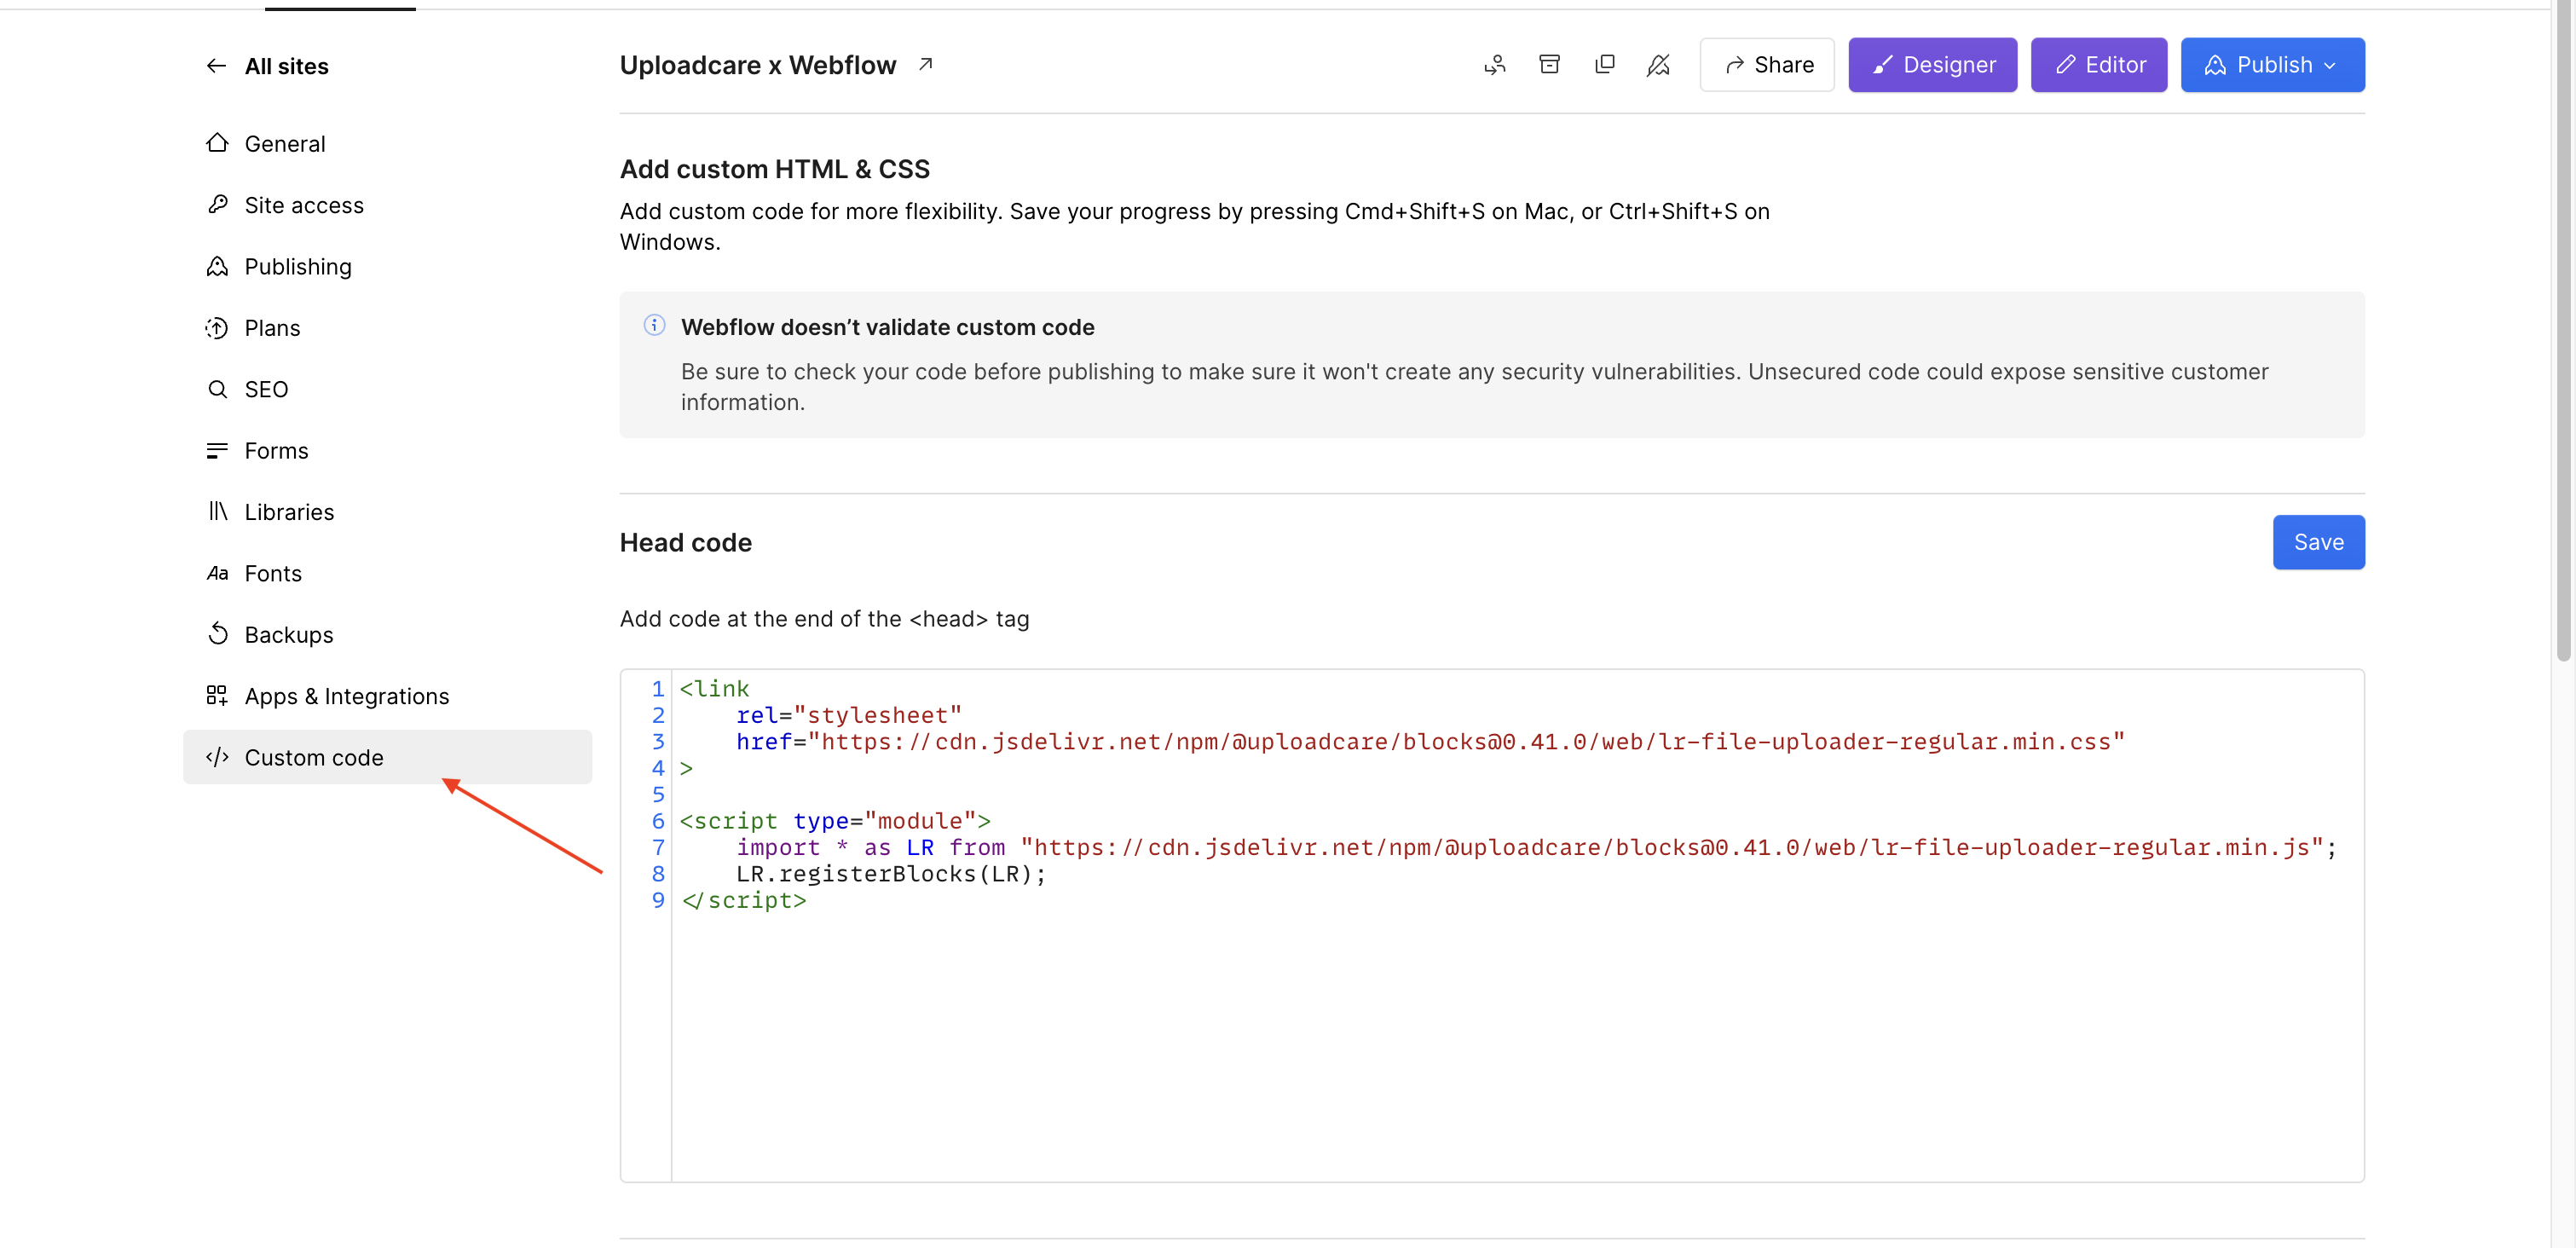 Custom code section in Webflow for adding the File Uploader script
Add the File Uploader configuration to the Webflow page
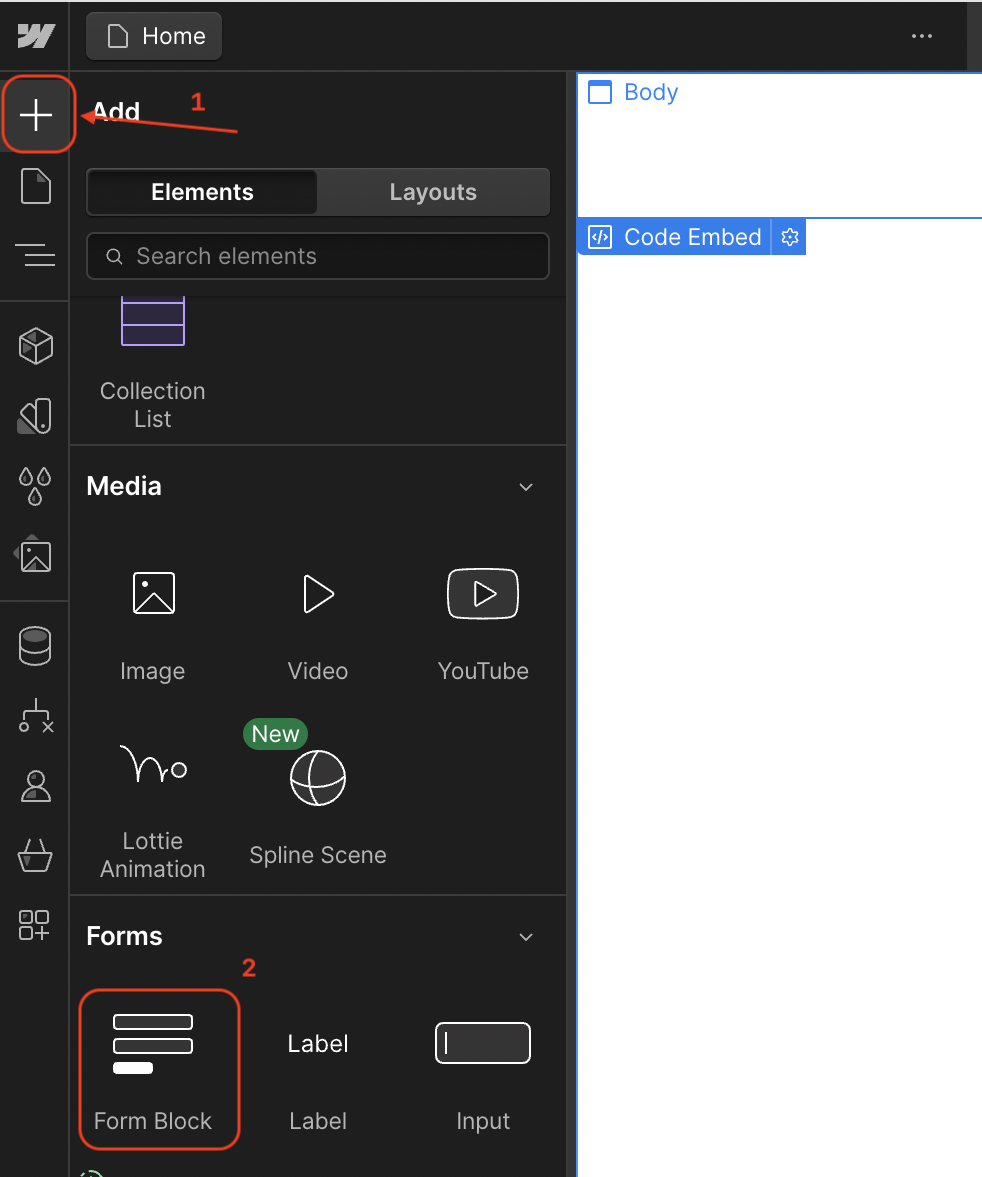
Open your website on the Webflow Designer page to add the configurations for the File Uploader. To do this:
- Click on Add Elements (plus sign button).
- Scroll down and drag a Code Embed block onto the page.
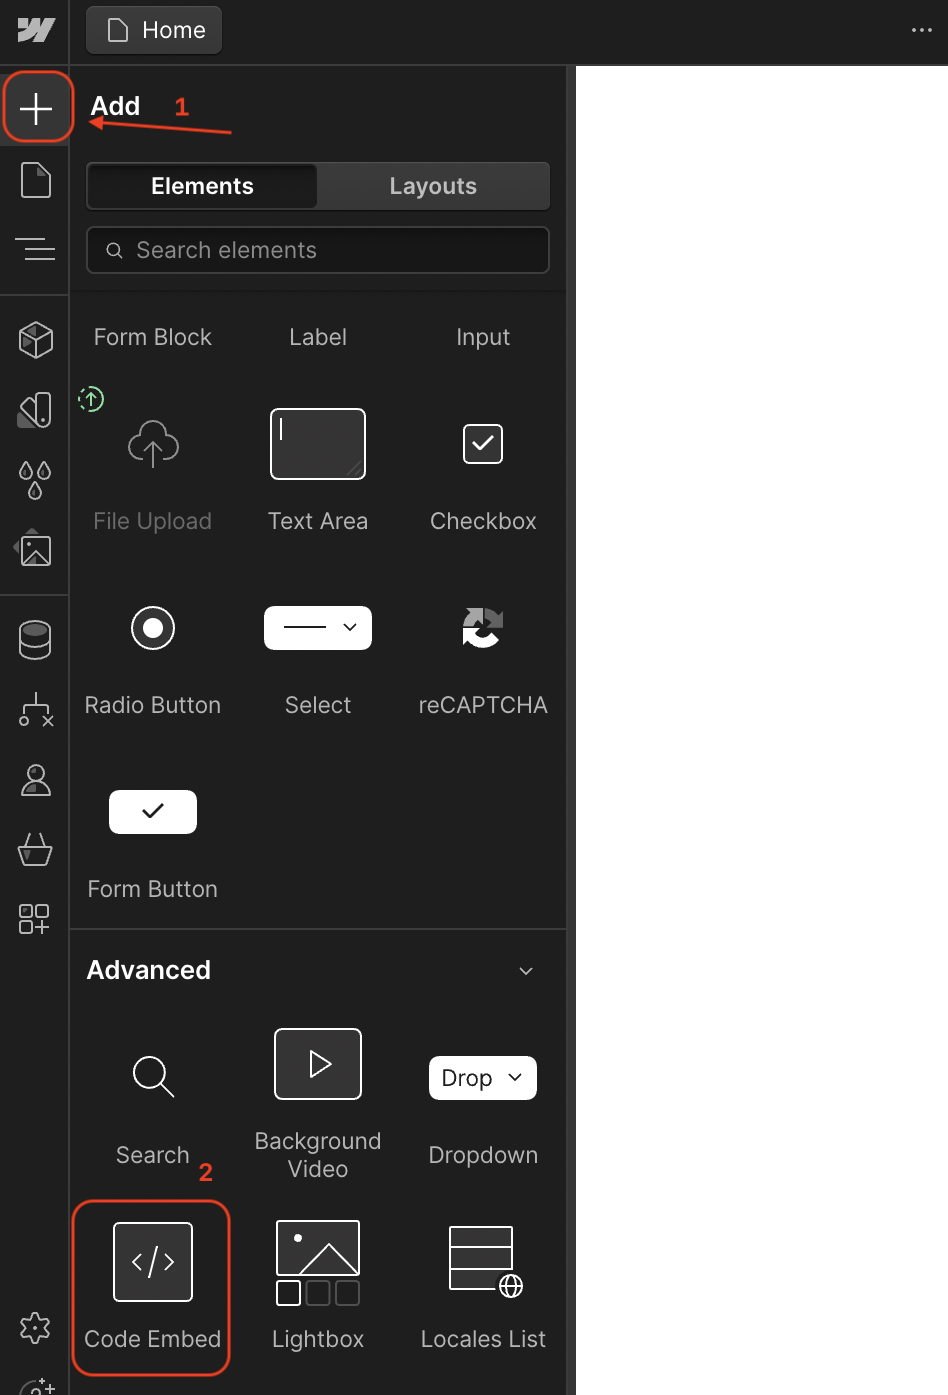 Adding a code embed block in Webflow Designer
Add the following code to the Code Embed block to configure the File Uploader:
<lr-config
  ctx-name="my-uploader"
  pubkey="YOUR_PUBLIC_KEY"
  group-output
></lr-config>
The code above:
- Creates a File Uploader configuration block.
- Sets the context name to
my-uploader. - Sets the public key to your Uploadcare Public API key.
- Enables the
group-outputoption to group all files uploaded as a single group URL.
Replace YOUR_PUBLIC_KEY with your public API key.
For more details on the available options for configuring the File Uploader, check out the configuration page.
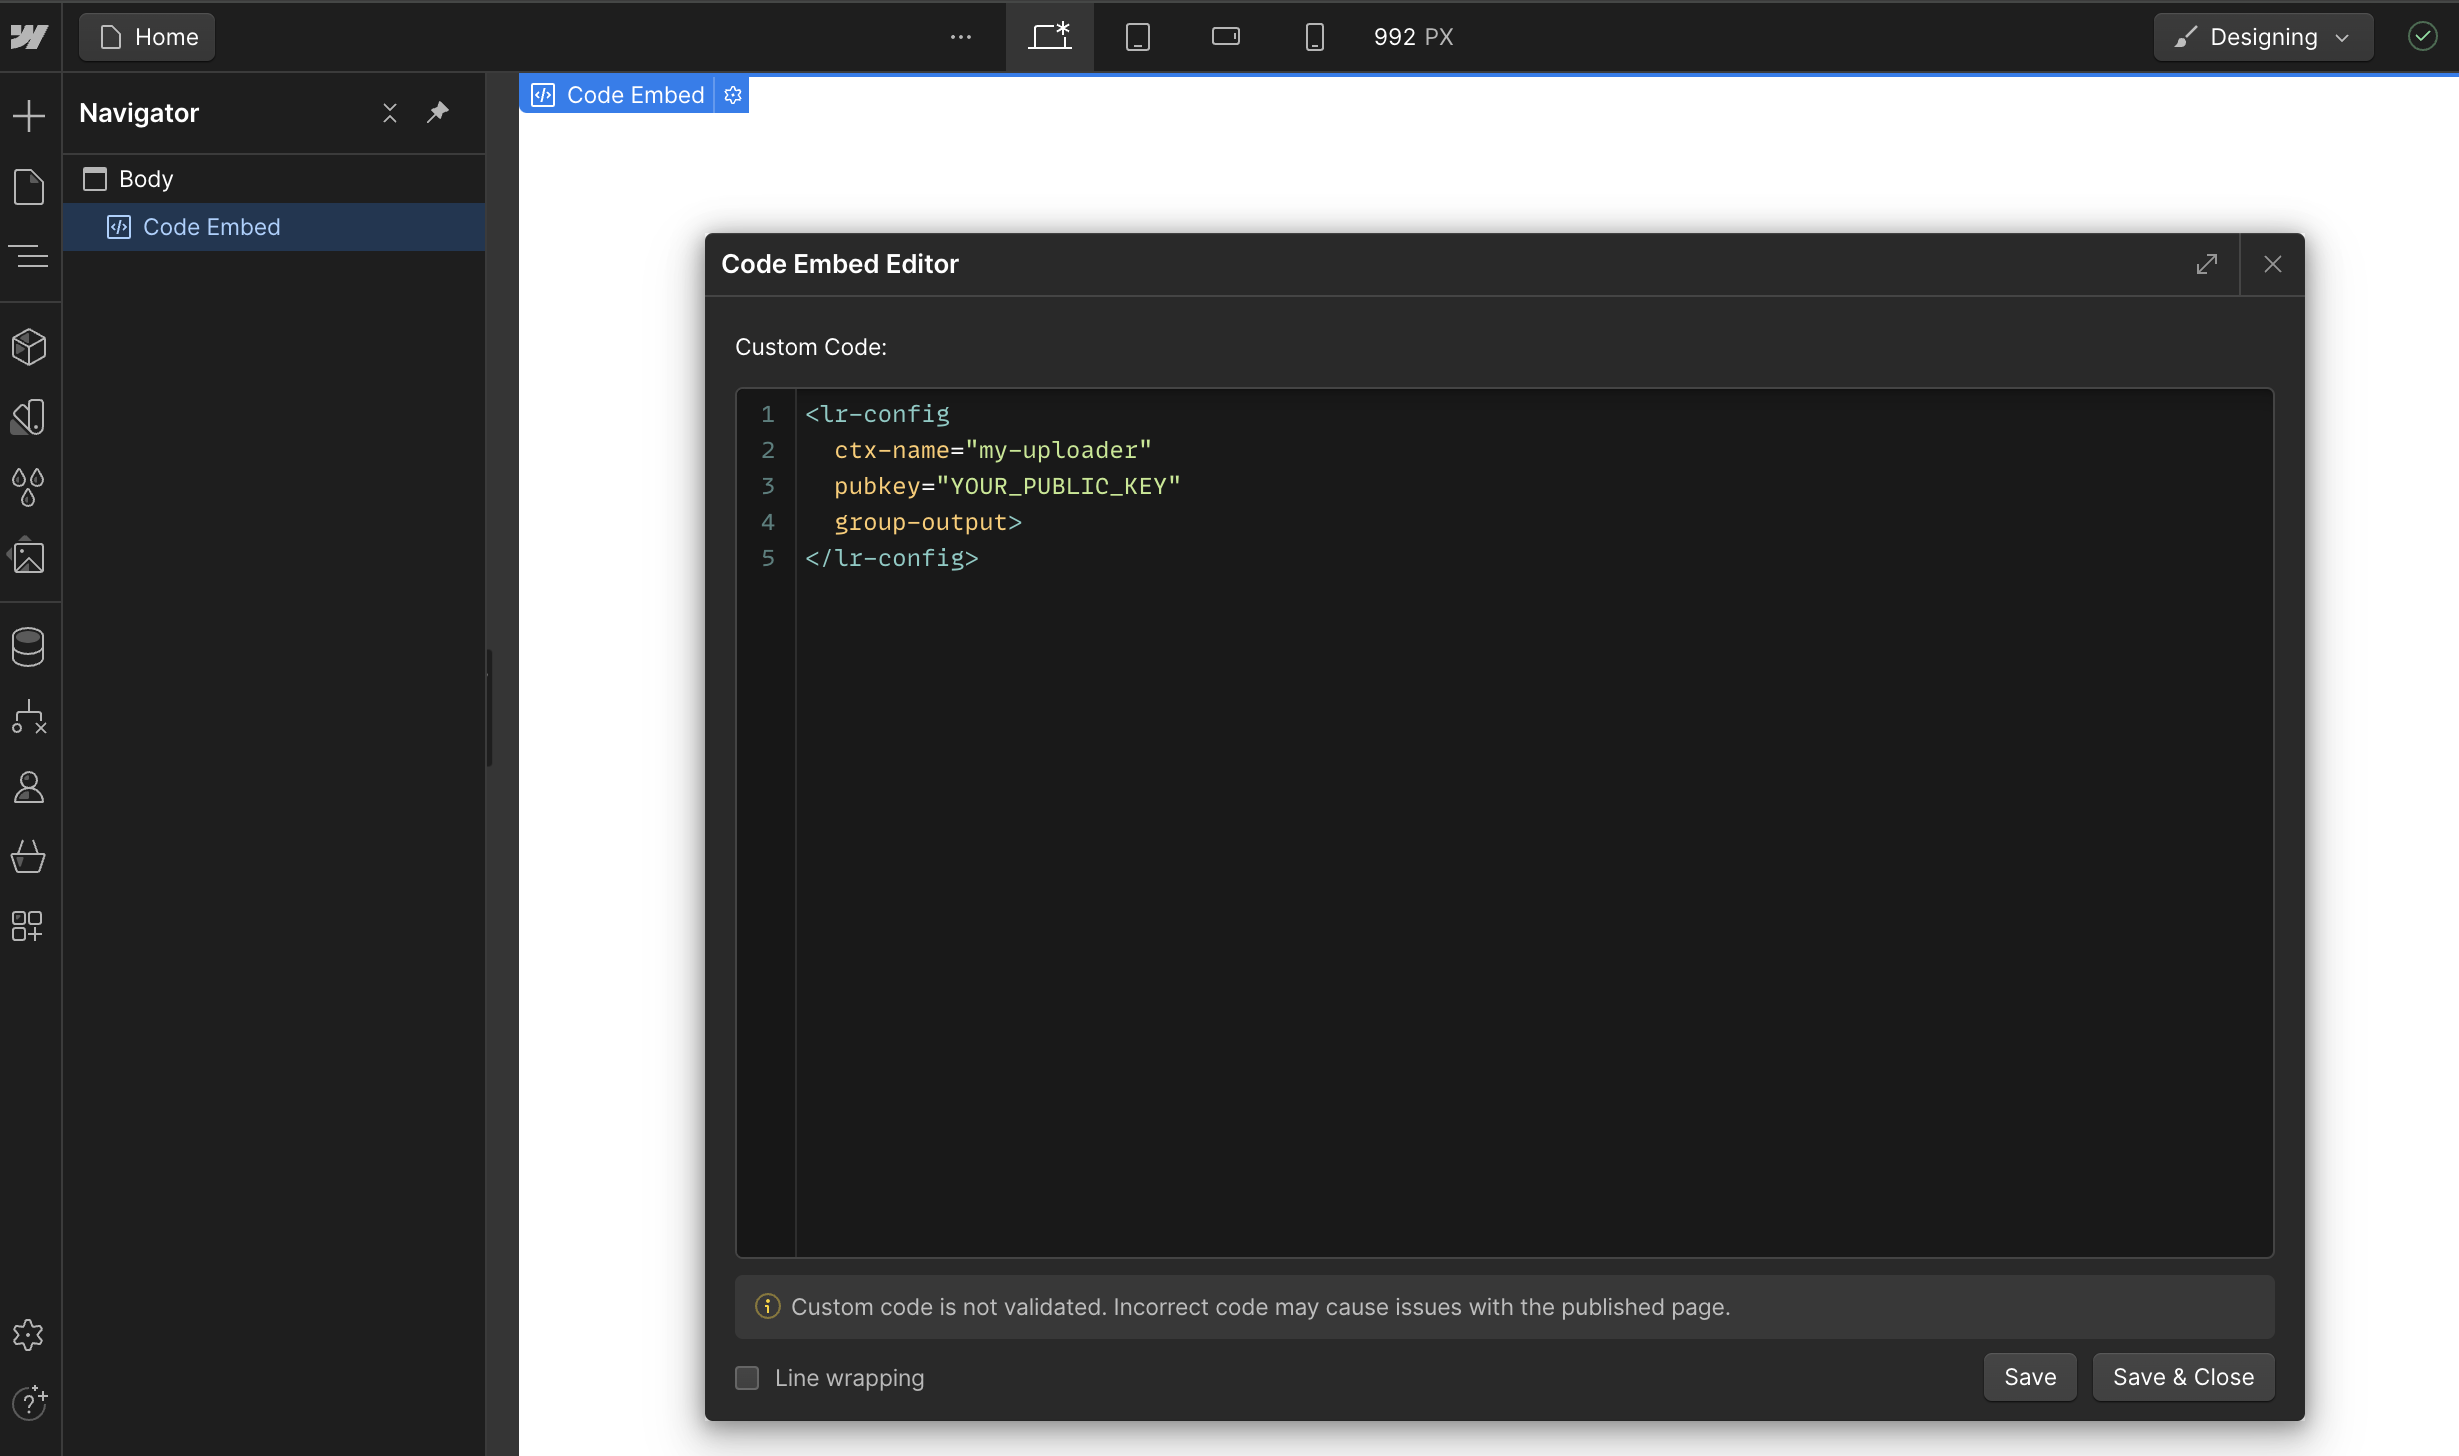 Code to configure the File Uploader in a Webflow code embed block
Click on the Save and Close button to save the changes.
Add a Webflow form to your page
To add a new form block to the page in Webflow:
- Click on Add Elements (plus sign button).
- Drag a Form Block onto the page.
 Adding a form block in Webflow Designer
Add the File Uploader component to the Webflow form
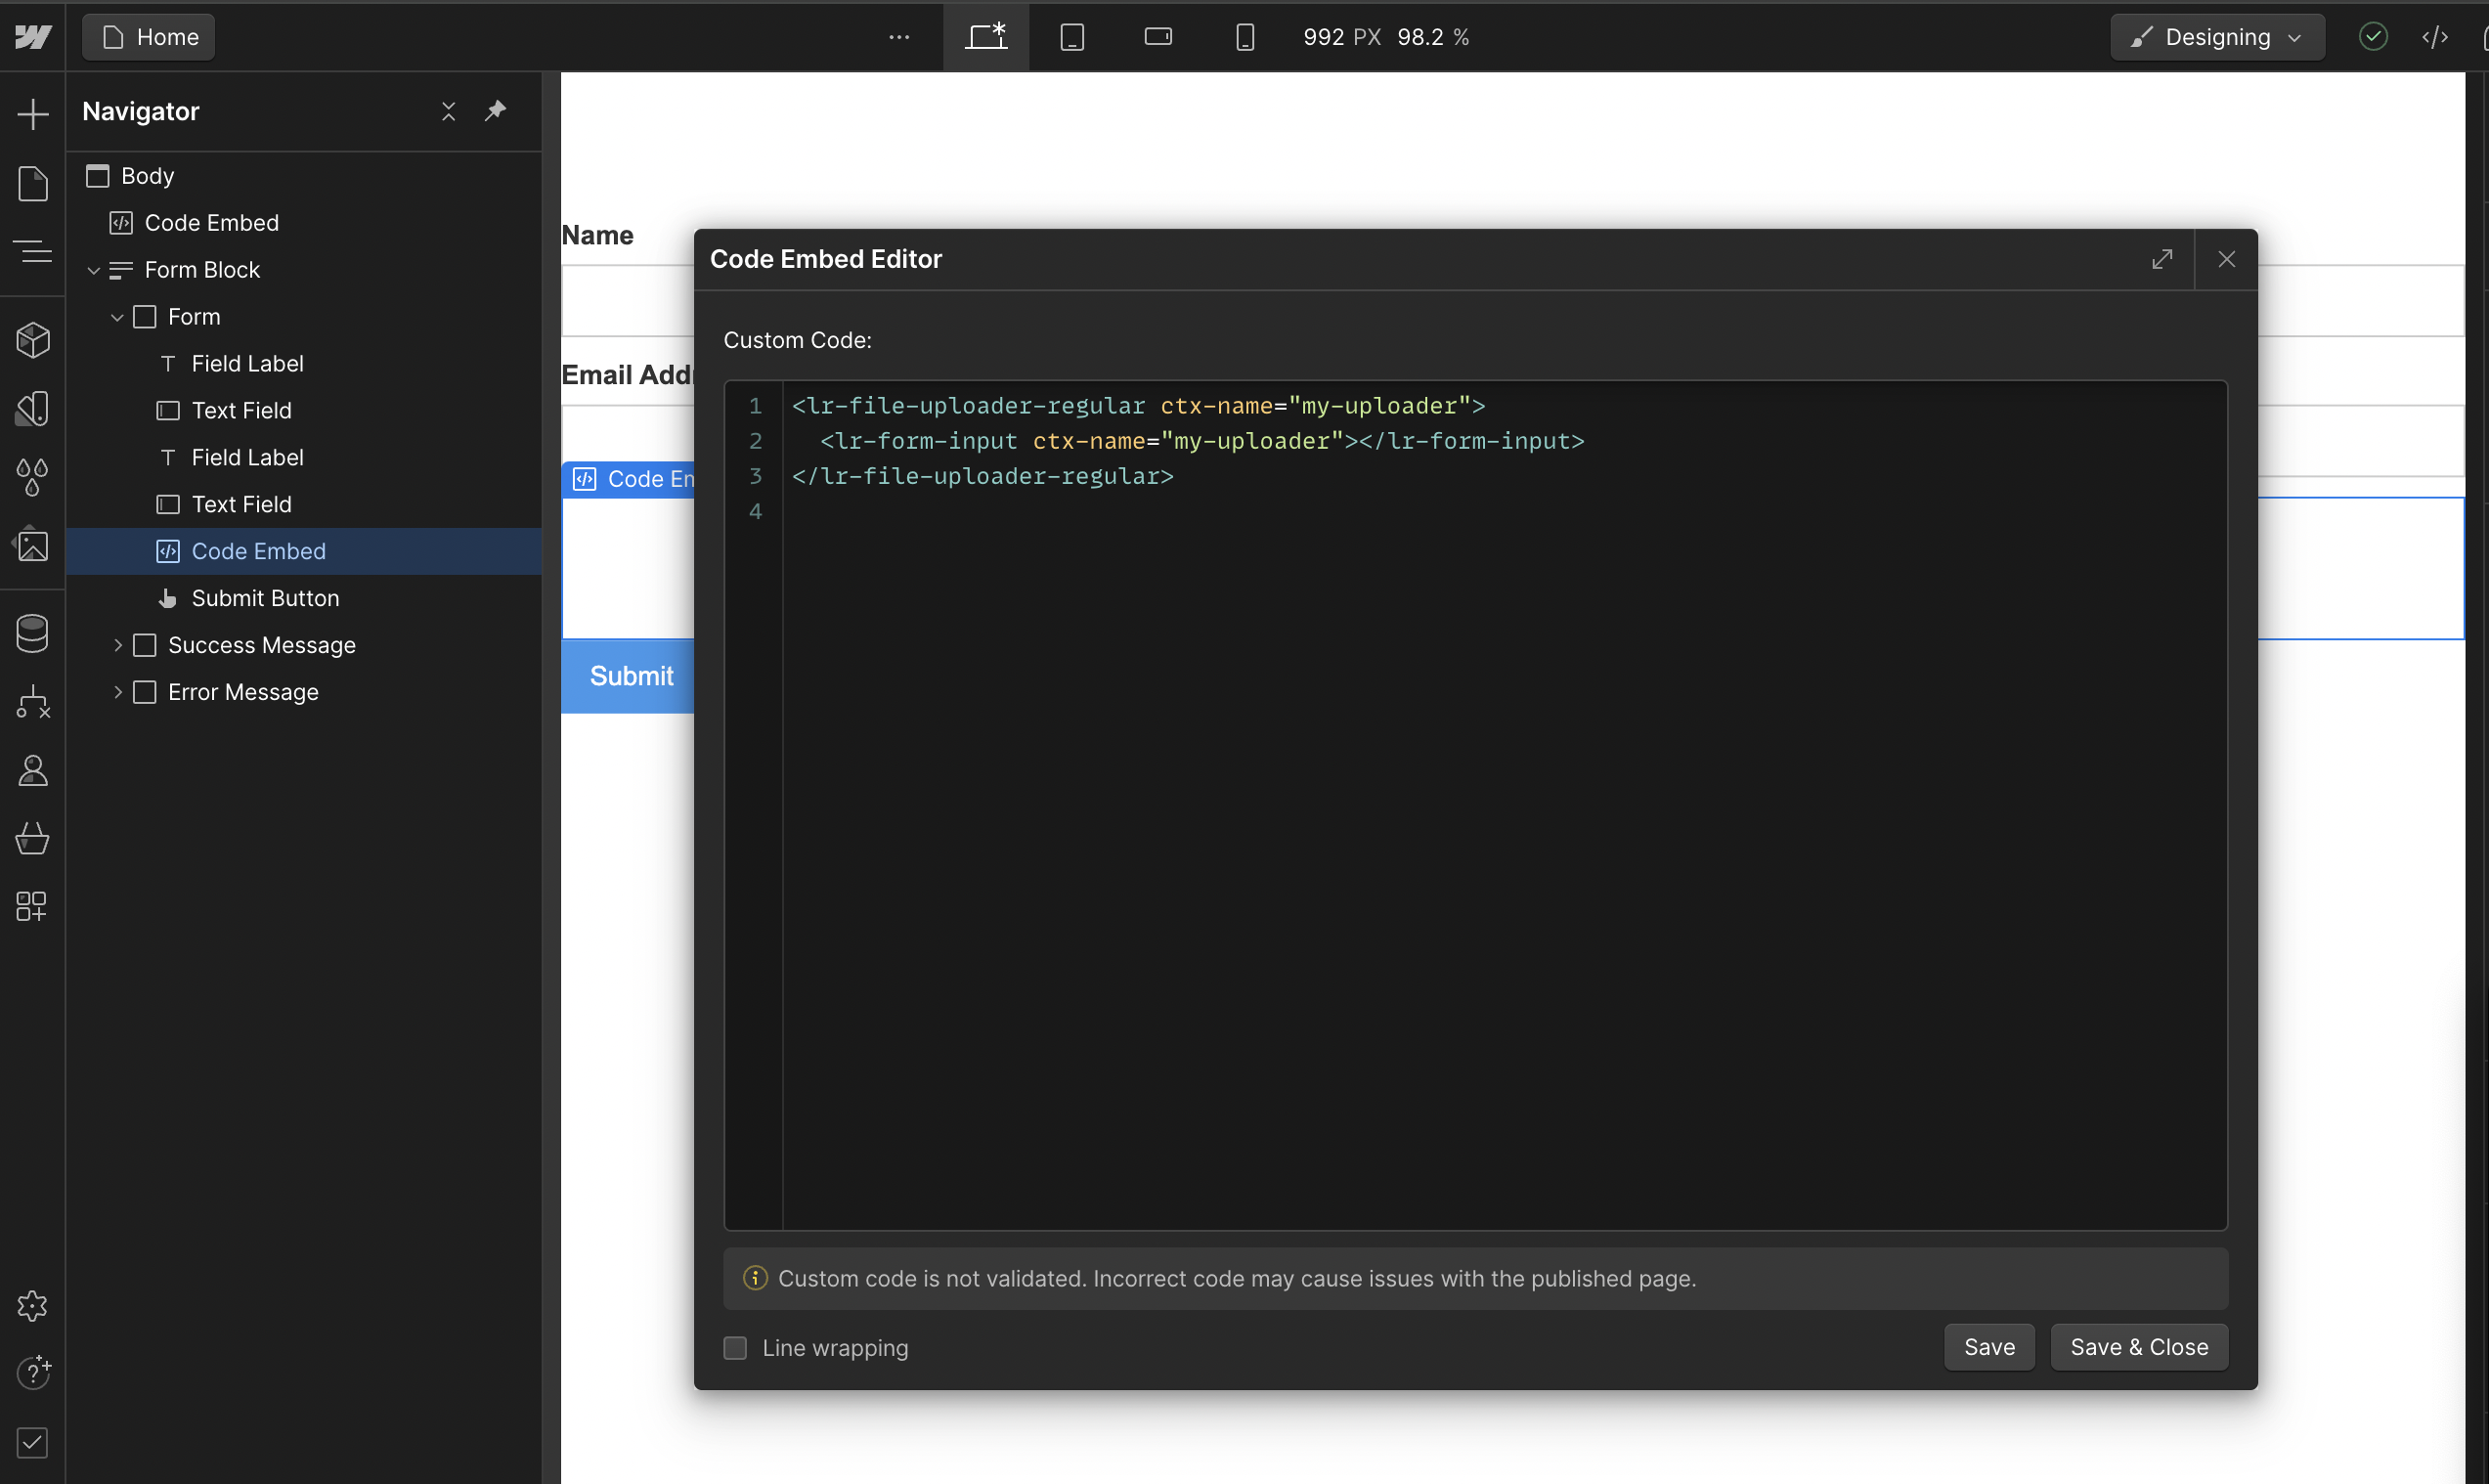
Inside the Form block, just before the submit button, add a new Code Embed block and add the following code:
<lr-file-uploader-regular ctx-name="my-uploader">
  <lr-form-input ctx-name="my-uploader"></lr-form-input>
</lr-file-uploader-regular>
The code above:
- Adds the File Uploader component to the form.
- Adds a form input block that creates an HTML input containing the uploaded files’ URLs.
 Code to add the File Uploader component to the Webflow form
Click on the Save and Close button to save the changes.
Publish your Webflow site
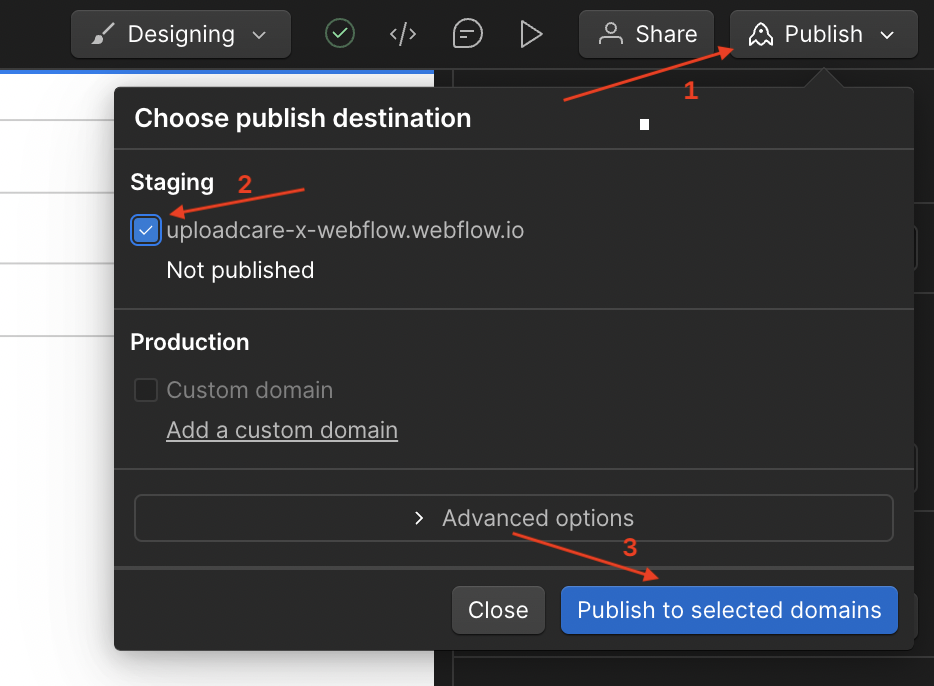
To see the results, you need to publish the page. To do this:
- Click on the Publish button.
- Select the domain to which you want to publish your page.
- Click on the Publish to selected domains button.
 Publishing a Webflow site with the File Uploader integrated
To view the results, click the link icon next to the domain name to open the page in a new tab.
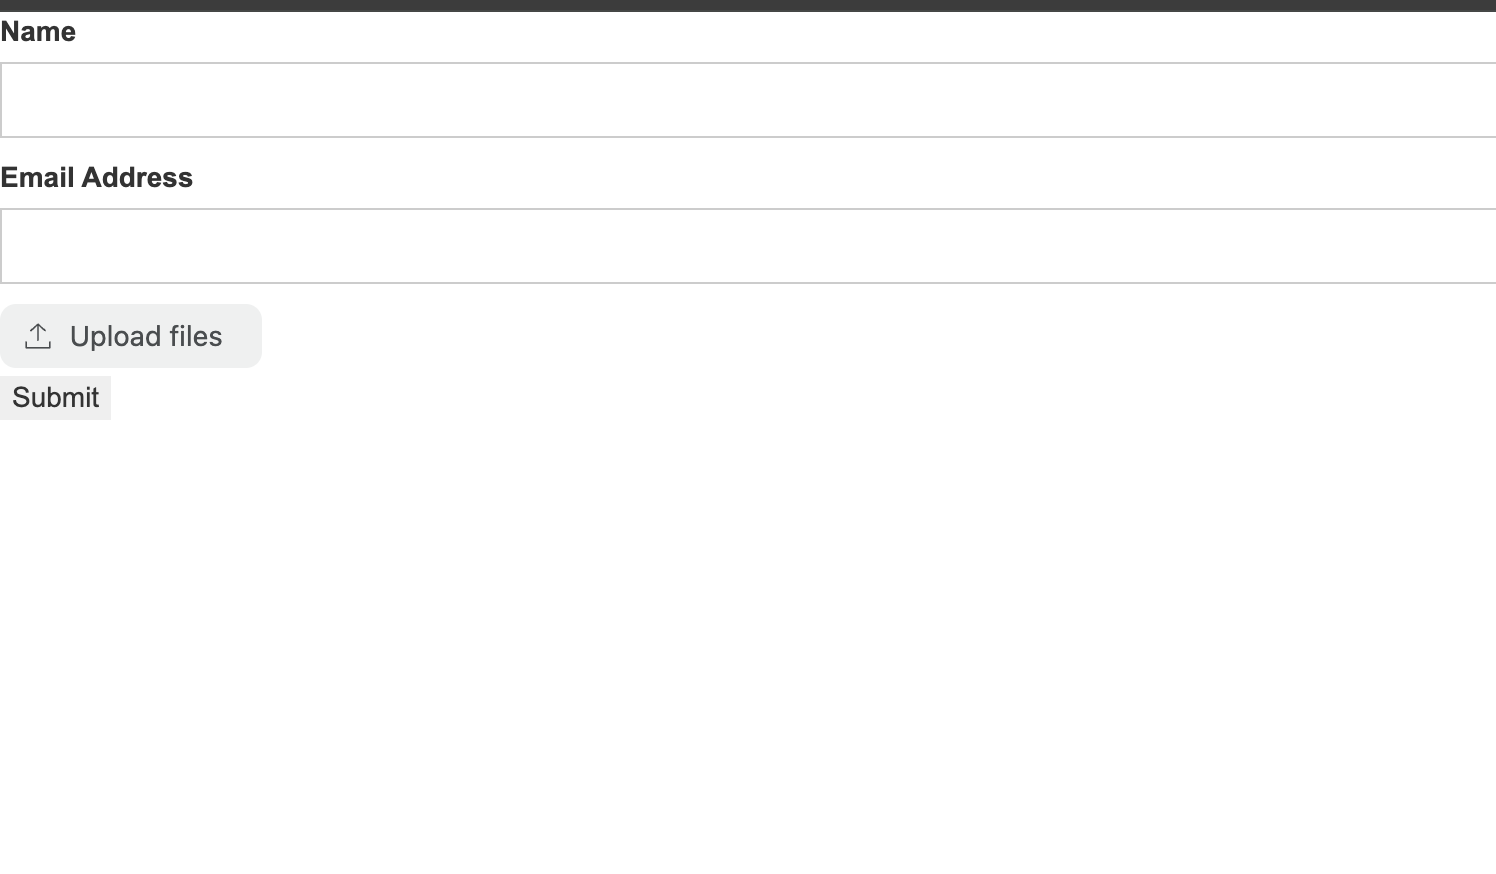
You should have a form with a file uploader that looks like this:
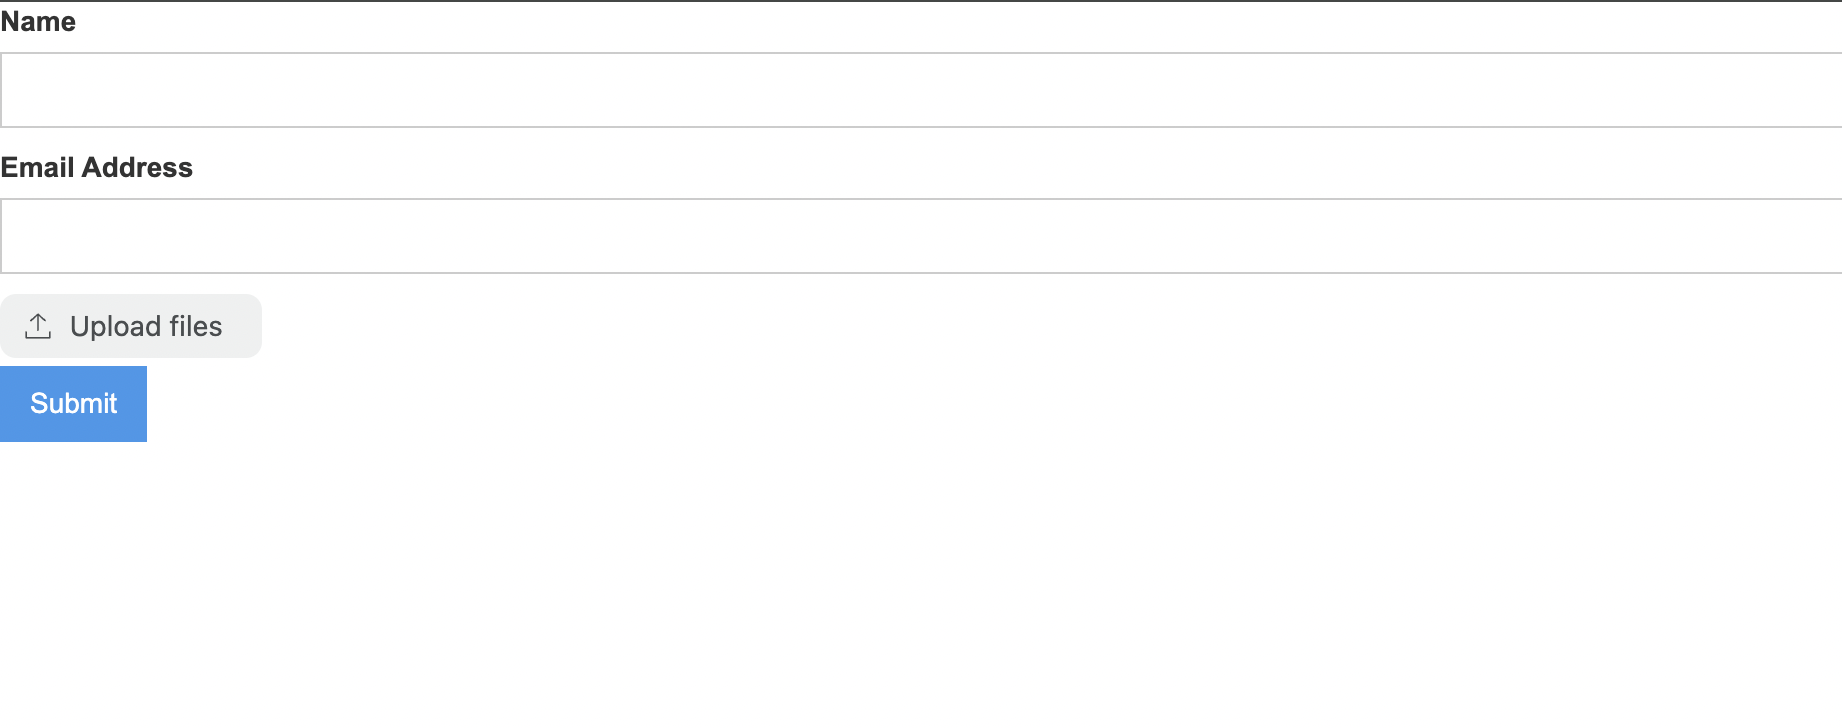 Webflow form with File Uploader integrated
Clicking on the “Upload files” button will open the File Uploader modal to upload files.
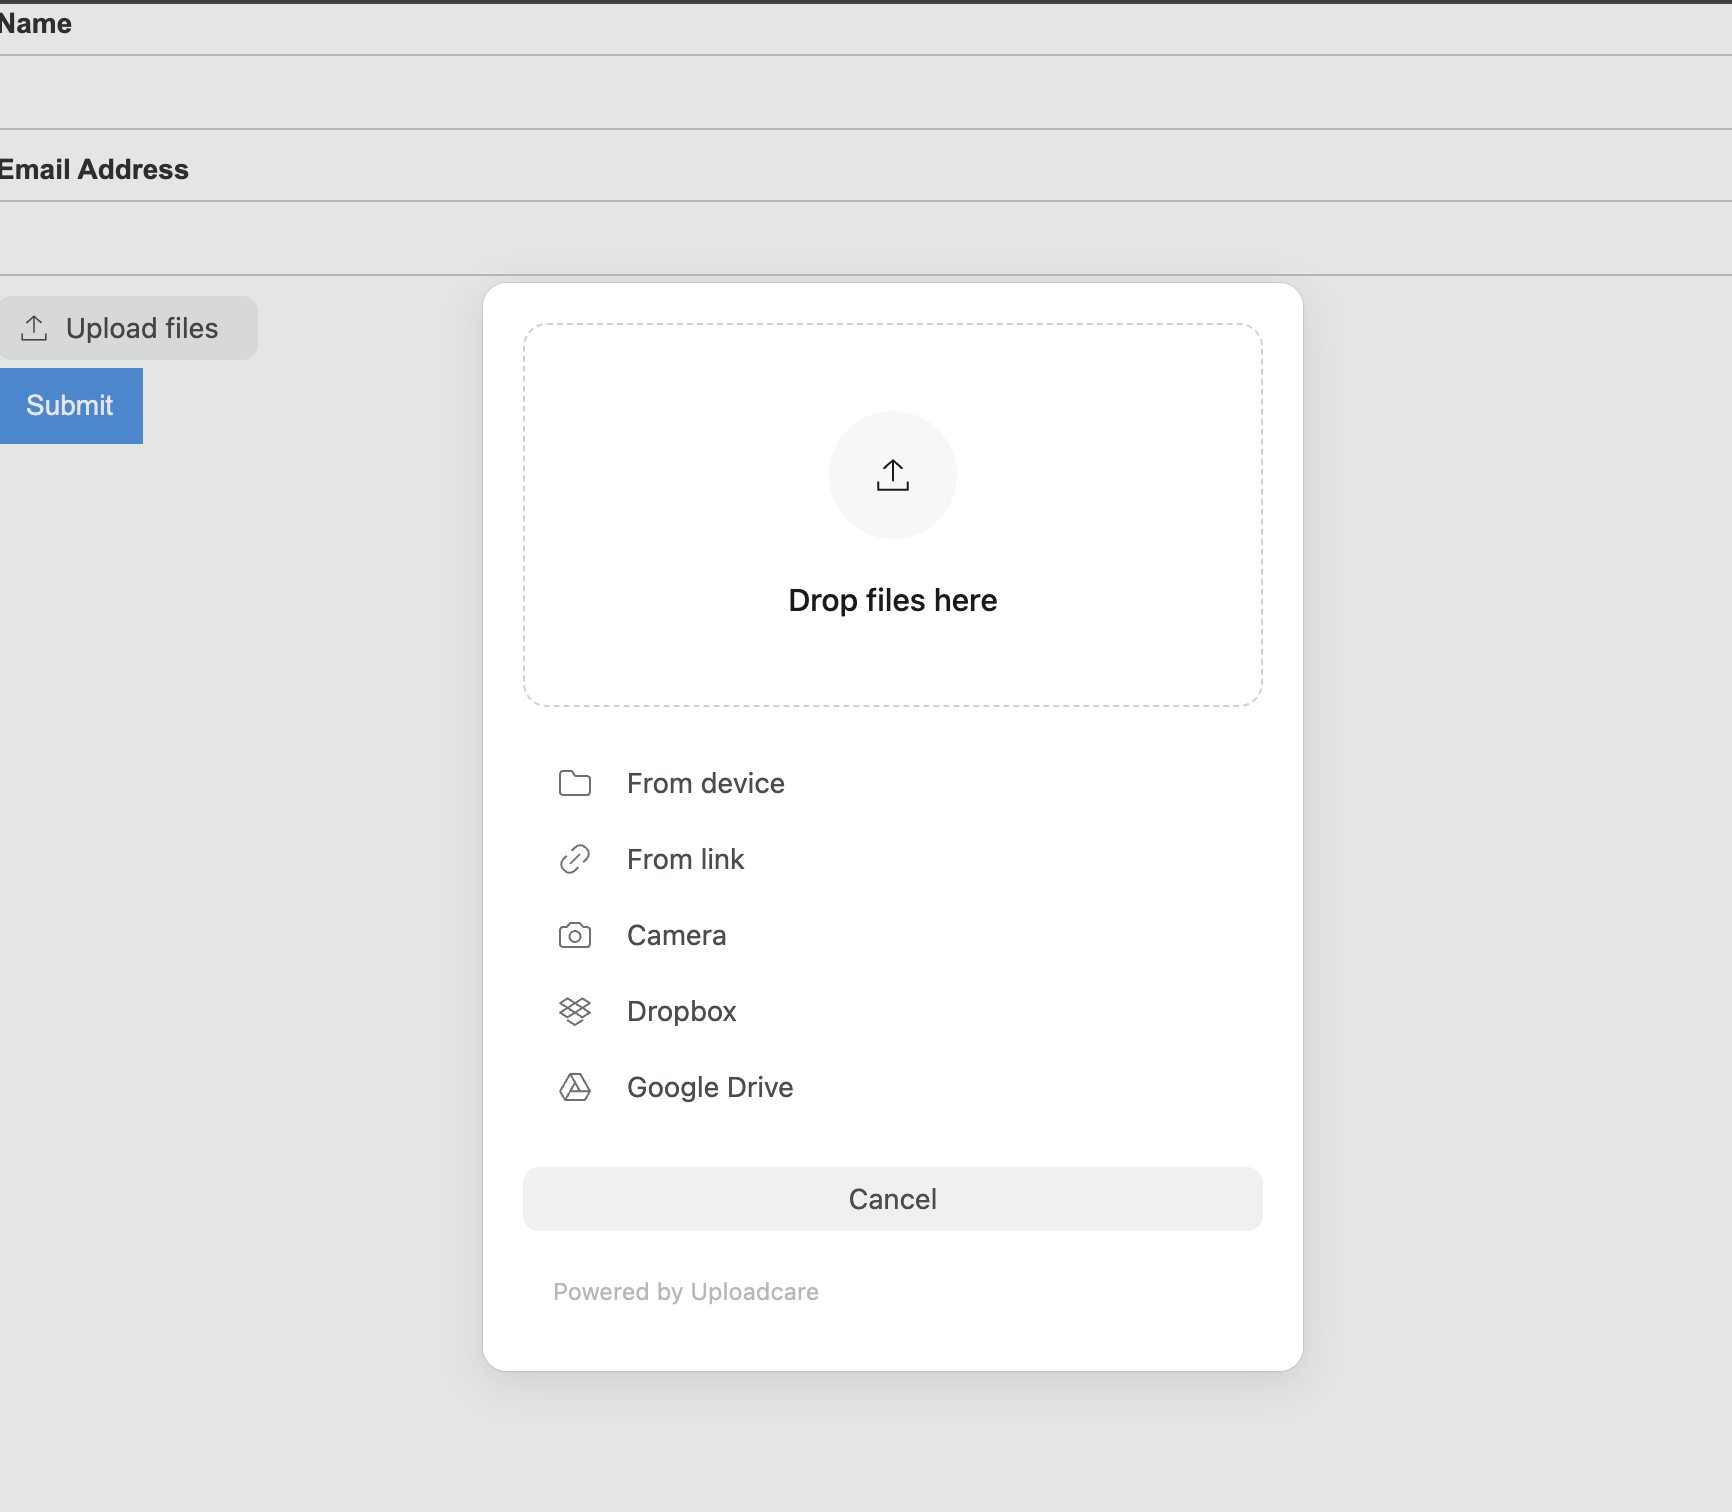 File Uploader modal for uploading files
Customizing the File Uploader
You can add custom CSS code to style the File Uploader and customize it to fit your design. Add the code below to the Custom Code tab in the Site Settings of your Webflow project.
<style>
  lr-file-uploader-regular {
    --darkmode: 1;
    --h-accent: 122;
    --s-accent: 100%;
    --l-accent: calc(50% - 5% * var(--darkmode));
  }
</style>
This will enable dark mode for the File Uploader components and change the modal color accent using the HSL color space.
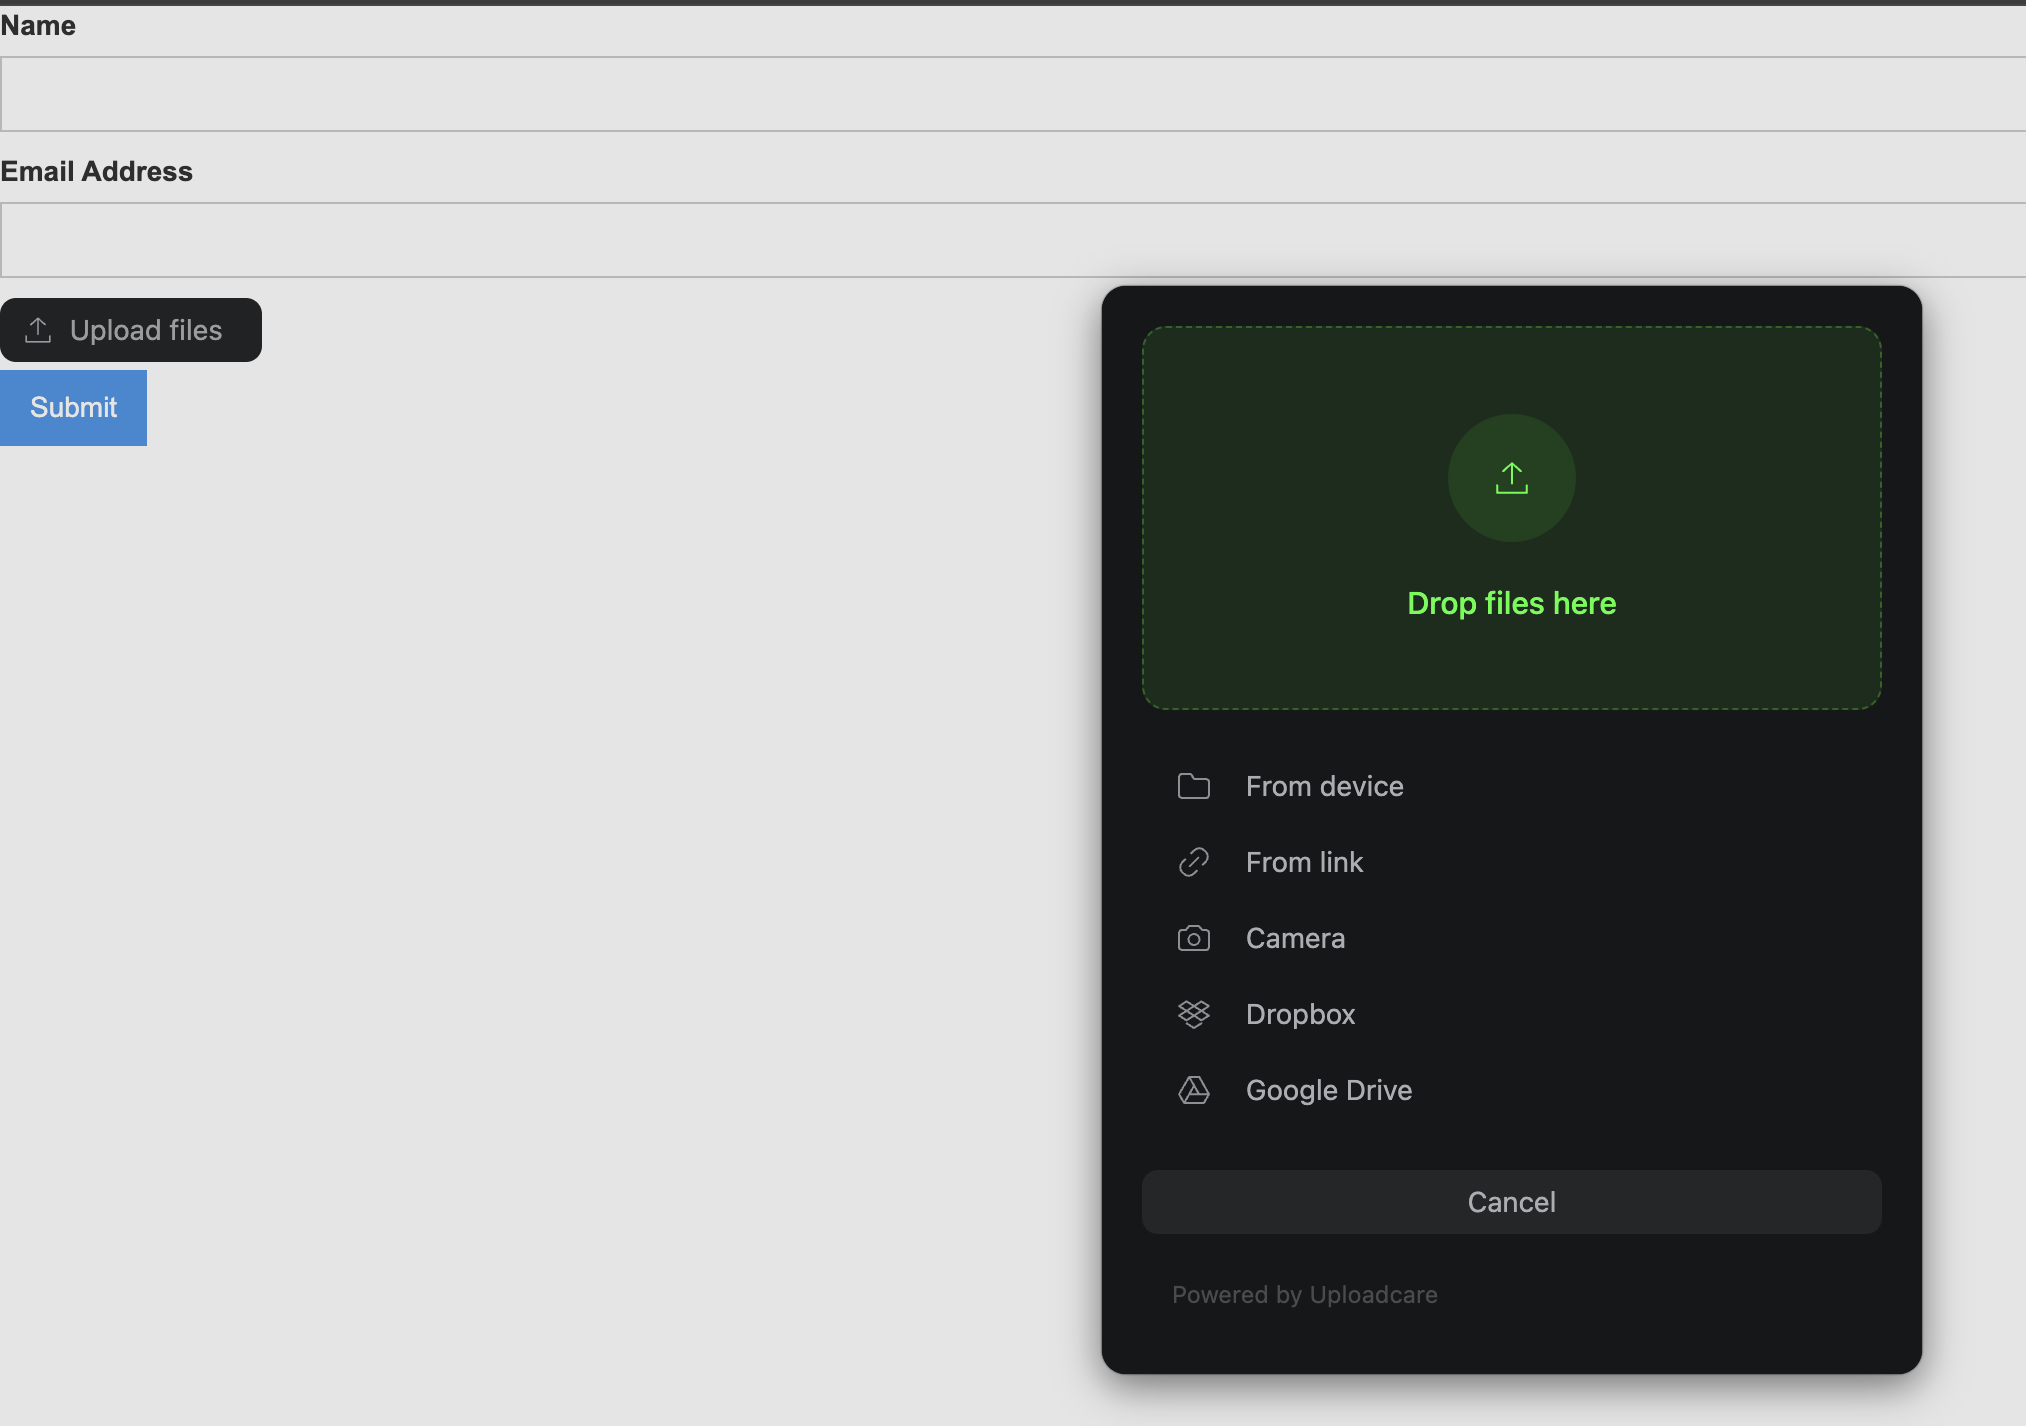 Dark mode for File Uploader modal
Styling individual components
You can also customize the individual components of the File Uploader by targeting the component’s block name with CSS.
lr-simple-btn button {
  width: 500px;
  padding: 20px;
  background-color: #000;
  color: #fff;
}
The code above changes the button’s background color in the File Uploader to black sets the width to 500px, and changes the text color to white.
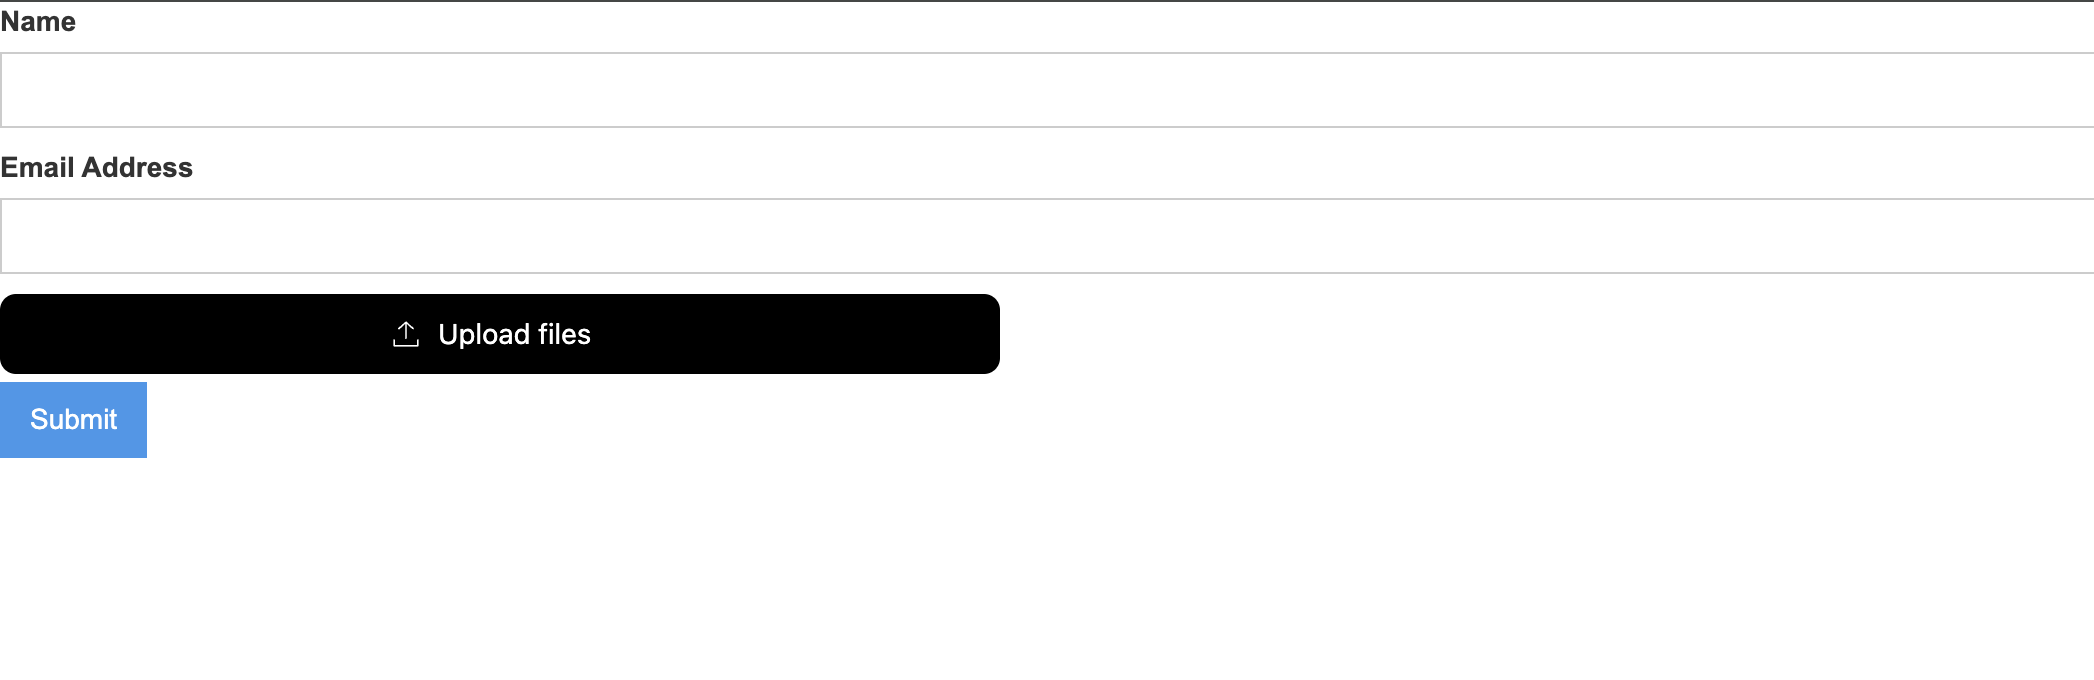 Customized button in File Uploader
For more details on customizing the File Uploader, check out the styling page.
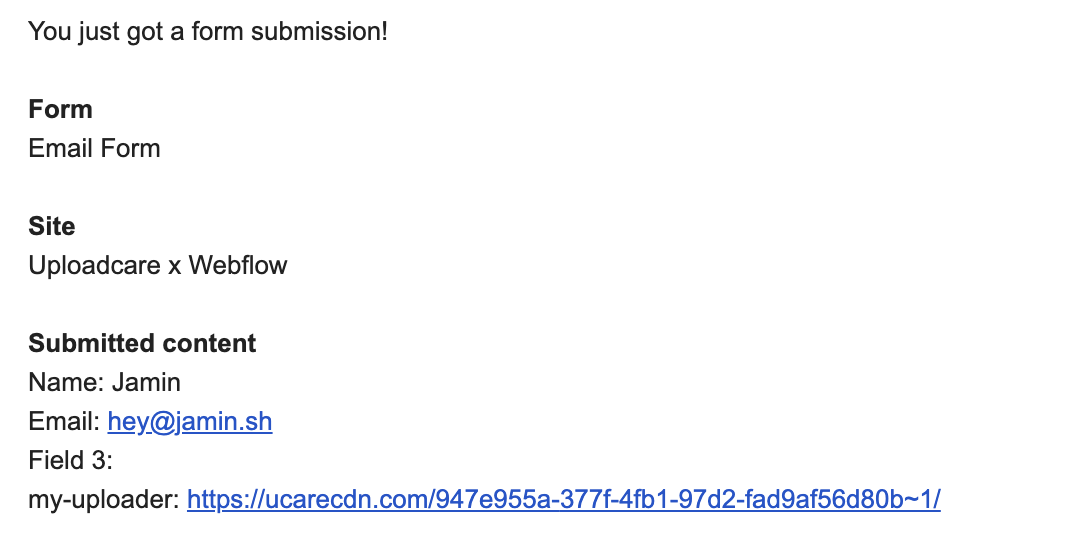
Extra: Fixing empty fields in the form submission
When you submit the form, you may notice that the form submission includes empty fields for the File Uploader component.
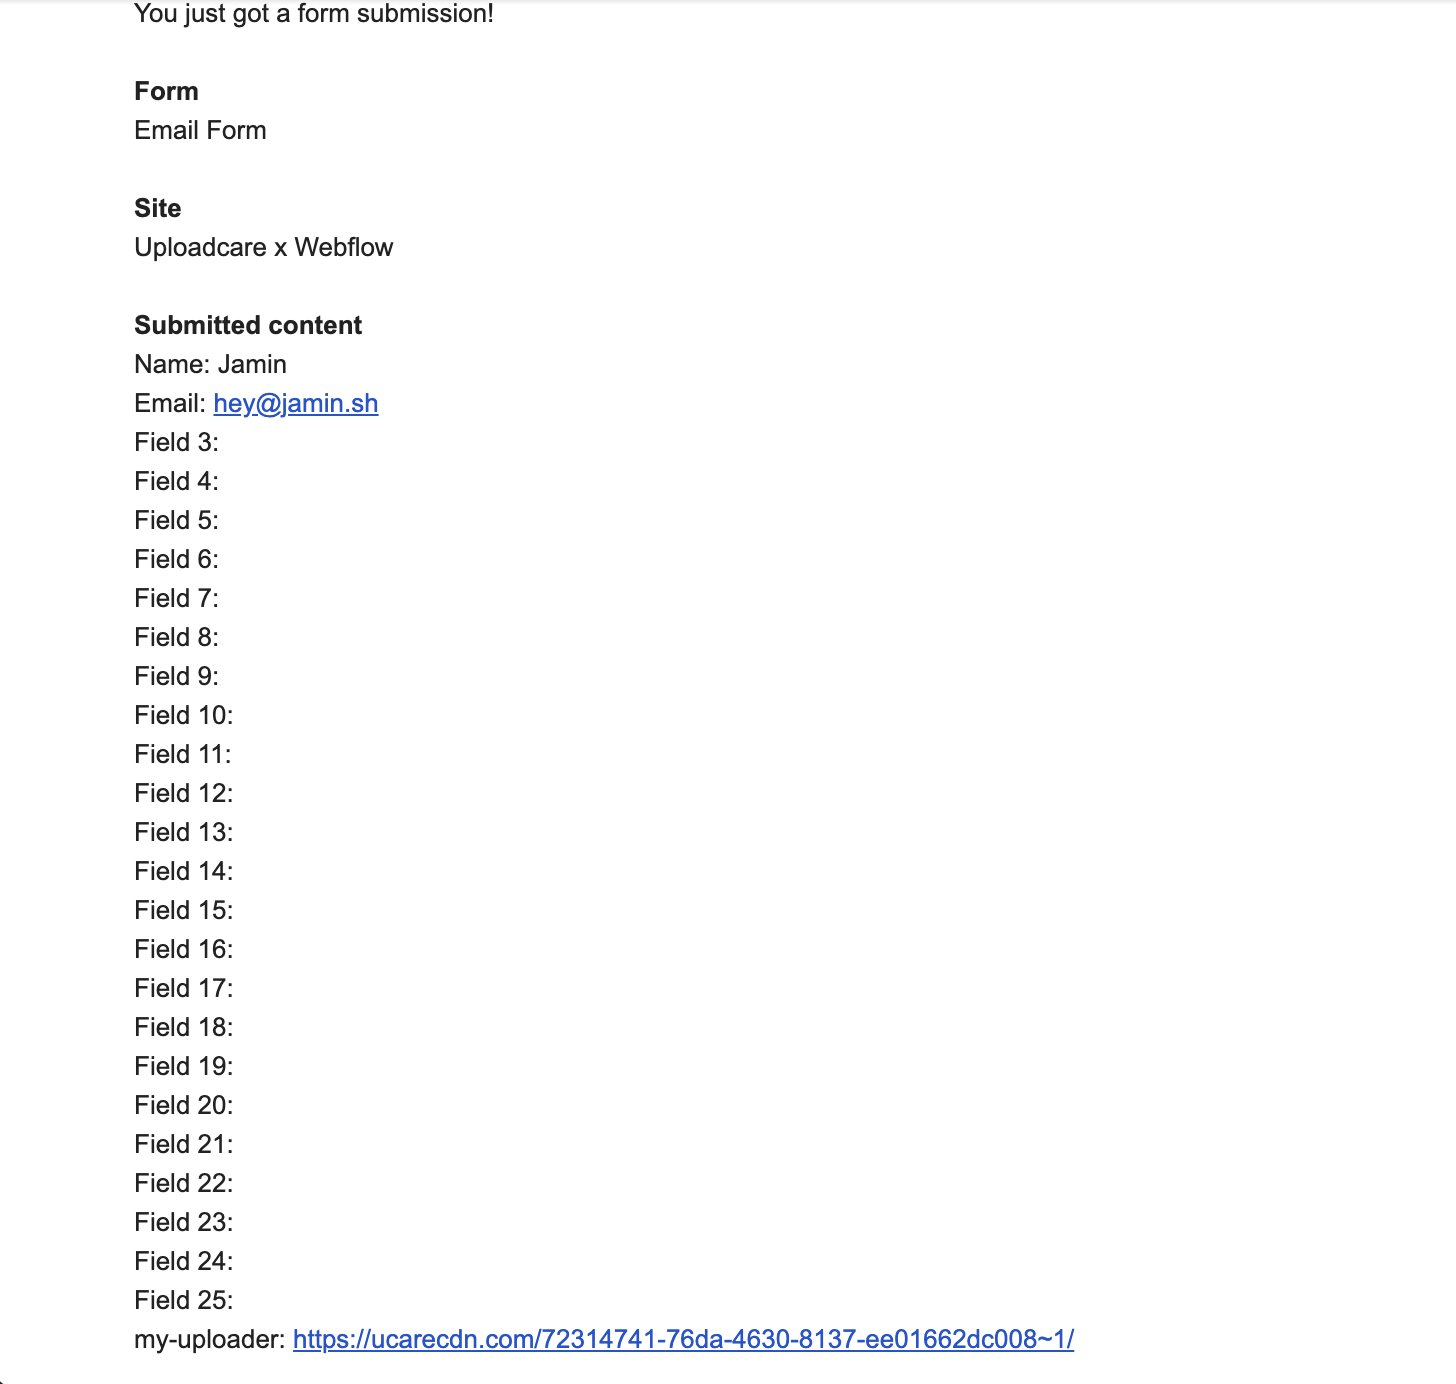 Example of empty fields in form submission due to File Uploader component
This happens because Webflow includes the File Uploader buttons in the form submission, even if they are not input fields.
To fix this, you can add a custom script to remove the empty fields from the form submission by creating a button that first removes buttons from the form and then triggers the form submission.
Create a button to remove empty fields
To create a button in Webflow, just before the add a custom element block to the format. To do this:
- Click on Add Elements (plus sign button).
- Scroll down and drag a Custom Element block onto the page.
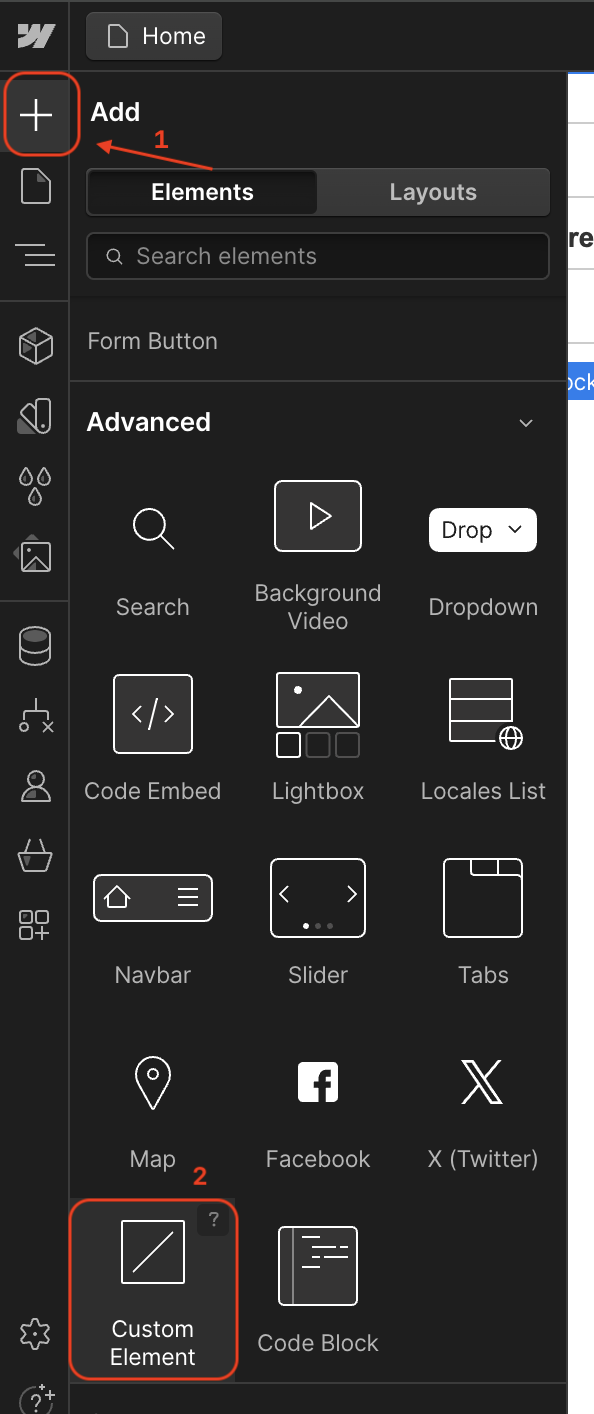 Adding a custom element block in Webflow Designer
With a custom element added to the format, let’s make the custom element a button and add an id to it. On the right side of the Webflow Designer:
- Click on the Settings tabs.
- Change the element’s tag from
divtobutton. - Add an attribute with the name
idand a value ofremove-empty-fields. - Add a text “Submit” to the button.
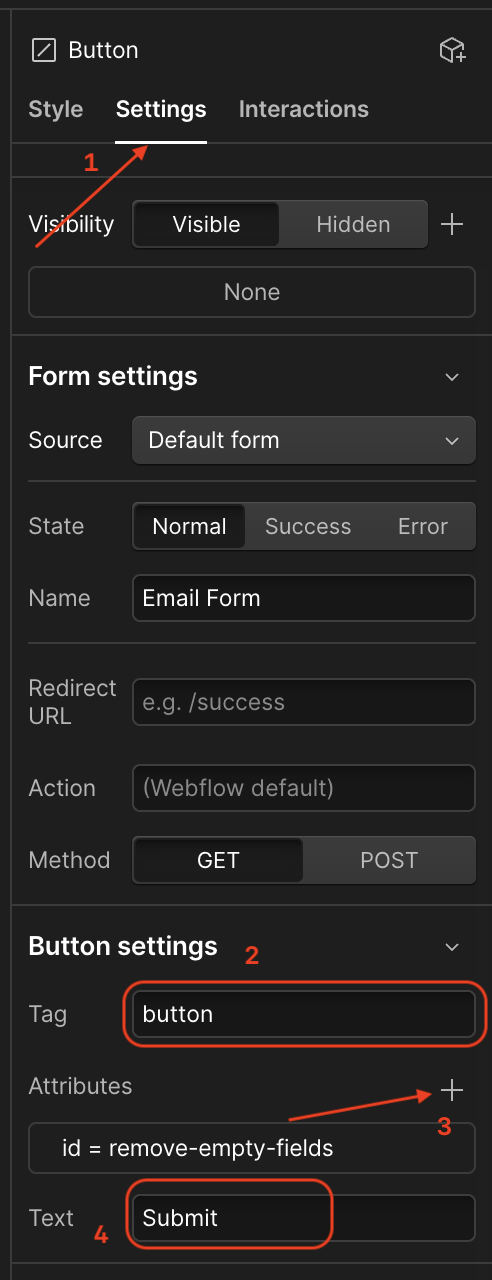 Settings to change custom element to a button in Webflow Designer
Next, click on the original submit button and set the display property to none. This will hide the original submit button and only show the new button.
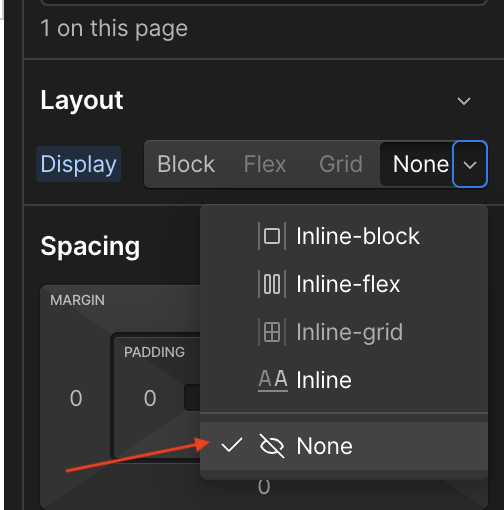 Hiding the original submit button in Webflow Designer
Add a script to remove empty fields
To remove empty fields from the form submission, add the following script to the Footer code in Custom Code tab in the Site Settings of your Webflow project.
<script>
document.addEventListener('DOMContentLoaded', () => {
// Get the remove-empty-fields button from the page
const submitButton = document.querySelector('#remove-empty-fields');
submitButton.addEventListener('click', event => {
event.preventDefault();
const form = document.querySelector('form');
// Remove all button elements from the form
const buttons = form.querySelectorAll('button');
buttons.forEach(button => button.parentNode.removeChild(button));
// Trigger the real submit button
const formButton = form.querySelector('[type="submit"]');
formButton.click();
});
});
</script>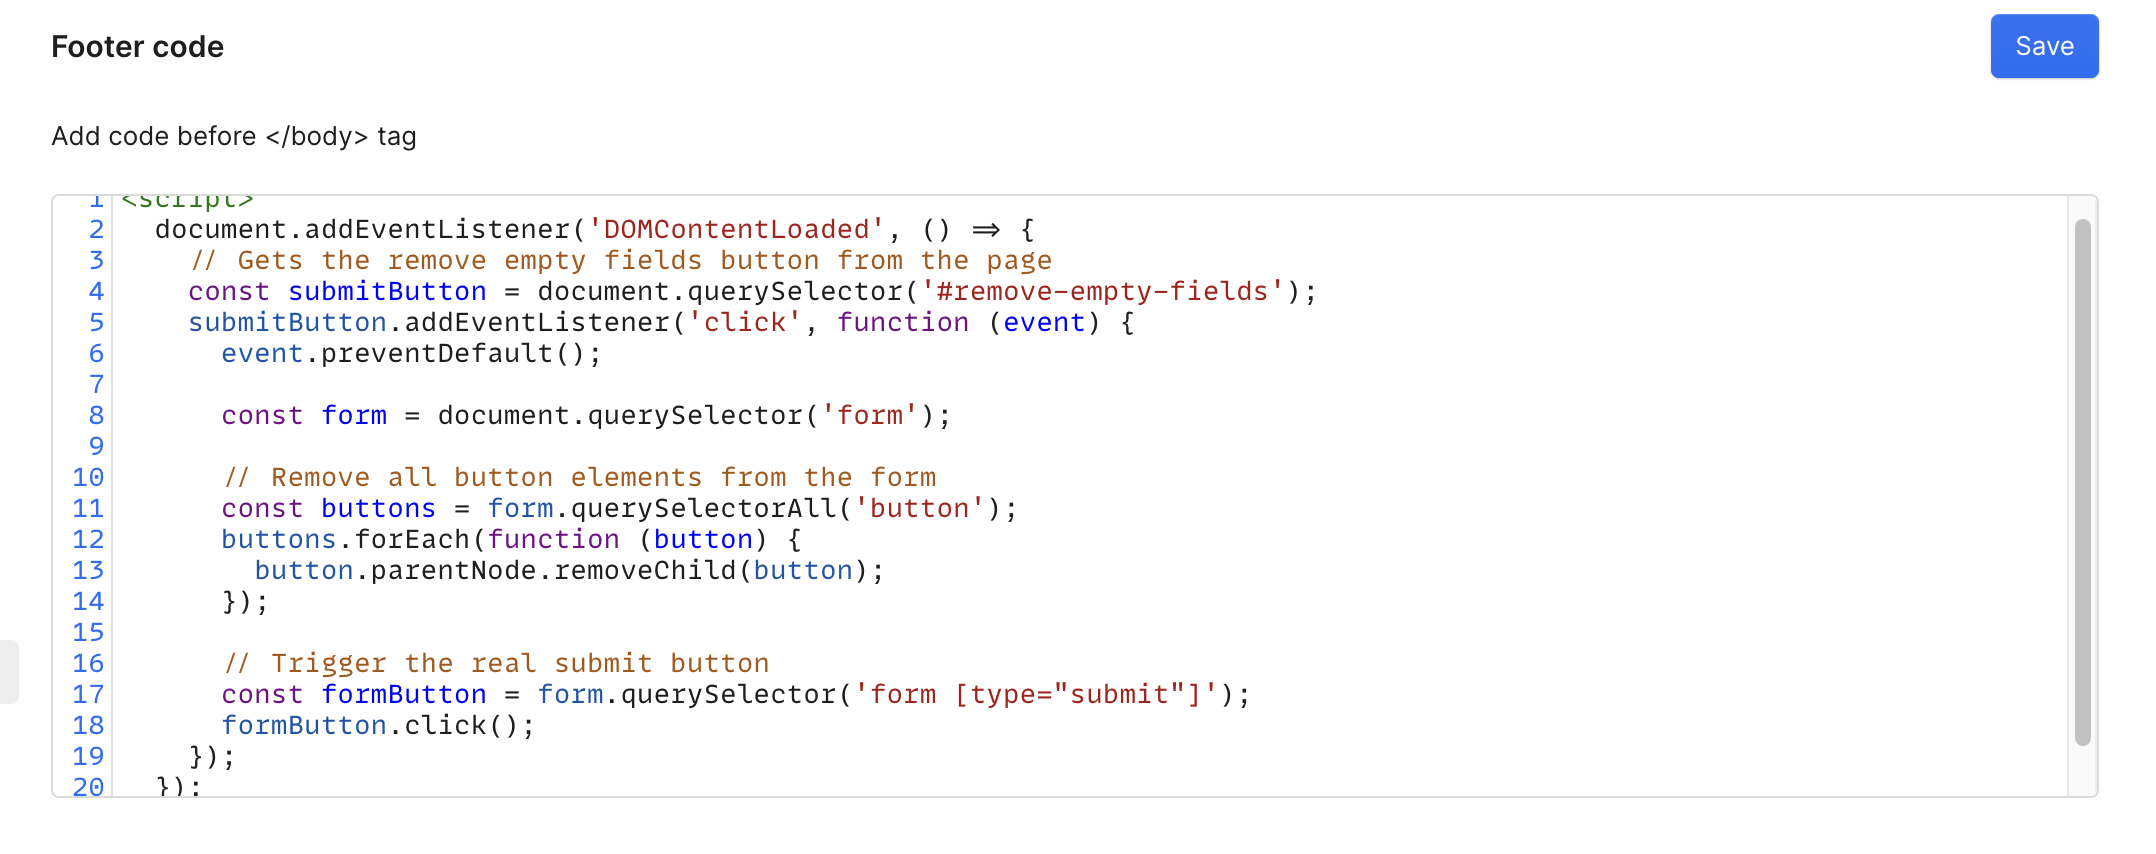 Adding custom script to remove empty fields in the form submission
Click on the Save button and publish a new version of your website again.
You should now have a page that looks like this:
 Webflow form with empty fields removed before submission
You can style the new button to match the design of the form using classes in Webflow.
When you click the “Submit” button, the empty fields will be removed, and the form will be submitted.
 Webflow form submission with empty fields removed
Conclusion
In this tutorial, you’ve successfully integrated Uploadcare File Uploader into your Webflow websites with custom code. You also customized the File Uploader to fit your design.
Uploadcare also provides more advanced features, such as image editing, file conversion, and more. To learn more about these features, check out the Uploadcare documentation.